All are invited to leave a comment by putting the three images in order of their preference; put the image you judge to be the strongest first, your next favorite second, the least strongest third on the list. For example (arbitrarily): #3, #1, #2. Warning: all three images are pretty darned good. I still cannot decide on my number one pick …
What’s Up?
After a fabulous Black Vulture session on Tuesday morning– see Images #1 & #2 below — Wednesday morning was not as good despite seemingly perfect conditions — mostly sunny with a NE breeze. After a big rainstorm on Tuesday afternoon, the beach was littered with all sorts of clutter. Conditions were perfect for flight but many of the images of flying vultures had the pier in the background 🙁 The forty or so Black Vultures that came to the gar on Tuesday mornings were virtually absent; on Wednesday, about a dozen Turkey Vultures predominated –see Image #3 below.
Yesterday, I got lots of work done on my 2023 taxes and began laying the groundwork for a lawsuit against AirBnB with regard to my month long Lido Beach rental; the alleged Superhost did not tell me that a major construction project would be going on during my entire stay. When I texted her about the noise, she told me to contact the next door neighbor in her absence. He was pretty close to worthless.
Today is Thursday 12 September and I will be heading down to the lake again no matter the forecast. Whatever you are doing, I hope that you too choose to have fun and to enjoy life.
Please remember to use the B&H links that are found on most blog pages and to use the BIRDSASART discount code at checkout when purchasing your new gear from Bedfords to get 3% back on your credit card and enjoy free second-day air FedEx. Please, also, consider joining a BAA IPT. You will be amazed at how much you will learn!
If an item — a Delkin flash card, or a tripod head — for example, that is available from B&H and/or Bedfords, is also available in the BAA Online Store, it would be great, and greatly appreciated, if you would opt to purchase from us. We will match any price. Please remember also to use my B&H affiliate links or to earn 3% cash back at Bedfords by using the BIRDSASART discount code at checkout for your major gear purchases. Doing either often earns you free guides and/or discounts. And always earns my great appreciation.
Supporting My Efforts Here
If you enjoy and learn from the blog, are all set for gear, or live overseas, consider leaving a Thank You gift here.
If you enjoy and learn from the blog, please consider using one of my affiliate links when purchasing new gear. It will never cost you a single penny. To support my effort here, please order from B&H by beginning your search here. Or, click here, to order from Bedfords and enter the discount code BIRDSASART at checkout to receive 3% cash back to your credit card and enjoy free Second-Day Air Fed-Ex shipping. It is always best to write for advice via e-mail.
In many cases, I can help you save some serious dollars. And/or prevent you from purchasing the wrong gear.
This image was also created on 10 September 2024 down by the lake near my home at Indian Lake Estates, FL. Working from the front seat of my SUV, I used the BLUBB-supported Levered-Clamp FlexShooter Pro-mounted Sony FE 600mm f/4 GM OSS lens, the Sony FE 2.0x Teleconverter, and the ridiculously amazing Sony a9 III Mirrorless Camera. The exposure was determined via Zebra technology with ISO on the thumb dial. ISO 640. 1/1250 sec. at f/8 (wide open) in Manual mode. When evaluated in RawDigger, the raw file brightness was determined to be dead-solid perfect. AWB at 9:04:16am on a then sunny morning.
Tracking: Expand Spot/AF-C with Bird-Eye/Face Detection performed perfectly. Be sure to click on the image to enjoy a high-res version.
Image #1: Black Vulture scavenging Florida Gar
Super Tight
My first instinct is often to work super tight. Image #1 is un-cropped and the clean-up was minimal. The trick with images like this is coming up with a pleasing composition and a perfect head angle. The bird-eye tracking with the a9 iii performed perfectly by first grabbing the eye and then tracking it perfectly as the bird alternately raised and lowered its head. That made it easy to shoot aggressively and wind up with lots of image design choices. Except when shooting flight, I work at only 60 fps with the a9 iii. 120 fps with pre-capture is reserved for pure flight situations.
Could I have done anything different in the field to make this image better?
This image was also created on 10 September 2024 down by the lake near my home at Indian Lake Estates, FL. Working from the front seat of my SUV, I used the BLUBB-supported Levered-Clamp FlexShooter Pro-mounted Sony FE 600mm f/4 GM OSS lens and the ridiculously amazing Sony a9 III Mirrorless Camera. The exposure was determined via Zebra technology with ISO on the thumb dial. ISO 800. 1/1250 sec. at f/5 (stopped down 2/3-stop) in Manual mode. When evaluated in RawDigger, the raw file brightness was determined to be dead-solid perfect. AWB at 9:21:29am on a variably cloudy morning.
Tracking: Expand Spot/AF-C with Bird-Eye/Face Detection performed perfectly. Be sure to click on the image to enjoy a high-res version.
Image #2: Black Vulture scavenging Florida Gar
Sony Zebra Technology
On Tuesday morning the light was changing constantly. Image #1 was created in complete sun. I raised the ISO until I saw Zebras (live in the viewfinder) on the bird’s very white legs. When a cloud covered the sun to whatever degree, I did the exact same thing, raising the ISO until I saw Zebras on the bird’s very white legs. Fifteen minutes later, substantial clouds covered the sun. Working now at f/4 with the bare 600mm lens, I raised the ISO until there were lots of Zebras on the water and some Zebras on the bird’s very white legs. Both exposures were determined by RawDigger to be dead-solid perfect. (Note: most folks are scared to use RawDigger and learn how badly they are underexposing their raw files.)
When the sun is going in and out every few seconds because of passing clouds, I always think how blessed I am to be using Zebra technology to determine the exposures. Not having to create a test image and then evaluate the JPEG enables me to keep shooting without having to waste time every time that a cloud moves. What a huge advantage.
As to the water color question, I made no effort to add any blue to the water or two darken it. I love the look of the image, the image design, the soft light, the raised foot, and yes, the white water. This is a small crop and as with Image #1, very little clean-up was done.
Could I have done anything different in the field to make this image better?
This image was created on 11 September 2024 down by the lake near my home at Indian Lake Estates, FL. Seated on damp sand, I used the and held Sony FE 300mm f/2.8 GM OSS lens and The One, the Sony Alpha 1 Mirrorless Digital Camera). The exposure was determined via Zebra technology with ISO on the Thumb Dial. ISO 400. 1/4000 sec. at f/3.2 (stopped down 1/3 stop) in Manual mode. When evaluated in RawDigger, the raw file brightness was determined to be dead-solid perfect (ho hum). AWB at 8:56:00 am on a then sunny morning.
Zone/AF-C with Bird Face/Eye detection enabled performed to perfection. Be sure to click on the image to enjoy a high-res version.
Image #3: Turkey Vulture adult in flight — incoming
Flight Decisions
I went with the a1 rather than with the a9 iii so that I could see how the a-1 AF system worked after updating from Firmware 1.31 to 2.01. It seemed that nothing had changed; results were as expected. Image #3 was perfectly sharp with the AF point on the bird’s head barely below and just a bit to the right of the vulture’s eye. More than good enough.
I elected not to work from my SUV, opting instead to sit on the sand with the 300mm f/2.8. As it was sunny, I added the 1.4X TC but quickly learned that I was too close as I clipped the wings of most of the incoming birds. As I did not bring my fanny pack along — always a big mistake, I removed the TC and laid it atop my cell phone on the sand.
Image #3 represents yet another pretty much perfect capture with close to zero cleanup — just a few specks of sand were removed from the bird’s bill. After a small crop from left and right, and a crop to a pano from above and below.
Could I have done anything different in the field to make this image better?
Click on the composite to view a larger version and be even more impressed.
First of all, if you use Nikon or Canon (or Olympus or Fuji) gear, or a Sony a9 iii, do not be put off by the title. While a portion of the guide deals specifically with the Sony α-1, there is a ton of priceless information, tips, and techniques that can help you become a better flight photographer. No matter what system you are using. If you do not use a Sony α-1, be sure to read down to the bottom to save a few bucks.
Arash Hazeghi and Arthur Morris have created the definitive and most comprehensive ever treatise on photographing birds in flight. With more than sixty years of experience photographing birds, they know what you need to know but have not figured out yet! You will be astounded by the depth of their knowledge and the tips they have to offer. More than six months in the making, the guide contains 229 pages, 24,321 words,97 exceptional and inspirational flight images — each with a legendary, enlightening BIRDS AS ART caption, and 22 screen captures. The guide contains a wealth of useful, practical, and for the most part — never-before-available information.
We will teach you the basic concepts that you need to master to become a great flight photographer along with the techniques used by the world’s best flight photographers.
You will learn that most any telephoto lens can be perfect for flight photography in a given situation; focal lengths for the images in the book range from 200mm to 1200mm and everywhere in between.
We discuss the merits of various lenses in depth, including and especially comparing the 400mm f/2.8 lenses with the 600mm f/4s.
We guide you in getting your hands on the flight photography lens that will best meet your needs. We offer a variety of handholding and rest position tips and include tips on working with a big lens on a tripod when working with a flight lens that is otherwise too heavy for you.
Both authors offer their thoughts on getting the right exposure when photographing birds in flight. You will learn to get the right exposure on foggy days and even when photographing black birds in white sky conditions.
You will learn the tremendous importance of pre-focusing, of finding the bird in the viewfinder quickly, acquiring focus almost instantly (with tips on doing all three).
You will learn the role of image stabilization in flight photography and the best settings.
Both authors share their thoughts on using the focus range limiter switch. In the same vein, you will learn to use Direct Manual Focus to make your flight photography life easier.
All will learn about the best wing positions and the importance of the background with images of birds in flight. With lots of examples.
You will learn about the best shutter speeds (and the best aperture) to use when photographing flying birds.
You will learn to photograph flight while seated and the many advantages of doing so.
You will learn the best methods of controlling high ISO noise.
All will learn to properly and safely format their flash cards.
You will learn what to do when your AF system is temporarily blinded.
All will learn the huge effect that wind strength and direction has on flight photography and to evaluate the quality and direction of the light on both sunny and cloudy days.
You will learn why it is vitally important to shoot aggressively when photographing birds in flight.
You will learn to carefully observe and evaluate a variety of bird behaviors that may shine light on some excellent opportunities for photographing birds in flight. And about getting into the best position from which to photograph.
You will learn to be a much better flight photographer.
What Sony Folks Will Learn
Exactly how Artie uses Zebras to come up with perfect exposure after perfect exposure.
The fine points and recommended settings for Optical Steady Shot (OSS).
The concept of Auto-Focus (AF) tracking in the α-1.
Everything there is to know about the complex Sony autofocus system.
About all the AF patterns, how to quickly switch them, and about those favored by each author. And why.
The Tracking and Non-tracking AF patterns. When and why Arash uses Non-Tracking Zone. And why Artie uses only two AF patterns.
How to set and use Bird Face-Eye detection for flight photography.
How and why to assign various custom functions to the various programmable buttons on the α-1 body.
The perfect settings for the many, many Menu items that are vitally related to flight photography.
How and why the Sony α-1 uses both contrast and phase detection AF to determine focus (and the benefits thereof).
Which are the best memory cards for the Sony α-1.
To quickly access frequently used menu items.
Non-Sony α-1 Discount
Using the honor system, folks who do not use a Sony α-1 body are invited to click here to save $25.00 on the purchase price of the guide.
Typos
With all blog posts, feel free to e-mail or to leave a comment regarding any typos or errors.
I did get down to the lake on Sunday morning past and had some good chances on a fresh juvenile Least Sandpiper (!), a Killdeer, a very tame young Limpkin preening, two Sandhill Cranes, and both Black and Turkey Vultures. Monday morning dawned dark and cloudy so I did not head down to the lake until well after 9:30am when things began to brighten up a bit. The lakeshore was dead. As I was getting out of my car for what turned out to be a 1.5 mile shirt/off sun walk, I noticed a Great Blue Heron in the marsh just north of the pier. So, I got back into the car and drove onto the grass to get closer to the bird. As it has been raining a ton here, I left some nasty tire tracks on the grassy field and was lucky not to get stuck.
I checked the old eagle nest several times on both mornings but never saw the previously reported birds either on the nest or anywhere else.
In the recent Two Wins for Shutter Priority Mode! blog post here, Maggi Fuller, who never likes any blurred images kindly noted that “Image 2 is of course for me, the best of the two, amazingly sharp and perfect head angle… It’s a nice shot of an Oystercatcher, but really, no “wow” factor for her … Just a nice image..”
David Policansky also preferred Image 2, but agreed with Maggi Fuller that it had no wow factor. He added that he did not think that the slightly blurred body in Image 2 added anything. For me, the wow factor with Image #2 had to do with the fact (as noted by Maggi) that the head of the bathing bird was amazingly sharp at 1/30 second. For me that’s a huge wow! How many sharp images ave you made at 1/30 second when working at 600mm? The answer for me is “very few in 41 years.”
Like today’s featured images, many of the images on the BAA blog do lack the wow factor. Again, as with today’s images, many or most of those are posted for educational purposes. As for oystercatcher images, I (and Monte Brown as well — tanks, Monte), liked Image #1 — the pleasing somewhat angelic blur — best. The point of the post was that working in Shutter Priority mode with AUTO ISO can be an effective choice when working with backgrounds of uniform tonality (especially in the low light of pre-dawn).
As to the water color question, Anthony Ardito wrote: I like the water the way it looks in real life, so dull and grey, lol! I was not sure if he was being facetious or not. Monte Brown would have liked to have seen “a touch more blue in the water.” I did actually try to make the water a bit bluer during the image optimization because many folks here on the blog do not like white water or white skies on cloudy days. I was not thrilled with the resulting color of the Atlantic and would have preferred whiter water so that the images would have showed a bit more contrast …
Here are some thoughts on becoming a better bird photographer. The first step is to learn to create sharp, properly exposed images of easy subjects doing nothing but nicely positioned in the frame. Until you can do that consistently, it is best to put thoughts of great flight and action shots on the back burner. With today’s amazing mirrorless gear, those will come quickly enough.
Kudos to eagle-eyed Joel Eade for his insightful comment on the juvie Osprey reflection image in the Questions, Comments, Suspicions? blog post here. We will exploring lots more on reflections in a future blog post.
I did get back to work on my 2023 tax return yesterday and got lots done. Today is Tuesday 10 September 2024. It is dark, dreary and humid outside but I will head down to the lake for a bit at some point to continue evaluating Sony a-1 Firmware Update 2.01. Whatever you are doing, I hope that you too choose to have fun and to enjoy life.
Please remember to use the B&H links that are found on most blog pages and to use the BIRDSASART discount code at checkout when purchasing your new gear from Bedfords to get 3% back on your credit card and enjoy free second-day air FedEx. Please, also, consider joining a BAA IPT. You will be amazed at how much you will learn!
If an item — a Delkin flash card, or a tripod head — for example, that is available from B&H and/or Bedfords, is also available in the BAA Online Store, it would be great, and greatly appreciated, if you would opt to purchase from us. We will match any price. Please remember also to use my B&H affiliate links or to earn 3% cash back at Bedfords by using the BIRDSASART discount code at checkout for your major gear purchases. Doing either often earns you free guides and/or discounts. And always earns my great appreciation.
Supporting My Efforts Here
If you enjoy and learn from the blog, are all set for gear, or live overseas, consider leaving a Thank You gift here.
If you enjoy and learn from the blog, please consider using one of my affiliate links when purchasing new gear. It will never cost you a single penny. To support my effort here, please order from B&H by beginning your search here. Or, click here, to order from Bedfords and enter the discount code BIRDSASART at checkout to receive 3% cash back to your credit card and enjoy free Second-Day Air Fed-Ex shipping. It is always best to write for advice via e-mail.
In many cases, I can help you save some serious dollars. And/or prevent you from purchasing the wrong gear.
This image was created on 9 September down by the lake near my home at Indian Lake Estates, FL. Working from the front seat of my SUV, I used the BLUBB-supported Sony FE 600mm f/4 GM OSS lens, the Sony FE 2.0x Teleconverter, and The One, the Sony Alpha 1 Mirrorless Digital Camera). The exposure was determined via Zebra technology with ISO on the thumb dial. ISO 800. 1/1000 sec. at f/8 (wide open) in Manual mode. When evaluated in RawDigger, the raw file brightness was determined to be dead-solid perfect. AWB at 10:22:25am on a cloudy, very bright morning.
Upper Center Tracking: Zone/AF-C with Bird-Eye/Face Detection performed perfectly. Be sure to click on the image to enjoy a high-res version.
Image #1: Great Blue Heron in marsh at f/8– head and neck portrait
1200mm at f/8
I could have lived with the background here but for the single, too-close-to-the-bird and thus distracting to me, out-of-focus blade of vegetation lower right. The rest of the background is, as expected, beautifully de-focused.
This image was created on 9 September down by the lake near my home at Indian Lake Estates, FL. Working from the front seat of my SUV, I used the BLUBB-supported Sony FE 600mm f/4 GM OSS lens, the Sony FE 2.0x Teleconverter, and The One, the Sony Alpha 1 Mirrorless Digital Camera). The exposure was determined via Zebra technology with ISO on the thumb dial. ISO 800. 1/500 sec. at f1 (stopped down one stop) in Manual mode. When evaluated in RawDigger, the raw file brightness was determined to be dead-solid perfect. AWB at 10:23:01am on a cloudy, very bright morning.
Upper Center Tracking: Zone/AF-C with Bird-Eye/Face Detection performed perfectly. Be sure to click on the image to enjoy a high-res version.
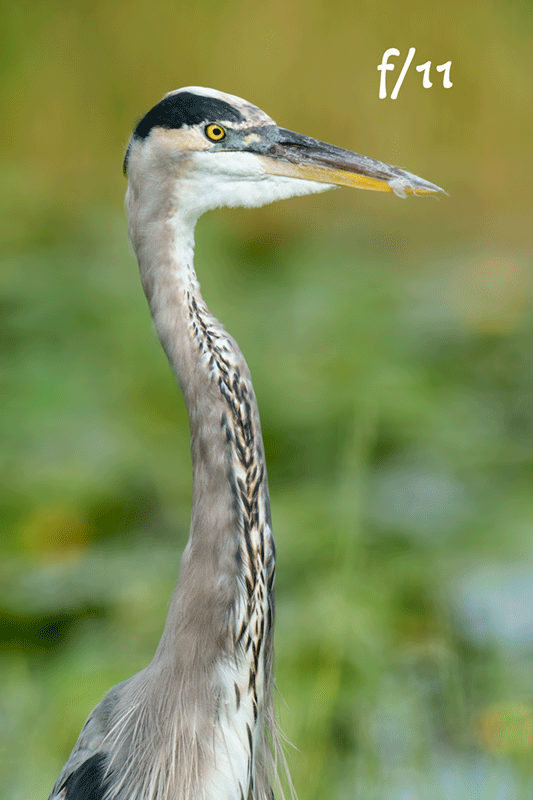
Image #2: Great Blue Heron in marsh at f/11 — head and neck portrait
1200mm at f/11
For years here on the blog I have professed my love of working wide open with long focal lengths because stopping down even only one stop “will bring up unwanted background detail.” When viewing Image #1 and #2 separately it is not easy to see that unwanted background detail was brought up by stopping down one stop from f/8 to f/11. That is why I created the animated GIF immediately below.
As for the bird’s pose, I like Image #2 a lot better than Image #1 as the head is slighlty cocked down and the head is turned a bit toward the viewer.
The Animated GIF
Viewing the animated GIF makes it a lot easier to see both the increased (and unwanted) background detail and the better head angle in Image #2. The extra stop of depth-of-field at f/11 did help to keep the bill tip sharp in Image #2.
This image was created on 9 September down by the lake near my home at Indian Lake Estates, FL. Working from the front seat of my SUV, I used the BLUBB-supported Sony FE 600mm f/4 GM OSS lens, the Sony FE 2.0x Teleconverter, and The One, the Sony Alpha 1 Mirrorless Digital Camera). The exposure was determined via Zebra technology with ISO on the thumb dial. ISO 800. 1/1000 sec. at f/8 (wide open) in Manual mode. When evaluated in RawDigger, the raw file brightness was determined to be dead-solid perfect. AWB at 10:22:25am on a cloudy, very bright morning.
Upper Center Tracking: Zone/AF-C with Bird-Eye/Face Detection performed perfectly. Be sure to click on the image to enjoy a high-res version.
Image #3: Cleaned up version of the Great Blue Heron in marsh at f/8 — head and neck portrait image
The f/8 Capture Cleaned Up
I used my usual cadre of Photoshop Tools and techniques for the clean up work: the Remove Tool, the Patch Tool, the Clone Stamp, a Gaussian Blur on the background (in conjunction with a Hide-all, Inverse, or Black Layer Mask, and a series of small Quick Masks each refined by the addition of a Regular Layer Mask.
This image was created on 9 September down by the lake near my home at Indian Lake Estates, FL. Working from the front seat of my SUV, I used the BLUBB-supported Sony FE 600mm f/4 GM OSS lens, the Sony FE 2.0x Teleconverter, and The One, the Sony Alpha 1 Mirrorless Digital Camera). The exposure was determined via Zebra technology with ISO on the thumb dial. ISO 800. 1/500 sec. at f1 (stopped down one stop) in Manual mode. When evaluated in RawDigger, the raw file brightness was determined to be dead-solid perfect. AWB at 10:23:01am on a cloudy, very bright morning.
Upper Center Tracking: Zone/AF-C with Bird-Eye/Face Detection performed perfectly. Be sure to click on the image to enjoy a high-res version.
Image #4: Cleaned up version of the Great Blue Heron in marsh at f/11 — head and neck portrait image
The f/11 Capture Cleaned Up/Your Calls?
Removing the white feather on the bill in each image was time consuming as I needed to work large and slowly. Do you prefer one bill over the other? Why?
Which of the two cleaned up version is your favorite, Image #1 created at f/8, or Image #2 created at f/11? Please be so kind as to let us know why you made your choice.
The BIRDS AS ART Current Workflow e-Guide (Digital Basics II).
You can order your copy from the BAA Online Store here, by sending a PayPal for $40 here, or by calling Jim or Jennifer weekdays at 863-692-0906 with your credit card in hand. Be sure to specify Digital Basics II.
The BIRDS AS ART Current Workflow e-Guide (Digital Basics II)
The techniques mentioned above and tons more great Photoshop tips and techniques — along with my complete digital workflow, Digital Eye Doctor Techniques, and all my personalized Keyboard Shortcuts — are covered in detail in the BIRDS AS ART Current Workflow e-Guide (Digital Basics II), an instructional PDF that is sent via e-mail. Note: folks working on a PC and/or those who do not want to miss anything Photoshop may wish to purchase the original Digital Basics along with DB II while saving $15 by clicking here to buy the DB Bundle.
Please note: the Divide and Conquer technique was inadvertently omitted from DB II. It is detailed in a free excerpt in the blog post here.
Folks who learn well by following along rather than by reading can check out the complete collection of MP 4 Photoshop Tutorial Videos by clicking here. Note: most of the videos are now priced at an amazingly low $5.00 each.
You can learn how and why I converted all of my Canon digital RAW files in DPP 4 in the DPP 4 RAW Conversion Guide here. More recently, I became proficient at converting my Nikon RAW (NEF) files in Adobe Camera Raw. About three years ago I began converting my Nikon and Sony RAW files in Capture One and did that for two years. You can learn more about Capture One in the Capture One Pro 12 Simplified MP4 Video here. The next step would be to get a copy of Arash Hazeghi’s “The Nikon Photographers’ Guide to Phase One Capture One Pro e-Guide” in the blog post here. Today, I convert my Sony raw files in Photoshop with Adobe Camera Raw.
You can learn advanced Quick Masking and advanced Layer Masking techniques in APTATS I & II. You can save $15 by purchasing the pair.
The Digital Basics III Video Series
The Digital Basics III Video Series
I realized more than a year ago that my digital workflow had changed significantly and was toying with the idea of writing a Digital Basics III. More recently, I learned and begun working with two great new Photoshop Tools, the Remove Tool and the Luminance Targeted Adjustment Tool. The former is like a smarter Spot Healing Brush Tool on steroids and the latter is a step up from the fabulous Color Mixer Tool. During that same time frame, I came up with a new and improved 2-step noise reduction technique. I still use Divide and Conquer, Quick Masks, Layer Masks, an expanded array of personalized keyboard shortcuts, and tons of other stuff from both versions of Digital Basics.
As soon as I realized that I did not want to take on another large writing project, I realized that by creating a series of videos I could much more easily share all the details of my current digital workflow and much more easily incorporate additional new tips, techniques, and tools as I went. And so, The Digital Basics III Video Series was born.
You can save $26 by ordering the first five videos in Volume I by clicking here. The videos will be most valuable for folks using the latest version of Photoshop (2024) or Lightroom along with Topaz DeNoise AI and Topaz Sharpen AI.
Typos
With all blog posts, feel free to e-mail or to leave a comment regarding any typos or errors.
Yesterday I learned from neighbor Ron that the Bald Eagles that have nested successfully at ILE for the past three winters have been hanging out by the original nest that had they abandoned last season. I am hoping, of course, that they lay eggs in the old nest as it is ten thousand times better for photography than the cluttered nest that they used to successfully fledge two young last February.
I cleared some more space on my laptop on Saturday and now have 5.17 TB available on my 8TB Solid State Hard Drive (SSHD).
Today is Sunday 8 September 2024. I will head down to the lake to check on the eagles and see what else is about on another typically humid morning. Whatever you are doing today, I hope that you too choose to have fun and to enjoy life.
Please remember to use the B&H links that are found on most blog pages and to use the BIRDSASART discount code at checkout when purchasing your new gear from Bedfords to get 3% back on your credit card and enjoy free second-day air FedEx. Please, also, consider joining a BAA IPT. You will be amazed at how much you will learn!
If an item — a Delkin flash card, or a tripod head — for example, that is available from B&H and/or Bedfords, is also available in the BAA Online Store, it would be great, and greatly appreciated, if you would opt to purchase from us. We will match any price. Please remember also to use my B&H affiliate links or to earn 3% cash back at Bedfords by using the BIRDSASART discount code at checkout for your major gear purchases. Doing either often earns you free guides and/or discounts. And always earns my great appreciation.
Supporting My Efforts Here
If you enjoy and learn from the blog, are all set for gear, or live overseas, consider leaving a Thank You gift here.
If you enjoy and learn from the blog, please consider using one of my affiliate links when purchasing new gear. It will never cost you a single penny. To support my effort here, please order from B&H by beginning your search here. Or, click here, to order from Bedfords and enter the discount code BIRDSASART at checkout to receive 3% cash back to your credit card and enjoy free Second-Day Air Fed-Ex shipping. It is always best to write for advice via e-mail.
In many cases, I can help you save some serious dollars. And/or prevent you from purchasing the wrong gear.
Apple M3 Max 16-Core Chip
128GB Unified RAM | 8TB SSD
16″ 3456 x 2234 Liquid Retina XDR Screen
40-Core GPU | 16-Core Neural Engine
Wi-Fi 6E (802.11ax) | Bluetooth 5.3
Thunderbolt 4 | HDMI | MagSafe 3
SDXC Slot | FaceTime HD 1080p Camera
Backlit Magic Keyboard
Force Touch Trackpad | Touch ID Sensor
macOS
In other words, the bomb. Looking to spend a bit less? Click here and search for Apple MacBook Pro M3. Feel free to e-mail or call (863-221-23720 for laptop advice.
Why Not Buy Your MacBook Pro From Apple?
If you purchase a laptop from Apple and have a problem right off the bat they will fix it for you in a few days or a week after you send it to them. They will not replace it. If you purchase a laptop from B&H and have a problem right out of the box, they will send you a new one no questions asked.
Price Drop
Canon EOS-1DX Mark II Digital SLR Camera with Extras!
BAA Record-low Price! Price reduced $200.00 on 25 November 2023. Price reduced $400.00 on 6 SEPT 2024.
John Nelson is offering a Canon EOS-1DX Mark II dSLR camera in excellent condition for a BIRDS AS ART record low $999.00 (was $1599.00). The sale includes the original box, one battery, the charger, the front body cap, four (4) 128 128GB CFast memory cards, cfast cards, and insured ground shipping via major courier to lower-48 US addresses only. Your item will not ship until your check clears unless other arrangements are made.
The 1DX Mark II is a rugged, fast Canon professional digital camera body. It features an excellent AF system and high quality image files with great dynamic range. When he used Canon, it was the first choice of Arash Hazeghi, the world’s premier photographer of birds in flight. Two 1DX II served as my workhorse bodies for several years. And I loved them. artie
This image was created down by the lake near my home on 7 July 2024. Working from the front seat of my SUV I used the BLUBB-supported Sony FE 600mm f/4 GM OSS lens, the Sony FE 2.0x Teleconverter, and The One, the Sony Alpha 1 Mirrorless Digital Camera). The exposure was determined via Zebra technology with ISO on the thumb dial. ISO 800. 1/2000 sec. at f/8 (wide open) in Manual mode. When evaluated in RawDigger, the raw file brightness was determined to be dead-solid perfect. AWB at 8:46:08am on a still, sunny morning.
Upper Center Tracking: Zone/AF-C with Bird-Eye/Face Detection performed perfectly. Be sure to click on the image to enjoy a high-res version.
Osprey in fresh juvenal plumage with its reflection
Questions, Comments, Suspicions?
2024 was a poor year for breeding Ospreys. The nest on a utility pole near the base of the pier fledged three young. While there are an additional six nests down by the lake, none produced any chicks.
In late June and July of 2024, most mornings found one or two adult and/or juvenile Ospreys bathing in the shallows just left (south) of the pier. On still mornings, there were great opportunities for photographing the birds and their reflections.
If you have any questions, comments, or suspicions with regards to the creation of today’s featured image, please ask or comment below. Be sure to click on the image to see the larger, sharper high res version. There will be lots more on this new topic coming soon.
Cliff Beittel: no spoilers please!
The Sharpness of the Reflection
After clicking on the image to enlarge it, determine whether the reflection is as sharp as the bird itself.
If you are shooting from a vehicle with a long lens and are not working off a BLUBB, you are putting yourself at a big disadvantage. Beware of cheap imitations; there are many beanbags available today, but if you want to make sharp images, none come close to the BLUBB.
Whatever beanbag you are using, if your super-telephoto lens has a Direct Manual Focus switch, be sure turn the switch to the OFF position. This prevents you from throwing off accurate focus as you frame the shot. (Note: with some camera bodies, you may also need to turn DMF off in the camera menu.
Typos
With all blog posts, feel free to e-mail or to leave a comment regarding any typos or errors.
Apple M3 Max 16-Core Chip
128GB Unified RAM | 8TB SSD
16″ 3456 x 2234 Liquid Retina XDR Screen
40-Core GPU | 16-Core Neural Engine
Wi-Fi 6E (802.11ax) | Bluetooth 5.3
Thunderbolt 4 | HDMI | MagSafe 3
SDXC Slot | FaceTime HD 1080p Camera
Backlit Magic Keyboard
Force Touch Trackpad | Touch ID Sensor
macOS
In other words, the bomb. Looking to spend a bit less? Click here and search for Apple MacBook Pro M3. Feel free to e-mail or call (863-221-23720 for laptop advice.
Why Not Buy Your MacBook Pro From Apple?
If you purchase a laptop from Apple and have a problem right off the bat they will fix it for you in a few days or a week after you send it to them. They will not replace it. If you purchase a laptop from B&H and have a problem right out of the box, they will send you a new one no questions asked.
What’s Up?
My trip home was blessedly uneventful. I managed a bit of sleep on the southbound Auto Train and got lots of work done. By doing three second edits, I cleared .19 TB of space on my laptop. I like to have at least 5TB of space on the solid state drive in the laptop so that I will not have any problems when backing up to my 4TB SSDs. The work I did on the train got me here: 5.02 TB available of 8 TB.
I was glad to hear that Greg Clarkson sold his Sony 90mm Macro lens for the asking price the first day it was listed. If you are interested in his pretty much new Sony 200-600 G Lens, check out his listing on the Used Gear page here.
Today is Friday 6 September and it feels good to be home. Bird photography at Indian Lake Estates on muggy August days is usually not very good so I will be staying in this morning. I have lots to do in the next few weeks, most importantly, is finishing my 2023 tax return. I have been working on a mega-YouTube video: Shutter Speeds for Bird Photography. Stay tuned. Whatever you opt to do, I hope that you too choose to have fun and to enjoy life.
Please remember to use the B&H links that are found on most blog pages and to use the BIRDSASART discount code at checkout when purchasing your new gear from Bedfords to get 3% back on your credit card and enjoy free second-day air FedEx. Please, also, consider joining a BAA IPT. You will be amazed at how much you will learn!
If an item — a Delkin flash card, or a tripod head — for example, that is available from B&H and/or Bedfords, is also available in the BAA Online Store, it would be great, and greatly appreciated, if you would opt to purchase from us. We will match any price. Please remember also to use my B&H affiliate links or to earn 3% cash back at Bedfords by using the BIRDSASART discount code at checkout for your major gear purchases. Doing either often earns you free guides and/or discounts. And always earns my great appreciation.
Supporting My Efforts Here
If you enjoy and learn from the blog, are all set for gear, or live overseas, consider leaving a Thank You gift here.
If you enjoy and learn from the blog, please consider using one of my affiliate links when purchasing new gear. It will never cost you a single penny. To support my effort here, please order from B&H by beginning your search here. Or, click here, to order from Bedfords and enter the discount code BIRDSASART at checkout to receive 3% cash back to your credit card and enjoy free Second-Day Air Fed-Ex shipping. It is always best to write for advice via e-mail.
In many cases, I can help you save some serious dollars. And/or prevent you from purchasing the wrong gear.
Canon EOS-1D X Mark II DSLR Camera Body
Used Gear page veteran Ralph Fletcher is offering a Canon EOS-1D X Mark II dSLR Camera in near-excellent condition (would be excellent plus but for some chipped paint on the bottom of the camera body) for $999.00. The sale includes the original box, the front lens cap, the battery and the charger, and insured ground shipping via major courier to lower-48 US addresses only. Your item will not ship until your check clears unless other arrangements are made.
Please contact Ralph via at e-mail or by phone at 1-603-969-5776 (eastern time zone).
The 1DX Mark II is a rugged, fast Canon professional digital camera body. It features an excellent AF system and high quality image files with great dynamic range. When he used Canon, it was the first choice of Arash Hazeghi, the world’s premier photographer of birds in flight. Two 1DX II served as my workhorse bodies for several years. And I loved them. artie
Save 15%!
If you’d like to try out a new lens or if you need a lens for a specific trip or project (or for an IPT), LensRentals.com is the only way to go. To save 15%, simply click on the logo link above, arrange for your rental, and type in BIRDSASART15. If you type the gear you are looking for in the search box, it will pop right up. LensRentals.com offers affordable insurance. You can decline it, opt for LensCap: Damage Only, or select LensCap: Damage & Theft. Then hit PROCEED TO CHECKOUT. After you enter all of your info but before completing your order, be sure to scroll down to Promo Code box and enter the BIRDSASART15 code to save 15%.
I checked on renting a Sony FE 70-200mm f/2.8 GM OSS II lens for a week. The cost is only $122.00. LensCap: Damage Only coverage can be added for a very low $18.00. Going with LensCap: Damage & Theft would be $27.00. The shipping charge varies. They offer an interesting program called Lensrentals HD. By signing up for this shipping discount program ($99.00/year), you’ll get free Standard Shipping on all the orders you place.
Renting a Sony 600mm f/4 GM OSS lens for a week will cost you $536.00. The two coverage options come in at $76.00 or $114.00. Less your 15% discount when you enter the BIRDSASART15 code into the Promo Code box at checkout and enter the BIRDSASART15 code in the Promo Code box at checkout to save 15%.
Remember, to save the 15% on your rental you must start your search by clicking on the logo above, or on this link: LensRentals.com
B&H
To ensure that I get credit for your B&H purchases, you can always click here. The tracking is invisible but greatly appreciated. And, you can use your PayBoo card. You must use the website to order. B&H will reopen on Fri April 14. Thanking me for the past 4000 educational blog posts could not be any easier and will not cost you one penny. Please shoot me your B&H receipt for major purchases.
Many folks have written recently stating that they purchased a Sony a1 from B&H and would like their free membership in the Sony 1 Info and Updates Group, a $150.00 value. When I check my affiliate account, their orders have not been there. When I let them know that they get credit for B&H purchases only if they use one of the many B&H affiliate links on the blog or begin their searches with this link, they are always disappointed. If in doubt, please contact me via e-mail and request a BH link. I am always glad to help and to guide you to the right gear.
Bedfords Simplified
Click here to start your search. Choose standard shipping, and when you get to the payment page, enter BIRDSASART in the discount code box and hit apply. You will be upgraded to free second day air Fed-Ex and receive 3% cash back on your credit card once your stuff ships. Either is greatly appreciated by yours truly.
Bedfords Amazing BAA Discount Policy
Folks who have fallen in love with Bedfords can now use the BIRDSASART coupon code at checkout to enjoy a post-purchase, 3% off-statement credit (excluding taxes and shipping charges) on orders paid with a credit card. The 3% credit will be refunded to the card you used for your purchase. Be sure, also, to check the box for free shipping to enjoy free Second Day Air Fed-Ex. This offer does not apply to purchases of Classes, Gift Cards, prior purchases.
Visit the Bedfords website here, shoot Steve Elkins an e-mail, or text him on his cell phone at (479) 381-2592.
Gear Questions and Advice
Too many folks attending BAA IPTs and dozens of photographers whom I see in the field and on BPN, are — out of ignorance — using the wrong gear, especially when it comes to tripods and more especially, tripod heads. And the same is true in spades when ordering new camera bodies or lenses. My advice will often stave you some serious money and may help you avoid making a seriously bad choice. Please know that I am always glad to answer your gear questions via e-mail. If you are desperate, you can try me on my cell at 863-221-2372. Please leave a message and shoot me a text if I do not pick up.
Tracking: Zone/AF-C with Bird-Eye/Face Detection performed perfectly. Click on the image to enjoy the high-res version.
Image #1: American Oystercatcher juvenile flapping after bath
Two Wins for Shutter Priority Mode
In the recent Two Sony a-1 Black-bellied Action Imageshere, I wrote, in part:
There are times, however, when working in situations where the tonality of the background is relatively consistent that working in Shutter Priority mode offers some huge advantages. At the beach, before the sun comes up, the sky, the water, and the beach are all of about the same tonality, each much lighter than a middle tone. As the possibility of creating some nice pleasing blurs exists, I will set up the camera as follows: AUTO ISO, Exposure Compensation (EC) on the thumb dial, and Shutter Priority. Then I’ll usually set the EC to +2 1/3 stops and the shutter speed to 1/15 sec., the classic blur speed.
The camera sets the ISO and the well-to-the-right exposures are excellent. And, I can quickly and easily change the shutter speed during a blastoff to try for a different effect. If a nice bird lands right in front of me, I can quickly dial the shutter speed up to 1/60 or 1/125 sec. and begin making sharp images almost instantly (without having to change both the shutter speed and the ISO as I would have had to do if I had been working in Manual mode). Note: By using Zebra technology, I can always tweak the EC as needed.
Win #1
With a single bird fairly close, a shutter speed of 1/30 sec., and the bird flapping after a bath, I created an image with precisely the degree of wing blur that I was looking for, the angelic look. And I judged the eye just sharp enough so that I did not have to mess with it.
Tracking: Zone/AF-C with Bird-Eye/Face Detection performed perfectly. Click on the image to enjoy the high-res version.
Image #2: American Oystercatcher juvenile pausing for an instant mid-bath
Win #2
As noted in the previous blog post quoted above, you can often create something sharp by increasing the shutter speed to 1/60 or 1/125 sec. Image #2 was one of a fairly long series of images, all at 1/30 sec. At that shutter speed, I absolutely got lucky by creating a single sharp-on-the-eye photo. Click on the image and you can see the sharp eye and lots of motion blur elsewhere on the bird. At the instant I hit the shutter button, the bird’s head, by chance, was perfectly still while the wings and the waves were moving.
Why Did I Add the 1.4X TC?
I wanted to get closer, but as I was shooting with two other photographers and did not want to risk disturbing the un-banded family of four, I opted to add the 1.4X TC. Because I was working in Shutter Priority mode, I did not have to change a single setting. If I had been in manual mode, I would have had to change the ISO.
Note that with practice, you can add a TC to a tripod mounted telephoto lens in less than 30 seconds.
Water Color Question
Do you like the grayish-blue water in both images? Or would you have preferred the water either darker and bluer or lighter and whiter?
Typos
With all blog posts, feel free to e-mail or to leave a comment regarding any typos or errors.
Thanks for the plethora of thoughtful comments at the last blog post. Which of today’s two featured Sora images do you like best? Please be so kind as to share your thoughts as to why you made your choice.
In Image #1, the yellowlegs was lying down flat in the water to hide from a falcon that flew overhead. I actually preferred the near B&W version to the more natural color in Image #2.
Nobody came close to answering the High Level Focusing Technique Question that accompanied Image #4. Give it a try. There are clues in the text and another one in the comments, but you will need to put your thinking cap on.
As for favorites, all but Image #2 got at least vote. One reader would have deleted Image #7. Another picked it as his favorite. Two folks loved Image #4; it was my least favorite of the seven. My top pick was #6 for its simplicity and the gorgeous background.
What’s Up?
I saw Dr. Puopolo on Tuesday afternoon to have the seven stitches removed from the base of my right thumb. The news was about what I expected, but a bit better than that. Both incisions healed perfectly. He told me that the tenderness I’ve been feeling on the inside of my right ring finger is because when the surgery is done, they stay to the left side of the nerve “for a variety of anatomical reasons” and that it typically disappears over time as the nerve calms down. I am thrilled with the results of the two operations, especially because the crushing episodes of tingling, numbness, and pain are completely gone. He is such a cool guy. I was going to confess my sins of going out to photograph twice to JBWR. When I began by saying, “I’ve been a bad patient.” He said, “Don’t tell me.” I thanked him again and we exchanged hugs.
Today is Wednesday 4 September. I set the alarm for oh-dark-hundred (3:34am) but woke at 3:00am so I got up and hit the road before 4:00am for my drive down to Lorton, VA to catch the Auto Train south late this afternoon. If all goes as expected, I should be home at about 1pm on Thursday. Whatever you are doing, I hope that you too choose to have fun and enjoy life.
Used Gear New Listngs
Sony FE 200-600mm f/5.6-6.3 G OSS Lens
BAA-friend Greg Clarkson is offering a Sony FE 200-600mm f/5.6-6.3 G OSS Lens in Like-new condition for a ridiculously low $1299.00. This lens has never been in the field. The sale includes the front and rear lens caps, the lens hood, the lens strap, the original product box, the lens case, and insured ground shipping via major courier to lower-48 US addresses only. Your item will not ship until your check clears unless other arrangements are made.
The Sony 2-6 is an amazingly versatile relatively inexpensive telephoto zoom lens. It sells new for $1898.00. If you would like to get started with Sony and bird photography and cannot afford the 300mm f/2.8 GM lens then grabbing George’s pretty much new lens would be a very smart move. artie
Sony FE 90mm f/2.8 Macro G OSS Lens
Sold the first day of listing!
BAA-friend Greg Clarkson is offering a Sony FE 90mm f/2.8 Macro G OSS Lens in Like-new condition for a ridiculously low $698.00. This lens has never been in the field. The sale includes the front and rear lens caps, the lens hood, the original product box, the lens pouch, and insured ground shipping via major courier to lower-48 US addresses only.
Your item will not ship until your check clears unless other arrangements are made.
Sony’s longest macro lens sells new for $998.00. If you love macro photography, grabbing Greg’s pretty much new lens right now would be the best option. artie
Get up close and personal with the 1:1 magnification ratio of the full-frame compatible Sony FE 90mm f/2.8 Macro G OSS Lens. As a G series lens, it perfectly balances sharpness and bokeh and, as a macro lens, close and controlled focusing performance is prioritized with advanced AF and intuitive handling. B& & Sony
Tracking: Expand Spot/AF-C with Bird-Eye/Face Detection performed perfectly. Click on the image to enjoy the high-res version.
Image #1: Sora quasi-birdscape
My First Sora?
I may have seen and/or photographed this species somewhere before, but neither the experience nor the images (???) were in any way memorable. Thus, I do not remember when, where, or even if 🙂 Thanks again to the very nice Asian lady who pointed the bird out to me as it skulked around the edge of one of the two small ponds that abutted the phragmites at the south end of the East Pond at JBWR on Saturday last.
Tracking: Expand Spot/AF-C with Bird-Eye/Face Detection performed perfectly. Click on the image to enjoy the high-res version.
Image #2: Sora in the water
Strategy for Photographing a Rare or Uncommon Bird
When you come across a group of birders viewing a rare or uncommon species with binoculars and/or spotting scopes, you should first consider some common sense field etiquette before trying to create some images. The same is true even if they are looking at a group of commonly seen species. Walking slowly up to the group and asking where the group is from and what they are seeing is often a good start.
Unless they are very close to what they are looking at, you should put photography out of your mind at least for a few minutes. When they move along, you may begin your approach.
As I had heard that the Sora had been around the pond for at least two days and they were looking to the southeast, I knew exactly what they were looking at. Anyhoo, I walked up to the group and said “Hi” to Emme, a friendly young woman with binoculars and a field notebook, “what’s the group?” I figured it might be a local Audubon Group. “We’re the Queer Birders,” she replied.
We chatted for a while as I shared a bit of the history of the East Pond and a bit of the history of Arthur Morris/BIRDS AS ART. (Note: the two are intricately interwoven.) You can check them out here on Instagram. They have an absolute ton of great bird walks and trips in and around NYC.
After a few minutes, the group drifted off to the north. One photographer who had stayed a good distance away from the pond remained. After I finally spotted the bird (albeit with help, as above), I judged its behavior as “could-care-less.” So I flattened my tripod, crouched down a bit, walked slowly past the single photographer to the edge of the pond, got down on the ground, and worked the bird for about ten minutes until it disappeared into the reeds.
You might think that my courteous behavior was rewarded, or that I had gotten lucky.
Note that approaching a bird or a flock of birds that is being viewed by others who were there before you is 100% rude and improper. (It would be nice if the birders acted in a similar manner; often, they do not.)
Typos
With all blog posts, feel free to e-mail or to leave a comment regarding any typos or errors.
Photographing a species and then checking it off your list is not something that I strive to do. The idea is to create interesting images. Though each of today’s photos is of the same subject, juvenile Lesser Yellowlegs, each is distinctly different. There are a variety of behaviors, poses, habitats, and image formats and designs.
Your Call?
Which of today’s seven featured images is the strongest? Please be so kind as to leave a comment and let us know why you made your choice.
Please note that there are several additional questions below; each is designed to make you think and hopefully, to help you become a better bird photographer.
What’s Up?
With high tide at 7:20am and cloudy skies and a southeast wind forecast for Friday past, I set my alarm for 5:15am and arrived at Jamaica Bay Wildlife Refuge just after 6:15am. I had planned on visiting the East Pond on the Combo IPT on the previous set of morning high tides but things were so good at Nickerson Beach that Geri and I never made it.
As I walked out onto the pond, I was delighted to note the low water level. Kudos to the refuge management for getting the gate valve at the north end of the pond repaired and keeping the water down despite lots of recent rain. What struck me the most, were the huge stands of blossoming saltmarsh fleabane (Pluchea odorata) that covered acres and acres of shoreline. On 46 years of previous visits, you might see a few plants blossoming at the end of August.
I was feeling quite nostalgic as I traversed the pond. Forty-eight years ago, on my first visit to the East Pond, I saw a Marbled Godwit that wound up changing the remainder of my adult life. I thought of the late Thomas H. Davis Jr, all 145 pounds, 6′ 9″ of him. He taught me to identify and age the shorebirds that visit the pond every season. I thought of my late wife Elaine picking up a dying Forster’s Tern and comforting it. Memories of rare birds and two Jewish high holiday screw-ups flooded my mind and left me feeling quite emotional at times.
I was glad to see lots of shorebirds on the pond. I began on the South Flats and made my way up to the Raunt stopping several times to photograph. I left quite satisfied at about 11:00am. I hit the sack early on Saturday night and woke completely refreshed at 4:45am. I had not planned on returning to the pond but figured what the heck. After making some raspberry tea, I headed back to the East pond leaving at 5:45am.
With the wind having switched to the southwest, I was not feeling stoked. The morning began slowly but then things got better and better. I had lots of birds posing on the weathered boards at the Raunt and right before I headed home at 11:30am, I got my best ever, heck, probably my first ever, images of a Sora, a small usually secretive rail.
Today is Monday September 2, 2024. With a cold northwest wind in the forecast, I opted to stay home and begin packing up for my trip home. I see Dr. Pop tomorrow to have the seven stitches removed from the back of my right thumb. Whatever you opt to do, I hope that you choose to have fun.
Please remember to use the B&H links that are found on most blog pages and to use the BIRDSASART discount code at checkout when purchasing your new gear from Bedfords to get 3% back on your credit card and enjoy free second-day air FedEx. Please, also, consider joining a BAA IPT. You will be amazed at how much you will learn!
If an item — a Delkin flash card, or a tripod head — for example, that is available from B&H and/or Bedfords, is also available in the BAA Online Store, it would be great, and greatly appreciated, if you would opt to purchase from us. We will match any price. Please remember also to use my B&H affiliate links or to earn 3% cash back at Bedfords by using the BIRDSASART discount code at checkout for your major gear purchases. Doing either often earns you free guides and/or discounts. And always earns my great appreciation.
Supporting My Efforts Here
If you enjoy and learn from the blog, please consider using one of my affiliate links when purchasing new gear. It will never cost you a single penny. To support my effort here, please order from B&H by beginning your search here. Or, click here, to order from Bedfords and enter the discount code BIRDSASART at checkout to receive 3% cash back to your credit card and enjoy free Second-Day Air Fed-Ex shipping. It is always best to write for advice via e-mail.
In many cases, I can help you save some serious dollars. And/or prevent you from purchasing the wrong gear.
Tracking: Expand Spot/AF-C with Bird-Eye/Face Detection performed perfectly. Click on the image to enjoy the high-res version.
Image #1: Lesser Yellowlegs — worn juvenal plumage lying flat in the water
Behavior Question
Why is this bird lying flat in the water?
This image was created on 31 August 2024 at the East Pond, Jamaica Bay Wildlife Refuge, Queens, NY. Seated on damp grass I used the heel-pod technique to get as low as possible with the Sony FE 600mm f/4 GM OSS lens and The One, the Sony Alpha 1 Mirrorless Digital Camera.. ISO 2000. The exposure was determined by Zebras with ISO on the rear wheel: 1/640 second at f/5.6 (stopped down one full stop for depth of field) in Manual mode. RawDigger showed the raw file brightness to be dead solid perfect. AWB at 8:15:27am on a very cloudy morning.
Tracking: Zone/AF-C with Bird-Eye/Face Detection performed perfectly. Click on the image to enjoy the high-res version.
Images #1 and #2 are of the same bird photographed in the same light just minutes apart. For the first image, I desaturated it completely but for the yellow on the bill that was then juiced up. The color in the second image is much more accurate. Which version do you prefer?
Because of the answer to the behavior question above, this bird posed quite close to me long enough for me to remove the 1.4X TC, take the right off the tripod, and make several images. I will share my choice in the next blog post.
Tracking: Zone/AF-C with Bird-Eye/Face Detection performed perfectly. Click on the image to enjoy the high-res version.
Image #3: Lesser Yellowlegs — worn juvenal plumage on weathered timber with sedge
The Raunt
About 1/4 of the way up the eastern shore of the East Pond (heading north, toward the city), you will come across the remains of a circa 1950s baymen’s community.
Many lengths of weathered timber can be found in the area. Most are covered with algae and some have a variety of wetlands vegetation growing on them. These old rotting beams and planks make ideal perches for the visiting shorebirds because you get to see their feet (usually unseen in an inch or two of brackish water).
Focus was acquired via Tracking: Expand Spot AF/C. Then I turned the AF switch to M (Manual Focus) and made sure not to touch the focusing ring. Click on the image to enjoy the high-res version.
Image #4: Lesser Yellowlegs — worn juvenal plumage resting in front of a stand of saltmarsh fleabane
High Level Focusing Technique Question
Why did I focus first and then move the autofocus switch to OFF? Clue: I would not have had to do this if I had been using the a9 iii rather than the a-1.
Only a few species of shorebirds swim. Among those are all of the Tringas (including both our yellowlegs), Stilt Sandpiper, all of the avocets including our American Avocet, and somewhat surprisingly, Red Knot and Dunlin.
The yellowlegs in Image #6 was fishing well within range of my 840mm rig. I talked softly to it, “Up on the log, please.” I prayed a bit. Then my prayers were answered.
Tracking: Zone/AF-C with Bird-Eye/Face Detection performed perfectly. Click on the image to enjoy the high-res version.
Image #7: Lesser Yellowlegs — juvenal plumage preening in front of saltmarsh fleabane
Sora Distraction
For two days, folk had been telling me about a Sora in a small pond on the South Flats. I had looked for it several times without success. I checked the location one last time before heading home on Sunday but did not see the bird. Thanks to the Asian woman who pointed it out to me. Typically, the Sora was playing hide and seek in the reeds that fringed the pond. When it hid, I photographed the preening Lesser Yellowlegs.
Note that this individual is in the freshest juvenal plumage of the lot with the upperparts’ feathers looking more black and white than brownish and white.
Image Question
Would you delete this image because the bird’s face is hidden? Why or why not?
Typos
With all blog posts, feel free to e-mail or to leave a comment regarding any typos or errors.
My right hand continues to heal nicely. The thumb (trigger finger) was as good as new the next day. The stitches come out next Tuesday. Though the crushing, tingling pain in the hand is gone, it appears that I will have some lingering tenderness along the inside of the ring finger of my right hand for quite some time as the nerve heals and calms down.
I have been getting lots of rest at younger daughter Alissa’s home in Ronkonkoma, Long Island, and have been taking a 1 1/2 mile sun walk every afternoon. Older daughter Jennifer and her husband Eric flew to Long Island MacArthur Airport in nearby Islip on Thursday afternoon and we all enjoyed a fabulous spaghetti squash lasagna prepared by Alissa followed by an absolutely sinful dessert, Best S’mores Bars: chocolate, peanut butter, and marshmallow sandwiched between two layers of a graham cookie crust.
Today is Friday 30 August 2024. I will continue working on a new writing project and a Getty Pacific-race Brown Pelican image submission. Whatever you opt to do, I hope that you too choose to have fun and to enjoy life.
Please remember to use the B&H links that are found on most blog pages and to use the BIRDSASART discount code at checkout when purchasing your new gear from Bedfords to get 3% back on your credit card and enjoy free second-day air FedEx. Please, also, consider joining a BAA IPT. You will be amazed at how much you will learn!
If an item — a Delkin flash card, or a tripod head — for example, that is available from B&H and/or Bedfords, is also available in the BAA Online Store, it would be great, and greatly appreciated, if you would opt to purchase from us. We will match any price. Please remember also to use my B&H affiliate links or to earn 3% cash back at Bedfords by using the BIRDSASART discount code at checkout for your major gear purchases. Doing either often earns you free guides and/or discounts. And always earns my great appreciation.
Supporting My Efforts Here
If you enjoy and learn from the blog, please consider using one of my affiliate links when purchasing new gear. It will never cost you a single penny. To support my effort here, please order from B&H by beginning your search here. Or, click here, to order from Bedfords and enter the discount code BIRDSASART at checkout to receive 3% cash back to your credit card and enjoy free Second-Day Air Fed-Ex shipping. It is always best to write for advice via e-mail.
In many cases, I can help you save some serious dollars. And/or prevent you from purchasing the wrong gear.
Save 15%!
If you’d like to try out a new lens or if you need a lens for a specific trip or project (or for an IPT), LensRentals.com is the only way to go. To save 15%, simply click on the logo link above, arrange for your rental, and type in BIRDSASART15. If you type the gear you are looking for in the search box, it will pop right up. LensRentals.com offers affordable insurance. You can decline it, opt for LensCap: Damage Only, or select LensCap: Damage & Theft. Then hit PROCEED TO CHECKOUT. After you enter all of your info but before completing your order, be sure to scroll down to Promo Code box and enter the BIRDSASART15 code to save 15%.
I checked on renting a Sony FE 70-200mm f/2.8 GM OSS II lens for a week. The cost is only $122.00. LensCap: Damage Only coverage can be added for a very low $18.00. Going with LensCap: Damage & Theft would be $27.00. The shipping charge varies. They offer an interesting program called Lensrentals HD. By signing up for this shipping discount program ($99.00/year), you’ll get free Standard Shipping on all the orders you place.
Renting a Sony 600mm f/4 GM OSS lens for a week will cost you $536.00. The two coverage options come in at $76.00 or $114.00. Less your 15% discount when you enter the BIRDSASART15 code into the Promo Code box at checkout and enter the BIRDSASART15 code in the Promo Code box at checkout to save 15%.
Remember, to save the 15% on your rental you must start your search by clicking on the logo above, or on this link: LensRentals.com
B&H
To ensure that I get credit for your B&H purchases, you can always click here. The tracking is invisible but greatly appreciated. And, you can use your PayBoo card. You must use the website to order. B&H will reopen on Fri April 14. Thanking me for the past 4000 educational blog posts could not be any easier and will not cost you one penny. Please shoot me your B&H receipt for major purchases.
Many folks have written recently stating that they purchased a Sony a1 from B&H and would like their free membership in the Sony 1 Info and Updates Group, a $150.00 value. When I check my affiliate account, their orders have not been there. When I let them know that they get credit for B&H purchases only if they use one of the many B&H affiliate links on the blog or begin their searches with this link, they are always disappointed. If in doubt, please contact me via e-mail and request a BH link. I am always glad to help and to guide you to the right gear.
Bedfords Simplified
Click here to start your search. Choose standard shipping, and when you get to the payment page, enter BIRDSASART in the discount code box and hit apply. You will be upgraded to free second day air Fed-Ex and receive 3% cash back on your credit card once your stuff ships. Either is greatly appreciated by yours truly.
Bedfords Amazing BAA Discount Policy
Folks who have fallen in love with Bedfords can now use the BIRDSASART coupon code at checkout to enjoy a post-purchase, 3% off-statement credit (excluding taxes and shipping charges) on orders paid with a credit card. The 3% credit will be refunded to the card you used for your purchase. Be sure, also, to check the box for free shipping to enjoy free Second Day Air Fed-Ex. This offer does not apply to purchases of Classes, Gift Cards, prior purchases.
Visit the Bedfords website here, shoot Steve Elkins an e-mail, or text him on his cell phone at (479) 381-2592.
Gear Questions and Advice
Too many folks attending BAA IPTs and dozens of photographers whom I see in the field and on BPN, are — out of ignorance — using the wrong gear, especially when it comes to tripods and more especially, tripod heads. And the same is true in spades when ordering new camera bodies or lenses. My advice will often stave you some serious money and may help you avoid making a seriously bad choice. Please know that I am always glad to answer your gear questions via e-mail. If you are desperate, you can try me on my cell at 863-221-2372. Please leave a message and shoot me a text if I do not pick up.
Tracking: Zone/AF-C with Bird-Eye/Face Detection performed perfectly. Click on the image to enjoy the high-res version.
Image #1: Black-bellied Plover flying off with a lugworm stolen from a Marbled Godwit
Lugworm City!
The lugworm (Arenicola marina) is a large marine worm of the phylum Annelida. Its coiled castings are a familiar sight on a beach at low tide, but the animal itself is rarely seen except by those who, from curiosity or to use as fishing bait, dig the worm out of the sand. At DeSoto, it is a favorite food of the Marbled Godwits that will often work for minutes extracting the worms from their holes. Black-bellied Plovers and Willets will almost always attempt to steal a just-captured lugworm from the larger godwits.
The plover in Image #1 grabbed the lugworm from a Marbled Godwit and flew right at me. Note that the black axillary (armpit) feathers are diagnostic of Black-bellied Plover and separate them from the slimmer, shorter-billed, (much rarer along the east coast) American Golden-Plover.
Photo Tip
Whenever the possibility of action exists, it is usually best to select a fast shutter speed along with the relatively high ISO that will result in a properly exposed to the right raw file. At times a shutter speed of 1/2000 sec. (or even slower) will suffice. Shutter speeds of 1/4000 sec. are ideal for flight and for action.
This image was created at Indian Lake Estates, FL from the driver’s seat of my SUV on 30 May 2024. I used the BLUBB-supported Sony FE 600mm f/4 GM OSS lens and The One, the Sony Alpha 1 Mirrorless digital camera.. Exposure was determined via Zebras with Exposure Compensation on the rear dial. Multi-Metering +2.0 stops. AUTO ISO set ISO 2500. 1/4000 sec. at f/4 (wide open) in Shutter Priority mode. AWB at 8:03:26pm just before sunset.
Zone/AF-C was active at the moment of exposure and performed perfectly. Be sure to click on the image to enjoy the larger version.
Image #2: Black-bellied Whistling Duck chasing another
Real Photographers Use Manual Mode 100% of the Time. Not!
There are many who firmly state that real photographers use Manual mode 100% of the time. For years, I have firmly disagreed.
In bird photography, the main reason we work in Manual mode more than 90% of the time is that the tonality of the background changes frequently and often. In Manual mode, we determine and set the correct exposure for the bird manually so that the changing background tonalities will not screw things up as they would if we were working in an automatic (exposure) mode.
There are times, however, when working in situations where the tonality of the background is relatively consistent that working in Shutter Priority mode offers some huge advantages. At the beach, before the sun comes up, the sky, the water, and the beach are all of about the same tonality, each much lighter than a middle tone. As the possibility of creating some nice pleasing blurs exists, I will set up the camera as follows: AUTO ISO, Exposure Compensation (EC) on the thumb dial, and Shutter Priority. Then I’ll usually set the EC to +2 1/3 stops and the shutter speed to 1/15 sec., the classic blur speed.
The camera sets the ISO and the well-to-the-right exposures are excellent. And, I can quickly and easily change the shutter speed during a blastoff to try for a different effect. If a nice bird lands right in front of me, I can quickly dial the shutter speed up to 1/60 or 1/125 sec. and begin making sharp images almost instantly (without having to change both the shutter speed and the ISO as I would have had to do had I been working in Manual mode). Note: By using Zebra technology, I can always tweak the EC as needed.
I often use a similar strategy when photographing action against brightly colored skies or their reflection off the water (as in Image #2, above). I will set a fast shutter speed and an EC of +2 or so. As noted above, the camera will set the ISO. This approach works perfectly if either the sun is well muted or not in the frame. If I want to try for an image with the bird crossing in front of a partially muted sun, I can reduce the EC depending on the exact situation.
This approach will be far more efficient than opting to work in Manual mode “100% of the time.”
Note: some camera bodies allow you to save a combination of settings as a Custom Setting and usually denote them as C1, C2, or C3. That done you can do everything noted above in one fell swoop simply by moving the main dial from M to 1 (for example).
Your Call?
Which of today’s two featured images is the strongest? Please be so kind as to leave a comment and let us know why you made your choice.
Typos
With all blog posts, feel free to e-mail or to leave a comment regarding any typos or errors.
After reading the article below, please take a moment to sign and share the petition below. I did, and it only took a minute as most of the work has been done for you.
In addition, call the Governor’s office at 1-850-717-9337. Press option 1 and voice your dispaproval of all plans to develop Florida State Parks.
It is hard to comprehend that these plans were announced by the Department of Environmental Protection. What’s in a name anyway? Governor Ron DeSantis wholeheartedly backs the plans.
I first learned of this important issue on William Steele’s Facebook page. The first round of scheduled meetings has been postponed. You can find lots more important information here.
Florida Is Trying to Ram Development of State Parks, “Skirting the Legal Process”
Posted August 21 2024
By Jason Cochran (from the Frommer’s Website here.)
Floridians are sounding a red alert after the state unexpectedly revealed its intent to allow rapid development at nine of Florida’s nature reserves, sidestepping the usual process that allows for public participation.
“This appears to be something that has been planned in secret, and it doesn’t appear to have involved the hundreds, if not thousands, of people who are volunteers in the parks, the citizen support organizations, or the many people who have been involved in helping to create and develop Florida’s award-winning park system,” said Eric Draper, who served as the director of Florida’s state parks between 2017 and 2021, in the Tampa Bay Times.
On Aug. 19, Florida’s current Department of Environmental Protection announced plans to carve out major sections of nine state parks for several construction projects. Many of the areas are on pristine land that has never before been built upon.
One proposal obtained by citizen watchdogs called for the bulldozing of a section of John Dickinson State Park, north of Jupiter, to be replaced by two 18-hole golf courses, another 9-hole golf course, and a clubhouse. The development would destroy protected Atlantic coastal scrub habitat and a heritage observation tower at Hobe Mountain, pictured above.
“I’m not sure who is feeling a desperate lack of golf courses in southeast Florida, but what I can tell you is we are feeling a desperate lack of native scrub habitat,” Julie Brashears Wraithmell, executive director of Audubon Florida, told the Palm Beach Post. “Putting in a golf course on top of habitat is not what state parks are meant to be.”
Plans for construction at all nine state parks were announced simultaneously, and, contrary to the legal protocol, the state gave members of the public just 8 days to research the impact to the natural habitat, study potential conflicts, and catch corruption in government contracting before public comment is solicited.
According to the Tampa Bay Times, other projects suddenly threatening Florida’s nature reserves include a new 350-room lodge at Anastasia State Park near St. Augustine and another 350-room lodge at Topsail Hill Preserve State Park near Panama City Beach.
Sections of Hillsborough River State Park near Tampa are slated to be cleared for a “disc golf course” and paved over for pickleball courts. New space for “glamping” was announced for Oleta River State Park, a rare green space in the urban Miami Beach area.
Most of the state parks already have amenities for recreation and overnight visitors. The Hillsborough River State Park Preservation Society, for instance, says that location already has a 106-site family campground, picnic areas, pavilions, and a canoe launch.
In interviews, the Tampa Bay Times found that even officials who run the state parks had not been informed of the construction plans. Meanwhile, the state’s newly filed land planning documents claim the changes have been in the works, including through “field meetings,” since 2022.
The public comment process is happening in a manner that will severely limit citizen input. The Florida government is scheduling eight different public comment meetings to be held on a single day—Tuesday, Aug. 27—spread across various locations spanning a whopping 620 miles across the state.
That far-flung simultaneous scheduling, which comes just 6 work days after the plans were announced, will make it impossible for citizens to attend more than one hearing or to comment on the scheme as a whole.
“This seems like a process that is deliberately intended to avoid public participation. The whole spirit of the law is to encourage public participation,” Draper told the Tampa Bay Times.
Florida Gov. Ron DeSantis—famous for loving golf (he even owns a $28,000 golf simulator, courtesy of a political donor) and his administration have named the state park destruction plans the “Great Outdoors Initiative.”
The Tampa Bay Times has spent this week pressing Gov. DeSantis’ office and the state’s environmental agency to answer questions about the surprise development scheme, but so far, DeSantis and company have stonewalled journalists.
This isn’t the first time the DeSantis government has gone around state residents to force its commercial will upon vacation-related destinations. In 2021, after a majority of Key West voters approved a legal referendum to limit the number of cruise passengers permitted to disembark in the town, the DeSantis administration and the Republican-dominated state legislature simply passed a new law to reverse the result of the public vote.
This also isn’t the first time Florida’s ruling elites have tried to convert the state’s nature reserves into cash cows catering to personal leisure interests. In 2011, the Florida legislature attempted to pass a law to allow celebrity golfer Jack Nicklaus to build golf courses in state parks. That plot was withdrawn after public outcry.
It should go without saying that nature reserves have a deep value to our society and our heritage (not to mention the Earth), and citizens should always have an extensive opportunity to examine and approve any construction plans that affect public lands.
The DeSantis government, hiding behind closed doors and trying to splinter any opposition by scheduling distant in-person public hearings swiftly and simultaneously, is trying to force irreversible destruction and commercial exploitation on Florida’s dwindling and threatened ecosystem, and the public deserves better.
Nature reserves are not a partisan issue, and any changes to them must be conducted in the sunshine. The so-called Sunshine State is now depriving Americans of both political parties of the right to appropriately scrutinize and evaluate any changes to our public lands.
Typos
With all blog posts, feel free to e-mail or to leave a comment regarding any typos or errors.
Judy Stepenaskie showed up barely understanding how to operate her Canon gear. After a 90-minute camera body setup session, and a bit of in the field instruction, she began making some excellent images. And she continued to do so for the next five days. When she got back home, she shared some of her images with her partner, Dave, and sent me this e-mail:
Hi Artie: I can’t believe it – Dave was looking at some of my pics and he said: “You never made pictures like this before”!!!
I can believe it. Bird photography is not rocket science. If you cannot join an IPT, be sure too study and bookmark the Improve Your Bird (and Nature) Photography By Leaps and Bounds blog post here.
Which of Judy’s five featured images do you think is the strongest? Be so kind as to leave a comment and let us know why you made your choice.
What’s Up?
I removed my bandages yesterday for the first time. The trigger finger (thumb) incision — six stitches, is looking good, and the carpal tunnel (laparoscopic) incision is barely visible. As expected, I continue to have a bit of numbness in the first four fingers but the debilitating tingling and pain is blessedly gone. I am feeling a bit better each day. As the nerves continue to calm down, I am looking forward to a full and complete recovery.
In the previous blog post here, I was a bit surprised that all but one person picked Image #3 as best. Monte Brown and I liked the first image best. Me because of the blue water and the bit of seaweed. (From the original The Art of Bird Photography, “Add green whenever possible.”)
Today is Monday 26 August. I will be finishing up and submitting my Bird Watcher’s Digest Magazine Fort DeSoto article and get back to work on Murder on the Beach. I hope that you too have a great day.
First Ever Emperor Penguin Chicks Cliff Diving
Check out this amazing video by National Geographic photographer Bertie Gregory:
If, like me, you have never heard of Bertie Gregory, click here. I did, and was awestruck. Do not miss his spine-tingling stuff on Antarctic Killer Whales here. His accomplishments at age 30 are mind boggling. If you start surfing his site, be prepared to spend at least a few hours with your jaw hanging down…
This image was created on 5 January 2023 on a San Diego Instructional Photo-Tour at La Jolla, CA. I used the handheld Sony FE 70-200mm f/2.8 GM OSS II lens (at 200mm) and The One, the Sony Alpha 1 Mirrorless Digital Camera.. The exposure was determined via Zebras with ISO on the Thumb Dial. ISO 2000: 1/320 sec. at f/5.6 (a mistake) in Manual mode. AWB at 8:02:16pm on cloudy afternoon.
Tracking: Expand Spot AF/C with Bird-Eye/Face Detection performed perfectly. Click on the image to enjoy a high-res version.
Image #1:Judy Stepenaskie on the beach with her Canon RF 100-500mm.R6 II rig.
The First E-mail Exchange
AM: Hi Judy,
Good to hear from you. Thanks for getting in touch. I am just finishing up with the Bald Eagles in Homer, AK.
A few questions if you would: Can you easily handhold the Canon 100-500 or do you use it on a tripod for flight? How much bird photography have you done? Where do you live? What camera and telephoto lenses have you used previously?
JS: I am interested in the July Photo-tour at Nickerson Beach.
AM: Great.
JS: I was wondering how much individual instruction is given.
AM: Lots. Always. Right now, Monte Brown, the only person signed up has been with me many times and has the basics down pat.
JS: I am using a Canon EOS R6m2 with a 100-500 mm zoom lens. I have not been able to capture birds in flight with this camera and need help with the settings to do this.
AM: Though I have never used either the R6 or the R6 II, I am fairly confident that I can help you out with the AF settings.
If you sign up for the IPT I wills send you a free copy of our R5/R6 guide. I used the R5 and a 100-500 for more than a few months when it first came out.
JS: Would I be getting the help I need, or would a day of individual instruction be better?
AM: In general, beginners and/of folks with new camera bodies would benefit greatly from a day of private instruction the day before an IPT begins. I do that often.
LMK on my questions and any additional thoughts you might have.
With love, artie
This image was created by Judy Stepenaskie on 27 July 2024 at Nickerson Beach Park, Lido Beach, Long Island, NY on the first afternoon of the first Nickerson Beach (Extended) IPT. Seated on dry sand, she used the hand held Canon RF 100-500mm f/4.5-7.1 L IS USM lens (at 400mm) and the impressive Canon EOS R6 Mark II Mirrorless Camera. The exposure was determined using the in viewfinder histogram and confirmed after evaluation of blinks on the JPEG. AWB at 5:51:10pm on a sunny afternoon. ISO 1250: 1/2000 sec. at f/7.1.
Be sure to click on the image to enjoy a high-res version.
Image #1: Black Skimmer adult calling
Image Courtesy of and Copyright 2024: Judy Stepenaskie
The First Afternoon
Judy showed up 90 minutes early as planned with her R6 II/RF 100-500 rig. She explained that she had been working in Aperture Priority with AUTO ISO. Her camera set-up was 100% inefficient. I explained to her that working in an automatic exposure mode was a terrible approach as the exposure would change as the tonality of the background changed. As she had no understanding for exposure theory, I frankly explained to her that any good images that she had created previously were due to luck.
She understood, she did not take my comments personally, and quickly agreed to work in Manual mode.
Next was the camera set-up. We reviewed the R5/R6 guide and made lots of menu changes. We set up her R6 so that she could toggle the histogram in the viewfinder On and Off and use it to determine her exposures. I taught her to examine the resulting image for blinkies and thus evaluate her exposures in each new situation. We limited her AF options and made it easy for her to change from one AF pattern to another. As it had been quite a while since I had used the similar R5, we phoned BPN Avian Forum Super-Moderator Dan Cadieux who helped immensely in tying up the loose ends. He saved us a ton of time.
Judy was a quick study, and more importantly, she trusted me. We headed to the beach and in short order, she began creatitng quality images that were sharp and correctly exposed. The skimmer image above was her first keeper. With the southeast wind, she did a great job of waiting for the look-back head turn!
This image was also created by Judy Stepenaskie on 27 July 2024 at Nickerson Beach Park, Lido Beach, Long Island, NY on the first afternoon of the first Nickerson Beach (Extended) IPT. Seated on dry sand, she used the hand held Canon RF 100-500mm f/4.5-7.1 L IS USM lens (at 500mm) and the impressive Canon EOS R6 Mark II Mirrorless Camera. The exposure was determined using the in viewfinder histogram and confirmed after evaluation of blinks on the JPEG. AWB at 5:51:10pm on a sunny afternoon. ISO 2000: 1/1250 sec. at f/7.1.
Be sure to click on the image to enjoy a high-res version.
Image #2: Common Tern — large chick begging
Image Courtesy of and Copyright 2024: Judy Stepenaskie
Incredible!
I was amazed that same afternoon when Judy came up with a long series of sharp, perfectly exposed images of a frantically begging Common Tern chick. We had a hard time picking the best of the lot in Photo Mechanic and I was quite impressed with the Animal Eye tracking AF system as it had no problems tracking the eyes of birds.
This image was also created by Judy Stepenaskie. This one on 30 July at Nickerson Beach Park, Lido Beach, Long Island, NY on the third morning of the first Nickerson Beach (Extended) IPT. Seated on dry sand, she used the hand held Canon RF 100-500mm f/4.5-7.1 L IS USM lens (at 500mm) and the impressive Canon EOS R6 Mark II Mirrorless Camera. The exposure was determined using the in viewfinder histogram and confirmed after evaluation of blinks on the JPEG. AWB at 7:13:58pm on a sunny afternoon. ISO 500: 1/1000 sec. at f/7.1.
Be sure to click on the image to enjoy a high-res version.
Image #3: Adult Common Tern feeding chick
Image Courtesy of and Copyright 2024: Judy Stepenaskie
Nobody Ever Believes This One
I often state that beginning photographers, with their cameras set up properly and a modicum of instruction, can, on occasion, produce images as good or better than those created by a professional sitting right next to them. That, however, is exactly what happened when Judy created Image #3. As I was to her right when she created Image #3, she had a better angle than I did. She did however, nail the focus and the exposure. QED. (Quod erat demonstrandum: “Which was to be demonstrated.”)
This image was also created by Judy Stepenaskie. This one on 31 July at Nickerson Beach Park, Lido Beach, Long Island, NY on the fourth morning of the first Nickerson Beach (Extended) IPT. Seated on dry sand, she used the hand held Canon RF 100-500mm f/4.5-7.1 L IS USM lens (at 500mm) and the impressive Canon EOS R6 Mark II Mirrorless Camera. The exposure was determined using the in viewfinder histogram and confirmed after evaluation of blinks on the JPEG. AWB at 8:02:02am on a sunny afternoon. ISO 250: 1/1250 sec. at f/7.1.
Be sure to click on the image to enjoy a high-res version.
Image #4: Adult American Oystercatcher preening (& large chick)
Image Courtesy of and Copyright 2024: Judy Stepenaskie
The 1.6x (crop)
As Judy’s longest available focal length (500mm) was shorter than everyone else’s (600mm), I recommended that we set her camera to 1.6X crop mode. On the Red Menu, screen 1, the third item down is Cropping/aspect ratio. The default is FULL. We changed that to [1.6x (crop)].That gave her an effective 160 – 800mm lens. Image quality remained quite good.
On the Canon RF100-500mm f/4.5 to f/7.1 L IS USM Super-Telephoto Zoom Lens
At f/7.1 on the long end, this lens is quite slow, faster only than some of the off-brand telephoto zooms. My biggest problem with this lens, however, is the balky, inefficient zoom mechanism. Even with the Tight/Smooth ring set to Smooth, zooming in and out is quit difficult. And the fact that the physical length of the lens changes as you zoom, is a huge negative. The zoom ratio is also poor. I know more than a few very good photographers who use this lens very often. My hat goes off to those who do and produce some very fine work.
Kudos again to Judy for not being afraid of the higher ISOs she needed in various situations to properly expose to the right when using appropriate shutter speeds as needed for a given situation. By correctly choosing a fast enough shutter speed, Judy consistently created sharp images.
This image was also created by Judy Stepenaskie. This one on 31 July at Nickerson Beach Park, Lido Beach, Long Island, NY on the fourth morning of the first Nickerson Beach (Extended) IPT. Seated on dry sand, she used the hand held Canon RF 100-500mm f/4.5-7.1 L IS USM lens (at 300mm) and the impressive Canon EOS R6 Mark II Mirrorless Camera. The exposure was determined using the in viewfinder histogram and confirmed after evaluation of blinks on the JPEG. AWB at 8:02:02am on a sunny afternoon. ISO 2000: 1/4000 sec. at f/6.3
Be sure to click on the image to enjoy a high-res version.
Image #5: Common Tern adult in flight above colony
Image Courtesy of and Copyright 2024: Judy Stepenaskie
Judy’s Biggest Problem with the Canon RF 100-500mm Lens
Judy’s biggest problem was a direct result of the zoom mechanism problems mentioned above; she found it nearly impossible o change the focal length of the lens on the fly.
I cannot help but compare the Canon RF 100-500 (3 lbs.) with the Sony 200-600 (4.65 lbs.). Aside from the significant weight advantage of the RF 100-500, the speed (f/6.3 to f/7.1), the reach (600mm to 500mm), the price ($700 less), and the smooth internal zoom mechanism (the length of the lens does not change as you zoom in and out) and much faster zoom ratio are all clear wins for the Sony super-telephoto zoom.
Typos
With all blog posts, feel free to e-mail or to leave a comment regarding any typos or errors.
My surgery went well. I am healing nicely at younger daughter Alissa’s home in Ronkonkoma in Suffolk County, Long Island. The best news is that the tingling pain that came and went in the first four fingers of my right hand is pretty much gone. And, I have not had to take any oxycodone. If all continues to go well as we expect, I will have my stitches taken out on 3 September, drive to Lorton, VA on the 4th, and be headed south on the Auto Train that same evening. I should be back home at ILE just after lunch on the 5th.
Today is Friday 23 August 2024. After publishing the new YouTube video and this post, I will begin work on an article for the new Bird Watcher’s Digest (BWD) Magazine; the working title is Shifting Sands; Bird Photography at Fort DeSoto County Park. Wherever you are and whatever you are doing, I hope that you too choose to have a great day.
Please remember to use the B&H links that are found on most blog pages and to use the BIRDSASART discount code at checkout when purchasing your new gear from Bedfords to get 3% back on your credit card and enjoy free second-day air FedEx. Please, also, consider joining a BAA IPT. You will be amazed at how much you will learn!
If an item — a Delkin flash card, or a tripod head — for example, that is available from B&H and/or Bedfords, is also available in the BAA Online Store, it would be great, and greatly appreciated, if you would opt to purchase from us. We will match any price. Please remember also to use my B&H affiliate links or to earn 3% cash back at Bedfords by using the BIRDSASART discount code at checkout for your major gear purchases. Doing either often earns you free guides and/or discounts. And always earns my great appreciation.
Supporting My Efforts Here
If you enjoy and learn from the blog, please consider using one of my affiliate links when purchasing new gear. It will never cost you a single penny. To support my effort here, please order from B&H by beginning your search here. Or, click here, to order from Bedfords and enter the discount code BIRDSASART at checkout to receive 3% cash back to your credit card and enjoy free Second-Day Air Fed-Ex shipping. It is always best to write for advice via e-mail.
In many cases, I can help you save some serious dollars. And/or prevent you from purchasing the wrong gear.
Save 15%!
If you’d like to try out a new lens or if you need a lens for a specific trip or project (or for an IPT), LensRentals.com is the only way to go. To save 15%, simply click on the logo link above, arrange for your rental, and type in BIRDSASART15. If you type the gear you are looking for in the search box, it will pop right up. LensRentals.com offers affordable insurance. You can decline it, opt for LensCap: Damage Only, or select LensCap: Damage & Theft. Then hit PROCEED TO CHECKOUT. After you enter all of your info but before completing your order, be sure to scroll down to Promo Code box and enter the BIRDSASART15 code to save 15%.
I checked on renting a Sony FE 70-200mm f/2.8 GM OSS II lens for a week. The cost is only $122.00. LensCap: Damage Only coverage can be added for a very low $18.00. Going with LensCap: Damage & Theft would be $27.00. The shipping charge varies. They offer an interesting program called Lensrentals HD. By signing up for this shipping discount program ($99.00/year), you’ll get free Standard Shipping on all the orders you place.
Renting a Sony 600mm f/4 GM OSS lens for a week will cost you $536.00. The two coverage options come in at $76.00 or $114.00. Less your 15% discount when you enter the BIRDSASART15 code into the Promo Code box at checkout and enter the BIRDSASART15 code in the Promo Code box at checkout to save 15%.
Remember, to save the 15% on your rental you must start your search by clicking on the logo above, or on this link: LensRentals.com
B&H
To ensure that I get credit for your B&H purchases, you can always click here. The tracking is invisible but greatly appreciated. And, you can use your PayBoo card. You must use the website to order. B&H will reopen on Fri April 14. Thanking me for the past 4000 educational blog posts could not be any easier and will not cost you one penny. Please shoot me your B&H receipt for major purchases.
Many folks have written recently stating that they purchased a Sony a1 from B&H and would like their free membership in the Sony 1 Info and Updates Group, a $150.00 value. When I check my affiliate account, their orders have not been there. When I let them know that they get credit for B&H purchases only if they use one of the many B&H affiliate links on the blog or begin their searches with this link, they are always disappointed. If in doubt, please contact me via e-mail and request a BH link. I am always glad to help and to guide you to the right gear.
Bedfords Simplified
Click here to start your search. Choose standard shipping, and when you get to the payment page, enter BIRDSASART in the discount code box and hit apply. You will be upgraded to free second day air Fed-Ex and receive 3% cash back on your credit card once your stuff ships. Either is greatly appreciated by yours truly.
Bedfords Amazing BAA Discount Policy
Folks who have fallen in love with Bedfords can now use the BIRDSASART coupon code at checkout to enjoy a post-purchase, 3% off-statement credit (excluding taxes and shipping charges) on orders paid with a credit card. The 3% credit will be refunded to the card you used for your purchase. Be sure, also, to check the box for free shipping to enjoy free Second Day Air Fed-Ex. This offer does not apply to purchases of Classes, Gift Cards, prior purchases.
Visit the Bedfords website here, shoot Steve Elkins an e-mail, or text him on his cell phone at (479) 381-2592.
Gear Questions and Advice
Too many folks attending BAA IPTs and dozens of photographers whom I see in the field and on BPN, are — out of ignorance — using the wrong gear, especially when it comes to tripods and more especially, tripod heads. And the same is true in spades when ordering new camera bodies or lenses. My advice will often stave you some serious money and may help you avoid making a seriously bad choice. Please know that I am always glad to answer your gear questions via e-mail. If you are desperate, you can try me on my cell at 863-221-2372. Please leave a message and shoot me a text if I do not pick up.
The Second Edit — Two Afternoons of Young Skimmers Skimming
On my recent month-long Nickerson Beach (Lido Beach, Long Island, NY) visit, we had two excellent afternoons with decent light and the wind from the WSW. Those conditions had the young Black Skimmers practicing skimming mostly right at us. Sit beside me as I select my second edit keepers as I explain the various factors that helped me decide to tag or delete each image. I kept 27 out of 48 (21 deleted) from the first session and 22 out of 41 (19 deleted) from the afternoon of 11 August. If you like flight photography, you will learn a ton.
The 89 first round keepers had previously been selected from two afternoon folders totaling more than 5,000 images. Do understand that each of the 40 images deleted after the second round of editing (Untagged > Command A — select all, > Command Delete in Photo Mechanic), and another 2000 or so deleted after the first edit, would have thrilled me as recently as five years ago. Why? Flight photography technology has improved drastically with the advent of high end mirrorless camera bodies. Right now, the science-fiction-like autofocus that I had dreamed of for so long is pretty much a reality.
On the first afternoon I used the a1. The next day, I went with the a9 iii. Below are my three favorites from the 49 keepers. I find it a bit strange that all were made at 420mm (300mm f/2.8 + 1.4X TC) rather than at 600mm (300mm f/2.8 + 2X TC).
This image was created on 10 August 2024 at Nickerson Beach Park, Lido Beach, Long Island, NY. Seated on damp sand, I used the hand held Sony FE 300mm f/2.8 GM OSS lens (Sony E) with the Sony FE 1.4x Teleconverter and The One, the Sony a1 Mirrorless Camera. The exposure was determined using Zebra technology with ISO on the Thumb Dial. ISO 4000. 1/3200 second at f/4 (wide open) in Manual Mode. AWB at 7:28:14pm on a sunny afternoon. RawDigger showed the raw file brightness to be dead solid perfect.
Zone AF-C AF with Bird Face/Eye Detection performed perfectly. Be sure to click on the image to enjoy a high-res version.
Image #1: Black Skimmer juvenile flying with seaweed
Practice Skimming
Though I have been watching young Black Skimmers skim near the shore at Nickerson Beach in August for more than two decades, I have never once seen one catch a fish. They will often pick up bits of grass, seaweed, or small sticks while skimming, but never a fish. They will skim in shallow puddles, and even skim the sand on occasion. It seems obvious to me that they are simply practicing skimming. Most will likely catch their first fish either on very calm mornings or by visiting and fishing nearby sheltered bays.
This image was created on 11 August 2024 at Nickerson Beach Park, Lido Beach, Long Island, NY. Seated on damp sand, I used the hand held Sony FE 300mm f/2.8 GM OSS lens (Sony E) with the Sony FE 1.4x Teleconverter and the ridiculously amazing Sony a9 III Mirrorless Camera. The exposure was determined using Zebra technology with ISO on the Thumb Dial. ISO 1600. 1/4000 second at f/4 (wide open) in Manual Mode. AWB at 7:20:02pm on a barely sunny afternoon. RawDigger showed the raw file brightness to be dead solid perfect.
Zone AF-C AF with Bird Face/Eye Detection performed perfectly. Be sure to click on the image to enjoy a high-res version.
Image #2: Black Skimmer juvenile practice skimming with bill in foamy water
A9 iii AF
With most of the a9 iii images, as expected, Bird Face-Eye AF grabbed and tracked the young skimmer’s eye more consistently than the a1 did. Nonetheless, all of the a1 keepers were sharp on the eye despite the fact that with some of the images, a7 INFO showed the AF point on the bird’s wing or on the background. A possible explanation is that the recording of the active AF point or points on the a1 is not quite fast enough to keep up with the AF technology, not as fast as the recording capabilities of the a9 iii. Sharp a1 images will always offer superior quality when compared to sharp a9 iii images, and the a9 iii will always offer those shooting at 60 or 120 fps more wing positions and flight poses. Take your pick.
This image was also created on 11 August 2024 at Nickerson Beach Park, Lido Beach, Long Island, NY. Seated on damp sand, I again used the hand held Sony FE 300mm f/2.8 GM OSS lens (Sony E) with the Sony FE 1.4x Teleconverter and the ridiculously amazing Sony a9 III Mirrorless Camera. The exposure was determined using Zebra technology with ISO on the Thumb Dial. ISO 6400. 1/3200 second at f/4 (wide open) in Manual Mode. AWB at 7:32:14pm on then cloudy afternoon. RawDigger showed the raw file brightness to be dead solid perfect.
Zone AF-C AF with Bird Face/Eye Detection performed perfectly. Be sure to click on the image to enjoy a high-res version.
Image #3: Black Skimmer juvenile practice skimming leaving wake
Your Call?
Which of today’s three featured images is your favorite? Why?
Typos
With all blog posts, feel free to e-mail or to leave a comment regarding any typos or errors.
Which of today’s three magical evening images do you like best? Please leave a comment and let us know why you made your choice.
What’s Up?
Today is Wednesday 21 August 2024. I will be heading to St. Charles Hospital in Port Jefferson, Long Island, NY at 7:30am for “two for the price of one” right hand surgery. In addition to carpal tunnel release surgery, Dr. Puopolo will do trigger finger release surgery on the right thumb. Unable to get back to sleep on Sunday evening due to the numbness, tingling, and pain in my right hand, I realized that my right thumb was clicking. When I awoke I experienced pain at the base of my right thumb. As a veteran of about six different trigger fingers, I recognized the symptoms quite clearly. I called Dr. Pop’s office on Monday morning and he called me back soon afterwards. That is when I signed up for the double-header surgery.
Thanks for all the good wishes at the last blog post. Again, there is no guarantee when it comes to any surgery, but I am of course hoping for relief. I do have 100& faith in Dr. Poupolo who has twice before operated on me with outstanding results.
A Magical Evening on All Counts
On Monday evening past, I traveled to Lawrence, Long Island, one of the Five Towns, with friend Anke Frohlich and friends/clients Geri Georg and Marc Wortsman. We had all been generously invited to dinner at Prime Bistro, a Kosher, French steakhouse by Izzy Flamm, my B&H affiliate manager. We have been friends now for 13 years. His friend and associate, the very delightful, very sincere, very spiritual, and very funny Stuart Honickman joined us. Needless to say, the wine, the appetizers, the entrées, and the conversation were all superb. A great time was had by all. Huge thanks to Izzy and to B&H for our wonderful meal.
The four photographers then headed to Nickerson Beach for a sunset photo session and I was thrilled that Izzy decided to join us as he had done in previous years. Just as we arrived at my AirBnB in Lido Beach, the skies opened up and it began to pour. I, however, was optimistic. The storm passed quickly so we made the 3-minute drive to the beach and headed out. There was a bright rainbow to the northeast. By the time we got out to the berm, an amazing yellow light lit up the eastern sky. The Atlantic Ocean was rendered in golden tones. As they had been doing every evening for a week, the large flocks of terns and skimmers repeatedly blasted off in all directions. Izzy was blown away. As we all were. It was a fabulous end to a great Monday afternoon.
Tuesday morning dawned cold and grey, a fitting end to my month long Nickerson Beach adventure. After a short morning session — we were all freezing, we headed back to the AirBnB to pack up. After dropping Geri off at LaGuardia, I dropped Anke off in Greenwich Village, and returned to Lido Beach for a nap. After I awoke, I packed up the car and drove to younger daughter Alissa’s home in Ronkonkoma where I will be staying for two weeks after the surgery.
This i-phone 15 image was created at about 7:45pm on the magical evening of 19 August 2024 at Nickerson Beach Park, Lido Beach, Long Island, NY.
Image #1: Common Tern blast-off in front of the eastern sky
The Yellow Light
The yellow light to the east was both glorious and ethereal. Even had I removed the 2X TC and zoomed out to 70mm, I could not have gotten nearly wide enough with my versatile 70-200 f/2.8 II GM lens so I grabbed my I-Phone 15 from my new fanny pack (details soon) and went to work.
I got very lucky as the terns blasted off while I struggled a bit with my I-phone. I needed to crop a sliver off the top of this image as I had my thumb in front of the lens :-(.
This image was also created on the magical evening of 19 August 2024 at Nickerson Beach Park, Lido Beach, Long Island, NY. Standing at full height in six inches of water, I used the handheld Sony FE 70-200mm f/2.8 GM OSS II lens with the Sony FE 2x teleconverter (at 198mm), and The One, the Sony Alpha 1 Mirrorless Digital Camera.. The exposure was determined via Zebras with Exposure Compensation on the Thumb Dial. Multi metering +1.7 stops. AUTO ISO set ISO 3200: 1/125 sec. at f/5.6 (wide open) in Shutter Priority mode. AWB at 7:48:46pm on a stormy evening.
Tracking: Expand Spot AF/C with Bird-Eye/Face Detection performed perfectly. Click on the image to enjoy a high-res version.
Image #2: Great Black-backed Gull standing on berm after storm
TLC
The image optimization for Image #2 required some tender loving care as far as getting the color right. While I was able to get the surface of the ocean right and the wave washed sand right, the wave and the whites on the bird had a large CYAN/BLUE cast. I corrected that by going Select > Color Range, clicking on the problematic whites, adjusting the Fuzziness and Range sliders, and then doing a Hue Saturation adjustment to the layer; I decreased the BLUE and the CYAN saturation and made both colors lighter. All as detailed in the Digital Basics II PDF.
The BIRDS AS ART Current Workflow e-Guide (Digital Basics II).
You can order your copy from the BAA Online Store here, by sending a PayPal for $40 here, or by calling Jim or Jennifer weekdays at 863-692-0906 with your credit card in hand. Be sure to specify Digital Basics II.
The BIRDS AS ART Current Workflow e-Guide (Digital Basics II)
The technique mentioned above and tons more great Photoshop tips and techniques — along with my complete digital workflow, Digital Eye Doctor Techniques, and all my personalized Keyboard Shortcuts — are covered in detail in the BIRDS AS ART Current Workflow e-Guide (Digital Basics II), an instructional PDF that is sent via e-mail. Note: folks working on a PC and/or those who do not want to miss anything Photoshop may wish to purchase the original Digital Basics along with DB II while saving $15 by clicking here to buy the DB Bundle.
Please note: the Divide and Conquer technique was inadvertently omitted from DB II. It is detailed in a free excerpt in the blog post here.
Folks who learn well by following along rather than by reading can check out the complete collection of MP 4 Photoshop Tutorial Videos by clicking here. Note: most of the videos are now priced at an amazingly low $5.00 each.
You can learn how and why I converted all of my Canon digital RAW files in DPP 4 in the DPP 4 RAW Conversion Guide here. More recently, I became proficient at converting my Nikon RAW (NEF) files in Adobe Camera Raw. About three years ago I began converting my Nikon and Sony RAW files in Capture One and did that for two years. You can learn more about Capture One in the Capture One Pro 12 Simplified MP4 Video here. The next step would be to get a copy of Arash Hazeghi’s “The Nikon Photographers’ Guide to Phase One Capture One Pro e-Guide” in the blog post here. Today, I convert my Sony raw files in Photoshop with Adobe Camera Raw.
You can learn advanced Quick Masking and advanced Layer Masking techniques in APTATS I & II. You can save $15 by purchasing the pair.
This image was also created on the magical evening of 19 August 2024 at Nickerson Beach Park, Lido Beach, Long Island, NY. Standing at full height, I used the handheld Sony FE 70-200mm f/2.8 GM OSS II lens with the Sony FE 2x teleconverter (at 196mm), and The One, the Sony Alpha 1 Mirrorless Digital Camera.. The exposure was determined via Zebras with Exposure Compensation on the Thumb Dial. Multi metering +2.0 stops. AUTO ISO set ISO 3200: 1/13 sec. at f/5.6 (wide open) in Shutter Priority mode. AWB at 8:01:31pm on a stormy evening.
Tracking: Expand Spot AF/C with Bird-Eye/Face Detection performed perfectly. Click on the image to enjoy a high-res version.
Image #3: Tern/skimmer Blur
Looking Southwest
Good nature photographers keep their eyes moving constantly, especially in rapidly changing situations. Looking to the southwest, I noted a decent tern/skimmer blastoff and was able to include some pan-blurred beach vegetation by zooming out. As first pointed out in the original The Art of Bird Photography, adding green to an image is usually a good idea.
A Guide to Pleasing Blurs
Learn everything there is to know about creating pleasingly blurred images in A Guide to Pleasing Blurs by Denise Ippolito and yours truly. This 20,585 word, 271 page PDF is illustrated with 144 different, exciting, and artistic images. The guide covers the basics of creating pleasingly blurred images, the factors that influence the degree of blurring, the use of filters in creating pleasing blurs, and a great variety of both in-the-field and Photoshop techniques that can be used to create pleasingly blurred images.
Artie and Denise teach you many different ways to move your lens during the exposure to create a variety of pleasingly blurred images of flowers and trees and water and landscapes. They will teach you to recognize situations where subject movement can be used to your advantage to create pan blurs, wind blurs, and moving water blurs. They will teach you to create zoom-blurs both in the field and during post-processing. Artie shares the techniques that he has used and developed for making blurred images of flocks of geese in flight at his beloved Bosque del Apache and Denise shares her flower blur magic as well as a variety of creative Photoshop techniques that she has developed.
With the advent of digital capture creating blurred images has become a great and inexpensive way to go out with your camera and have fun. And while many folks think that making successful blurred images is the result of being a sloppy photographer, nothing could be further from the truth. In “A Guide to Pleasing Blurs” Artie and Denise will help you to unleash your creative self.
Typos
With all blog posts, feel free to e-mail or to leave a comment regarding any typos or errors.
Which, if any, of today’s three featured images do you like? Why did you make your choice. If none of them, why?
What’s Up?
I’ve been busier than the proverbial one armed paper hanger. Today is Sunday 18 August. On Monday morning, I head out to eastern Long Island for pre-surgical testing and medical clearance. This coming Wednesday — assuming no unexpected problems, I will have carpal tunnel surgery on my right wrist. I have had sporadic numbness and tingling in my right hand for several years that has gotten worse over time, sometimes to the point of pain. The numbness often makes sleep difficult. It goes from the inside of my right ring finger to the inside of the right thumb, classic median nerve/carpal tunnel symptoms. More than a few times recently, I could not feel the shutter button at all and had to press it with my right pointer finger. And typing has been and is a challenge. Right now the hand is numb pretty much 24/7. The surgery will be done at St. Charles Hospital in Port Jefferson, NY by the word’s greatest hand surgeon, Dr. Steven Puopolo.
I have tried Vitamin B6 and all kinds of massage and stretching without success. While I am hoping that the surgery brings relief, there are of course, no guarantees.
I am far behind on e-mails so if you have been waiting to hear from me, please continue to be patient. With lots of rain in the forecast, I should get to some of them today.
On Friday evening, we were greeted by two evening high tide overflow pools at Nickerson. There were quite a few large gulls bathing and we had some fun with them. We were excited on Saturday morning to see if the pools had persisted. They had, and with the early morning high tide, they had gotten larger. Things started off slowly but by moving the group often as the pools first got deeper and then began to shrink, we enjoyed a ton of flight and bathing action for many hours, finally leaving the beach at about 11am as the sun broke through the heavy cloud cover. The 15 mph wind from the southeast had been perfect. Using my a9 iii for the first time in a while, I created more than 16,000 images. Anke made more than 8,000, and Geri about 5,500. With the extreme low light conditions, we were all using very high ISOs most of the time. My keeper rate for the first edit was a shade less than 2%, about twice what I had expected.
By the time we left, the pools had shrunk to relatively small puddles.
We were curious to see what the conditions would be like on Saturday evening, wondering if there would be any pools left at all. As we walked over the wooden walkway to the beach, we were stunned to see that the entire beach was flooded, almost from the parking lot to the berm. It was an amazing sight. With little light, I experimented first with ridiculously high ISOs, as high as 40,000 (at f/2.8!) but then went to blurs. There were lots of skimmers skimming and huge tern blastoffs.
Tracking: Expand Spot AF-C with Bird Face/Eye Detection performed perfectly. Be sure to click on the image to enjoy a high-res version.
Image #1: Black Skimmer juvenile skimming
a9 iii for Action
Knowing that the morning southeast wind combined with the flooding would likely produce lot of flight and bathing chances, I went with tripod mounted 600mm f/4 lens and the a9 iii, adding the 1.4X TC early on because most of the action was in the center of the pool.
Tracking: Expand Spot AF-C with Bird Face/Eye Detection performed perfectly. Be sure to click on the image to enjoy a high-res version.
Image #2: Common Tern juvenile shaking off water in midair
Whole Lotta Shaking Going On. But When?
I kept missing the Common Tern midair shakes until I realized that when they flap after their baths and then keep flapping to lift off, the birds would consistently flap several times more before shaking the water off their feathers. Once I figured that out, I stayed on them and created a few neat photos despite the high ISOs. My double noise reduction technique (as detailed in Volume I of the Digital Basics III Video Series) produced clean, noise free images even at ISO 5000.
Zone AF-C with Bird Face/Eye Detection performed perfectly. Be sure to click on the image to enjoy a high-res version.
Image #3: Black Skimmer adult taking flight after bath
Footsies! What’s With the Feet?
As we watched and photographed mostly adult skimmers bathing right in front of us for hours, we all noticed that they were doing very strange things with their feet as they lifted off and took flight. They would flap vigorously in place after they bathed, and when they lifted off, it seemed that they were using their feet to push the air to give them more lift. They would point their toes down and then bring their feet forward, sometimes in tandem, other times in opposition, as if trying to walk on air.
Though Image #3 looks very much like the bird is braking to land, it is actually taking flight. We all made some very interesting skimmer footsie photos.
Five videos, fifteen complete image optimizations.
The Digital Basics III Video Series
The Digital Basics III Video Series
I realized about two years ago that my digital workflow had changed significantly and was toying with the idea of writing a Digital Basics III. More recently, I learned and begun working with two great new Photoshop Tools, the Remove Tool and the Luminance Targeted Adjustment Tool. The former is like a smarter Spot Healing Brush Tool on steroids and the latter is a step up from the fabulous Color Mixer Tool. During that same time frame, I came up with a new and improved 2-step noise reduction technique. I still use Divide and Conquer, Quick Masks, Layer Masks, an expanded array of personalized keyboard shortcuts, and tons of other stuff from both versions of Digital Basics.
As soon as I realized that I did not want to take on another large writing project, I realized that by creating a series of videos I could much more easily share all the details of my current digital workflow and much more easily incorporate additional new tips, techniques, and tools as I went. And so, The Digital Basics III Video Series was born. The five videos (with 15 image optimizations in all) will be most valuable for folks using the latest version of Photoshop (2024) or Lightroom along with Topaz DeNoise AI and Topaz Sharpen AI.
Typos
With all blog posts, feel free to e-mail or to leave a comment regarding any typos or errors.
While we continue to battle the wind against sun conditions, we have continued to make some very fine images each and every session. You can see three of those in today’s blog post. Your comments on each image are welcomed.
On Thursday morning there were five of us in good position to create some pre-dawn skimmer blurs. Rob from Maryland, a very nice man who had been hanging with us for a few days, asked if we should all go closer. I said that I thought that there was no need to do so. We all stayed and enjoyed some excellent blastoff action.
The distance from Point Lookout (to the east) to the Silver Point Jetty in Atlantic Beach (to the west) is about 10 miles. We had all noted a tame young Great Black-backed Gull standing on the smooth sand near the ocean. Anyhoo, the gull was no more than 10 yards from us when suddenly it flew up and dove into the water just a few feet from shore. It emerged with a foot long baby Sand Shark (Dogfish) in its bill. It took about five minutes to subdue and then swallow its prey. The five lucky photographers created more than a few images in that relatively short time. What luck that the gull got lucky in plain sight right in front of five bird photographers. Photos soon.
When the action was over, I asked Rob (with a smile on my face), “Are you glad that we did not all move up?”
Today is Friday 16 August 2024. We learned that the pale sunrises have been due to both marine haze and smoke from western US wildfires. After another excellent blast-off blur session at the beach, made a wiggle. Thanks to a great tip from good friend longtime NYC birder Peter Post, we found and photographed about a dozen juvenile Yellow-crowned Night-Herons at a nearby marina. Geri and I went for portraits and head shots and Anke went for flight. All of us succeeded. No surprise at all.
This image was created on 15 August 2024 on the first morning of the (extended) Combo IPT by Geri George. Seated on damp sand she used the knee pod technique with the hand held Sony FE 200-600mm f/5.6-6.3 G OSS lens (at 600mm) and The One, the Sony Alpha 1 Mirrorless digital camera. ) The exposure was determined using Zebra technology with ISO on the Thumb Dial. ISO 6400. 1/3200 second at f/6.3 (wide-open) in Manual Mode. AWB at 8:05:31am on a barely sunny morning with the sun muted by thick haze to the east. RawDigger showed the exposure to be dead-solid perfect.
Tracking: Zone AF-C with Bird Face/Eye Detection performed perfectly. Click on the image to enjoy a larger, sharper high-res version.
Image #1: American Oystercatcher juvenile flapping after bath
Image courtesy of and copyright 2024 Geri Georg
Geri Georg
With about two decades between IPTs, Geri Georg attended a Spring DeSoto IPT this past May. She had so much fun and learned so much that she returned for the Combo IPT. Geri is one of my many Canon to Sony converts. In short, she says with a big smile, “I love it!” She has never had a problem making sharp images. By learning and using Sony Zebras, she is constantly nailing her exposures. And she is an excellent student. I teach, pick the shutter speed that you need to make a sharp image and increase the ISO (using the Thumb Wheel) until you see some Zebras on the highlights (live in the viewfinder before you press the shutter button). There is no need to create and evaluate a test image to consistently cone up with perfect exposures. Anyhoo, Geri came up with the perfect ISO for the situation without even noticing that she was at ISO 6400! Image optimization by yours truly, BIRDS AS ART.
She has absolutely loved being on the beach with the skimmers and the terns.
Tracking: Zone/AF-C was active at the moment of exposure and performed perfectly. Be sure to click on the image to enjoy the larger version.
Image #2: American Oystercatcher buzzing first summer Great Black-backed Gull
Image courtesy of and Copyright 2024: Anke Frohlich Photogrpahy
Action Anke
Anke loves to photograph birds in flight and in action. She almost always sets up with a very fast shutter speed even when working in low light conditions and thus needs very high ISOs. “I will always go for action over the art shots. I need to be ready,” she says. When Anke saw the adult oystercatcher begin attacking the gull to protect its two chicks, she moved back quickly (human zooming so to speak) while staying on sun angle. When she’d see the oystercatcher fly at the large predator, she would raise her lens, acquire focus on the gull’s head, and begin firing. Her timing was perfect for Image #2.
While she was making this great image, I was sitting in about a foot of Atlantic Ocean water trying to avoid being knocked on my ass by the occasional small wave. I was way off sun angle and got nothin’.
You can see more of Anke’s excellent bird photography on her Instagram page here or check her out further online here.
This image was created by Arthur Morris at Nickerson Beach while leading the first (extended) Combo IPT. Seated on damp sand he used the heel pod technique with the I used the hand held Sony FE 300mm f/2.8 GM OSS lens (Sony E) with the Sony FE 2x Teleconverter and The One, the Sony a1 Mirrorless Camera. The exposure was determined using Zebra technology with ISO on the Thumb Dial. ISO 1250. 1/1250 second at f/6.3 (stopped down 1/3-stop in error) in Manual Mode. AWB at 6:54:34pm late on a sunny afternoon. RawDigger showed the raw file brightness to be perfect.
Tracking: Expand Spot AF-C AF with Bird Face/Eye Detection performed perfectly. Be sure to click on the image to enjoy a high-res version.
Image #3: American Oystercatcher male atop a mound in gorgeous light
Art for artie
Anke calls images like this beauty shots. I call them BIRDS AS ART — clean, tight, graphic, and colorful with a lovely, de-focused background. And the somewhat patriotic color scheme works for me as well. When I saw this bird pause atop a clean mound of sand, I hustled to my right to get on sun angle, flipped out the rear screen, put on my reading glasses, and prayed for the bird to stay for a few moments as I sat down slowly so as not to scare him off. I supported the lens with between my heels quickly found the bird in the viewfinder, and fired about two dozen frames, the first 12 at the exposure above, and then another 12 1/3 stop lighter. Only two of the slightly darker frames had the perfect head angle.
The key to the success of this image was that with the bird elevated on a rise, the Atlantic Ocean blue background was a relative mile away from the bird. The resulting image was exactly what I had envisioned when I saw the bird on the smooth mound of sand.
Typos
With all blog posts, feel free to e-mail or to leave a comment regarding any typos or errors.
Please remember that the blog is designed to be interactive, to make you think, to help you become a better photographer, to inspire you, and to help you to develop both your eye for image design and your creativity. Toward that end, while considering the fact that this blog post took more than two hours to create, please consider taking a minute or two to comment on the images or to answer the image design question below.
Your Call?
Which of today’s three featured images is your favorite? Please leave a comment and let us know why you make your choice?
What’s Up?
Photography at Nickerson Beach continues to be both challenging and productive. On Monday morning, I took the 600 and a tripod into the field for the first time in about ten days. I’d been doing most of my work with the 300mm f/2.8, either TC, and either camera body (the a-1 or the a9 iii).
Today is Tuesday 13 August 2024. I will again be heading out early to deal with allegedly clear skies and a SW wind, a very challenging situation. I hope that you too opt to have a great day. The afternoon weather looks perfect for my afternoon session with repeat private session client Marc Wortsman.
Please remember to use the B&H links that are found on most blog pages and to use the BIRDSASART discount code at checkout when purchasing your new gear from Bedfords to get 3% back on your credit card and enjoy free second-day air FedEx. Please, also, consider joining a BAA IPT. You will be amazed at how much you will learn!
If an item — a Delkin flash card, or a tripod head — for example, that is available from B&H and/or Bedfords, is also available in the BAA Online Store, it would be great, and greatly appreciated, if you would opt to purchase from us. We will match any price. Please remember also to use my B&H affiliate links or to earn 3% cash back at Bedfords by using the BIRDSASART discount code at checkout for your major gear purchases. Doing either often earns you free guides and/or discounts. And always earns my great appreciation.
Supporting My Efforts Here
If you enjoy and learn from the blog, please consider using one of my affiliate links when purchasing new gear. It will never cost you a single penny. To support my effort here, please order from B&H by beginning your search here. Or, click here, to order from Bedfords and enter the discount code BIRDSASART at checkout to receive 3% cash back to your credit card and enjoy free Second-Day Air Fed-Ex shipping. It is always best to write for advice via e-mail.
In many cases, I can help you save some serious dollars. And/or prevent you from purchasing the wrong gear.
Save 15%!
If you’d like to try out a new lens or if you need a lens for a specific trip or project (or for an IPT), LensRentals.com is the only way to go. To save 15%, simply click on the logo link above, arrange for your rental, and type in BIRDSASART15. If you type the gear you are looking for in the search box, it will pop right up. LensRentals.com offers affordable insurance. You can decline it, opt for LensCap: Damage Only, or select LensCap: Damage & Theft. Then hit PROCEED TO CHECKOUT. After you enter all of your info but before completing your order, be sure to scroll down to Promo Code box and enter the BIRDSASART15 code to save 15%.
I checked on renting a Sony FE 70-200mm f/2.8 GM OSS II lens for a week. The cost is only $122.00. LensCap: Damage Only coverage can be added for a very low $18.00. Going with LensCap: Damage & Theft would be $27.00. The shipping charge varies. They offer an interesting program called Lensrentals HD. By signing up for this shipping discount program ($99.00/year), you’ll get free Standard Shipping on all the orders you place.
Renting a Sony 600mm f/4 GM OSS lens for a week will cost you $536.00. The two coverage options come in at $76.00 or $114.00. Less your 15% discount when you enter the BIRDSASART15 code into the Promo Code box at checkout and enter the BIRDSASART15 code in the Promo Code box at checkout to save 15%.
Remember, to save the 15% on your rental you must start your search by clicking on the logo above, or on this link: LensRentals.com
B&H
To ensure that I get credit for your B&H purchases, you can always click here. The tracking is invisible but greatly appreciated. And, you can use your PayBoo card. You must use the website to order. B&H will reopen on Fri April 14. Thanking me for the past 4000 educational blog posts could not be any easier and will not cost you one penny. Please shoot me your B&H receipt for major purchases.
Many folks have written recently stating that they purchased a Sony a1 from B&H and would like their free membership in the Sony 1 Info and Updates Group, a $150.00 value. When I check my affiliate account, their orders have not been there. When I let them know that they get credit for B&H purchases only if they use one of the many B&H affiliate links on the blog or begin their searches with this link, they are always disappointed. If in doubt, please contact me via e-mail and request a BH link. I am always glad to help and to guide you to the right gear.
Bedfords Simplified
Click here to start your search. Choose standard shipping, and when you get to the payment page, enter BIRDSASART in the discount code box and hit apply. You will be upgraded to free second day air Fed-Ex and receive 3% cash back on your credit card once your stuff ships. Either is greatly appreciated by yours truly.
Bedfords Amazing BAA Discount Policy
Folks who have fallen in love with Bedfords can now use the BIRDSASART coupon code at checkout to enjoy a post-purchase, 3% off-statement credit (excluding taxes and shipping charges) on orders paid with a credit card. The 3% credit will be refunded to the card you used for your purchase. Be sure, also, to check the box for free shipping to enjoy free Second Day Air Fed-Ex. This offer does not apply to purchases of Classes, Gift Cards, prior purchases.
Visit the Bedfords website here, shoot Steve Elkins an e-mail, or text him on his cell phone at (479) 381-2592.
Gear Questions and Advice
Too many folks attending BAA IPTs and dozens of photographers whom I see in the field and on BPN, are — out of ignorance — using the wrong gear, especially when it comes to tripods and more especially, tripod heads. And the same is true in spades when ordering new camera bodies or lenses. My advice will often stave you some serious money and may help you avoid making a seriously bad choice. Please know that I am always glad to answer your gear questions via e-mail. If you are desperate, you can try me on my cell at 863-221-2372. Please leave a message and shoot me a text if I do not pick up.
This image was created on 7 August 2024 at Nickerson Beach Park, Lido Beach, Long Island, NY. While crouching a bit on the beach below the berm, I used the handheld Sony FE 70-200mm f/2.8 GM OSS II lens with the Sony FE 2x teleconverter (at 400mm), and The One, the Sony Alpha 1 Mirrorless Digital Camera.. The exposure was determined via Zebras with Exposure Compensation on the Thumb Dial. Multi metering +1.3 stops. AUTO ISO set ISO 3200: 1/60 sec. at f/5.6 (wide open) in Shutter Priority mode. AWB at 6:20:51am on a totally cloudy morning.
Tracking: Expand Spot AF/C with Bird-Eye/Face Detection performed perfectly. Click on the image to enjoy a high-res version.
Image #1: Black Skimmer with baitfish for chick
Sometimes, I am Just Plain Lazy …
The morning of August 7th dawned dark and dreary and I was feeling a bit lazy as I exited my SUV in the parking lot. So, not planning on having a great morning, I grabbed the a1, the 70-200 f/2.8 II, and both TCs. Hoping for some spectacular blastoffs, I set up in Shutter Priority mode. But the skimmers had other thoughts. So I looked to the north at the birds on the beach with the berm serving as sort of a hide for me and was able to get fairly close to this skimmer without bugging it.. I had only to crouch a bit to get eye level with the birds. I created about a dozen images before it flew off in search of its chick. Working at 400mm, I had chosen the borderline shutter speed of 1/60 second; only two were sharp.
This image was also created on 7 August 2024 at Nickerson Beach Park, Lido Beach, Long Island, NY. Seated on damp sand, I employed the knee-pod technique with the handheld Sony FE 70-200mm f/2.8 GM OSS II lens with the Sony FE 2x teleconverter (at 308mm), and The One, the Sony Alpha 1 Mirrorless Digital Camera.. The exposure was determined via Zebras with Exposure Compensation on the Thumb Dial. Multi metering +2.3 stops. AUTO ISO set ISO 800: 1/13 sec. at f/5.6 (wide open) in Shutter Priority mode. AWB at 6:23:30am on a totally cloudy morning.
Tracking: Expand Spot AF/C with Bird-Eye/Face Detection performed perfectly. Click on the image to enjoy a high-res version.
Image #2: American Oystercatcher in surf
A Quasi Jiggle Blur
When handholding at 500mm with a very slow shutter speed, like 1/13 second, it is virtually impossible to create sharp images (unless the lens is firmly supported as it would be by placing the lens hood on the ground with your left hand on the ground beneath the camera body — I made some neat images with blurred wave backgrounds recently using this technique at 1/15 second and will share one or two of them with you here soon.)
Back to the oystercatcher blur — as I could not keep the lens perfectly still for this image, I got the effect of a jiggle blur, usually created by a slight circular shaking of the lens. In any case, I like the result but for the double eye in the original. So, I did some neat Eye Doctor work with the Clone Stamp Tool and a series of small Quick Masks each resized and Warped and then refined by the addition of a Regular Layer Mask. That after easily removing a young oystercatcher that had been standing next to the adult. You can see the original in the new YouTube video that was featured here in the last blog post.
I love the streamlined swoosh-shape of the re-crafted eye as it seems to suggest speed and forward motion.
A Guide to Pleasing Blurs
Learn everything there is to know about creating pleasingly blurred images in A Guide to Pleasing Blurs by Denise Ippolito and yours truly. This 20,585 word, 271 page PDF is illustrated with 144 different, exciting, and artistic images. The guide covers the basics of creating pleasingly blurred images, the factors that influence the degree of blurring, the use of filters in creating pleasing blurs, and a great variety of both in-the-field and Photoshop techniques that can be used to create pleasingly blurred images.
Artie and Denise teach you many different ways to move your lens during the exposure to create a variety of pleasingly blurred images of flowers and trees and water and landscapes. They will teach you to recognize situations where subject movement can be used to your advantage to create pan blurs, wind blurs, and moving water blurs. They will teach you to create zoom-blurs both in the field and during post-processing. Artie shares the techniques that he has used and developed for making blurred images of flocks of geese in flight at his beloved Bosque del Apache and Denise shares her flower blur magic as well as a variety of creative Photoshop techniques that she has developed.
With the advent of digital capture creating blurred images has become a great and inexpensive way to go out with your camera and have fun. And while many folks think that making successful blurred images is the result of being a sloppy photographer, nothing could be further from the truth. In “A Guide to Pleasing Blurs” Artie and Denise will help you to unleash your creative self.
This image was also created on 7 August 2024 at Nickerson Beach Park, Lido Beach, Long Island, NY. Standing at full height, I used the handheld Sony FE 70-200mm f/2.8 GM OSS II lens (at 200mm), and The One, the Sony Alpha 1 Mirrorless Digital Camera.. The exposure was determined via Zebras with ISO on the Thumb Dial. ISO 1250: 1/80 sec. at f/5.6 (stopped down two stops) in Manual mode. AWB at 7:25:56am on a then cloudy morning.
Tracking: Expand Spot AF/C with Bird-Eye/Face Detection performed perfectly. Click on the image to enjoy a high-res version.
Image #3: Euphorbia polygonifolia
Captivated by a Low Growing Plant
I had been looking at this specific plant for more than a week before I created the successful image above. I loved the oval shape and the soft vibrant colors. I first photographed it with my iPhone 15; I optimized the raw file but the resulting image simply did not cut it. On my lazy 7 August morning, as I headed back to my car early, I made it a point to swing by the tiny (about 5 inches in width) sandmat plant. The soft light was perfect. With its fabulous close focus, the amazingly versatile 70-200mm lens at 200mm turned out to be the very best tool for the job. Note that I needed ISO 1250 to get to +2 stops of light on the analogue scale and that I stopped down two full stops from f/2.8 to f/5.6 to provide enough depth-of field to cover the leaves and the stems.
As you saw or can see in the above-mentioned video, the original for this image looked dull and washed out as it should have been. The relatively new Luminance Targeted Adjustment Tool allowed me to easily juice up the colors to taste in a matter of moments.
An Image Design Question
Does the centered image design for this oval-shaped subject work for you or would you have preferred a more angular approach by rotating the plant or a different crop?
Euphorbia Polygonifolia
Euphorbia polygonifolia, known by the common names of seaside sandmat and seaside spurge, is a member of the spurge family, Euphorbiaceae. It is an annual herb, native to the east coast of the United States where it grows on coastal sand dunes of the Atlantic Ocean as well as along the shores of the Great Lakes. This plant is potentially threatened by development, coastal erosion, recreational activities, invasive species, and succession. Contact with the latex of seaside sandmat can cause poison ivy-like symptoms.
Typos
With all blog posts, feel free to e-mail or to leave a comment regarding any typos or errors.
I am between extended IPTs without any clients. The Killing Shoreline is once again open for business on Saturday morning. Pretty much in the dark, I saw a Great Black-backed Gull approach, kill, and rip apart a surf-weakened Black Skimmer fledging — see the two ISO 12800 images at the end of the video. Later in the morning I saw two other young skimmers meet their demise.
I always root for the predators and I always let nature take its course (except when humanity is the immediate cause of a bird’s problems).
Saturday afternoon was fantastic with afternoon sun and a nice wind from the SW that had dozens of young skimmers flying right at me while practicing skimming. The only thing that they were catching was seaweed.
Sunday morning was strange. It began cloudy very dark with practically no wind at all and would up mixed sun and clouds with a northeast wind. I worked very hard without much payoff. Maybe I will find one great one …
Nope. Just finished editing and breakfast. Breakfast was the clear winner.
Seventeen Before and After Nickerson Beach Images
Check out 17 raw files, hear my plans for improving them in Photoshop, and then compare the originals with the optimized files. Some of the changes are minor, some fairly astounding. Learn a lot about how and what I see in the field and what I can do on my laptop.
If you like what you saw, you will want to check out the Digital Basics II PDF here and the The Digital Basics III Video Series here. Details below.
The BIRDS AS ART Current Workflow e-Guide (Digital Basics II).
You can order your copy from the BAA Online Store here, by sending a PayPal for $40 here, or by calling Jim or Jennifer weekdays at 863-692-0906 with your credit card in hand. Be sure to specify Digital Basics II.
The BIRDS AS ART Current Workflow e-Guide (Digital Basics II)
The techniques mentioned above and tons more great Photoshop tips and techniques — along with my complete digital workflow, Digital Eye Doctor Techniques, and all my personalized Keyboard Shortcuts — are covered in detail in the BIRDS AS ART Current Workflow e-Guide (Digital Basics II), an instructional PDF that is sent via e-mail. Note: folks working on a PC and/or those who do not want to miss anything Photoshop may wish to purchase the original Digital Basics along with DB II while saving $15 by clicking here to buy the DB Bundle.
Please note: the Divide and Conquer technique was inadvertently omitted from DB II. It is detailed in a free excerpt in the blog post here.
Folks who learn well by following along rather than by reading can check out the complete collection of MP 4 Photoshop Tutorial Videos by clicking here. Note: most of the videos are now priced at an amazingly low $5.00 each.
You can learn how and why I converted all of my Canon digital RAW files in DPP 4 in the DPP 4 RAW Conversion Guide here. More recently, I became proficient at converting my Nikon RAW (NEF) files in Adobe Camera Raw. About three years ago I began converting my Nikon and Sony RAW files in Capture One and did that for two years. You can learn more about Capture One in the Capture One Pro 12 Simplified MP4 Video here. The next step would be to get a copy of Arash Hazeghi’s “The Nikon Photographers’ Guide to Phase One Capture One Pro e-Guide” in the blog post here. Today, I convert my Sony raw files in Photoshop with Adobe Camera Raw.
You can learn advanced Quick Masking and advanced Layer Masking techniques in APTATS I & II. You can save $15 by purchasing the pair.
The Digital Basics III Video Series
The Digital Basics III Video Series
I realized about a year ago that my digital workflow had changed significantly and was toying with the idea of writing a Digital Basics III. More recently, I learned and begun working with two great new Photoshop Tools, the Remove Tool and the Luminance Targeted Adjustment Tool. The former is like a smarter Spot Healing Brush Tool on steroids and the latter is a step up from the fabulous Color Mixer Tool. During that same time frame, I came up with a new and improved 2-step noise reduction technique. I still use Divide and Conquer, Quick Masks, Layer Masks, an expanded array of personalized keyboard shortcuts, and tons of other stuff from both versions of Digital Basics.
As soon as I realized that I did not want to take on another large writing project, I realized that by creating a series of videos I could much more easily share all the details of my current digital workflow and much more easily incorporate additional new tips, techniques, and tools as I went. And so, The Digital Basics III Video Series was born.
Order the first five videos in Volume I by clicking here. The videos will be most valuable for folks using the latest version of Photoshop (2024) or Lightroom along with Topaz DeNoise AI and Topaz Sharpen AI.
Typos
With all blog posts, feel free to e-mail or to leave a comment regarding any typos or errors.
The forecast on Tuesday for Lido Beach was for rain all day on Wednesday, Thursday, Friday, and Saturday. Other than a light mist here and there, it did not rain at all on Wednesday or Thursday. I went out early on Wednesday morning, made some nice blurs, photographed a lovely beach plant, and had an encounter with the week-old skimmer chick that is featured in today’s post.
On Wednesday afternoon I wanted to treat Pat Fishburne to a nice thank you lunch at Wild Ginger in Rockville Center but she kindly insisted on treating me instead. Then I drove her to an airport hotel for her early Thursday morning JFK to Fort Myers flight. I will be sharing some of her amazing images with y’all here soon.
Today is Friday 9 August 2024. The forecast is again calling for rain all day. My plan is to head to the beach early unless it is pouring.
Whatever you are doing, I hope that you have fun too.
Note the versatility of the 70-200 lens in Images #1 and #2. I will be sharing other images made that morning in a future blog post.
70-200mm f/2.8 Minimum Focusing Distance (MFD) Tip
In most systems, the 70-200mm f/2.8 lenses offer excellent MFDs.The MFDs vary as you zoom in and out; the longer the focal length the closer you can focus.
When you can get really, really close to your subject, you need to pay attention to make sure that you are not too close to focus. Working in Continuous AF, make sure that focus has been attained by watching the AF point or points in the viewfinder. If they stabilize where you want them to, the bird’s eye for example, you are good to go. If they continue to dance around, you are too close and need to move back at least a few inches.
On occasion, I have created long series of image only to find out on the laptop that none were sharp. Why? I had been too close and not paying attention to the details.
Your Call?
1- What happened with the skimmer chick that morning?
2- Do you think that the chick will survive?
This image was created on 7 August 2024 at Nickerson Beach, Long Island, NY. Seated on damp sand, I used the hand held Sony FE 70-200mm f/2.8 GM OSS II lens (at 200mm) and The One, the Sony Alpha 1 Mirrorless Digital Camera.. The exposure was determined via Zebras with Exposure Compensation on the thumb dial. Multi Metering + 2 1/3 stops in S (Shutter Priority) mode. AUTO ISO set ISO 2500. 1/125 sec. at f/2.8 (wide open). AWB at 6:48:31am on a totally overcast, threatening to rain morning.
Tracking: Expand Spot S AF/C with Bird-Eye/Face Detection performed perfectly. Click on the image to enjoy a high-res version.
Image #1: Black Skimmer, weak, exhausted chick about one week old
This image was also created on 7 August 2024 at Nickerson Beach, Long Island, NY. Now lying on the damp sand, I used the hand held Sony FE 70-200mm f/2.8 GM OSS II lens (this time zoomed out to 80mm) and The One, the Sony Alpha 1 Mirrorless Digital Camera.. The exposure was determined via Zebras with Exposure Compensation on the thumb dial. Multi Metering + 2 stops in S (Shutter Priority) mode. AUTO ISO set ISO 1600. 1/125 sec. at f/2.8 (wide open). AWB at 6:48:59am on a totally overcast, threatening to rain morning. I activated the in-viewfinder level as I was in quite an awkward position.
Tracking: Expand Spot S AF/C with Bird-Eye/Face Detection performed perfectly. Click on the image to enjoy a high-res version.
Image #2: Black Skimmer, weak, exhausted chick about one week old facing a big challenge
The raw file for this image, also created on 7 August 2024 at Nickerson Beach, Long Island, NY, was made with the iPhone 15.
Image #3: Black Skimmer, weak, exhausted chick about one week old in my hand
The raw file for this image, also created on 7 August 2024 at Nickerson Beach, Long Island, NY, was made with the iPhone 15.
Image #4: Left of the bottom of the sign post, note the weak, exhausted skimmer chick in a scrape inside the colony ropes
Typos
All questions and comments are welcome. With all blog posts, feel free to e-mail or to leave a comment regarding any typos or errors.
Which of today’s three featured images is the strongest? If you are so kind as to leave a comment, please let us know why you made your choice.
What’s Up?
The images that 86-year old, new-to-Sony Pat Fishburne has been making at Nickerson Beach with her 300mm f/2.8 GM/a9 iii rig have astounded me. And they have astounded her as well. Images and more soon. And I am pretty darned sure that they will astound you too.
Today is Wednesday 7 August 2024. The current forecast is for four straight days of nonstop rain. We shall see. I am betting that I will be making a few good images between now and Saturday.
Fresh caught Alaskan seafood caught sustainably. Save $20 on your first order by clicking here.
Wild Alaska Salmon and Seafood Company
Ever since my two daughters sent me a big box of salmon filets and sea scallops from Wild Alaska Salmon and Seafood Company for my birthday a few years ago, I have been ordering salmon and scallops from them. Now that Junior’s Fish Market in Lake Wales is closing, I will be depending on Wild Alaska every month. I always order Sockeye filets and the Sea Scallops. The stuff comes frozen solid, is easy to prepare, and tastes pretty much as good as the fresh stuff would.
You can save $20 on your first order by clicking here. Eating wild caught seafood is about as healthy as you can go. The scallops are a real treat. When you sear them, be sure to cook them in the liquid that comes in the bag and be sure also not to overcook them. I bake or broil the lightly seasoned salmon filets skin side down in olive or coconut oil. Crisp the skin and eat it as it contains the most nutrients.
Buy Direct from the Fisherman
Captain Tony has been fishing in Alaska since 1990. Wild Alaska is famous for their wild caught Sockeye and King Salmon! All of their other fish and seafood, including Ahi Tuna, Shrimp, Scallops, Cod, etc., are responsibly sourced, caught the right way and closely inspected by Capt. Tony to meet their high standards for quality and freshness. They catch and process all 5 species of wild pacific salmon, and source their other seafood products from high quality sustainable fisheries.
The stuff tastes great and is good for you. Internet orders to the continental United States are shipped from their fulfillment center in the Midwest allowing their seafood products to reach US customers in perfect condition. The flavor and texture of their salmon and other products remain fresher than fresh is because the stuff is frozen the same day it is caught.
Note
Nutritionally, if you are eating farm-raised salmon, you might as well be eating pop tarts. Sockeye salmon has the highest amount of Omega 3 of any fish with approximately 2.7 grams per 100-gram portion. Therefore, just one serving of Alaska salmon per week can help to lower cholesterol and the risk of heart disease. Scallops are widely considered one of the healthiest seafoods. Made up of 80% protein and sporting a low fat content, they can help you feel fuller longer and are rich in vitamins and minerals. They are also a great source of antioxidants. Dr. Morris 🙂
Canon EF 70-200mm f2.8L IS II USM Lens
BIRDS AS ART Record Low Price!
Mark Harrington is offering a Canon EF 70-200mm f2.8L IS II USM in excellent plus condition (the glass is pristine) for a BIRDS AS ART record low $647.00. The sale includes the lens with front and rear caps, original product box, manual and software, Lens case LZ1326 and Lens Hood and insured ground shipping via major courier to lower-48 US addresses only.
Your item will not ship until your check clears unless other arrangements are made.
Please contact Mark via e-mail at e-mail or by phone at 1-612-308-5776 MST.
The versatile 70-200mm f/2.8 lenses have long been big favorites of many nature photographers. They are great for landscapes especially with fall color peaking in many areas. I have used this lens with Canon and Nikon and SONY. I used my Canon version to photograph granddaughter Maya’s dance recitals and to create bird-scapes and pre-dawn blast-off blurs at Bosque del Apache NWR in New Mexico. They are fast and sharp and have 1000 uses. The 70-200 f/2.8 lenses are a specialty lens for bird photographers. Like the bad little child, when they are good, they are really, really good! I’ve used mine mostly for flight photography at point blank range where their performance is unmatched, especially in low light. I’ve killed with these lenses on the gannet boat in the UK, in Homer for eagles, for pre-dawn and blizzard blast-offs at Bosque, and at Merritt Island on feeding sprees right next to the road. Lenses in this class are easily hand holdable by just about everyone. artie
ps: To see what the 70-200 zoom lenses can do, see the blog post here.
Canon EF 24-70mm f/2.8L II USM Lens
BIRDS AS ART Shock-the World Record Low Price!
Mark Harrington is offering a Canon EF 24-70mm f/2.8L II USM in excellent plus condition (the glass is pristine) for a BIRDS AS ART shock-the-world record low $599.00. The sale includes the lens with front and rear caps, Lens Case LP1219 and Lens Hood EW-88C, Lens instructions, original box, insured ground shipping via major courier to lower-48 US addresses only. Your item will not ship until your check clears unless other arrangements are made.
Please contact Mark via e-mail at e-mail or by phone at 1-612-308-5776 MST.
The 24-70II is the serious landscape photographer’s dream lens. There is a used copy on B&H that sells for $1,442.00! So, you can save a ton by grabbing Mark’s copy today. artie
Zone AF-C AF with Bird Face/Eye Detection performed perfectly. Be sure to click on the image to enjoy a high-res version.
Image #1: Black Skimmer — large chick running at full speed with wings raised
Superior Sony a9 iii AF
In action situations similar to Image #1, Sony a1 AF will fail to grab the eye perhaps 90% of the time and grab the wing. Sony a9 iii AF will nail the eye more than 90% of the time.
As compared to the a9 iii, colors with the a1 are richer (especially in the golden light of early morning and late afternoon), and sharp a1 raw files are of higher image quality with more fine feather detail. But what good are more pleasing color and superior image quality if the images are not razor sharp?
This image was created on 4 August 2024 at Nickerson Beach Park, Lido Beach, Long Island, NY on the 2nd Nickerson Beach (extended) IPT. Seated on dry sand, I used the hand held Sony FE 300mm f/2.8 GM OSS lens (Sony E) with the Sony FE 1.4x Teleconverter and the ridiculously amazing Sony a9 III Mirrorless Camera. The exposure was determined using Zebra technology with ISO on the Thumb Dial. ISO 1600. 1/3200 second at f/4 (wide open) in Manual Mode. AWB at 7:54:01am on a cloudy morning. RawDigger showed the raw file brightness to be perfect.
Zone AF-C with Bird Face/Eye Detection performed perfectly. Be sure to click on the image to enjoy a high-res version.
Image #2: Black Skimmer — large chick, short practice flight
Orvilles
For fairly obvious reasons, avian researchers studying tern and skimmer chicks that are struggling to learn to fly call such young birds “Orvilles.” That in honor of the efforts of
American aviation pioneers Orville and Wilbur Wright. The Wright brothers crashed many early versions of the Wright Flyer in the sandy hills south of Kitty Hawk, North Carolina. When the young birds are first learning to fly, their landings are often comical wrecks.
Pat Fishburne and I were seated on the sand in range of several young skimmers. The bird in the photo ran toward us twice flapping its wings. When it walked back to the rusty fence post again, we got ready. The third time was the charm and the a9 iii nailed the eye!
This image was created on 4 August at Nickerson Beach Park, Lido Beach, Long Island, NY on the 2nd Nickerson (extended) IPT. Standing at full height on the berm, I used the hand held Sony FE 300mm f/2.8 GM OSS lens (Sony E) with the Sony FE 1.4x Teleconverter and the ridiculously amazing Sony a9 III Mirrorless Camera. The exposure was determined using Zebra technology with ISO on the Thumb Dial. ISO 2500. 1/3200 second at f/4 (wide open) in Manual Mode. AWB at 6:39:22am on an overcast morning. RawDigger showed the raw file brightness to be perfect.
Zone AF-C with Bird Face/Eye Detection performed perfectly. Be sure to click on the image to enjoy a high-res version.
Image #3: Black Skimmer — fledged, flying juvenile
From Egg to Expert Flyer
At about four weeks after hatching as virtually helpless (but precocial) chicks, most young skimmers are making their first flights. A week later, they are confident flyers capable of skimming and catching fish on their own. The transformation from tiny chicks to strong fliers in such a short time is remarkable.
Right now at Nickerson there are still newly hatching chicks along with dozens of fledged and flying young. Along with many hundreds of young skimmer of all sizes and ages in between. Though we have not seen a Great Black-backed Gull grab a young skimmer and rip it apart, it will not be long till that happens. We did see a large, fledged skimmer chick that was injured and flopping helplessly on the beach. The researchers picked it up on Tuesday morning. All young beach nesting birds do not make it.
Typos
All questions and comments are welcome. With all blog posts, feel free to e-mail or to leave a comment regarding any typos or errors.
Which version (of basically the same image) do you like best? Why?
What’s Up?
After seven days of photography and learning, Monte Brown left on Saturday morning for his 1 1/2 day drive back to Indiana. Heading north ahead to beat Tropical Storm Debby, 86-year old Pat Fishburne few in a day early on Saturday afternoon. I picked her up at a totally insane JFK. There was zero traffic on the way to the airport and then it took me 20 minutes to make my way through the huge line of cars trying to get to C4 at Terminal 4 (Delta pick-up). Pat was very glad to see me as she had walked about a mile from her gate to baggage claim! We enjoyed a quick visit to the beach after dinner as Pat re-acquainted herself with her Sony gear.
Today is Sunday 4 August and we will be headed to the beach early. The forecast — completely cloudy with a light breeze from the SW is not bad. I am hoping to get in a long session this morning as bad weather may be on the way. Wherever you are and whatever you are doing, I hope that you too have a great day.
Please remember to use the B&H links that are found on most blog pages and to use the BIRDSASART discount code at checkout when purchasing your new gear from Bedfords to get 3% back on your credit card and enjoy free second-day air FedEx. Please, also, consider joining a BAA IPT. You will be amazed at how much you will learn!
If an item — a Delkin flash card, or a tripod head — for example, that is available from B&H and/or Bedfords, is also available in the BAA Online Store, it would be great, and greatly appreciated, if you would opt to purchase from us. We will match any price. Please remember also to use my B&H affiliate links or to earn 3% cash back at Bedfords by using the BIRDSASART discount code at checkout for your major gear purchases. Doing either often earns you free guides and/or discounts. And always earns my great appreciation.
Supporting My Efforts Here
If you enjoy and learn from the blog, please consider using one of my affiliate links when purchasing new gear. It will never cost you a single penny. To support my effort here, please order from B&H by beginning your search here. Or, click here, to order from Bedfords and enter the discount code BIRDSASART at checkout to receive 3% cash back to your credit card and enjoy free Second-Day Air Fed-Ex shipping. It is always best to write for advice via e-mail.
In many cases, I can help you save some serious dollars. And/or prevent you from purchasing the wrong gear.
Summer On Long Island
Check out the August Nickerson Beach (& JBWR Co) IPT offerings here or scroll down and consider joining us to learn a ton, make lots of great images, and improve your image processing skills.
Photo Mechanic screen capture for the Backlit Black Skimmer in flight image image
Photo Mechanic Screen Capture
With yet another wind against sun morning (SW at 6mph), we arrived at Nickerson by 5:00am to get in position to try for some backlit red light images. But a fairly substantial cloud to the east yielded orange/yellow/pink light instead. And because it was high tide — there was no flat beach available– I hate the tire tracks on the beach above the berm, we worked the south edge of the colony. With the sun rising just north of east, we enjoyed a bit of sky color. After some early incoming flight at 600mm, I went to the 2T TC for some backlit small skimmer chick images. All in all it was another great morning despite the challenging conditions.
Consider this question before scrolling down: If you saw the raw file above on your laptop, what would your image optimization plans be? What would you do with the color? How would you crop it?
Shooting Flight Off the Tilted Rear Monitor
Low level flight photography with a long lens when working off the tilted rear monitor of your mirrorless camera body is a huge challenge. It takes lot of practice. In addition, you are trying to anticipate the flight paths of birds flying towards you (the latter with the right wind direction, of course.) I went with a generic +1 Exposure Compensation as the tonality of the sky varied as you got closer to the muted sun. I instructed Monte and Anke Frohliach to look for birds flying below the sun and above the beach vegetation, the middle zone so to speak (with the most color).
This image was created on 2 August 2024 on the last morning of the first Nickerson Beach (extended) IPT. Seated on dry sand behind my flattened Robus RC-5570 Vantage Series 3 Carbon Fiber Tripod/Levered-Clamp FlexShooter Pro-mounted Sony FE 600mm f/4 GM OSS lens with The One, the Sony Alpha 1 Mirrorless Digital Camera). The exposure was determined via Zebra technology with Exposure Compensation on the thumb dial. Multi metering + 1 stop — AUTO ISO set ISO 2500. 1/3200 sec. at f/4 (wide open) in Manual mode. When evaluated in RawDigger, the raw file brightness was determined to be perfect. AWB at 6:11:40am on a then barely sunny morning.
Image #1: Backlit Black Skimmer juiced up pano crop
Bold, Bright, and Graphic
Yes. This image was created from the raw file that opened this blog post. It is a somewhat radical, seriously jazzed up version and was my first effort with this photo. Getting the clean, bright, tight, high contrast, colorful, graphic look was the result of following my basics workflow and juicing up the color in several ways.
The way we choose the look of our images is determined by the artist within each us.
This is a more neutral version of the same image with the foreground included.
Zone/AF-C with Bird-Eye/Face Detection performed perfectly. Be sure to click on the image to enjoy a high-res version.
Image #2: Backlit Black Skimmer in flight above the colony
As you see in today’s three featured images, optimizing early morning or late afternoon backlit photos is quite subjective. When it comes to sky color and contrast, there are many ways to go. There are lots of personal choice to be made, and those choices determine the look of your photo. Image #2 is fair representation of to what we were seeing in the field. I cropped from the bottom, moved the bird to the center of the frame, lightened the foreground, removed an adult bird in vegetation from the middle of the frame, and added canvas above. All that plus some beach clean-up.
This image was created by Anke Frohlich on 2 August 2024 on the last morning of the first Nickerson Beach (extended) IPT. Seated to my right on dry sand, she used the hand held Sony FE 200-600mm f/5.6-6.3 G OSS lens (at 243mm) with The One, the Sony Alpha 1 Mirrorless Digital Camera). The exposure was determined via Zebra technology with Exposure Compensation on the thumb dial. Multi metering + 1 stop — AUTO ISO set ISO 1600. 1/3200 sec. at f/5.6 (wide open) in Manual mode. AWB at 6:11:40am on a then barely sunny morning.
Zone/AF-C with Bird-Eye/Face Detection performed perfectly. Be sure to click on the image to enjoy a high-res version.
Image courtesy of and copyright 2024: Anke Frohlich Photography
Image #3: Backlit Black Skimmer in flight above the colony
The Anke Frohlich Version
As noted above, folks working on an image produced at nearly the exact same moment will always produce at least slightly different versions depending on their tastes and their personal vision. Having zoomed out quite a bit, Anke’s image represents a healthy crop but with the superb image quality the Sony a1, her image looks just fine. Her version is similar to my Image #2 with a corp similar to my Image #1. I love the extra bit of yellow above and to our right of the bird in her image (#3).
You can see more of Anke’s excellent bird photography on her Instagram page here or check her out further online here.
The BIRDS AS ART Current Workflow e-Guide (Digital Basics II).
You can order your copy from the BAA Online Store here, by sending a PayPal for $40 here, or by calling Jim or Jennifer weekdays at 863-692-0906 with your credit card in hand. Be sure to specify Digital Basics II.
The BIRDS AS ART Current Workflow e-Guide (Digital Basics II)
The techniques mentioned above and tons more great Photoshop tips and techniques — along with my complete digital workflow, Digital Eye Doctor Techniques, and all my personalized Keyboard Shortcuts — are covered in detail in the BIRDS AS ART Current Workflow e-Guide (Digital Basics II), an instructional PDF that is sent via e-mail. Note: folks working on a PC and/or those who do not want to miss anything Photoshop may wish to purchase the original Digital Basics along with DB II while saving $15 by clicking here to buy the DB Bundle.
Please note: the Divide and Conquer technique was inadvertently omitted from DB II. It is detailed in a free excerpt in the blog post here.
Folks who learn well by following along rather than by reading can check out the complete collection of MP 4 Photoshop Tutorial Videos by clicking here. Note: most of the videos are now priced at an amazingly low $5.00 each.
You can learn how and why I converted all of my Canon digital RAW files in DPP 4 in the DPP 4 RAW Conversion Guide here. More recently, I became proficient at converting my Nikon RAW (NEF) files in Adobe Camera Raw. About three years ago I began converting my Nikon and Sony RAW files in Capture One and did that for two years. You can learn more about Capture One in the Capture One Pro 12 Simplified MP4 Video here. The next step would be to get a copy of Arash Hazeghi’s “The Nikon Photographers’ Guide to Phase One Capture One Pro e-Guide” in the blog post here. Today, I convert my Sony raw files in Photoshop with Adobe Camera Raw.
You can learn advanced Quick Masking and advanced Layer Masking techniques in APTATS I & II. You can save $15 by purchasing the pair.
The Digital Basics III Video Series
The Digital Basics III Video Series
I realized about a year ago that my digital workflow had changed significantly and was toying with the idea of writing a Digital Basics III. More recently, I learned and begun working with two great new Photoshop Tools, the Remove Tool and the Luminance Targeted Adjustment Tool. The former is like a smarter Spot Healing Brush Tool on steroids and the latter is a step up from the fabulous Color Mixer Tool. During that same time frame, I came up with a new and improved 2-step noise reduction technique. I still use Divide and Conquer, Quick Masks, Layer Masks, an expanded array of personalized keyboard shortcuts, and tons of other stuff from both versions of Digital Basics.
As soon as I realized that I did not want to take on another large writing project, I realized that by creating a series of videos I could much more easily share all the details of my current digital workflow and much more easily incorporate additional new tips, techniques, and tools as I went. And so, The Digital Basics III Video Series was born.
You can order your copy of the Digital Basics III Video series here. The five videos with three images optimizations in each will be most valuable for folks using the latest version of Photoshop (2024) or Lightroom along with Topaz DeNoise AI and Topaz Sharpen AI.
Typos
With all blog posts, feel free to e-mail or to leave a comment regarding any typos or errors.
Despite the challenging conditions, photography has been great on the Nickerson Beach (extended) #1 IPT. Judy headed back to PA yesterday and Monte begins his drive back to Indiana tomorrow.
Momma Said, Life was Like a Box of Chocolates
My favorite line in the clip above is the woman saying, “My feet hurt.” How great is Tom Hanks?
A Story
A little old Jewish man goes to temple. He speaks to God, “You know my wife and I have been good Jews for many years. We keep Kosher and go to shul every Sabbath. Please, please, let us win the lottery.‘ Next week, the same thing. Week after week, month after month, the same thing. After almost a year he is in the temple. He speaks to God again, “You know my wife and I have been good Jews for many years. We keep Kosher and go to shul every Sabbath. Please, please, let us win the lottery.‘ There is a deafening clap of thunder and lightning strikes his place of worship. A gruff voice booms with a Yiddish accent, “So at least by a ticket …”
So, what does this have to do with digital photography? It does not cost one penny to press the shutter button. Be aggressive. See the possible shot, determine the shutter speed and the ISO, acquire focus, and press and hold the shutter button. It’s that “Life was like a box of chocolates‘ thing all over again: “You never know what you’re gonna get.”
Remember, you can’t win it if you ain’t in it. Take risks. Press the button!
Photo Mechanic screen capture for the American Oystercatcher — the un-banded family of four image
Photo Mechanic Screen Capture
On a warm, humid, somewhat foggy morning, the front element of my 600mm f/4 lens had fogged over (despite that fact that it had not been in an air conditioned location all night). I could not clear, it so I kept on shooting. Being sure to expose to the right as always, the images looked beyond washed out and boring.
If you saw this raw file on your laptop would you keep it or delete it?
Tracking: Zone/AF-C with Bird-Eye/Face Detection performed amazingly well. Click on the image to enjoy the high-res version.
American Oystercatcher — the un-banded family of four
A 10,000 to 1 Against Head Angle /Juxtapositional Miracle
Though the image looked completely washed out, the image design thrilled me. Getting two perfect head angles is difficult enough — four is too much to even dream of. And you could not paint the juxtaposition of the four birds any better. And since I knew that I could improve the color and contrast, this was a 100 percent keeper for me.
I thought that I would need to use more Dehaze than usual to bring this one to life, but simply setting the White Point and the Black Point as I always do as the first step in the raw conversion was all that was needed to improve the color and contrast. I cropped from below and from the right, added canvas in front of the birds, and worked hard to clean up the wet, ratty looking head of the closest bird, one of the two juveniles.
If you would be lost trying to optimize foggy looking images, check out the two offerings immediately below.
The un-banded family of four has given us many, many hours of enjoyment as they are absolutely tame and feed along the surf line in the same spot every morning. On Thursday, I was sitting in the water to photograph them and when I big wave came along, I needed to lift my rig with one hand to avoid having it get inundated by saltwater.
The BIRDS AS ART Current Workflow e-Guide (Digital Basics II).
You can order your copy from the BAA Online Store here, by sending a PayPal for $40 here, or by calling Jim or Jennifer weekdays at 863-692-0906 with your credit card in hand. Be sure to specify Digital Basics II.
The BIRDS AS ART Current Workflow e-Guide (Digital Basics II)
The techniques mentioned above and tons more great Photoshop tips and techniques — along with my complete digital workflow, Digital Eye Doctor Techniques, and all my personalized Keyboard Shortcuts — are covered in detail in the BIRDS AS ART Current Workflow e-Guide (Digital Basics II), an instructional PDF that is sent via e-mail. Note: folks working on a PC and/or those who do not want to miss anything Photoshop may wish to purchase the original Digital Basics along with DB II while saving $15 by clicking here to buy the DB Bundle.
Please note: the Divide and Conquer technique was inadvertently omitted from DB II. It is detailed in a free excerpt in the blog post here.
Folks who learn well by following along rather than by reading can check out the complete collection of MP 4 Photoshop Tutorial Videos by clicking here. Note: most of the videos are now priced at an amazingly low $5.00 each.
You can learn how and why I converted all of my Canon digital RAW files in DPP 4 in the DPP 4 RAW Conversion Guide here. More recently, I became proficient at converting my Nikon RAW (NEF) files in Adobe Camera Raw. About three years ago I began converting my Nikon and Sony RAW files in Capture One and did that for two years. You can learn more about Capture One in the Capture One Pro 12 Simplified MP4 Video here. The next step would be to get a copy of Arash Hazeghi’s “The Nikon Photographers’ Guide to Phase One Capture One Pro e-Guide” in the blog post here. Today, I convert my Sony raw files in Photoshop with Adobe Camera Raw.
You can learn advanced Quick Masking and advanced Layer Masking techniques in APTATS I & II. You can save $15 by purchasing the pair.
The Digital Basics III Video Series
The Digital Basics III Video Series
I realized about a year ago that my digital workflow had changed significantly and was toying with the idea of writing a Digital Basics III. More recently, I learned and begun working with two great new Photoshop Tools, the Remove Tool and the Luminance Targeted Adjustment Tool. The former is like a smarter Spot Healing Brush Tool on steroids and the latter is a step up from the fabulous Color Mixer Tool. During that same time frame, I came up with a new and improved 2-step noise reduction technique. I still use Divide and Conquer, Quick Masks, Layer Masks, an expanded array of personalized keyboard shortcuts, and tons of other stuff from both versions of Digital Basics.
As soon as I realized that I did not want to take on another large writing project, I realized that by creating a series of videos I could much more easily share all the details of my current digital workflow and much more easily incorporate additional new tips, techniques, and tools as I went. And so, The Digital Basics III Video Series was born.
You can order your copy of the Digital Basics III Video series here. The five videos with three images optimizations in each will be most valuable for folks using the latest version of Photoshop (2024) or Lightroom along with Topaz DeNoise AI and Topaz Sharpen AI.
Typos
With all blog posts, feel free to e-mail or to leave a comment regarding any typos or errors.
Which of Monte Brown’s four excellent flight images is the strongest? Why?
Catching Up
Check out the comments in the previous blog post to learn the answer to the Sun Ball Perspective Question.
Monte Brown in Action with his favorite flight rig
Monte Brown
Monte Brown was born in Muncie, Indiana in October 1953. As a kid he had severe asthma and almost died twice (and eventually outgrew that). He swam competitively at Muncie Central High School. He loved to fish and hike and took to bird watching because his mom loved the birds. He worked on a Masters degree in Communication and Information Sciences at Ball State University (but wound up three credits short). He handled investments at a local bank for 11 years and then transitioned into commercial real estate. He has worked for Coldwell Banker Commercial since 1998. His 2nd wife Nancy wants him to retire, but he likes being around people and solving problems and still enjoys property management so he keeps at it. Monte and Nancy quit tent camping almost 20 years ago and now enjoy RV-ing.
Monte’s daughter from his first marriage, Brenna, a physical therapist, lives in Blacklick, OH with her husband Gary and their son Ryvor. At age five, Ryvor declared that he would become a professional ice hockey goalie. At age 13, he is in goal for the Cincinnati Cyclones junior team.
Monte decided that he wanted to do some bird photography and an online search brought him to BIRDS AS ART. His first Instructional Photo-Tour was to St. Augustine Alligator Farm. He was so frustrated after that first trip that he did not touch his gear for six months. But he never gave up. Since then he’s been to San Diego (twice), on three bear boat trips, Bosque (twice), Homer, AK for Bald Eagles, Jacksonville, DeSoto (twice), and a SW Florida President’s Day IPT (not necessarily in that order). He shot Canon for 14 years. Since switching to Sony mirrorless three years ago, he has really blossomed as bird photographer. Early on, he sold a beloved Chevrolet Corvette and used the money to grab a Canon EF 800mm f/5.6 lens. My kind of guy and a good friend for many years to boot.
What’s Up?
Monte, Judy Stepenaskie, and I have killed when conditions have been great and we have killed in challenging conditions by being in the right place at the right time. Period. The number of photographers with great gear who set themselves up in locations where — because of light angle and wind direction considerations, have absolutely zero chance to make good or great images, continues to astound me. Judy , a relative beginner who continues to make excellent images with her hand held Canon RF 100-500mm f/4.5-7.1 L IS USM lens/Canon EOS R6 Mark II Mirrorless camera body rig, already has a firm grasp as to the importance of sky conditions, light angle and wind direction. She has been a quick study and a great student.
We all struggled to make a few good images on Monday evening with the 20mph plus south wind and partly sunny skies. As conditions were not favorable on Tuesday morning, Judy and I worked the four unbounded oystercatcher family and were blessed bye a Common Tern that landed right in front of us and got fed several times. Monte stayed in because of a bad back.
Today is Wednesday 31 July 2024. The forecast is for rain all day. I never believe such forecasts until I see deep puddles. As it rarely rains all day — exactly once on me in 35 years of doing photo trips, I am pretty sure that we will get in some decent photography here and there. I hope that you too have a great day and that you learn something.
Scroll down to the bottom if you are interested in earning a free guide for your new Sony 300mm f/2.8 lens and your new a9 iii. Just below that, consider joining me at Nickerson in August.
Please remember to use the B&H links that are found on most blog pages and to use the BIRDSASART discount code at checkout when purchasing your new gear from Bedfords to get 3% back on your credit card and enjoy free second-day air FedEx. Please, also, consider joining a BAA IPT. You will be amazed at how much you will learn!
If an item — a Delkin flash card, or a tripod head — for example, that is available from B&H and/or Bedfords, is also available in the BAA Online Store, it would be great, and greatly appreciated, if you would opt to purchase from us. We will match any price. Please remember also to use my B&H affiliate links or to earn 3% cash back at Bedfords by using the BIRDSASART discount code at checkout for your major gear purchases. Doing either often earns you free guides and/or discounts. And always earns my great appreciation.
Supporting My Efforts Here
If you enjoy and learn from the blog, please consider using one of my affiliate links when purchasing new gear. It will never cost you a single penny. To support my effort here, please order from B&H by beginning your search here. Or, click here, to order from Bedfords and enter the discount code BIRDSASART at checkout to receive 3% cash back to your credit card and enjoy free Second-Day Air Fed-Ex shipping. It is always best to write for advice via e-mail.
In many cases, I can help you save some serious dollars. And/or prevent you from purchasing the wrong gear.
Summer On Long Island
Check out the July and August Nickerson Beach (& JBWR) IPT offerings here or scroll down and consider joining us to learn a ton, make lots of great images, and improve your image processing skills.
Save 15%!
If you’d like to try out a new lens or if you need a lens for a specific trip or project (or for an IPT), LensRentals.com is the only way to go. To save 15%, simply click on the logo link above, arrange for your rental, and type in BIRDSASART15. If you type the gear you are looking for in the search box, it will pop right up. LensRentals.com offers affordable insurance. You can decline it, opt for LensCap: Damage Only, or select LensCap: Damage & Theft. Then hit PROCEED TO CHECKOUT. After you enter all of your info but before completing your order, be sure to scroll down to Promo Code box and enter the BIRDSASART15 code to save 15%.
I checked on renting a Sony FE 70-200mm f/2.8 GM OSS II lens for a week. The cost is only $122.00. LensCap: Damage Only coverage can be added for a very low $18.00. Going with LensCap: Damage & Theft would be $27.00. The shipping charge varies. They offer an interesting program called Lensrentals HD. By signing up for this shipping discount program ($99.00/year), you’ll get free Standard Shipping on all the orders you place.
Renting a Sony 600mm f/4 GM OSS lens for a week will cost you $536.00. The two coverage options come in at $76.00 or $114.00. Less your 15% discount when you enter the BIRDSASART15 code into the Promo Code box at checkout and enter the BIRDSASART15 code in the Promo Code box at checkout to save 15%.
Remember, to save the 15% on your rental you must start your search by clicking on the logo above, or on this link: LensRentals.com
B&H
To ensure that I get credit for your B&H purchases, you can always click here. The tracking is invisible but greatly appreciated. And, you can use your PayBoo card. You must use the website to order. B&H will reopen on Fri April 14. Thanking me for the past 4000 educational blog posts could not be any easier and will not cost you one penny. Please shoot me your B&H receipt for major purchases.
Many folks have written recently stating that they purchased a Sony a1 from B&H and would like their free membership in the Sony 1 Info and Updates Group, a $150.00 value. When I check my affiliate account, their orders have not been there. When I let them know that they get credit for B&H purchases only if they use one of the many B&H affiliate links on the blog or begin their searches with this link, they are always disappointed. If in doubt, please contact me via e-mail and request a BH link. I am always glad to help and to guide you to the right gear.
Bedfords Simplified
Click here to start your search. Choose standard shipping, and when you get to the payment page, enter BIRDSASART in the discount code box and hit apply. You will be upgraded to free second day air Fed-Ex and receive 3% cash back on your credit card once your stuff ships. Either is greatly appreciated by yours truly.
Bedfords Amazing BAA Discount Policy
Folks who have fallen in love with Bedfords can now use the BIRDSASART coupon code at checkout to enjoy a post-purchase, 3% off-statement credit (excluding taxes and shipping charges) on orders paid with a credit card. The 3% credit will be refunded to the card you used for your purchase. Be sure, also, to check the box for free shipping to enjoy free Second Day Air Fed-Ex. This offer does not apply to purchases of Classes, Gift Cards, prior purchases.
Visit the Bedfords website here, shoot Steve Elkins an e-mail, or text him on his cell phone at (479) 381-2592.
Gear Questions and Advice
Too many folks attending BAA IPTs and dozens of photographers whom I see in the field and on BPN, are — out of ignorance — using the wrong gear, especially when it comes to tripods and more especially, tripod heads. And the same is true in spades when ordering new camera bodies or lenses. My advice will often stave you some serious money and may help you avoid making a seriously bad choice. Please know that I am always glad to answer your gear questions via e-mail. If you are desperate, you can try me on my cell at 863-221-2372. Please leave a message and shoot me a text if I do not pick up.
This image was also created by many multiple IPT veteran Monte Brown on 28 July 2024 at Nickerson Beach Park, Lido Beach, NY on the (extended) IPT. Standing at full height he used the hand held Sony FE 300mm f/2.8 GM OSS lens (Sony E) with the Sony FE 1.4x Teleconverter and the ridiculously amazing Sony a9 III Mirrorless Camera. The exposure was determined using Zebra technology with ISO on the Thumb Dial. ISO 640. 1/4000 second at f/4.5 (stopped down 1/3-stop) in Manual Mode. AWB at 7:57:55am on a mostly sunny morning. RawDigger showed the raw file brightness to be dead solid perfect.
Zone AF/C with Bird Face/Eye Detection performed perfectly. Be sure to click on the image to enjoy a high-res version.
Image #1: Common Tern in fresh juvenile plumage braking to land
Juvie Common Terns in Flight
Over the years I have not had much luck photographing fledged and flying young Common Terns. Monte has made several very excellent ones so far on the extended IPT,, Image #1 being the best by a slim margin. (I have made some good ones too.)
He says, The autofocus is fabulous and I love the light weight of the lens. When I tried the 200-600 last night I realized how heavy it is and how much faster the 300mm f/2.8 acquires focus. Yeah, the zoom lens gives us more versatility, but for flight at 420mm, you cannot go wrong with the 300mm f/2.8/1.4X TC/a9 iii rig for birds in flight.
I taught Monte a neat trick with the a9 iii that helps train you to avoid touching the manual focus ring when photographing with the 300mm f.2.8 lens. If you have both the 300 and the a9 iii guides, shoot me an e-mail and I will get you the info.
This image was also created by many multiple IPT veteran Monte Brown. This one on 29 July 2024 at Nickerson Beach Park, Lido Beach, NY on the (extended) IPT. Standing at full height he used the hand held Sony FE 300mm f/2.8 GM OSS lens (Sony E) with the Sony FE 1.4x Teleconverter and the ridiculously amazing Sony a9 III Mirrorless Camera. The exposure was determined using Zebra technology with ISO on the Thumb Dial. ISO 3200. 1/2500 second at f/4 (wide open) in Manual Mode. AWB at 7:57:55am on a dreary, cloudy morning. RawDigger showed the raw file brightness to be dead solid perfect.
Zone AF/C with Bird Face/Eye Detection performed perfectly. Be sure to click on the image to enjoy a high-res version.
Image #2: Common Tern adult in driving flight
Image courtesy of and copyright 2024: Monte Brown
Backgrounds Other Than Sky
As long as you can keep the bird in the center of the frame when using Zone AF with the a9 iii, the AF system will detect the bird’s eye even when the subject is flying against backgrounds other than sky (in this case beach vegetation) and track it accurately. When I as with Canon, I used to tell Rudy Winston that I dreamed that sometime in the future bird photographers would come to enjoy science-fiction-like autofocus. The a9 iii is as close as you can come to that. And the best Canon and Nikon mirrorless camera bodies are not very far behind.
I processed all four of Monte’s featured image during our Photoshop/Image review sessions. Both Monte and Judy were amazed when I transformed the (properly) washed out (exposed to the right), seemingly over-exposed raw file into an image that looks as if it were created in “good” light. All as detailed in the Digital Basics II PDF and the Digital Basics III Video Series.
This image was also created by many multiple IPT veteran Monte Brown on 29 July 2024 at Nickerson Beach Park, Lido Beach, NY on the (extended) IPT. Standing at full height he used the hand held Sony FE 300mm f/2.8 GM OSS lens (Sony E) with the Sony FE 1.4x Teleconverter and the ridiculously amazing Sony a9 III Mirrorless Camera. The exposure was determined using Zebra technology with ISO on the Thumb Dial. ISO 1250. 1/3200 second at f/4 (wide open) in Manual Mode. AWB at 9:49:35am on a dreary, cloudy morning. RawDigger showed the raw file brightness to be dead solid perfect.
Zone AF/C with Bird Face/Eye Detection performed perfectly. Be sure to click on the image to enjoy a high-res version.
Image #3: Common Tern adult screaming in white sky flight
White Sky Exposures
A convert from Canon, Monte quickly mastered exposure using Sony Zebra technology. Most folks will underexpose white sky flight images by one to two stops. With Image #3, Monte zebra-ed most of the sky in order to expose properly for the white bird. Simply masterful. In fact, he nailed the exposure with each of today’s featured images.
This image was also created by many multiple IPT veteran Monte Brown on 29 July 2024 at Nickerson Beach Park, Lido Beach, NY on the (extended) IPT. Standing at full height he used the hand held Sony FE 300mm f/2.8 GM OSS lens (Sony E) with the Sony FE 1.4x Teleconverter and the ridiculously amazing Sony a9 III Mirrorless Camera. The exposure was determined using Zebra technology with ISO on the Thumb Dial. ISO 1250. 1/3200 second at f/4 (wide open) in Manual Mode. AWB at 10:06:27am on what had become a cloudy very bright morning. RawDigger showed the raw file brightness to be dead solid perfect.
Zone AF-C with Bird Face/Eye Detection performed perfectly. Be sure to click on the image to enjoy a high-res version.
Image #4: Black Skimmer adult in flight with needlefish for chick(s)
Needlefish City
Right now, the needlefish are in. It seemed that every skimmer that flew by had one in its bill. If they land and cannot find their chick right off the bat, they will usually drop it in the sand briefly, pick it up, and circle around again and again in search for their progeny. After the first attempt, the silver fish is covered with sand. Monte did well to get this one with a nice clean fish.
We lucked out on Monday morning when the dreary skies brightened a bit and the wind swung to the southeast.
a9 iii E-mail Set-up and Info Guide
a9 iii E-mail Set-up and Info Guide
For those who think that my comments on the a9 iii are pure hype, know that I recently sold the second of my three a1 bodies.
If you plan on purchasing a Sony a9 III Mirrorless Camera (or anything else for that matter), please remember to use or write for either my Bedfords discount code or my B&H affiliate link. Folks who use one of my two affiliate links to purchase the a9 III will receive my .DAT settings (the complete camera set-up), a Buttons and Dials Guide, and an a9 iii Info Sheet.
For those who did not use my link to purchase their Sony 300mm f/2.8 GM lens, you can order your a copy here for $209.93.
Click on the image to enlarge and to be able to read the fine print.
The BAA Sony 300mm f/2.8 Lens Guide
Impressed by my (or Pat’s) Sony FE 300mm f/2.8 GM OSS Lens (Sony E) images? Use either my Bedfords or B&H affiliate link to purchase your Sony 300mm f/2.8 GM lens and shoot me your receipt via e-mail and request a copy of the first-ever BAA Lens Guide. I thought that it would take only minutes to create this guide, but I was dead wrong. In the process of creating it, I learned a ton about the lens. And even better, I discovered a simple yet potentially fatal flaw that was resulting in sporadically unsharp flight images. The set-up fix is simple. Just be sure to use one of my affiliate links and get the guide for free.
If not, you can purchase a copy here for $209.93. Yes, it never hurts to use my links and it never costs you one penny more. And if you contact me via e-mail before you make a major purchase, I can often save you some money.
Join me to photograph Black Skimmers, Common Terns, American Oystercatchers, and more!
The Summer 2024 Nickerson Beach 3 1/2 day Terns, Skimmers, & Oystercatchers IPTs
Nickerson Beach IPT #2: August 5-8 2024. 3 1/2 days: Afternoon session on MON 5 August through the full day on THURS 8 August, 2024: $2099.00. Limit: 6. Openings: 5.
Join me at Nickerson Beach Park this summer to photograph Black Skimmers, Common Terns, and American Oystercatchers. The trip is timed so that we should get to photograph tiny chicks as well as fledglings. There will be lots of flight photography including adults flying with baitfish and mole crabs. Creating great images of the chicks being fed is a challenge but I will do my best to help you toward that end. We will get to photograph a variety of breeding behaviors including courtship, sitting on (incubating) eggs, chick feeding, and more. We may get to photograph pre-dawn and early evening blastoffs. There is generally great afternoon skimmer flight photography that includes frequent midair battles sunny days. And with luck, we might even see a few tiny chicks in addition to fledged and flying young. We will also get to photograph the life cycle of American Oystercatcher. This will likely include nests with eggs and small chicks, young being fed, and surely a few fledglings.
Nesting Piping Plover is also possibly. There will be lots of gulls to photograph; most years I am able to find a few lesser black-backeds of varying ages in addition to the Herring, Ring-billed, and Great Black-backed Gulls. You will learn to identify and age the various gull species. There will likely be some Willets feeding along the surf and with luck we might get to photograph a handsome juvenile or two. In addition to the locally breeding shorebirds, we will likely get to see some southbound migrant arctic-and sub-arctic breeding shorebird species such as Sanderling, Semipalmated Plover, and maybe even Red Knot.
Clockwise from upper left around and back to center: Black Skimmer pair with chick; Black Skimmer fledgling skimming; Black Skimmer with large needlefish; Black Skimmer large chick; Black Skimmer fledgling taking flight; Black Skimmer adult with killifish; Black Skimmer adult landing near nest; Black Skimmer in midair chase; and Black Skimmers at dawn in the red light district.
Activities
Morning sessions will run from pre-dawn till about 9:00 or 9:30am, roughly 3 1/2 hours. Afternoon sessions will run from 5:30 till sunset (assuming that entry policies are as they were in 2023.
Many folks head home feeling that while our time in the field was fabulous and productive, that the working brunch sessions were even more valuable. During image review you will learn to select the best images from several thousand made with your 20- and 30 fps (or 120 fps!) camera bodies. And we will process a few images and distribute the screen capture videos for you to learn from after the trip. And all IPTs offer follow-up image critiques.
Change your life: sign up for this IPT today. Please shoot me an e-mail if you would like to explore the possibility of renting some Sony gear (including an a1) from me.
Clockwise from upper left around and back to center: Adult American Oystercatcher foraging at sunrise; Adult American Oystercatcher posing on clean sand; predawn skimmer flock blur; Black Skimmer large chick; Black Skimmer landing at nest on cloudy day; Black Skimmer large chick; Black Skimmer sunrise group blur; Black Skimmer adult with Atlantic Silversides; juvenile Semipalmated Plover, and photographer with oystercatcher family.
Some of What You Will Learn on a Nickerson Beach IPT
1- The basics and fine points of digital exposure; how to get the right exposure every time after making a single test exposure (or before if you are using SONY gear).
2- How and why to work in Manual mode (even if you’re scared of it).
3- How to approach free and wild birds without disturbing them.
4- Lots about bird behavior and how to use that knowledge to help you create better images.
6- To spot the good and great situations and to choose the best perspective.
7- To see, evaluate, and understand the light.
8- To design pleasing images by mastering your camera’s AF system.
9- And perhaps most importantly, to evaluate wind and sky conditions and understand how they affect bird photography. You will learn where and when to be (and why).
10- More than you could ever imagine.
Clockwise from upper left around and back to center: Black Skimmer pair with chick; Common Tern landing at nest with small baitfish; large Common Tern chick on pristine beach; American Oystercatchers courtship flight; Common Tern with pipefish; Common Tern fledgling; American Oystercatcher on eggs in high wind; American Oystercatcher nest with three eggs; and Black Skimmer midair battle.
The Details
We will be on the beach very early to enjoy sunrise. The morning sessions will run about 3 1/2 hours. Afternoon sessions will begin at 5:30 and run till sunset. There is never a set schedule on an IPT — we adapt to the conditions. On cloudy mornings with the right wind, we may opt to photograph till 11:30am or so and skip the afternoon session. That especially when the afternoon weather is looking iffy.
There will be a Photoshop/Image Review session before and after brunch (included) each full day. That will be followed by Instructor Nap Time. Each of these IPTs will run with only a single registrant as I do not like disappointing anyone. The best airports are JFK or Islip (if you have lots of Southwest points). Once you register, you will receive an e-mail with lodging information. Do know that it is always best if IPT folks stay in the same general area (rather than at home or at a friend’s place a good distance away).
Folks attending this IPT will be out in the field ridiculously early and stay out late to take advantage of sunrise and sunset colors; this is pretty much a staple on almost all BIRDS AS ART Instructional Photo-Tours. Doing so will often present unique photographic opportunities, opportunities that will be missed by those who need their beauty rest and those who need to get home for a proper dinner. I really love it when I am leaving the beach at 9:00am on a sunny morning after a great session just as a carful or two of well-rested photographers are arriving … We may be getting our feet wet on occasion, especially in the mornings, but those who wish to keep their feet 100% dry can do so.
Your $699 deposit is due now. Credit cards are OK for that. You can register by calling Jim or Jennifer during weekday business hours at 863-692-0906 with a credit card in hand. Once you leave a deposit, you will receive an e-mail with your balance statement and instructions for sending your balance check. Those who wish to pay for the trip in one fell swoop via check may do so by making the check out to BIRDS AS ART and then mailing it to BIRDS AS ART, PO BOX 7245, Indian Lake Estates, FL 33855. You will receive a confirmation e-mail with detailed instructions, and clothing and gear advice right after you register. Please shoot me an e-mail if you plan to register or if you have any questions.
IPT veterans and couples or friends signing up together may e-mail for discount information.
Join me on the COMBO IPT this coming August to photograph adult and juvenile shorebirds at the East Pond at Jamaica Bay Wildlife Refuge, Queens, NY.
Clockwise starting from the upper left back to center: juvenile Lesser Yellowlegs; adult Semipalmated Plover; fresh juvenile Semipalmated Sandpiper; fresh juvenile Least Sandpiper; fresh juvenile Stilt Sandpiper; fresh juvenile Short-billed Dowitcher; worn, molting adult Semipalmated Sandpiper; worn, molting adult White-rumped Sandpiper; and juvenile (left) and worn, molting adult Greater Yellowlegs.
The Combo IPT — East Pond, JBWR/Nickerson Beach: August 17 – 20, 2024. SAT August 17 through the morning session on TUES 20 August 2024. 3 1/2 days: $2199.00. Limit: 6. Openings: 5.
Join me for four mornings at the famed East Pond, Jamaica Bay Wildlife Refuge, Queens, NY (conditions permitting) to photograph southbound migrant shorebirds and for three afternoons to photograph beach nesting birds. The window for photographing juvenile shorebirds in fresh plumage is very narrow and this trip will of course get you to the right spot at the exact right time. You will learn to identify and age the shorebirds and to photograph them (at ground level). I will gladly share everything that I have learned during the 46 years I have been visiting the pond. Heck, I started late. After too many years of mismanagement, the gate valve at the north end of the East Pond has finally been repaired properly; water levels should be perfect this summer. If it is not, we will spend our mornings at Nickerson.
Afternoons (and mornings as well) at Nickerson Beach Park are superb in mid-August for photographing Black Skimmers, Common Terns, and American Oystercatchers with young of all ages. There will be lots of fledged chicks by mid-August, lots of flight including adults flying with baitfish and mole crabs, and excellent chances to photograph both chick feeding and predation by gulls. The Great Black-backed Gulls see the young skimmers as potato chips. We should get to photograph the evening skimmer blastoffs. On hot sunny days, there is still great afternoon skimmer flight photography that includes frequent midair battles.
There will be lots of terns (mostly Common Terns) and gulls to photograph; most years I am able to find a few Lesser Black-backed Gulls of varying ages in addition to the Herring, Ring-billed, and Great Black-backed Gulls. You will learn to identify and age the various gull species. There will likely be some Willets feeding along the surf and with luck we might get to photograph a handsome juvenile or two. In addition to the locally breeding shorebirds, we will likely get to see some southbound migrant arctic-and sub-arctic breeding shorebird species such as Sanderling, Semipalmated Plover, Semipalmated Sandpiper, and maybe even Red Knot. And we might encounter large, swirling flocks of Sanderling in flight over the ocean.
Join me this August to photograph at the East Pond at JBWR in the mornings (conditions permitting) and at Nickerson Beach in the afternoons.
Clockwise starting from the upper left back to center: Marbled Godwit (likely in juvenal plumage); Wilson’s Phalarope in first winter plumage; Black Skimmer adult in flight over the Atlantic; juvenile American Oystercatcher foraging surf; adult Lesser Black-backed Gull; Black Skimmer attacking tiny chick; Killdeer in fresh juvenal plumage; Least Sandpiper in fresh juvenal plumage ruffling; and juvenile Lesser Yellowlegs and mixed shorebird flock.
Morning sessions at the East Pond will run from just before dawn till about 9:00 or 9:30am. If the afternoon weather forecast is looking ominous, we may decide to photograph until after 11:00am and cancel the afternoon session. Afternoon sessions at Nick will run from 5:30 till sunset (assuming that entry policies are as they were in 2023).
Many folks head home feeling that while our time in the field was fabulous and productive, that the working brunch sessions were even more valuable. During image review you will learn to select the best images from several thousand made with your 20- and 30 fps (or 120 fps!) camera bodies. In addition, we will process some participant images and distribute the screen-capture videos for you to learn from after the trip. All IPTs offer follow-up image critiques.
Change your life: sign up for this IPT today. Please shoot me an e-mail if you would like to explore the possibility of renting some Sony gear (including an a1) from me.
Clockwise from upper left around and back to center: Adult American Oystercatcher foraging at sunrise; Adult American Oystercatcher posing on clean sand; predawn skimmer flock blur; Black Skimmer large chick; Black Skimmer landing at nest on cloudy day; Black Skimmer large chick; Black Skimmer sunrise group blur; Black Skimmer adult with Atlantic Silversides; juvenile Semipalmated Plover, and photographer with oystercatcher family.
Some of What You Will Learn on the COMBO IPT
1- The basics and fine points of digital exposure; how to get the right exposure every time after making a single test exposure (or before you make even a single image if you are using SONY gear).
2-How to get low and super low
3- How and why to work in Manual mode (even if you’re scared of it).
4- How to approach free and wild birds without disturbing them.
5- Lots about bird behavior and how to use that knowledge to help you create better images.
6- To spot the good and great situations and to choose the best perspective.
7- To see, evaluate, and understand the light.
8- To design pleasing images by mastering your camera’s AF system.
9- And perhaps most importantly, to evaluate wind and sky conditions and understand how they affect bird photography. You will learn where and when to be (and why).
10- To identify and age a variety of shorebird, tern, and gull species.
11- More than you could ever imagine.
The Details
There will be a Photoshop/Image Review session during and after brunch (included) each full day. That will be followed by Instructor Nap Time. This IPT will run with only a single registrant as I do not like disappointing anyone. The best airports are JFK or Islip (if you have lots of Southwest points). Once you register, you will receive an e-mail with lodging information. Do know that it is always best if IPT folks stay in the same general area (rather than at home or at a friend’s place a good distance away).
Folks attending this IPT will be out in the field ridiculously early and stay out late to take advantage of sunrise and sunset colors; this is pretty much a staple on almost all BIRDS AS ART Instructional Photo-Tours. Doing so will often present unique photographic opportunities, opportunities that will be missed by those who need their beauty rest and those who need to get home for a proper dinner. I really love it when I am leaving the beach at 9:00am on a sunny morning after a great session just as a carful or two of well-rested photographers are arriving … We may be getting our feet wet on occasion, especially in the mornings, but those who wish to keep their feet 100% dry can do so.
Your $699 deposit is due now. Credit cards are OK for that. You can register by calling Jim or Jennifer during weekday business hours at 863-692-0906 with a credit card in hand. Once you leave a deposit, you will receive an e-mail with your balance statement and instructions for sending your balance check. Those who wish to pay for the trip in one fell swoop via check may do so by making the check out to BIRDS AS ART and then mailing it to BIRDS AS ART, PO BOX 7245, Indian Lake Estates, FL 33855. You will receive a confirmation e-mail with detailed instructions, and clothing and gear advice right after you register. Please shoot me an e-mail if you plan to register or if you have any questions.
IPT veterans and couples or friends signing up together may e-mail for discount information.
Typos
With all blog posts, feel free to e-mail or to leave a comment regarding any typos or errors.