|
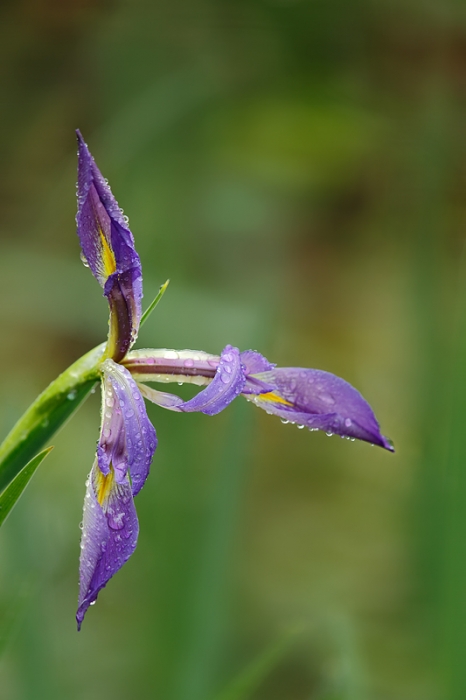
The two images used to created the image above were made at Corkscrew Swamp with the tripod-mounted Canon EF 600mm f/4L IS II USM lens, the Canon 1.4x EF Extender III (Teleconverter), and the Canon EOS-1D X Digital SLR camera. ISO 400. Evaluative metering +1/3 stop: 1/200 sec. at f/5.6 in Manual mode. Fill-flash at -3 stops with the Canon Speedlite 600EX-RT with the Better Beamer. Learn the basics of fill flash, flash as main light, ETTL, and manual flash in the “Flash Simplified” section of ABP II here. Central sensor Surround/AI Servo/Rear Focus AF and recompose as noted below. Click here if you missed the Rear Focus Tutorial. Click on the image to see a larger, sharper version. Click on the image to see a larger version.
|
Two-frame Simple Focus-Stacked Iris With Really Big Macro Lens
There were very few birds at Corkscrew when Denise, Geri George, and I visited the day before the SW FLA IPT began. And, when I headed out with a big plastic bag over my lens and flash, it was raining more than a bit. I stumbled across a small stand of irises, added the 1.4X TC to the mix, and set to work isolating this single blossom.
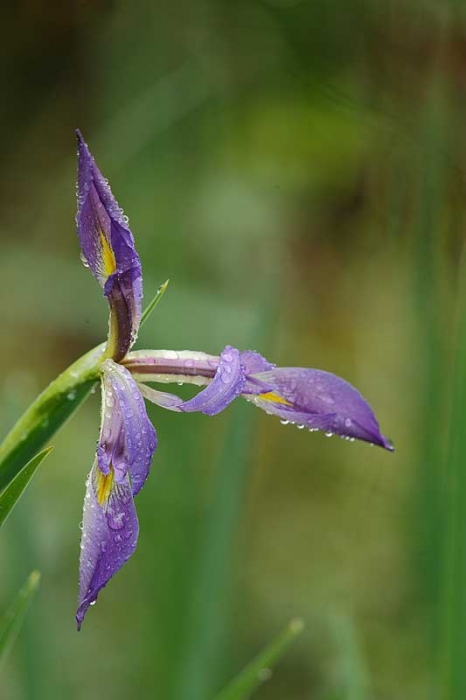
I started focusing on the lowest vertical petal. As I examined the image for sharpness by blowing it up on the rear LCD I noticed that the two vertical petals were sharp but that the two horizontal petals were not. This made sense as they were about 1/4 inch beyond the plane of the two vertical petals. And depth of field at point blank range with a big telephoto lens is measured in tiny fractions of an inch. So I created a second image after focusing on the horizontal petal.
|
Here, I focused on the lower vertical petal. This left the horizontal petal in the back out of focus. Central sensor Surround/AI Servo/Rear Focus AF and recompose as noted below. Click here if you missed the Rear Focus Tutorial. Click on the image to see a larger, sharper version. Click on the image to see a larger version. |
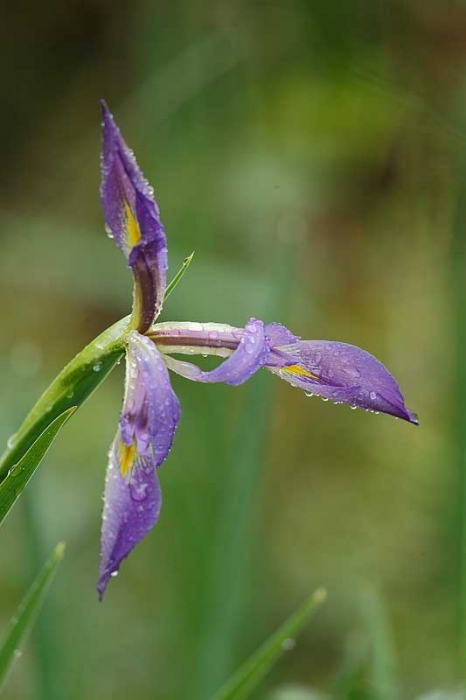
The image above is sharpest on the two vertical petals and the smaller curved petal. The image below is sharpest on the horizontal petal to the rear.
|
For this one I focused on the horizontal petal while planning to combine the sharpest parts of the two images in Photoshop using a Layer Mask. Central sensor Surround/AI Servo/Rear Focus AF and recompose as noted below. Click here if you missed the Rear Focus Tutorial. Click on the image to see a larger, sharper version. Click on the image to see a larger version. |
Focus-Stacking
To focus stack the two images I painted a Quick Mask of the horizontal petal on the image immediately above, put it on its own layer (Control J), and used the Move Tool (V) to roughly position it on the image with the sharp vertical petals. Then I reduced the Opacity to 50%, fine-tuned the placement while working large, added a Layer Mask, and, working very large, painted in and out as needed until the whole flower looked sharp.
Background Improvement
The look of the background was improved using a new Denise Ippolito trick that involves Motion Blur on a Layer and an added Layer Mask for fine tuning. That plus some 70$ Clone Stamp work. If you’d like to learn to process your images like a pro, check out our Digital Basics File. Digital Basics includes my complete digital workflow, dozens of great Photoshop tips, Layer Masking for Dummies, all of my Keyboard Shortcuts, and tons more. This PDF, sent via e-mail, will be the best $25 you’ll ever spent on your photography. Your purchase includes free updates. Learn advanced Quick Masking techniques in APTATS I and advanced Layer Masking Techniques in APTATS II.
Creative Flower Photography
If you missed the Creative Flower Photography post, be sure to click here.
|
All images courtesy of and copyright 2012: Denise Ippolito. Click for a larger version. |
A Creative Adventure/BIRDS AS ART Swan Island Dahlia Farm Instructional Photo-Tour, September 11-15, 2013: 5 FULL DAYS: $1649
Join Denise Ippolito and Arthur Morris at the Swan Island Dahlia Farm in Canby, Oregon (just south of Portland) for a great learning and photography experience. Swan Island features more than 40 acres with over 350 varieties of dahlias in a plethora of colors, shapes and sizes, making it one of the largest growers in the United States.
Daily Photo Schedule
We will enjoy four morning (7:00am till 10:30am) and five afternoon (3:30pm till 6pm) photography sessions. While we will do most of our photography at the Swan Island Dahlia Farm, we will also visit the Portland Rose Garden and/or the Portland Japanese Garden on this IPT. The in-the-field instruction will include seeing the situation, the use of selective focus, creative use of depth of field, histogram and exposure guidance, designing creative images, choosing your background, isolating your subject, lens options, and the use of reflectors and diffusers. Our field sessions will include challenging photography assignments geared to make you think creatively. Both personalized and small group instruction will be provided. All times are tentative and subject to change based on the weather and on local conditions.
Seminar Morning: Friday, September 13: 8:30am till 12:30pm
Denise will begin by presenting her “Bloomin’ Ideas” program, an overview of the in-the-field and post-processing techniques that she has used and developed over the past few years to create her signature look. Artie will follow with a Photoshop session that will be geared towards all levels. He’ll be sharing some of his favorite techniques and tips while working on images from the first two days of the IPT. Denise will conclude the seminar portion of the IPT with a Photoshop demo; she will share her creative workflow using a variety of Photoshop filters and effects. The entire morning is designed to give you a peek into the minds of two very skilled and creative folks.
The group will have lunch together daily. All are invited to bring their laptops for image sharing. We hope that you can join us for an intense five days of learning and some of the best flower photography to be had in North America.
Deposit Info and Cancellation Policies:
A $449 non-refundable deposit is required to hold your slot for this IPT. Your balance is due 4 months before the date of the IPT and is also non-refundable. If the trip fills, we will be glad to apply a credit applicable to a future IPT for the full amount less a $100 processing fee. If we do not receive your check for the balance on or before the due date we will try to fill your spot from the waiting list. If your spot is filled, you will lose your deposit. If not, you can secure your spot by paying your balance.
Please print, complete, and sign the form that is linked to here and shoot it to us along with your deposit check (made out to “Arthur Morris.”) You can also leave your deposit with a credit card by calling the office at 863-692-0906. We will be short-handed in the office until January 21 so please leave a message and we will call you back. If you register by phone, please print, complete and sign the form as noted above and either mail it to us or e-mail the scan.
If you have any questions, please feel free to contact me via e-mail
Seriously Huge B&H Savings on Nikon and Canon Gear
Nikon
For the first time in many years NIKON is going to be deeply discounting many legacy pro lenses individually for the next 2 weeks only with discounts up to $350. There are also many amazing deals on NIKON Buy together and Save packages as well. Click here to save.
Nikon DSLRS Bundles with Lenses & Flash: Save up to $750. Click here to save. Make sure to add each item to your shopping cart to see the absolute lowest price.
Canon Lenses & Speedlites: Save Up to $300
Click here to save. Make sure to add each item to your shopping cart to see the absolute lowest price.
Canon Buy Together & Save: Save Up to $400
Click here to save.
EOS-1D X AF Guide
You can learn exactly how I set up and use this camera’s great new AF system in our EOS-1D X AF Guide. And you can learn about our camera User’s Guides here.
Southwest Florida Site Guide
Several folks have written recently asking why this great guide has not been updated since 2007. The answer is that I have not discovered any new hotspots and that the good places remain good and the great places remain great. We found the Snowy Plovers on Wednesday in the exact spot described in the Southwest Florida Site Guide. Go figure.
Africa Photo Safari: August 2013
Serengeti Summer Migration Safari: 12 full and two half-days of photography: $12,999/person double occupancy. Limit: 12/Openings: 9.
Leaders: Todd Gustafson, Denise Ippolito, and Arthur Morris. Tanzania Summer Migration Safari. Leave the US on August 3. Day 1 of the safari is August 5. We will visit Tarangire for great dry season photography, Seronera Lodge–aka Leopard City!–twice, Central Serengeti for big cats, Northern Serengeti and our mobile tented camp to search for river crossings, and the spectacular wildlife spectacle that is Ngorongoro Crater. Our last morning of photography is August 18. Fly home from Arusha, Tanzania on the evening of August 18.
A deposit of $4,000 is due now. This trip is a go. Happy Campers only please. Guaranteed maximum no more than 12 photographers plus the three great leaders. 3 persons/van. You get a row of seats for yourself and your gear. In addition to rotating in-the-field instruction with each of the co-leaders, artie, Todd, and denise will be available for image sharing and review and informal Photoshop instruction during breaks and after meals. And–with apologies to Miss Manners–even during meals!
Once we cash your check you will be strongly advised to purchase travel insurance. You may wish to consider using Travel Insurance Services. Do understand that most policies must be purchased within two weeks of our cashing your deposit check. The 2nd payment of $4000 is due MAR 30, 2013. The final payment/balance is due MAY 30, 2013. Sign up with a friend or a spouse and apply a $300 per person discount.
The lodging is all first class. Please e-mail to request a PDF with additional details, the complete itinerary, and a description of the unparalleled photographic opportunities that we will enjoy. Please e-mail or call me on my cell at 1-863-221-2372 with any questions. I hope that you can join us.
You can see a collection of my images from previous safaris here.
Weekend Creative Nature Photography Seminar, Tampa, FL: February 23 & 24, 2013: $149/. Walk-ins Welcome
You are invited to join Denise Ippolito and me on the weekend of February 23-24 on the outskirts of Tampa, FL for a great weekend of fun and learning. Learn to improve your photography skills, your skill at designing images in the field, your creative vision, and your image optimization skills. Sunday critiquing session. Click here for additional details and the complete schedule.
Fort DeSoto Morning In-the-Field Workshop/Two Slots Left!
Fort DeSoto In-the-field Workshop: FEB 25. Pre-dawn -10:30am. Strict Limit 16/2 Openings. Includes a great working lunch: $275.
On Monday morning, February 25, Denise Ippolito and I will be co-leading a morning In-the-field Workshop at Fort DeSoto, south of St. Petersburg, FL. We should get to photograph a variety of very tame herons, egrets, gulls, terns, and shorebirds. Spoonbills possible. There will be lots of individual and small group instruction. We will cover exposure and histograms, seeing the situation, creating sharp images, and lots more. Each registrant will have a personalized gear and set-up check. The more questions you ask, the more you will learn.
A great working lunch at the Sea Porch Café on St. Petersburg Beach is included. All are invited to bring a laptop along for image sharing at lunch. After the workshop, all are invited to send us three 1024 wide or 800 tall JPEGs for critiquing. Call 1-863-692-0906 to register or send us a Paypal. Either way, be sure to note that the payment is for the Fort DeSoto In-the-Field Workshop.
Typos
On all blog posts, feel free to e-mail or leave a comment regarding any typos, wrong words, misspellings, omissions, or grammatical errors. Just be right. 🙂
Support the BAA Blog. Support the BAA Bulletins: Shop B&H here!
We want and need to keep providing you with the latest free information, photography and Photoshop lessons, and all manner of related information. Show your appreciation by making your purchases immediately after clicking on any of our B&H or Amazon Affiliate links in this blog post. Remember, B&H ain’t just photography!
Support the BAA Blog. Support the BAA Bulletins: Shop Amazon here!
And from the BAA On-line Store:
LensCoats. I have a LensCoat on each of my big lenses to protect them from nicks and thus increase their re-sales value. All my big lens LensCoat stuff is in Hardwood Snow pattern.
LegCoat Tripod Leg Covers. I have four tripods active and each has a Hardwood Snow LegCoat on it to help prevent further damage to my tender shoulders :) And you will love them in mega-cold weather....
Gizo GT3532 LS CF Tripod. This one replaces the GT3530LS Tripod and will last you a lifetime. Learn more about this great tripod here.
Mongoose M3.6 Tripod Head. Right now this is the best tripod head around for use with lenses that weigh less than 9 pounds. For heavier lenses, check out the Wimberley V2 head.
Double Bubble Level. You will find one in my camera's hot shoe whenever I am not using flash.
The Lens Align Mark II. I use the Lens Align Mark II pretty much religiously to micro-adjust all of my gear an average of once a month and always before a major trip. Enjoy our free comprehensive tutorial here.
BreezeBrowser. I do not see how any digital photographer can exist without this program.
Delkin Flash Cards. I use and depend on Delkin compact Flash Cards and card readers most every day. Learn more about their great 700X and 1000X cards here or about my favorite Delkin card here.


Photoshop CS6 (and maybe CS5) will blend focus layers automatically using the Auto Blend tool set to stack. I created an action to automate it. Photoshop creates masks accurate to one pixel. I emailed you the steps. Feel free to share with your readers.