
Important Note
My sam and mayas att e-mail account was suspended on 18 DEC. Those who tried to reach me by e-mail between then and yesterday had their mails bounced back. If you tried to reach me during that period please re-send any important e-mails.
What’s Up?
On the very early morning of 20 DEC 2014 during the start of what turned out to be a very slow, nasty crossing from the Falklands to South Georgia, I woke to a bit of a sore throat. Did I mention a Force 9 gale? By dawn I had the world’s worst head cold featuring the world’s worst runny nose. I went through five large boxes of tissues in two days. I had zero energy. I stayed in bed and was glad that the worst of it was on the crossing rather than on landing days. By day 3 I was feeling not too bad. Today, 25 days later I still have a lingering post-nasal drip that had actually gotten worse the past few days.
Last night I spoke to Cliff Oliver who recommended Mucinex and nasal cleansing with hot salt water and AM iodine drops. I am feeling much better this morning. I had donated the Mucinex that I had on the ship to Micheal Viljeon (Say fill-YOON) who was about ten times sicker than I was.
I still have many more exciting new images, tales, and lessons to share with you here over the course of the next few weeks and am looking forward to doing so.
Huge Thanks!
Though page views dropped by about 35% during my absence y’all did a great job of remembering to use my B&H affiliate links while I was on my busman’s holiday. We sold about ten each of the new 100-400 II L IS lenses and 7D Mark IIs. I should be getting my 100-400 from B&H in a few days and plan on bringing it to San Diego where I will be using it the both my 7D II and a 1D X. IAC, thanks a stack to all those who use the BAA affiliate links for their December and early January purchases
To show your appreciation for my continuing efforts here, we ask, as always, that you use our the B&H and Amazon affiliate links on the right side of the blog for all of your purchases. B&H Is recommended for you major photography gear purchases, Amazon for your household, entertainment, and general purpose stuff. Please check the availability of all photographic accessories in the BIRDS AS ART Online Store, especially Gitzo tripods, Wimberley tripod heads, and the like. We sell only what I have used, have tested, and can depend on. We will not sell you junk. We know what you need to make creating great images easy and fun. And we are always glad to answer your gear questions via e-mail. I just learned that my account was suspended during my absence; it should be up and running by Monday at the latest.
I would of course appreciate your using our B&H affiliate links for all of your major gear, video, and electronic purchases. For the photographic stuff mentioned in the paragraph above we, meaning BAA, would of course greatly appreciate your business. Here is a huge thank you to the many who have been using our links on a regular basis and visiting the BAA Online store as well.
|
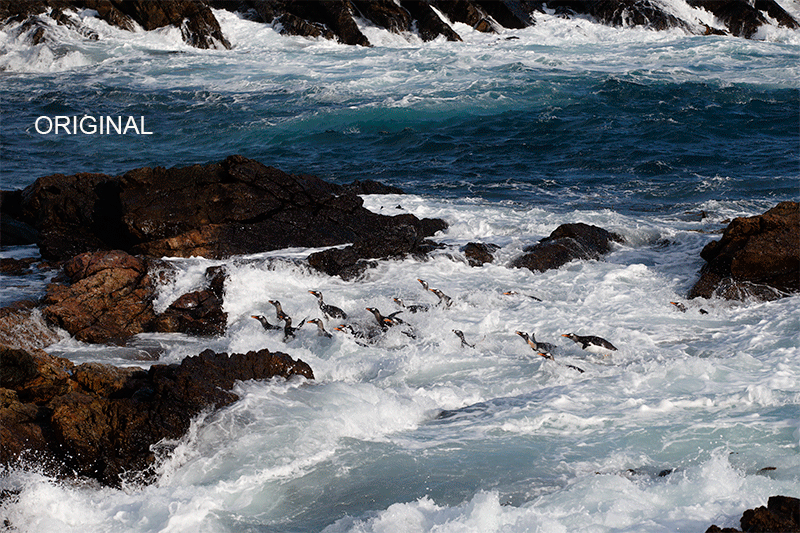
Image Question
Why are the black rocks in the original so dark, so black, and so underexposed?
Opening Up the BLACKs in DPP
One of the great advantages of converting your Canon RAW files is that the Shadow Slider is so effective at opening up dark shadows and revealing detail without increasing noise in those dark tones. For this image conversion I maxed out the shadow slider to +5. Then I did a Before/After Comparison at 400% to see if I needed to refine Arash’s recommended Noise Reduction settings. I did not.
The Image Optimization
It is a rare image that benefits from the addition of a 100% layer of NIK Color Efex Pro Detail Extractor. I did just that here and then used a Regular Layer Mask and painted away at bit of the effect from the less than brilliant WHITEs using a 33% Opacity brush. That to prevent those tones from becoming greyed out.
Next was a crop from the top. Some of the folks in the group felt that I should have left the rocks at the top as a border. Feel free to share your thoughts on the crop.
|
|
|
This image was created on 18 DEC, 2014, on day 4 of the great Cheesemans’Southern Ocean expedition. As is fairly typical, we pretty much encountered all four seasons worth of weather in a single day. By the time this image was created, 7:05pm, it was clear and sunny and very windy. See more on that below. I used the hand held Canon EF 70-200mm f/2.8L IS II USM lens (at 123mm) and the Canon EOS-1D. ISO 400. I exposed for the breaking surf with the equivalent of the very bright sunny very white exposure (1/3200 sec. at f/8) at 1/5000 sec. at f/6.3. Zone/AI Servo/Rear Focus AF as framed was active at the moment of exposure and performed perfectly by selecting one AF point two below and one to the right of the central sensor. Click here to see the latest version of the Rear Focus Tutorial. Click on the image to see the spectacular larger version. |

The Optimized Image
This is the optimized image that was featured in yesterday’s blog post. Do you like the crop?
Digital Basics
Everything that I did to optimize today’s image is covered in detail in my Digital Basics File–written in my easy-to-follow, easy-to-understand style. Are you tired of making your images look worse in Photoshop? Digital Basics File is an instructional PDF that is sent via e-mail. It includes my complete digital workflow, dozens of great Photoshop tips (including the Surface Blur settings as taught to me by Denise Ippolito), details on using all of my image clean-up tools, the use of Contrast Masks, several different ways of expanding and filling in canvas, all of my time-saving Keyboard Shortcuts, Quick Masking, Layer Masking, and NIK Color Efex Pro basics, Contrast Masks, Digital Eye Doctor techniques, using Gaussian Blurs, Tim Grey Dodge and Burn, a variety of ways to make selections, how to create time-saving actions, and tons more.
APTATS I & II
Learn the details of advanced Quick Masking techniques in APTATS I. Learn Advanced Layer Masking Techniques in APTATS II. Mention this blog post and apply a $5 discount to either with phone orders only. Buy both APTATS I and APTATS II and we will be glad to apply at $15 discount with phone orders only. Please call Jim or Jennifer at 863-692-0906 weekdays to order.
|
|
|
The latest version of DPP 4, DPP 4.1.50, now supports the RAW conversion for both the 1D Mark IV and the original 7D (in addition to several other digital camera bodies). Remember that DPP 4 IS completely new and different from the various versions of DPP 3. It originally handled files from the EOS-1D X, EOS 5D Mark III, EOS-6D, and the EOS-7D Mark II. |

Great Digital Photo Professional 4.1.50 News
An updated version of Canon Digital Photo Professional that now supports RAW files from several popular older Canon digital camera bodies including and especially the EOS-1D Mark IV, the EOS 7D, the EOS 5D Mark II, EOS Kiss X7i, and the EOS Rebel T5i among others.
To download your free copy of DPP 4.1.50,click here, then click on your camera body. Then click on Drivers and Software, then on Software, and then on the correct version of DPP 4.1.50. You will need to enter a valid serial number so have you camera in hand. After the file downloads click on it and follow the prompts. I just finished installing mine.
Welcome to a whole new world of high quality RAW conversions. I plan on speaking to Arash today to find out if we will be updating the Noise Reduction charts to include at least the 1D Mark IV and the 7D.
|
|
|
The Photographers’ Guide to Canon Digital Photo Professional 4.0 by Arash Hazeghi and Arthur Morris is now available. Click here to order. |

The DPP 4 eGuide (PDF)
The Photographers’ Guide to Canon Digital Photo Professional 4.0 by Arash Hazeghi and Arthur Morris: $40.
Artie first went to DPP because he was not happy with the colors he was getting with 1D X and 5D III images from ACR (Adobe Camera Raw). Though less than intuitive, he found it fast and easy to use once he mastered the basics. He collaborated with Arash Hazeghi on the first DPP RAW Conversion Guide. Do understand that the DPP RAW Conversion Guide details the use of various iterations of DPP 3. He calls those the DPP 3.whatever versions. The latest version is DPP 3.14.41.0.
Some time ago Canon released DPP 4.0, completely and utterly new and different from DPP 3. When it was introduced DPP 4 worked only EOS-1D X, EOS-5D Mark III, and EOS-6D images and that is still the case today. It will not work with RAW files from older Canon digital camera bodies. Both authors are hoping that a new version of DPP 4 that will convert EOS-7D Mark II images will be released soon.
In the meantime, DPP 4 performs superbly with his 1D X and 5D III images. When he first opened DPP 4 he felt as if he were in the cockpit of a Boeing 747 and was being asked to fly it. There were so many tabs and buttons and controls that he simply closed the program. He immediately called Arash and asked him if he wanted to work together on a DPP 4 guide. After 100s of hours of work the guide is now ready to teach you to conveniently and easily use DPP 4 to create the finest possible image files from your 1D X, 5D III, and 6D image files. Basically, Arash sent artie a sophisticated outline that he re-crafted into a clear, concise, easily understood, and easy to follow how-to guide written in the BAA style. Arash created all of the charts, diagrams, and graphics.
His charts with recommendations for both Chrominance and Luminance Noise Reduction values for each of the 3 covered cameras at various ISO settings are alone worth the price of the book. He spent many dozens of hours experimenting with high ISO RAW files and shares his findings with you in the DPP 4 Guide. Folks will surely want to create some sort of easily accessible quick reference on their laptops and home computers.
DPP offers a host of great features some but not all of which are reminiscent of ACR. These include the following: Multi-image display, the extremely valuable Before/after Comparison layout, Highlight/shadow warnings, White Balance, and the eight RAW Conversion tabs that include sliders for Brightness, Highlights, Shadows, Contrast, Hue-Saturation, Color Tone, Sharpness, Noise Reduction, HSL (Hue/Saturation/Luminance), Lens Corrections, and Digital Lens Optimizer among others. We teach you how to best utilize each of those and many more. We share our slightly different DPP workflows and dozens of tips that will simply make your life easier. Arash uses DPP4′s rating system for choosing his keepers while artie continues to rely on BreezeBrowser Pro for that. DPP offers a variety of sorting filters. We explain all of the options. In addition, we teach you how to set your preferences and how to arrange your workspace for the greatest efficiency.
Both authors firmly believe that the manufacturer’s conversion algorithms will always out-perform 2nd party software when it comes to preserving image quality, fine detail, and accurate color rendition.
The authors wish to thank Chuck Westfall and Rudy Winston of Canon USA for their help; they are always available to answer our nit-picking questions. Sincere thanks also to Ken Kovak, Bob Schwartz, Dane Johnson, and John Stuhlmuller for their thoughtful and substantive reviews of late drafts of the DPP 4 manuscript.
You can order your copy of the DPP 4 Guide for $40 through the BAA Online Store by clicking here, by calling Jim or Jen in the office at 863-692-0906 with credit card in hand, by sending us a check made out to “Arthur Morris” or a money order for $40 to BIRDS AS ART, PO Box 7245, Indian Lake Estates, FL 33855, or by by sending a Paypal for $40 to e-mail. IN the latter two instances be sure to note DPP 4 Guide so we know what you are ordering :).
Note: the Sharpness and Noise Reduction Charts have been updated to include the recommended values for the 7D Mark II. Those using some of the older Canon camera bodies like the 1D Mark IV, the 7D, and the 5D Mark II may now enjoy the convenience and superb conversions provided by DPP 4. Folks using the 50D and the 40D are directed to the original DPP RAW Conversion Guide click here. DPP 3 (the latest version is DPP v3.14.41.0) does a fine job of converting images from the older camera bodies. I used it for several years.
DPP 4 eGuide Kudos via e-mail from Melvin Grey
Artie, Thank you very much for creating and sending the superb new guide and for the excellent service.THANK YOU and ARASH, once again, for an invaluable guide and THANK YOU for your continuing educational blogs. Melvin
Be sure to like and follow BAA on Facebook by clicking on the logo link upper right. Tanks a stack!
Support the BAA Blog. Support the BAA Bulletins: Shop B&H here!
We want and need to keep providing you with the latest free information, photography and Photoshop lessons, and all manner of related information. Show your appreciation by making your purchases immediately after clicking on any of our B&H or Amazon Affiliate links in this blog post. Remember, B&H ain’t just photography!


Amazon.com
Those who prefer to support BAA by shopping with Amazon may use this link:
Amazon Canada
Many kind folks from north of the border, eh, have e-mailed stating that they would love to help us out by using one of our affiliate links but that living in Canada and doing so presents numerous problems. Now, they can help us out by using our Amazon Canada affiliate link by starting their searches by clicking here. Many thanks to those who have written.
Typos
In all blog posts and Bulletins, feel free to e-mail or to leave a comment regarding any typos or errors. Just be right :).


I like the crop. The rocks above are too heavy and somehow diminish a beautiful scene and fabulous water. Great shot.
The cropped version definitely. The rocks on the top of the original draw your attention away from the rest of the photo. The penguin is more visible and it makes for a more interesting image. Beautiful.
I actually prefer the ‘before’ shot to the optimized one. I like the greater contrast in the water and on the penguins, especially the dark blue in the water. Can the rock detail be enhanced without brightening everything?
Regarding the crop, it definitely brings your eyes to the penguins better. When I first saw the original, I admired the sea scape for a bit before I realized that there were birds in the photo.
In the conversion I think the water “gained” at the top and “lost” at the bottom.
How about in the optimized version?
Hi Artie, welcome back. I had a nasty head cold over the holidays also, had to get antibiotics for chest infection. It’s all gone now. Hope you got your flu shot, even though they say it may not do much good.
Great images as usual.
Denny
Many thanks Denny! artie
Its always interesting to see other photographers thoughts,when you ask a question. Many times I see a 50/50 divide, or something close to that in the answers. I’m in favor of the crop, my eyes stay with the penguins and don’t bounce around as they do in the photo with the rocks on top. Hope you feel better, I’m happy you are back!
I like the crop. The top rocks and channel (and movement in channel) did catch my immediate attention and therefore, took my eyes from the subject. I.e. they were a distraction.
I like the way the color of the water brightened up compared to the “DPP after,” but it seems that the shadow slider also took away some of the dark color from the penguins and some of the contrast in the whitewater, such as the large clear pool at the bottom. The effects in the water look fine and I would not have “missed” the darker black in the birds if I had not seen the original. Now, I wish they were darker…
But that is probably just me. By the way, Mucinex has done wonders for me in the past…
It is really interesting to see the different opinions posted on this forum. None are wrong and it makes me try to see things from a different perspective.
I fall in the pro rocks side as it seems to balance the image with white water rushing at both the upper and lower parts of the image giving better balance to the image.
Hi,
I agree with Bob Miller. With the rocks on top remaining, a more dynamic image is created. In my opinion, of course.
Hi Artie..My opinion is that the rocks at the top should be left as they act as a stop for the eye. They also help create a channel look that makes the water look more like it is moving. Just another opinion!
I do like the crop. Without it my eyes went right to the top line of white water and jagged rock pattern. Now I focus right on the penguins. Beautiful