|
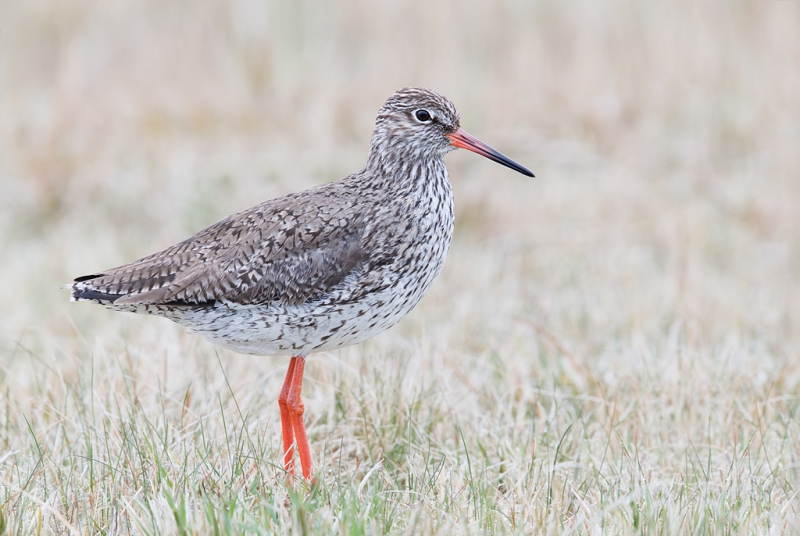
This breeding plumage Redshank image was created at Texel, Holland with the tripod-mounted Canon EF 600mm f/4L IS II USM lens, the Canon 2x EF Extender III (Teleconverter), and the Canon EOS-1D X Digital SLR camera. ISO 800. Evaluative metering +1 1/3 stops as framed: 1/60 sec. at f/11 in Manual Mode. Central sensor (by necessity) Expand/AI Servo/Rear Focus on the bird’s eye and recompose. Click here if you missed the Rear Focus Tutorial. Click on the image to see a larger version. |
Shy Wader
Redshank is a rather stocky member of the genus Tringa, a cousin of our yellowlegs. Many of the species in the Tringa tribe are known as tattlers for their habit of being the first shorebirds in a flock to be flushed. And when they take flight, they scream their telltale alarm calls taking the rest of the flock with them as they depart. As you might guess, Redshanks are not a favorite of bird photographers as they are not easily approached and when they leave the scene, they take the rest of the shorebirds with them.
Redhank is a regular migrant in Holland; many remain to breed in wet meadows. We saw many on Texel; most were impossible to approach.
|
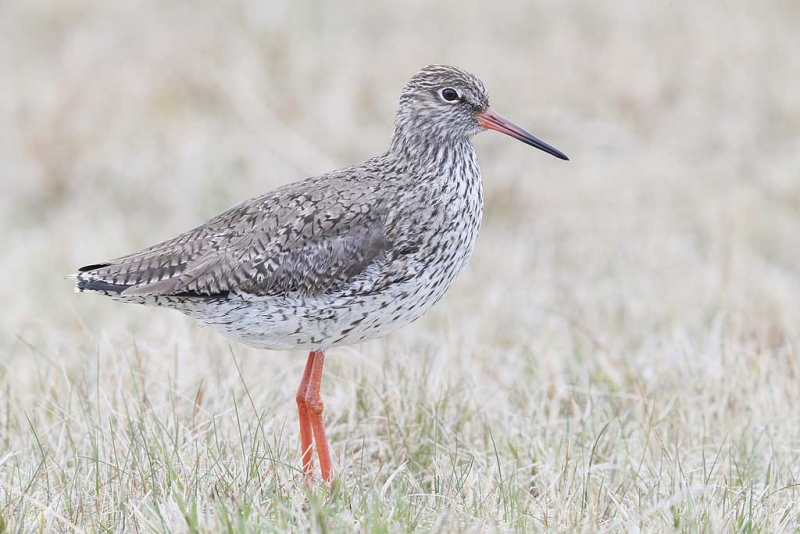
This is the original from which the image that opens this blog post was created. The bird is uncomfortably large in the frame, much too large for my taste. |
The Photo Story
When I first saw this bird it was feeding in a near-shore channel. Though it was unusually tame the mud bank in the immediate background was less then ideal. In fact, it was downright ugly. I made lots of horizontals and lots of verticals but was not excited by any of them on the back of the camera. Sensing that this was the tamest-ever Redshank I stood and walked towards the bird. I was right. It sensed me but instead of flying away in a panic is jumped up on the bank and posed. You can deduce by looking at the original image immediately above that–in my excitement–I simply got too close.
The Image Optimization
The conversion and initial processing of this image was done by Denise Ippolito who added a bit of canvas below. After I received the TIFF file from her I added more canvas below, right, and above. Thanks denise.
Denise expanded canvas using the Crop and the Clone Stamp Tools. As denise did, I used the love handles on the Crop Tool to expand the canvas and the Rectangular Marquee Tool to create selections that were then stretched with the Transform Tool. Then I used the Patch Tool to clean things up and added Layer Masks to fine-tune my work.
Digital Basics
All of the steps in the image optimization process mentioned above (and tons more) are described in detail in our in Digital Basics File, an instructional PDF that is sent via e-mail. It includes my complete digital workflow, dozens of great Photoshop tips, several different ways to expand canvas, all of my time-saving Keyboard Shortcuts, and Quick Masking, Layer Masking, and NIK Color Efex Pro basics.
Shorebirds vs. Waders
In the US we refer to the sandpipers and there allies as shorebirds and to herons and egrets as wading birds. In the UK and in Europe our shorebirds are referred to as waders. Learn about ageing and identifying all of the regularly occurring North American shorebird species in my “Shorebirds; Beautiful Beachcombers.”
Typos
On all blog posts, feel free to e-mail or leave a comment regarding any typos, wrong words, misspellings, omissions, or grammatical errors. Just be right. 🙂
Support the BAA Blog. Support the BAA Bulletins: Shop B&H here!
We want and need to keep providing you with the latest free information, photography and Photoshop lessons, and all manner of related information. Show your appreciation by making your purchases immediately after clicking on any of our B&H or Amazon Affiliate links in this blog post. Remember, B&H ain’t just photography!


And from the BAA On-line Store:
LensCoats. I have a LensCoat on each of my big lenses to protect them from nicks and thus increase their re-sales value. All my big lens LensCoat stuff is in Hardwood Snow pattern.
LegCoat Tripod Leg Covers. I have four tripods active and each has a Hardwood Snow LegCoat on it to help prevent further damage to my tender shoulders 🙂 And you will love them in mega-cold weather….
Gitzo GT3532 LS CF Tripod. This one replaces the GT3530LS Tripod and will last you a lifetime. Learn more about this great tripod here.
Mongoose M3.6 Tripod Head. Right now this is the best tripod head around for use with lenses that weigh less than 9 pounds. For heavier lenses, check out the Wimberley V2 head.
Double Bubble Level. You will find one in my camera’s hot shoe whenever I am not using flash.
The Lens Align Mark II. I use the Lens Align Mark II pretty much religiously to micro-adjust all of my gear an average of once a month and always before a major trip. Enjoy our free comprehensive tutorial here.
BreezeBrowser. I do not see how any digital photographer can exist without this program.
Delkin Flash Cards. I use and depend on Delkin compact Flash Cards and card readers most every day. Learn more about their great 700X and 1000X cards here or about my favorite Delkin card here.


Just curious as to why you didn’t switch to the 1.4x TC instead – was it because you already had the 2x on and you were afraid that the bird would fly?
Good question. That is exactly what I should have done….
Artie, can you elaborate on why you believe that, in the original image, the bird is too large. I like your original image (though I’m not criticizing the edit). There is space between the head and legs and the edges of the image, so it’s not as if the bird is that close to the edges. It would appear that the original image just needs a slight tweak on the levels or the color.
Purely personal taste. One of the best tips that I ever got was early on from a guy named J. Pete Myers, a brilliant and funny shorebird biologitst, who was working at VIREO in Philadelphia at the time. As a beginner, I tried to get every bird “full frame.” J. Pete suggested that I give the birds more room in the frame, room to be so to speak.
For me the Redshank definitely needed more room below as the virtual feet are pretty much clipped. After that, it needed more room above as I almost always want more room above the bird than below. And after that, I needed to add canvas in front of the bird as I love 3X2 and do not usually like boxy type compositions.
I have made the same mistake over and over again – trying to get that “full frame” image and going overboard. Now, I much prefer images with the bird a bit smaller in the frame.