Arthur Morris/BIRDS AS ART
March 13th, 2013

If It Works and Feels Good, Do It Again

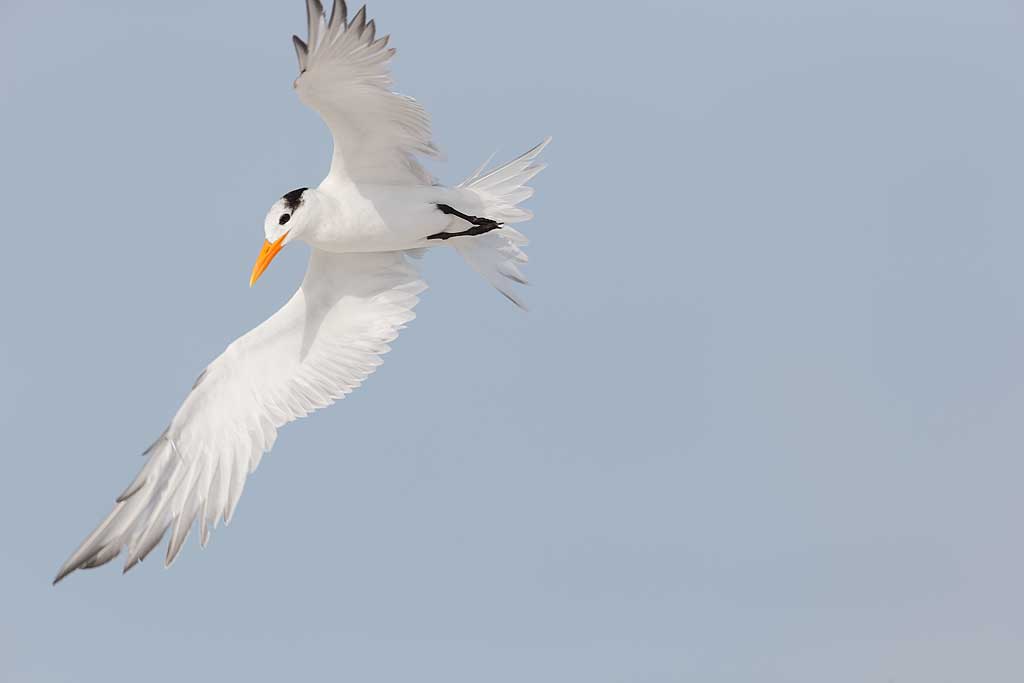
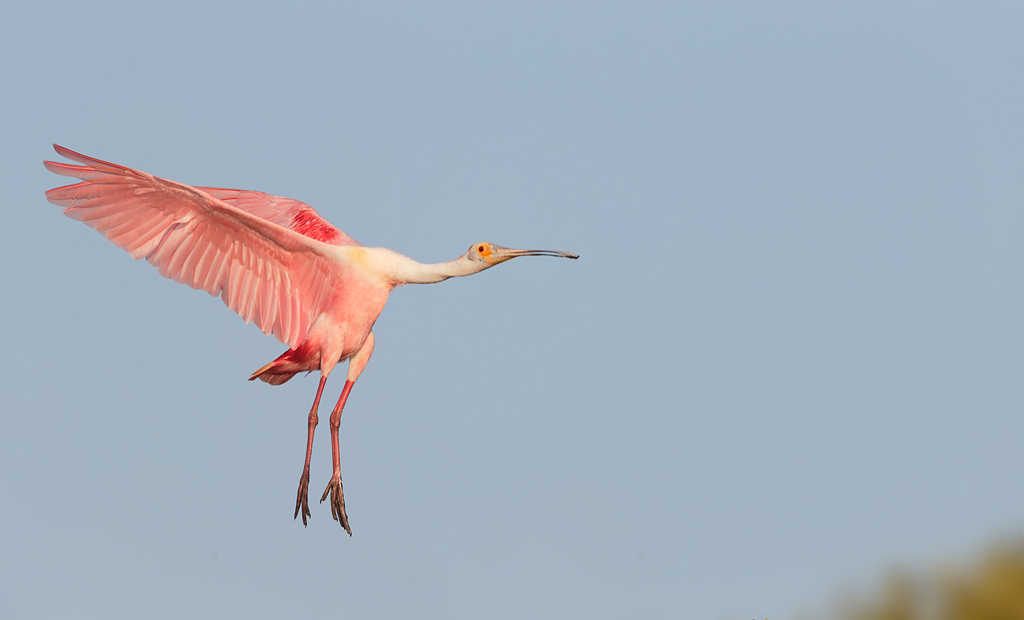
This Roseate Spoonbill flight image was created with the tripod-mounted Canon EF 600mm f/4L IS II USM lens, the Canon 1.4x EF Extender III (Teleconverter), and the Canon EOS-1D X Digital SLR camera. ISO 400. Evaluative metering +1 stop as framed: 1/2500 sec. at f/5.6 in Manual mode.

Central sensor/AI Servo/Rear Focus AF on the bird’s head just behind the eye active at the moment of exposure. Click here if you missed the Rear Focus Tutorial. Click on the image to see a larger version.

Most trips to Alafia Banks offer numerous excellent spoonbill flight opportunities.

If It Works and Feels Good, Do It Again

The first Fort Desoto/Hooptie Deux–Roseate Spoonbill Short Notice IPT was a huge success. Tons of learning and tons of great subjects and situations. And a great group. I will post a full IPT Report in the next BAA On-line Bulletin. Coming soon.

Announcing a 2nd New Concept IPT: the Fort Desoto/Hooptie Deux–Roseate Spoonbill Short Notice IPT/April 3-7, 2013/5 DAYS: $2399. Strict limit: six photographers.

Early April can be superb at Alafia Banks. Early April is almost always superb at Fort DeSoto.

Here is the structure and schedule: I will be leading the first three days of this IPT. James Shadle will be leading the last two days. We will do three Hooptie Deux trips, one full day and one morning only trip. The first day and one of the next two full days will be at Fort Desoto where the Laughing Gulls will be in splendid breeding plumage with their full black hoods, their wine-red bills, and white eye crescents. They are one of our most under-appreciated species. The Royal, Sandwich, and Forster’s Terns will also be in breeding plumage. And all of these species will be displaying, courting, and mating. You can also expect a variety of wading birds, especially Reddish Egret, and a variety of shorebirds including Long-billed Curlew, Marbled Godwit, Dunlin, American Oystercatcher, and many more. And you will need to beat the Willets off with a stick. The additional possibilities are too numerous to mention.

We will spend a full day on the Hooptie Deux with James Shadle on either Thursday or Friday depending on the weather. The morning will be at Alafia Banks with spoonbill as the main target species. There will be lots of great flight photography not only with spoonbills, many of which will be in full breeding plumage, but with Brown Pelicans and Double-crested Cormorants, Reddish Egret and White Ibis in full breeding plumage, Great Egret, Great Blue Heron, Turkey and Black Vultures, and lots more. The afternoon Hooptie trip will be at one of several fresh water heronries. James will trailer his customized pontoon boat to the best rookery. Subjects, depending on location, will likely include Cattle Egret, Snowy Egret, Little Blue Heron, Great Blue Heron, White Ibis, Black-crowned Night-heron, and Double-crested Cormorant. All nesting and in flight. Most but not all of the photography on a boat trip to the Banks with James is done while standing in the water with your tripod. James has lightweight chest waders and surf booties on board for all at no charge. Folks who wish to keep their expensive Gitzo tripods saltwater free often opt to use Drypods. Learn more here.
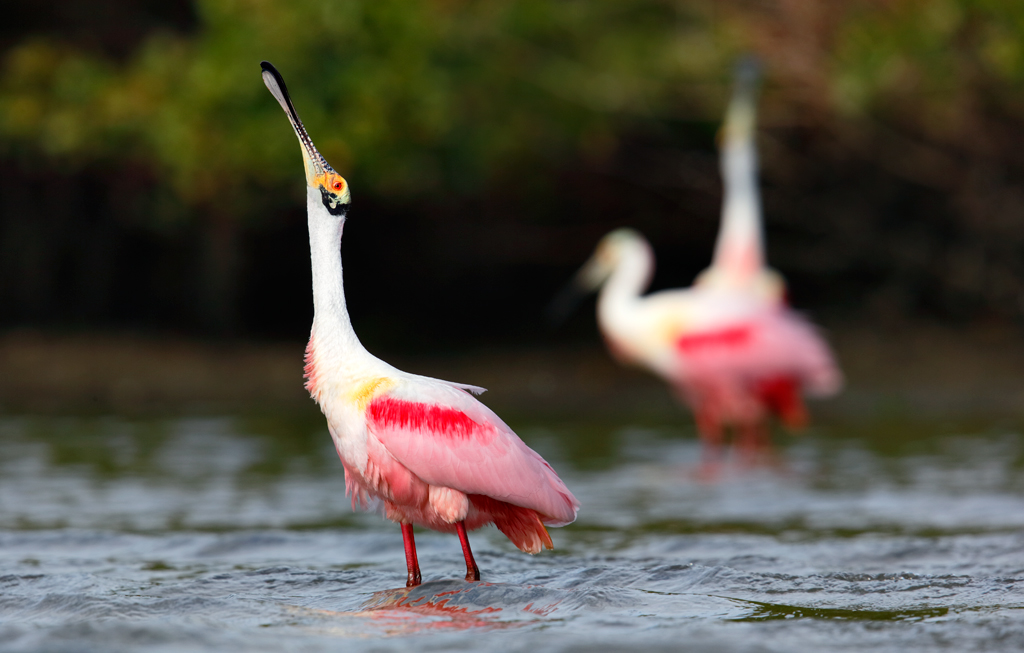
These displaying (sky-pointing) Roseate Spoonbills were photographed at Alafia Banks on the recently concluded Fort Desoto/Hooptie Deux IPT with the tripod-mounted Canon EF 600mm f/4L IS II USM lens, the Canon 2x EF Extender III (Teleconverter), and the Canon EOS-1D X. ISO 400. Evaluative metering -1 stop: 1/500 sec. at f/9 in Manual mode. The exposure was confirmed in advance via histogram check.

Central sensor (by necessity)/AI Servo Expand/Rear Focus AF on the closest bird and re-compose. Click here if you missed the Rear Focus Tutorial. Click on the image for a larger version.

We will get to photograph a great variety of breeding behaviors on the 2nd New Concept IPT: the Fort Desoto/Hooptie Deux–Roseate Spoonbill Short Notice IPT.

Saturday and Sunday with James will feature a morning on the Hooptie Deux at Alafia Banks and one or more sessions at Honeymoon Island State Park where many dozens of pairs of Osprey are nesting. There will of course be lots of flight photography. Depending on the winds and weather there may be an afternoon session at a Wood Stork rookery or some local beaches that James knows well. All of the above (except for the leader schedule) is of course subject to change depending on the weather including wind and sky conditions as well as local conditions. James has an intimate knowledge of each location and has visited them regularly for many years. We will be staying in St. Petersburg, FL where we will be 30-45 minutes at most from all of our shooting locations.

All of the above plus practically private access to two of the planet’s premier photographic educators represents a rare opportunity to grow as a nature photographer. A $500 deposit is needed to hold your spot; call Jim or Jennifer asap at 1-863-692-0906. Your deposit may be placed with a credit card. Your payment in full by personal check will then be due along with your completed paperwork both sent via US Mail. Please print, read, and sign the release form here and include it with your check. If you would rather pay in full via personal check, please call or e-mail immediately to save your spot. As always, this IPT will run with only a single registrant. Yeah, I know that it might seem nuts but neither James nor I can live with telling folks who have arranged to take time off from work and made travel plans that we are cancelling a trip because we will not be making enough money to justify running it….

You can learn more about New Concept IPTs by clicking here and scrolling down. Be sure to check out the killer white morph Reddish Egret image there.
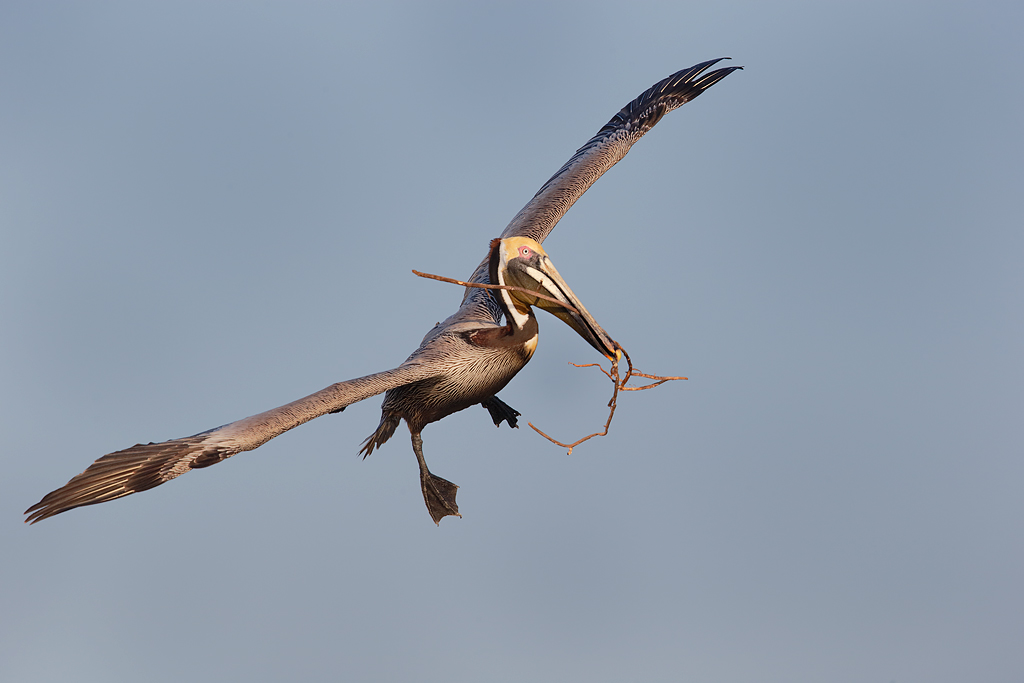
This Brown Pelican carrying nesting material was photographed with the tripod-mounted Canon EF 600mm f/4L IS II USM lens, the Canon 1.4x EF Extender III (Teleconverter), and the Canon EOS-1D X Digital SLR camera. ISO 800. Evaluative metering +2/3 stop as framed: 1/2000 sec. at f/7.1 in Manual mode.

Central sensor/AI Servo/Rear Focus AF on the bird’s head just behind the eye active at the moment of exposure. Click here if you missed the Rear Focus Tutorial. Click on the image to see a larger version.

During our after lunch editing sessions (by editing I mean selecting your keepers) we spent a lot of time discussing the nuances of ideal and less than ideal wing positions. Everyone learned a ton. In the field we spent an equal amount of time teaching folks about the effect of wind direction on bird photography.

Fort DeSoto/Hooptie Deux/Roseate Spoonbill Short Notice IPT Kudos

I received the e-mail below from a participant after the conclusion of this IPT.

Hello Artie, I wanted to thank you again for the fantastic last-minute IPT! Your teachings were excellent, with tons of hands-on practice. I greatly enjoyed watching over your shoulder as you reviewed the criteria that you use to select your keepers after getting back from the field and then doing complete image optimizations in Photoshop. This experience will help me greatly when making my own selections and help me know what to strive for when shooting on my own. Thanks to you, my photography has been stepped up a level. I would absolutely recommend that people wanting to be serious with wildlife photography to sign up for your IPTs.

Collier, John and Monte, It was a very enjoyable experience to be part of this with you guys! You were all very nice and it would be fantastic meeting again. I wish you a safe trip back home. Very best, Steven
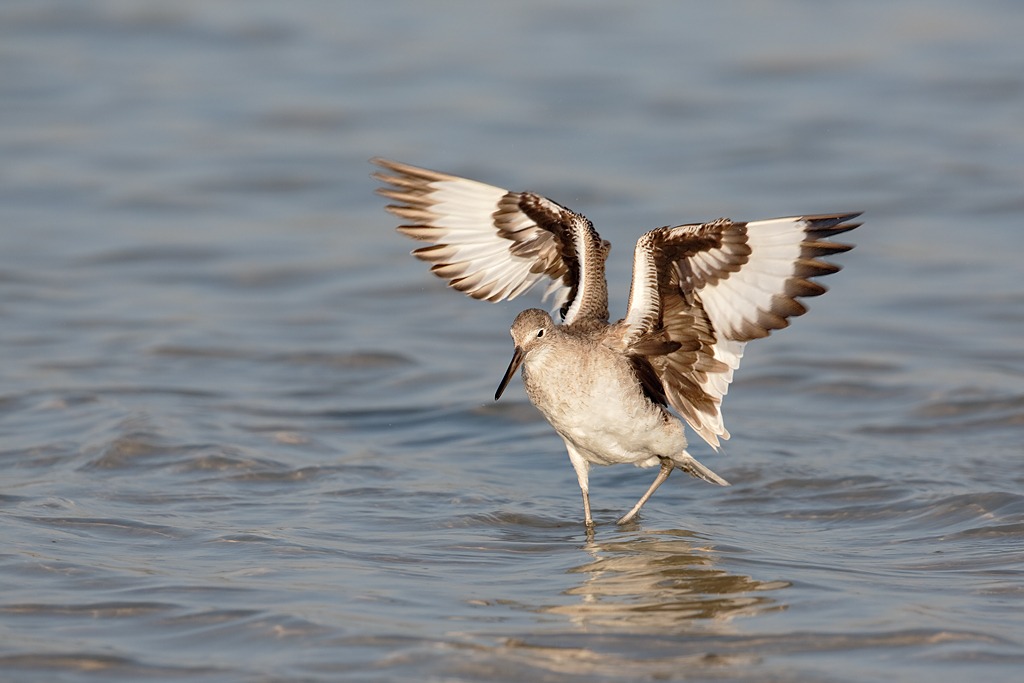
This image of a Willet flapping after its bath was made on March 8 at Fort Desoto on the Fort Desoto/Hooptie Deux Short Notice IPT with the hand held Canon EF 300mm f/2.8L IS II USM Telephoto Lens, the Canon 2x EF Extender III (Teleconverter), and the Canon EOS 5D Mark III camera body. ISO 400. Evaluative metering +1/3 stop: 1/1600 sec. at f/7.1 in Manual mode.

Central sensor/AI Servo Surround/Rear Focus AF active at the moment of exposure. Click here if you missed the Rear Focus Tutorial. Click on the image for a larger version.

Folks on the recently concluded Desoto/Hooptie Deux Short Notice IPT learned a ton about photographing bathing birds including why to frame wide, how to anticipate the flap, and which AF sensor and pattern(s) to use for a given species.

Fort Desoto Site Guide

There have been some major changes at Fort Desoto. Most of them are good. I will, therefore, be updating the Fort Desoto Site Guide quite soon. Learn more about this great guide here. You can check out all of our Site Guides by clicking here.
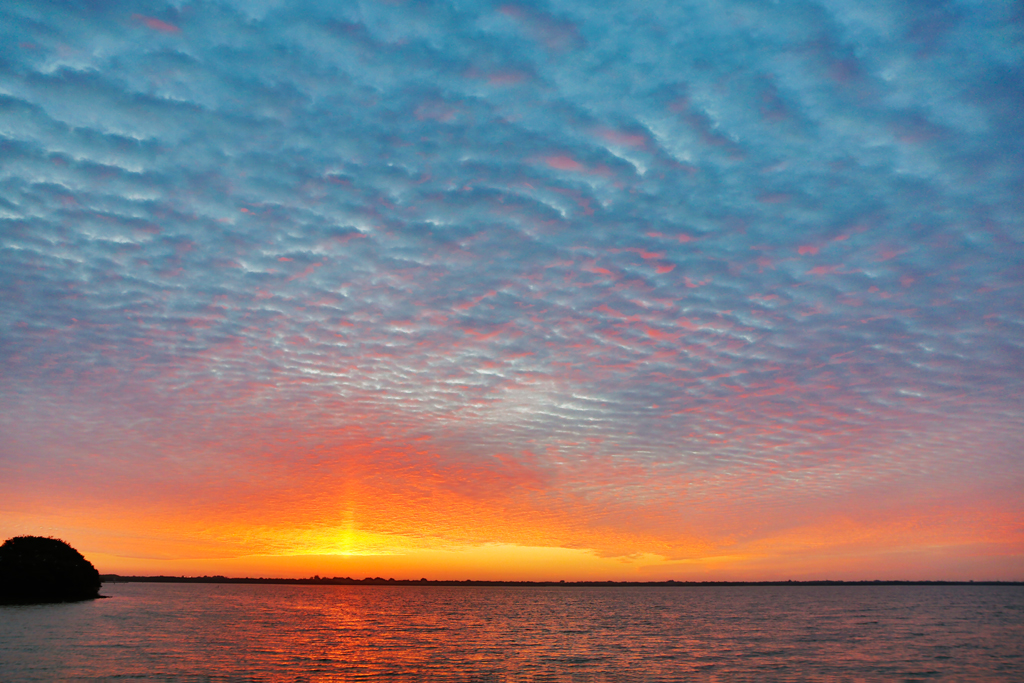
This 3-frame in-camera Art Vivid HDR image of the sky at sunrise at Alafia Banks was created with the hand held Canon 24-105mm f/4L IS EF USM AF Lens and the Canon EOS 5D Mark III camera body. ISO 800. Evaluative metering +1 stop (+/-3 full stops): 1/125 sec. at f/5.6 was the base exposure.

Central sensor/AI Servo Rear Focus AF and recompose. Click here if you missed the Rear Focus Tutorial. Be sure to click on the image to enjoy a larger version.

We leave the dock early to photograph the blast off of Fish Crows in pre-dawn light. On the morning of March 10th it was cloudy until the sun cracked the horizon and lit things up.

EOS-5D Mark III User’s Guide

In the EOS-5D Mark III User’s Guide You can learn everything that I know about the following important topics: 5D III exposure fine points, handling the WHITEs, the top LCD and all camera control buttons, 5D Mark III drive modes, how to manually select an AF sensor, choosing an AF Area Selection Mode, and Menu Item access. Coverage of almost all Menu Items and Custom Functions including: Image Quality, Auto Lighting Optimizer, Highlight Tone Priority, AF Configuration Tool (includes details on the custom Case setting that I use), Acceleration/deceleration tracking, Tracking sensitivity, Lens drive when AF impossible, Orientation linked AF point (I love this feature on the 5D III!), Highlight alert, Histogram display, Auto rotate, Custom Shooting Mode set-up, Safety shift, using the Q button, and setting up rear focus.Plus detailed instructions on how to set up for both in-camera HDR and in-camera multiple exposures.

The guide is–of course–written in my informal, easy-to-follow style. Learn more or purchase here.
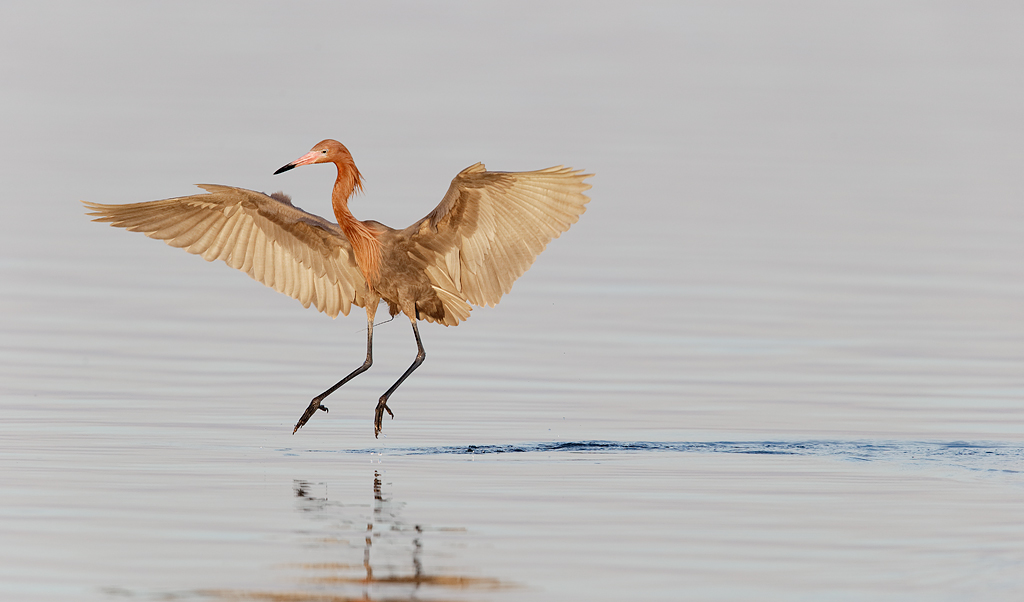
This dancing dark morph Reddish Egret photograph was made on the last afternoon of the Fort Desoto/Hooptie Deux Short Notice IPT with the tripod-mounted Canon EF 600mm f/4L IS II USM lens, the Canon 1.4x EF Extender III (Teleconverter), and the Canon EOS-1D X Digital SLR camera. ISO 800. Evaluative metering +1 1/3 stops as framed: 1/1000 sec. at f/5.6 in Manual mode.

61-point/AI Servo/Rear Focus AF on the bird’s head just behind the eye active at the moment of exposure. Click here if you missed the Rear Focus Tutorial. Click on the image to see a larger version.

Based on the wind and the weather my last- second decision to change of our afternoon shooting location paid off big time. I kept 45 images of this bird dancing and catching fish. 61-Point AF performed superbly here as it does with most situations featuring erratic action.

Your Fave?

Take a moment to leave a comment and let us know which of the images presented here is your favorite. Be sure to let us know why.

EOS-1D X AF Guide

You can learn exactly how I set up and use this camera’s great new AF system in our EOS-1D X AF Guide. And you can learn about our other camera User’s Guides here.

Typos

On all blog posts, feel free to e-mail or leave a comment regarding any typos, wrong words, misspellings, omissions, or grammatical errors. Just be right. 🙂

Support the BAA Blog. Support the BAA Bulletins: Shop B&H here!

We want and need to keep providing you with the latest free information, photography and Photoshop lessons, and all manner of related information. Show your appreciation by making your purchases immediately after clicking on any of our B&H or Amazon Affiliate links in this blog post. Remember, B&H ain’t just photography!

If you are considering an item for purchase or comparison shopping be sure to place an item in your cart to see the too-low-to show the actual price. In many cases the prices are so low that B&H is forbidden from publicizing them!

B&H Search Engine Banner


B&H Photo - Video - Pro Audio


Support the BAA Blog. Support the BAA Bulletins: Shop Amazon here!

Consider doing all of your Amazon.com shopping using the search link below. You'll be getting the same low prices and great service that you are accustomed to and at the same time, supporting my efforts in the Bulletins and on the Blog to bring you great images, timely product news and info, and tons of free educational articles on an almost daily (and sometimes almost back-breaking) basis :) Just type your search in the little white box and hit Go.

And from the BAA On-line Store:

LensCoats. I have a LensCoat on each of my big lenses to protect them from nicks and thus increase their re-sales value. All my big lens LensCoat stuff is in Hardwood Snow pattern.
LegCoat Tripod Leg Covers. I have four tripods active and each has a Hardwood Snow LegCoat on it to help prevent further damage to my tender shoulders :) And you will love them in mega-cold weather....
Gitzo GT3532 LS CF Tripod. This one replaces the GT3530LS Tripod and will last you a lifetime. Learn more about this great tripod here.
Mongoose M3.6 Tripod Head. Right now this is the best tripod head around for use with lenses that weigh less than 9 pounds. For heavier lenses, check out the Wimberley V2 head.
Double Bubble Level. You will find one in my camera's hot shoe whenever I am not using flash.
The Lens Align Mark II. I use the Lens Align Mark II pretty much religiously to micro-adjust all of my gear an average of once a month and always before a major trip. Enjoy our free comprehensive tutorial here.
BreezeBrowser. I do not see how any digital photographer can exist without this program.
Delkin Flash Cards. I use and depend on Delkin compact Flash Cards and card readers most every day. Learn more about their great 700X and 1000X cards here or about my favorite Delkin card here.
March 12th, 2013

How are Your Eagle Eyes?

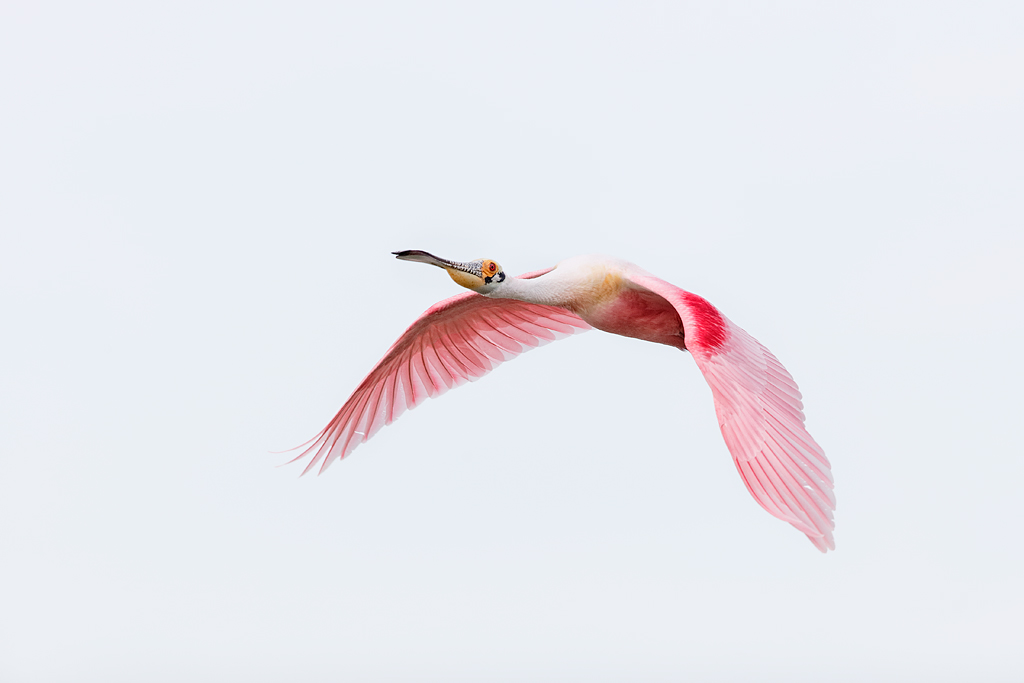
This Roseate Spoonbill flight image was created on the Hooptie Deux with the tripod-mounted Canon EF 600mm f/4L IS II USM lens and the Canon EOS-1D X Digital SLR camera. ISO 800. Evaluative metering +2 1/3 stops off the white sky: 1/2000 sec. at f/4 in Manual mode. Exposure previously confirmed via histogram check.

Central sensor/AI Servo Surround/Rear Focus AF active at the moment of exposure. Click here if you missed the Rear Focus Tutorial. Click on the image to see a larger version.

How are Your Eagle Eyes?

Please take a close look at each of the three images here by clicking on them to see the larger version. Let us know if you see any evidence of Photoshop work, extensive or otherwise. Right now, I ain’t saying.

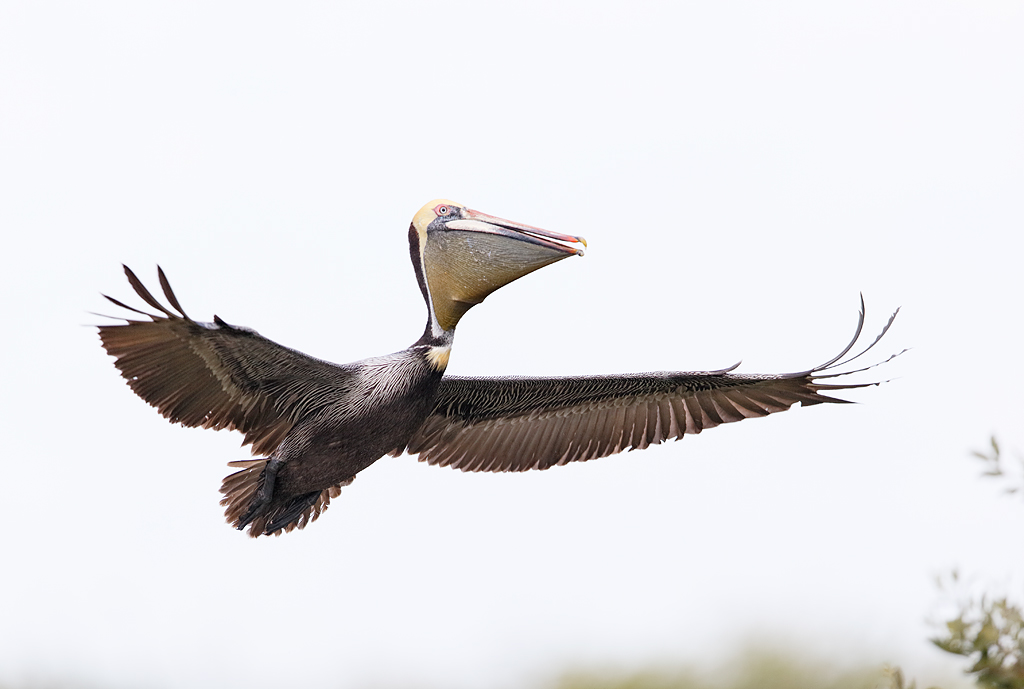
This Brown Pelican image was also created on the Hooptie Deux with the tripod-mounted Canon EF 600mm f/4L IS II USM lens and the Canon EOS-1D X Digital SLR camera. ISO 800. Evaluative metering +2 2/3 stops off the white sky: 1/1250 sec. at f/4 in Manual mode. I simply opened up 1/3 stop from the exposure that I was using at the time for the spoonbills.

It is not uncommon to see a pelican landing at the nests with its bill pouch distended as seen in this image. I am unsure as to why they do that. I have never seen this behavior away from a breeding colony.

Central sensor/AI Servo Surround/Rear Focus AF active at the moment of exposure. Click here if you missed the Rear Focus Tutorial. Click on the image to see a larger version.

The Hooptie Deux

All of the images here was created on the just-concluded Fort Desoto/Hooptie Deux Short notice IPT. We spent three mornings on the Hooptie Deux with my friend Captain James Shadle (aka FROGGIE). James has been taking small groups of photographers out to Alafia Banks for about a decade to photograph the Roseate Spoonbills and the several other species that breed there. The Hooptie Deux is a pontoon boat that has been customized and recently upgraded for photography. Most but not all of the photography on a boat trip to the banks with James is done while standing in the water with your tripod. Some folks have shown up with their Sunday-best Air Jordans…. James does have lightweight chest waders and surf booties on board for all at no charge. Folks who wish to keep their expensive Gitzo tripods saltwater free often opt to use Drypods. Learn more here. In addition James trailers the boat to one of several fresh water breeding bird rookeries in west-central Florida. Subjects on these trips include Wood Stork, Little Blue Heron, Cattle Egret, White Ibis, Black-crowned Night-heron, and many more.

There simply is no better place in Florida (and possibly in North America) to photograph spoonbills than Alafia Banks. If you have any questions, or would like to join James for either a full or half-day, try contacting him as follows: by cell phone at 813-363-2854 or via e-mail. Best would be to get a small group together to cut costs. James always has a lot on his plate. If you do not hear back from him in a day or three please shoot me an e-mail and I will get on his case. Not to worry: I am serious.

This image was made on March 8 at Fort Desoto on the Fort Desoto/Hooptie Deux Short Notice IPT with the hand held Canon EF 300mm f/2.8L IS II USM Telephoto Lens, the Canon 2x EF Extender III (Teleconverter), and the Canon EOS 5D Mark III Digital Camera (Body Only). ISO 400; 1/2000 sec. at f/8 in Manual mode was a slight underexposure.

Central sensor/AI Servo Surround/Rear Focus AF on the bird’s eye and recompose. Lots more on that in a future blog post soon. Click here if you missed the Rear Focus Tutorial. Click on the image for a larger version.

Fort Desoto Site Guide

There have been some major changes at Fort Desoto. Most of them are good. I will, therefore, be updating the Fort Desoto Site Guide quite soon. Learn more about this great guide here. You can check out all of our Site Guides by clicking here.

Your Favorite?

Please take a moment to let us know which of the three images here is your favorite. And let us know why.

IPT Opportunities

Click here to see the current schedule and IPT openings.

Highlights include a single opening on the next Bear Boat IPT, two slots left on this summer’s killer Galapagos trip, and lots of room on the Tanzania Photo-Safari.

Bear Boat/Bears Catching Salmon IPT: September 2-9, 2013 from Kodiak, AK: $6699.

Happy campers only! Maximum 6 + two leaders: Arthur Morris and Denise Ippolito. Openings: 1.

GALAPAGOS Photo Cruise of a Lifetime IPT/The Complete Galapagos Photographic Experience. July 2-16, 2013 on the boat.

13 FULL and two 1/2 days of photography: $12,749. Co-leader: Denise Ippolito. Limit 14 including the leaders/Openings: 2.

Africa/Tanzania/Serengeti Summer Migration Safari: 12 full and two half-days of photography: $12,999/person double occupancy. Limit: 12/Openings: 7.

Leaders: Todd Gustafson and Arthur Morris. Leave the US AUG 3, 2013. Fly home from Arusha, Tanzania on the evening of August 18. Day 1 of the safari is August 5. Our last morning of photography is August 18. We will be visiting Tarangire National Park, Seronera Lodge–aka Leopard City!–twice, an exclusive mobile tented camp in the Serengeti, and at the end, the spectacular wildlife spectacle that is Ngorongoro Crater. Please e-mail for itinerary.

Nickerson Baby Beach-nesting Birds IPT: July 23-25, 2013: $1099. Introductory slide program: Monday, July 22, 2013. Limit 12/Openings: 3. Co-leader: Denise Ippolito.

Again, please click here for additional info and additional IPTs.

Seriously Huge B&H Savings on Nikon and Canon Gear

Nikon

For the first time in many years NIKON is going to be deeply discounting many legacy pro lenses individually for the next 2 weeks only with discounts up to $350. There are also many amazing deals on NIKON Buy together and Save packages as well. Click here to save.

Nikon DSLRS Bundles with Lenses & Flash: Save up to $750. Click here to save. Make sure to add each item to your shopping cart to see the absolute lowest price.

Canon Lenses & Speedlites: Save Up to $300

Click here to save. Make sure to add each item to your shopping cart to see the absolute lowest price.

Canon Buy Together & Save: Save Up to $400

Click here to save.

EOS-1D X AF Guide

You can learn exactly how I set up and use this camera’s great new AF system in our EOS-1D X AF Guide. And you can learn about our other camera User’s Guides here.
.

Typos

On all blog posts, feel free to e-mail or leave a comment regarding any typos, wrong words, misspellings, omissions, or grammatical errors. Just be right. 🙂

Support the BAA Blog. Support the BAA Bulletins: Shop B&H here!

We want and need to keep providing you with the latest free information, photography and Photoshop lessons, and all manner of related information. Show your appreciation by making your purchases immediately after clicking on any of our B&H or Amazon Affiliate links in this blog post. Remember, B&H ain’t just photography!

If you are considering an item for purchase or comparison shopping be sure to place an item in your cart to see the too-low-to show the actual price. In many cases the prices are so low that B&H is forbidden from publicizing them!

B&H Search Engine Banner


B&H Photo - Video - Pro Audio


Support the BAA Blog. Support the BAA Bulletins: Shop Amazon here!

Consider doing all of your Amazon.com shopping using the search link below. You'll be getting the same low prices and great service that you are accustomed to and at the same time, supporting my efforts in the Bulletins and on the Blog to bring you great images, timely product news and info, and tons of free educational articles on an almost daily (and sometimes almost back-breaking) basis :) Just type your search in the little white box and hit Go.

And from the BAA On-line Store:

LensCoats. I have a LensCoat on each of my big lenses to protect them from nicks and thus increase their re-sales value. All my big lens LensCoat stuff is in Hardwood Snow pattern.
LegCoat Tripod Leg Covers. I have four tripods active and each has a Hardwood Snow LegCoat on it to help prevent further damage to my tender shoulders :) And you will love them in mega-cold weather....
Gitzo GT3532 LS CF Tripod. This one replaces the GT3530LS Tripod and will last you a lifetime. Learn more about this great tripod here.
Mongoose M3.6 Tripod Head. Right now this is the best tripod head around for use with lenses that weigh less than 9 pounds. For heavier lenses, check out the Wimberley V2 head.
Double Bubble Level. You will find one in my camera's hot shoe whenever I am not using flash.
The Lens Align Mark II. I use the Lens Align Mark II pretty much religiously to micro-adjust all of my gear an average of once a month and always before a major trip. Enjoy our free comprehensive tutorial here.
BreezeBrowser. I do not see how any digital photographer can exist without this program.
Delkin Flash Cards. I use and depend on Delkin compact Flash Cards and card readers most every day. Learn more about their great 700X and 1000X cards here or about my favorite Delkin card here.
March 10th, 2013

K-7500, Pre-dawn AF, Surface Blur Tips, & Crane Chick Behavior Answer

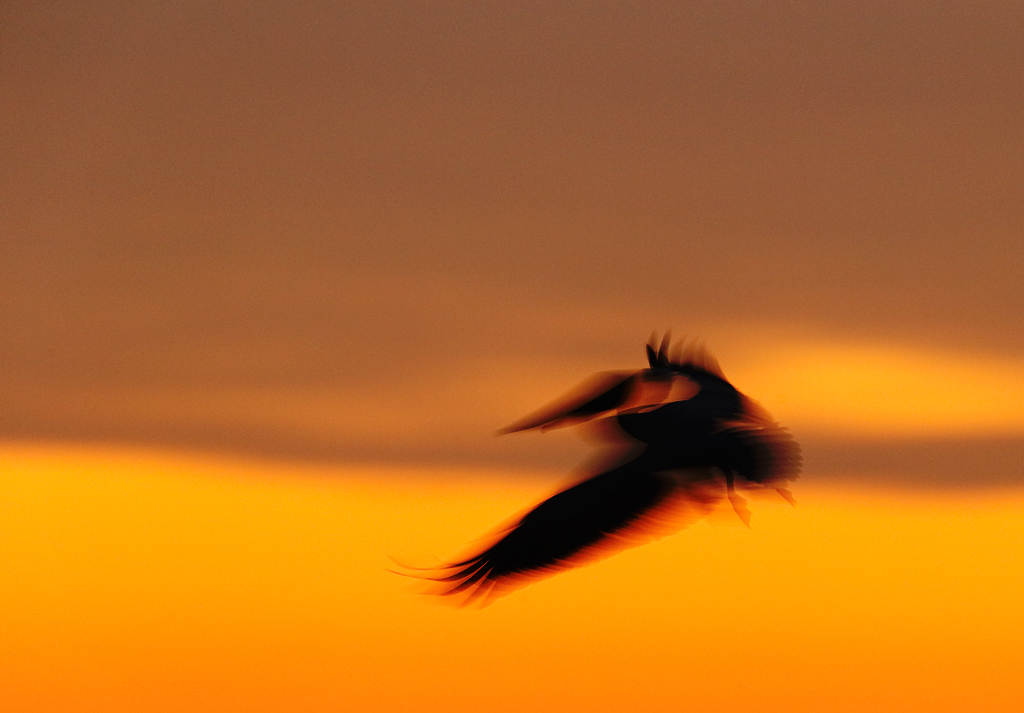
This Brown Pelican was photographed this morning from the deck of the Hooptie Deux at Alafia Banks with the tripod-mounted Canon EF 600mm f/4L IS II USM lens, the Canon 1.4x EF Extender III (Teleconverter), and the Canon EOS-1D X Digital SLR camera. ISO Safety Shift is the equivalent of Auto ISO: ISO 2000. Evaluative metering +1 stop as framed: 1/30 sec. at f/6.3 in Tv mode.

61-Point/AI Servo/Rear Focus AF active at the moment of exposure. Click here if you missed the Rear Focus Tutorial. Click on the image to see a larger version.

K-7500 & Pre-dawn AF Tips

Before the somewhat bland sunrise turned glorious the colors were rather muted. I switched the color temperature on my 1D X from my usual AWB (Auto White Balance) setting to K (Kelvin) and spun the index finger dial until it read 7500 knowing that this would accentuate the colors. With a small boost in Saturation after the RAW conversion in DPP that trick worked quite well. As my aim was to create a pleasing blur I was working in Tv mode at 1/30 sec. I set the exposure compensation to only +1 to avoid burning the red channel. That worked quite well too.

When attempting to photograph single birds in the pre-dawn light I will usually work in 61-Point AF. This worked especially well this morning as there were some birds flying left to right and others flying right to left. Being in 61-Point allows me to at least attempt to get the bird out of the center of the frame.

A Guide to Pleasing Blurs

As some folks believe, pleasing blurs are not out of focus mistakes. If you would like to learn how to create these increasingly popular images, get yourself a copy of “A Guide to Pleasing Blurs” by Denise Ippolito and yours truly.

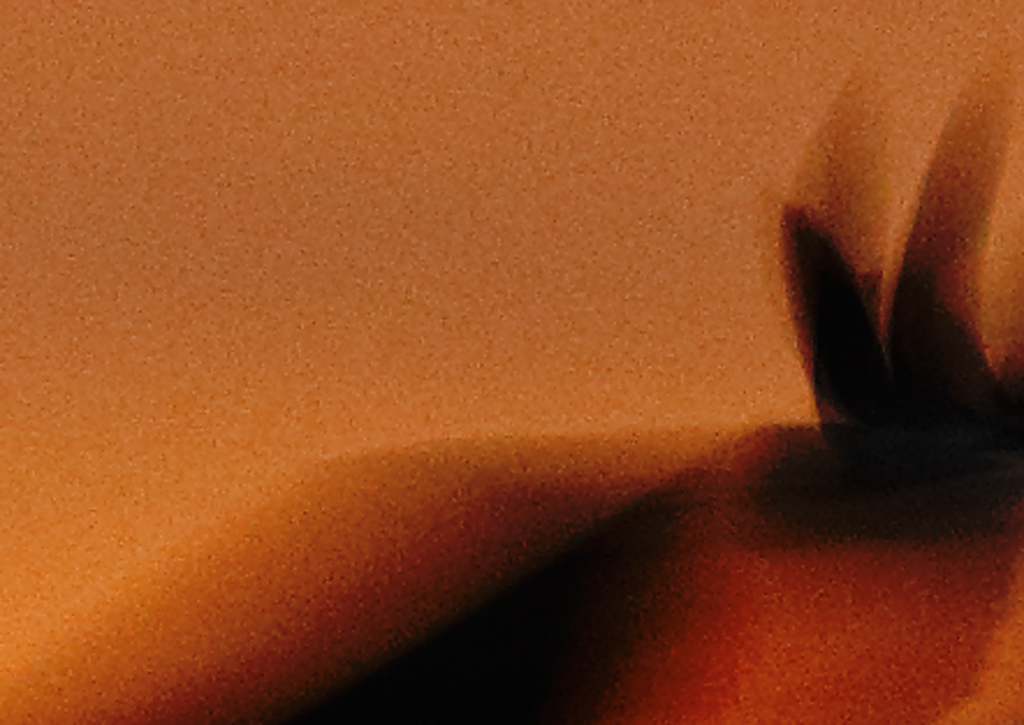
This is about a 200% crop of the image after conversion.

Noisy

With the ISO set automatically to 2000 and with the image somewhat underexposed to avoid burning the red channel there was, as you can see above, lots of noise present in the converted image. The noise we are seeing here is luminance noise. Chrominance noise would be seen as splotches of green and purple in the blacks. Note: I originally wrote that we were seeing chrominance noise; as that was a brain typo I chose to correct it here.

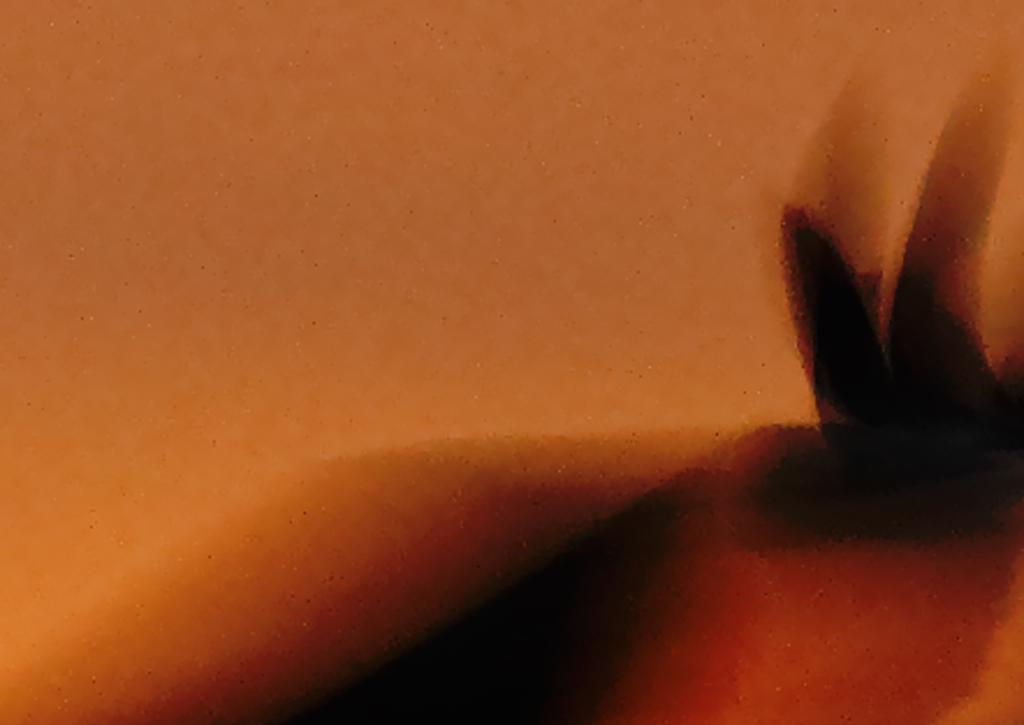
This is about a 200% crop of the image after running a Surface Blur adjustment.

Surface Blur

The amazingly creative Denise Ippolito, who is also something of a Photoshop whiz, taught me the Surface Blur trick about a year ago. Here, it shines. I put the image on its own layer and hit Filter/Blur/Surface Blur. After experimenting a bit I wound up going with the Radius at 3 pixels and Threshold at 6. I usually start at 2/3 and increase the numbers until the background is baby-tush smooth. You can click Preview on and off to check your results.

Once I hit OK I enlarged the image to about 200% and clicked the layer eyeball on and off to see if the Surface Blur settings were affecting the sharpness of the subject. As they were not there was no need to fine-tune with a Layer Mask. Thanks Lady D.

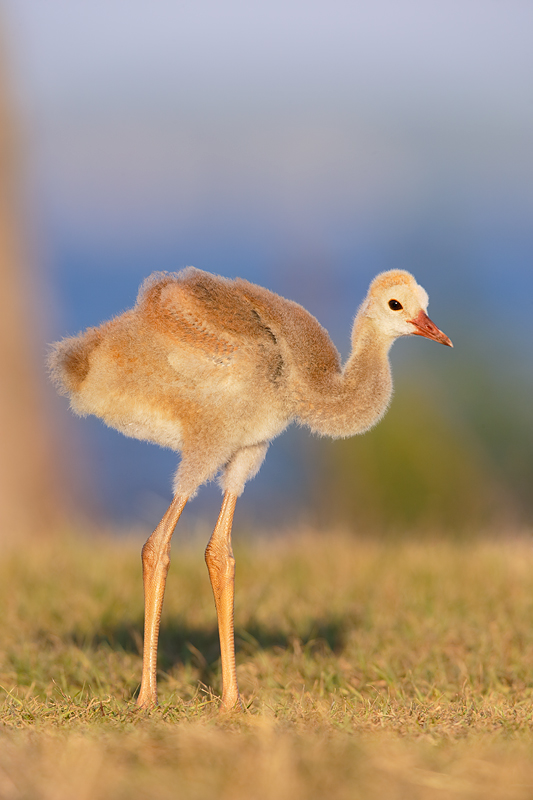
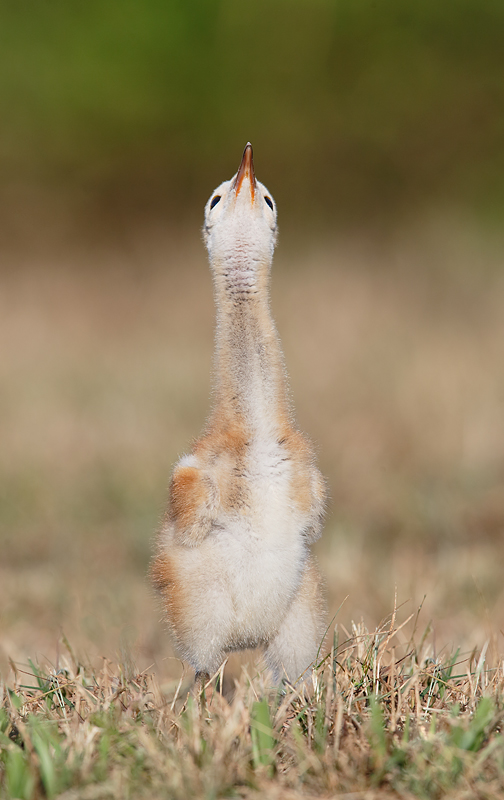
This image of a week-old Sandhill Crane chick was also created with the hand held Canon EF 600mm f/4L IS II USM lens and the Canon EOS-1D X Digital SLR camera. ISO 400. Evaluative metering +1/3 stop as framed: 1/1250 sec. at f/7.1 in Manual mode previously confirmed via histogram check.

Two sensors up and one to the left of the central sensor/AI Servo Surround/Rear Focus AF active at the moment of exposure. Click here if you missed the Rear Focus Tutorial. Click on the image to see a larger version.

When hand holding either the 500II or the 600II I like to sit and rest my left elbow on my bent left knee. This reduces fatigue and the quick build up of lactic acid in the muscles and allows for much sharper images. That is exactly what I did here.

Crane Chick Behavior Answer; Bird Watching

In the blog post of March 8, 2013 I posted the image above and asked “What was the baby crane doing?” And I mentioned that there had been a clue in a recent blog post. The clue was in the March 4, 2013 post, When Sharp Does Not Cut It.

In the image above the crane chick was looking up at swirling Tree Swallows. Amazingly, both parents were both somewhat alarmed by the swallows. Kudos to Doug West for getting the behavior right.

IPT Opportunities

Click here to see the current schedule and IPT openings.

Highlights include a single opening on the next Bear Boat IPT, two slots left on this summer’s killer Galapagos trip, and lots of room on the Tanzania Photo-Safari.

Bear Boat/Bears Catching Salmon IPT: September 2-9, 2013 from Kodiak, AK: $6699.

Happy campers only! Maximum 6 + two leaders: Arthur Morris and Denise Ippolito. Openings: 1.

GALAPAGOS Photo Cruise of a Lifetime IPT/The Complete Galapagos Photographic Experience. July 2-16, 2013 on the boat.

13 FULL and two 1/2 days of photography: $12,749. Co-leader: Denise Ippolito. Limit 14 including the leaders/Openings: 2.

Africa/Tanzania/Serengeti Summer Migration Safari: 12 full and two half-days of photography: $12,999/person double occupancy. Limit: 12/Openings: 7.

Leaders: Todd Gustafson and Arthur Morris. Leave the US AUG 3, 2013. Fly home from Arusha, Tanzania on the evening of August 18. Day 1 of the safari is August 5. Our last morning of photography is August 18. We will be visiting Tarangire National Park, Seronera Lodge–aka Leopard City!–twice, an exclusive mobile tented camp in the Serengeti, and at the end, the spectacular wildlife spectacle that is Ngorongoro Crater. Please e-mail for itinerary.

Again, please click here for additional info and additional IPTs.

Seriously Huge B&H Savings on Nikon and Canon Gear

Nikon

For the first time in many years NIKON is going to be deeply discounting many legacy pro lenses individually for the next 2 weeks only with discounts up to $350. There are also many amazing deals on NIKON Buy together and Save packages as well. Click here to save.

Nikon DSLRS Bundles with Lenses & Flash: Save up to $750. Click here to save. Make sure to add each item to your shopping cart to see the absolute lowest price.

Canon Lenses & Speedlites: Save Up to $300

Click here to save. Make sure to add each item to your shopping cart to see the absolute lowest price.

Canon Buy Together & Save: Save Up to $400

Click here to save.

EOS-1D X AF Guide

You can learn exactly how I set up and use this camera’s great new AF system in our EOS-1D X AF Guide. And you can learn about our other camera User’s Guides here.

Typos

On all blog posts, feel free to e-mail or leave a comment regarding any typos, wrong words, misspellings, omissions, or grammatical errors. Just be right. 🙂

Support the BAA Blog. Support the BAA Bulletins: Shop B&H here!

We want and need to keep providing you with the latest free information, photography and Photoshop lessons, and all manner of related information. Show your appreciation by making your purchases immediately after clicking on any of our B&H or Amazon Affiliate links in this blog post. Remember, B&H ain’t just photography!

If you are considering an item for purchase or comparison shopping be sure to place an item in your cart to see the too-low-to show the actual price. In many cases the prices are so low that B&H is forbidden from publicizing them!

B&H Search Engine Banner


B&H Photo - Video - Pro Audio


Support the BAA Blog. Support the BAA Bulletins: Shop Amazon here!

Consider doing all of your Amazon.com shopping using the search link below. You'll be getting the same low prices and great service that you are accustomed to and at the same time, supporting my efforts in the Bulletins and on the Blog to bring you great images, timely product news and info, and tons of free educational articles on an almost daily (and sometimes almost back-breaking) basis :) Just type your search in the little white box and hit Go.

And from the BAA On-line Store:

LensCoats. I have a LensCoat on each of my big lenses to protect them from nicks and thus increase their re-sales value. All my big lens LensCoat stuff is in Hardwood Snow pattern.
LegCoat Tripod Leg Covers. I have four tripods active and each has a Hardwood Snow LegCoat on it to help prevent further damage to my tender shoulders :) And you will love them in mega-cold weather....
Gitzo GT3532 LS CF Tripod. This one replaces the GT3530LS Tripod and will last you a lifetime. Learn more about this great tripod here.
Mongoose M3.6 Tripod Head. Right now this is the best tripod head around for use with lenses that weigh less than 9 pounds. For heavier lenses, check out the Wimberley V2 head.
Double Bubble Level. You will find one in my camera's hot shoe whenever I am not using flash.
The Lens Align Mark II. I use the Lens Align Mark II pretty much religiously to micro-adjust all of my gear an average of once a month and always before a major trip. Enjoy our free comprehensive tutorial here.
BreezeBrowser. I do not see how any digital photographer can exist without this program.
Delkin Flash Cards. I use and depend on Delkin compact Flash Cards and card readers most every day. Learn more about their great 700X and 1000X cards here or about my favorite Delkin card here.
March 9th, 2013

A 30-Year First

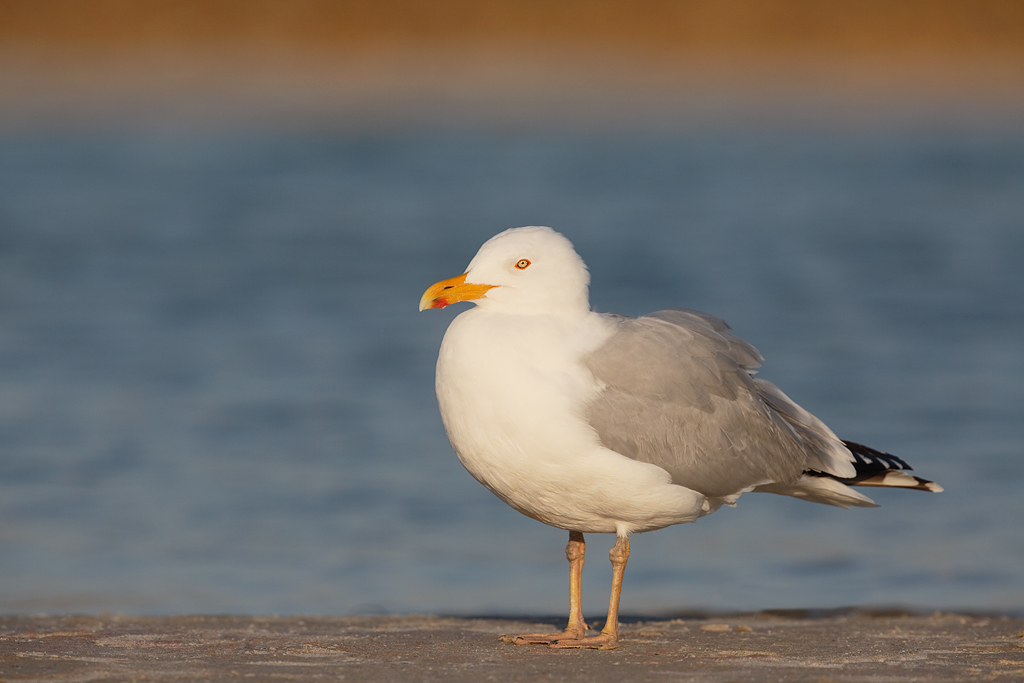
This image was created back on February 25 on the Monday Ft. Desoto In-the-Field Workshop with the tripod-mounted Canon 500mm f/4L EF IS II lens, the Canon 1.4x EF tele-extender III, and the Canon EOS-1D X. ISO 400. Evaluative metering +2/3 stop: 1/1000 sec. at f/13 in Manual mode confirmed in advance via histogram check.

Two sensors up from the central sensor/AI Servo Surround/Rear Focus AF active at the moment of exposure. Click here if you missed the Rear Focus Tutorial. Click on the image for a larger version.

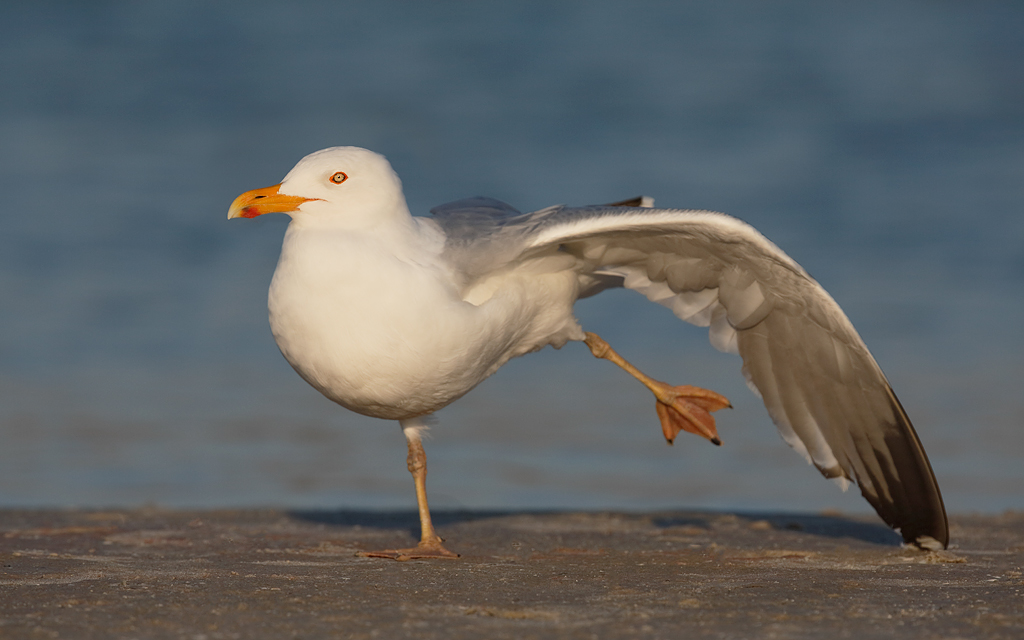
A Yellow Legged Gull, actually a gull with yellow legs….

When I first saw the gull above, I was somewhat mystified. It looked perfect for Herring Gull only it had yellowish not pink legs. I knew that there was a race of Herring Gull in Europe with yellow legs and I thought that there might be a different species, Yellow-legged Gull. So I send the photo to several friends, Kevin Karlson, Richard Crossley, and Julian Hough. Each agreed that it was a Herring Gull with yellow legs. Kevin referred me to his friend, a top of the food chain gull expert, Micheal Brothers. Michael works at the Marine Science Center in Ponce Inlet, Fl.

Micheal kindly responded:

It is a Herring Gull. In spring, some Herring Gulls get a flush of yellow in the legs. Note that the webbing in between the toes is still pink. Yellow-legged Gulls have an orange-red eye-ring, rather than the yellow-orange eye-ring you have so beautifully photographed here. They also have a slightly darker mantle and also a flatter crown. If it had a darker mantle, I would have suggested that it might be a Herring Gull x Lesser Black-backed Gull hybrid. However, those birds have a distinctly darker mantle and an orange-red eye-ring.” Best wishes, Michael

This tight head portrait of the gull in the image above was created on the same day with the tripod-mounted Canon 500mm f/4L EF IS II lens, the Canon 2x EF Extender III (Teleconverter), and the Canon EOS-1D X. ISO 400. Evaluative metering +2/3 stop: 1/1000 sec. at f/13 in Manual mode confirmed in advance via histogram check.

Central sensor (by necessity)/AI Servo Expand/Rear Focus AF active at the moment of exposure. Click here if you missed the Rear Focus Tutorial. Click on the image for a larger version.

The 500 makes a great super-telephoto when you are working with relatively tame birds and wish to go light.

A 30-Year First

In the image above you can see the yellow-orange eye-ring that Michael referred to. For the many non-birders here. Herring Gull is the common gull of the northeast where I lived for 46 years. Yellow-legged Gull would be an extreme rarity. That said, in 37 years of birding and 30 years of photography I had never seen a Herring Gull with yellow or yellowish legs.

As an aside, I love gulls. I love the challenged of identifying and ageing them. I love their beauty and their behavior. And for you beginning photographers, they make great practice subjects.

This image was on March 8 on the Fort Desoto/Hooptie Deux Short Notice IPT with the hand held Canon EF 300mm f/2.8L IS II USM Telephoto Lens, the Canon 2x EF Extender III (Teleconverter), and the Canon EOS 5D Mark III Digital Camera (Body Only). ISO 400; 1/1600 sec. at f/8 in Manual mode confirmed in advance via histogram check.

Central sensor/AI Servo Surround/Rear Focus AF on the bird’s neck active at the moment of exposure. Click here if you missed the Rear Focus Tutorial. Click on the image for a larger version.

Finally a Side View

When I first saw the Herring Gull with a blush of yellow in the leg color, I was not able to create a field guide type portrait as the wind was lined up directly at the sun so the bird was almost always facing us. I was delighted to see what I assumed to be the same bird on the big sand bar at North Beach yesterday. With the wind square to the sun creating the image above was a snap. Not that AF was active at the moment of exposure. This will be a small point of major importance that will be covered in detail in the next blog post that features this wonderful bird.

IPT Opportunities

Click here to see the current schedule and IPT openings.

Highlights include a single opening on the next Bear Boat IPT, two slots left on this summer’s killer Galapagos trip, and lots of room on the Tanzania Photo-Safari.

Bear Boat/Bears Catching Salmon IPT: September 2-9, 2013 from Kodiak, AK: $6699.

Happy campers only! Maximum 6 + two leaders: Arthur Morris and Denise Ippolito. Openings: 1.

GALAPAGOS Photo Cruise of a Lifetime IPT/The Complete Galapagos Photographic Experience. July 2-16, 2013 on the boat.

13 FULL and two 1/2 days of photography: $12,749. Co-leader: Denise Ippolito. Limit 14 including the leaders/Openings: 2.

Africa/Tanzania/Serengeti Summer Migration Safari: 12 full and two half-days of photography: $12,999/person double occupancy. Limit: 12/Openings: 7.

Leaders: Todd Gustafson and Arthur Morris. Leave the US AUG 3, 2013. Fly home from Arusha, Tanzania on the evening of August 18. Day 1 of the safari is August 5. Our last morning of photography is August 18. We will be visiting Tarangire National Park, Seronera Lodge–aka Leopard City!–twice, an exclusive mobile tented camp in the Serengeti, and at the end, the spectacular wildlife spectacle that is Ngorongoro Crater. Please e-mail for itinerary.

Again, please click here for additional info and additional IPTs.

Seriously Huge B&H Savings on Nikon and Canon Gear

Nikon

For the first time in many years NIKON is going to be deeply discounting many legacy pro lenses individually for the next 2 weeks only with discounts up to $350. There are also many amazing deals on NIKON Buy together and Save packages as well. Click here to save.

Nikon DSLRS Bundles with Lenses & Flash: Save up to $750. Click here to save. Make sure to add each item to your shopping cart to see the absolute lowest price.

Canon Lenses & Speedlites: Save Up to $300

Click here to save. Make sure to add each item to your shopping cart to see the absolute lowest price.

Canon Buy Together & Save: Save Up to $400

Click here to save.

EOS-1D X AF Guide

You can learn exactly how I set up and use this camera’s great new AF system in our EOS-1D X AF Guide. And you can learn about our other camera User’s Guides here.

Typos

On all blog posts, feel free to e-mail or leave a comment regarding any typos, wrong words, misspellings, omissions, or grammatical errors. Just be right. 🙂

Support the BAA Blog. Support the BAA Bulletins: Shop B&H here!

We want and need to keep providing you with the latest free information, photography and Photoshop lessons, and all manner of related information. Show your appreciation by making your purchases immediately after clicking on any of our B&H or Amazon Affiliate links in this blog post. Remember, B&H ain’t just photography!

If you are considering an item for purchase or comparison shopping be sure to place an item in your cart to see the too-low-to show the actual price. In many cases the prices are so low that B&H is forbidden from publicizing them!

B&H Search Engine Banner


B&H Photo - Video - Pro Audio


Support the BAA Blog. Support the BAA Bulletins: Shop Amazon here!

Consider doing all of your Amazon.com shopping using the search link below. You'll be getting the same low prices and great service that you are accustomed to and at the same time, supporting my efforts in the Bulletins and on the Blog to bring you great images, timely product news and info, and tons of free educational articles on an almost daily (and sometimes almost back-breaking) basis :) Just type your search in the little white box and hit Go.

And from the BAA On-line Store:

LensCoats. I have a LensCoat on each of my big lenses to protect them from nicks and thus increase their re-sales value. All my big lens LensCoat stuff is in Hardwood Snow pattern.
LegCoat Tripod Leg Covers. I have four tripods active and each has a Hardwood Snow LegCoat on it to help prevent further damage to my tender shoulders :) And you will love them in mega-cold weather....
Gitzo GT3532 LS CF Tripod. This one replaces the GT3530LS Tripod and will last you a lifetime. Learn more about this great tripod here.
Mongoose M3.6 Tripod Head. Right now this is the best tripod head around for use with lenses that weigh less than 9 pounds. For heavier lenses, check out the Wimberley V2 head.
Double Bubble Level. You will find one in my camera's hot shoe whenever I am not using flash.
The Lens Align Mark II. I use the Lens Align Mark II pretty much religiously to micro-adjust all of my gear an average of once a month and always before a major trip. Enjoy our free comprehensive tutorial here.
BreezeBrowser. I do not see how any digital photographer can exist without this program.
Delkin Flash Cards. I use and depend on Delkin compact Flash Cards and card readers most every day. Learn more about their great 700X and 1000X cards here or about my favorite Delkin card here.

March 8th, 2013

What, No Itinerary?

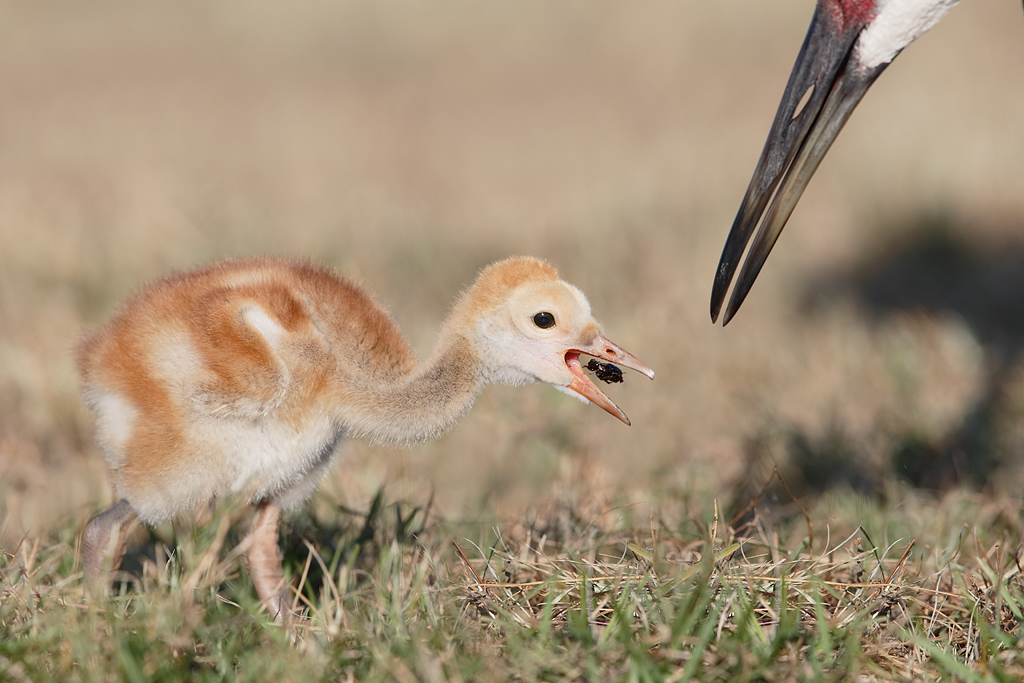
This image of a week-old Sandhill Crane chick getting ready to swallow a beetle that was fed to it by one of the parents was created with the hand held Canon EF 600mm f/4L IS II USM lens and the Canon EOS-1D X Digital SLR camera. ISO 400. Evaluative metering +1/3 stop as framed: 1/1250 sec. at f/7.1 in Manual mode previously confirmed via histogram check.

One sensor left of central sensor/AI Servo Surround/Rear Focus AF active at the moment of exposure. Click here if you missed the Rear Focus Tutorial. Click on the image to see a larger version.

When hand holding either the 500II or the 600II I like to sit and rest my left elbow on my bent left knee. This reduces fatigue and the quick build up of lactic acid in the muscles and allows for much sharper images. That is exactly what I did here.

What, No Itinerary?

When folks ask why there is never an itinerary for a BIRDS AS ART Instructional Photo-tour I usually chuckle. The truth is that I often do not even know where we are going after lunch when we are at lunch! Each decision is based on a combination of factors that include weather, sky conditions, wind direction, and local trends and conditions.

We are right smack in the middle of the Fort DeSoto/Hooptie Deux/Roseate Spoonbill Short Notice IPT. As you saw in the March 7 blog post, Impossible Conditions, we had a rough time on Wednesday morning. We did have some great chances that morning thanks to some good thinking on my part and the ability of the group to follow directions as to how to carefully approach a large group of beautiful White Ibises. In any case, when multiple IPT veteran John Snodgrass mentioned that the weather forecast for Thursday morning was even worse, colder with stronger winds from the northwest, I started thinking….

There had been some nice baby Sandhill Crane action down by the lake near my home in Indian Lake Estates, FL. With the dire forecast, I breached the idea of leaving St. Pete at 5am and making the 1 hour forty five minute drive to ILE to try for the baby cranes in lieu of freezing out butts off on another wind against sun morning. I did not have to twist any arms.

This image of a young Sandhill Crane colt was created at ILE on Thursday morning with the tripod-mounted Canon EF 600mm f/4L IS II USM lens, the Canon 2x EF Extender III (Teleconverter), and the Canon EOS-1D X. ISO 400. Evaluative metering +2/3 stop: 1/400 sec. at f/9 in Av mode. The exposure was confirmed via histogram check.

Central sensor (by necessity)/AI Servo Expand/Rear Focus AF on a spot just below the forward part of the wing bud active at the moment of exposure. Click here if you missed the Rear Focus Tutorial. Click on the image for a larger version.
.

Choice of Perspective

The key to the success of the image above was going long focal length and getting on the birds level by working from the slope of the adjacent canal. I recognized the shade of blue as one that would be dramatically enhanced by a layer of White Neutralizer. That was followed by a layer of my 50/50 Tonal Contrast/Detail Extractor recipe reduced to about 50% opacity.

[Not a valid template]

NIK 15% Discount

As regular readers know, Color Efex Pro has drastically changed my digital workflow and little by little I have begun using Viveza to solve more than a few sticky image optimization problems and Silver Efex Pro for fast, dramatic B&W conversions. You can save 15% on all NIK products (including Color Efex Pro, Silver Efex Pro, and Viveza) by clicking here and entering BAA in the Promo Code box at check-out. Then hit Apply to see your savings. You can download a trial copy that will work for 15 days and allow you to create full sized images.

This Sandhill Crane image was created with the hand held Canon EF 600mm f/4L IS II USM lens, the Canon 1.4x EF Extender III (Teleconverter), and the Canon EOS-1D X Digital SLR camera. ISO 400. Evaluative metering +1/3 stop as framed: 1/1250 sec. at f/7.1 in Manual mode previously confirmed by histogram check.

Central sensor Surround/AI Servo/Rear Focus AF on the bird’s head just behind the eye active at the moment of exposure. Click here if you missed the Rear Focus Tutorial. Click on the image to see a larger version.

Why Hand Hold the 600II?

While working the cranes with his tripod-mounted 600mm f/4L IS II/1.4X III/1D X rig, multiple IPT participant John Snodgrass, always eager to learn, asked me, “Why are you hand holding?” I replied, “When hand holding it is easier to frame the image, easier to follow the fast little buggers, easier to acquire and maintain AF, and easier to get up off the ground and move to the right sun angle. And any by using my knee-pod as described above pretty much all of the images will be sharp. And, as you can see here, cute.

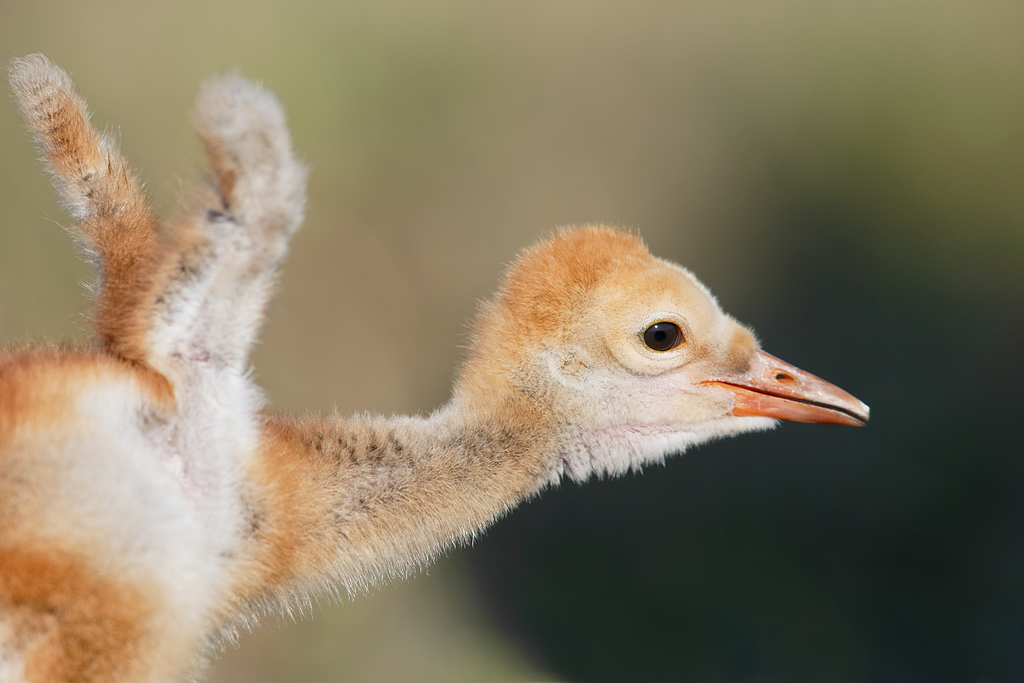
This image of a week-old Sandhill Crane chick was also created with the hand held Canon EF 600mm f/4L IS II USM lens and the Canon EOS-1D X Digital SLR camera. ISO 400. Evaluative metering +1/3 stop as framed: 1/1250 sec. at f/7.1 in Manual mode previously confirmed via histogram check.

Two sensors up and one to the left of the central sensor/AI Servo Surround/Rear Focus AF active at the moment of exposure. Click here if you missed the Rear Focus Tutorial. Click on the image to see a larger version.

When hand holding either the 500II or the 600II I like to sit and rest my left elbow on my bent left knee. This reduces fatigue and the quick build up of lactic acid in the muscles and allows for much sharper images. That is exactly what I did here.

Whaddaya Think?

If you think that you know what the baby crane in the image immediately above was doing please leave a comment and let us know. Hint: there have been clues in recent blog posts.

Which is Your Favorite?

Take a moment to leave a comment and let us know which is your favorite image, and why.

So What’s the Point?

The point is that on a BAA IPT there is never a set itinerary because we need to be able to change and react in response to a variety of current conditions in order to get you in a spot where you will have the best chance to make some great images. And we always strive to explain to you why we are going here rather than there.

IPT Opportunities

Click here to see the current schedule and IPT openings.

Highlights include a single opening on the next Bear Boat IPT, two slots left on this summer’s killer Galapagos trip, and lots of room on the Tanzania Photo-Safari.

Bear Boat/Bears Catching Salmon IPT: September 2-9, 2013 from Kodiak, AK: $6699.

Happy campers only! Maximum 6 + two leaders: Arthur Morris and Denise Ippolito. Openings: 1.

GALAPAGOS Photo Cruise of a Lifetime IPT/The Complete Galapagos Photographic Experience. July 2-16, 2013 on the boat.

13 FULL and two 1/2 days of photography: $12,749. Co-leader: Denise Ippolito. Limit 14 including the leaders/Openings: 2.

Africa/Tanzania/Serengeti Summer Migration Safari: 12 full and two half-days of photography: $12,999/person double occupancy. Limit: 12/Openings: 7.

Leaders: Todd Gustafson and Arthur Morris. Leave the US AUG 3, 2013. Fly home from Arusha, Tanzania on the evening of August 18. Day 1 of the safari is August 5. Our last morning of photography is August 18. We will be visiting Tarangire National Park, Seronera Lodge–aka Leopard City!–twice, an exclusive mobile tented camp in the Serengeti, and at the end, the spectacular wildlife spectacle that is Ngorongoro Crater. Please e-mail for itinerary.

Again, please click here for additional info and additional IPTs.

Seriously Huge B&H Savings on Nikon and Canon Gear

Nikon

For the first time in many years NIKON is going to be deeply discounting many legacy pro lenses individually for the next 2 weeks only with discounts up to $350. There are also many amazing deals on NIKON Buy together and Save packages as well. Click here to save.

Nikon DSLRS Bundles with Lenses & Flash: Save up to $750. Click here to save. Make sure to add each item to your shopping cart to see the absolute lowest price.

Canon Lenses & Speedlites: Save Up to $300

Click here to save. Make sure to add each item to your shopping cart to see the absolute lowest price.

Canon Buy Together & Save: Save Up to $400

Click here to save.

EOS-1D X AF Guide

You can learn exactly how I set up and use this camera’s great new AF system in our EOS-1D X AF Guide. And you can learn about our other camera User’s Guides here.

Typos

On all blog posts, feel free to e-mail or leave a comment regarding any typos, wrong words, misspellings, omissions, or grammatical errors. Just be right. 🙂

Support the BAA Blog. Support the BAA Bulletins: Shop B&H here!

We want and need to keep providing you with the latest free information, photography and Photoshop lessons, and all manner of related information. Show your appreciation by making your purchases immediately after clicking on any of our B&H or Amazon Affiliate links in this blog post. Remember, B&H ain’t just photography!

If you are considering an item for purchase or comparison shopping be sure to place an item in your cart to see the too-low-to show the actual price. In many cases the prices are so low that B&H is forbidden from publicizing them!

B&H Search Engine Banner


B&H Photo - Video - Pro Audio


Support the BAA Blog. Support the BAA Bulletins: Shop Amazon here!

Consider doing all of your Amazon.com shopping using the search link below. You'll be getting the same low prices and great service that you are accustomed to and at the same time, supporting my efforts in the Bulletins and on the Blog to bring you great images, timely product news and info, and tons of free educational articles on an almost daily (and sometimes almost back-breaking) basis :) Just type your search in the little white box and hit Go.

And from the BAA On-line Store:

LensCoats. I have a LensCoat on each of my big lenses to protect them from nicks and thus increase their re-sales value. All my big lens LensCoat stuff is in Hardwood Snow pattern.
LegCoat Tripod Leg Covers. I have four tripods active and each has a Hardwood Snow LegCoat on it to help prevent further damage to my tender shoulders :) And you will love them in mega-cold weather....
Gizo GT3532 LS CF Tripod. This one replaces the GT3530LS Tripod and will last you a lifetime. Learn more about this great tripod here.
Mongoose M3.6 Tripod Head. Right now this is the best tripod head around for use with lenses that weigh less than 9 pounds. For heavier lenses, check out the Wimberley V2 head.
Double Bubble Level. You will find one in my camera's hot shoe whenever I am not using flash.
The Lens Align Mark II. I use the Lens Align Mark II pretty much religiously to micro-adjust all of my gear an average of once a month and always before a major trip. Enjoy our free comprehensive tutorial here.
BreezeBrowser. I do not see how any digital photographer can exist without this program.
Delkin Flash Cards. I use and depend on Delkin compact Flash Cards and card readers most every day. Learn more about their great 700X and 1000X cards here or about my favorite Delkin card here.
March 7th, 2013

Impossible Conditions?

Want Spoonbills?

We still have room for one more photographer on James Shadle’s customized pontoon boat, the Hooptie Deux on the mornings of March 8-10, Friday through Sunday. If you would like to explore the possibility of joining us for a morning on the Hooptie Deux please e-mail me asap.

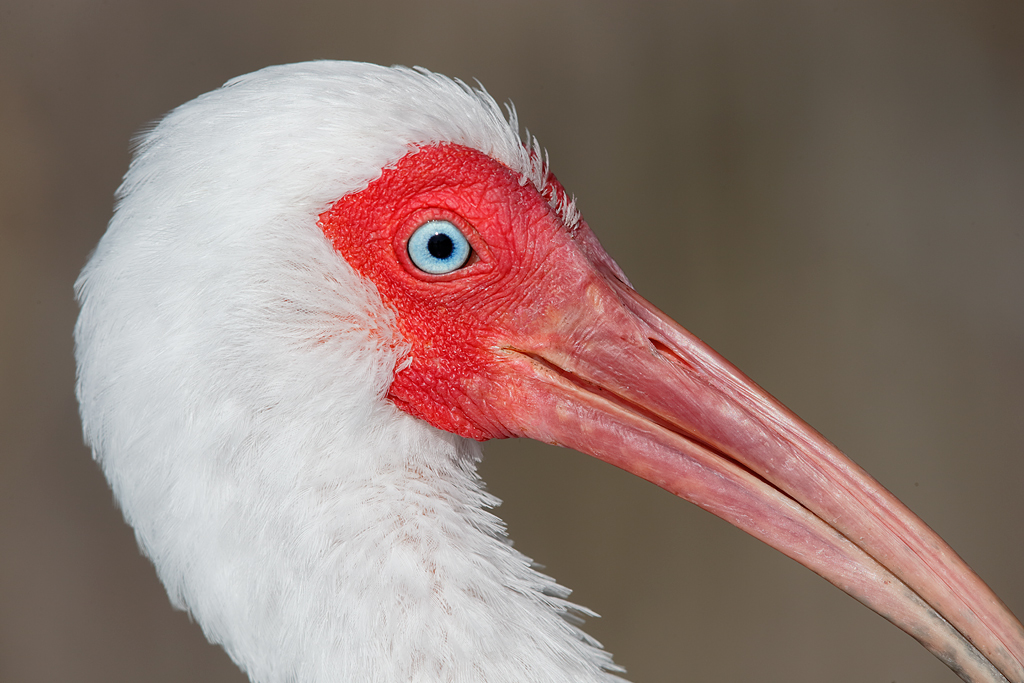
This tight face portrait of a pretty spiffy looking White Ibis was created on the first morning of the Fort DeSoto/Hooptie Deux/Roseate Spoonbill Short Notice IPT with the tripod-mounted Canon 500mm f/4L EF IS II lens, the Canon 2x EF Extender III (Teleconverter), and the Canon EOS-1D X. ISO 400. Evaluative metering at zero: 1/800 sec. at f/11 in Manual mode confirmed in via histogram check. This was 1/3 stop lighter than my standard bright white/ISO 400 exposure in full sun of 1/2000 sec. at f/8. Why? We had a very faint haze over the sun.

Central sensor (by necessity)/AI Servo Expand/Rear Focus AF on the eye and recompose. Click here if you missed the Rear Focus Tutorial. Click on the image for a larger version.

The 500 makes a great super-telephoto when you are working with relatively tame birds and wish to go light.

Impossible Conditions?

Forty-eight degrees. Twenty-five mile per hour northwest winds. These were the pretty much impossible conditions that we faced at Fort Desoto on the first morning of the Fort DeSoto/Hooptie Deux/Roseate Spoonbill Short Notice IPT. At 7am we were blessed with some cloud cover but things did not look good. By 8am it was clear as a bell and with wind against sun conditions things were looking pretty dismal. We had photographed three sorry looking Laughing Gulls hunkered down on the edge of the Gulf surf while it was still cloudy and then did some Royal Terns and a hauled out Double-created Cormorant. I had suggested trying the only spot where the birds could find shelter from the wind. There was a fairly big group of White Ibis there right along the shoreline but even then things seemed impossible as they were tight against the mangroves and the backgrounds were horrific. The light was still nice and there was one hope.

I did not think that we had a chance to get five folks really close but the previously stifling wind became our ally; within a few minutes and after some careful coaching we have everyone tight to the birds and on sun angle. We needed to choose our perspectives carefully. I talked the group through the exposure and we had nearly an hour of great opportunities. Two of my favorites are featured in this blog post. A third will have a starring role star in the next BAA On-line Bulletin.

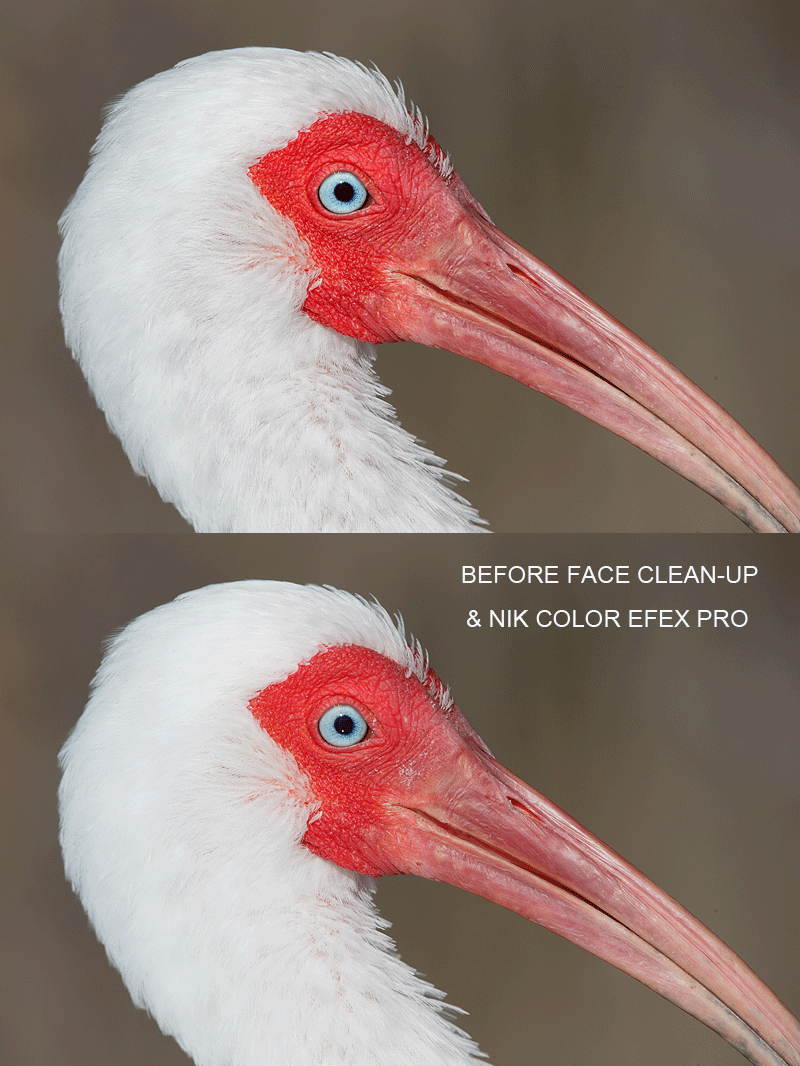
A surprisingly high 80% opacity layer of NIK Color Efex Pro’s Detail Extractor really brought out the detail in the whites. See more on that in the animated GIF below. In this image I also reduced the blue saturation in the whites with a Hue/Saturation adjustment (Control U) on the white layer. All as detailed in our Digital Basics file. Digital Basics includes my complete digital workflow, dozens of great Photoshop tips, Layer Masking for Dummies, Eye Doctor work, NIK Color Efex Pro basics, all of my Keyboard Shortcuts, and tons more. This PDF, sent via e-mail, will be the best $25 you’ll ever spent on your photography.

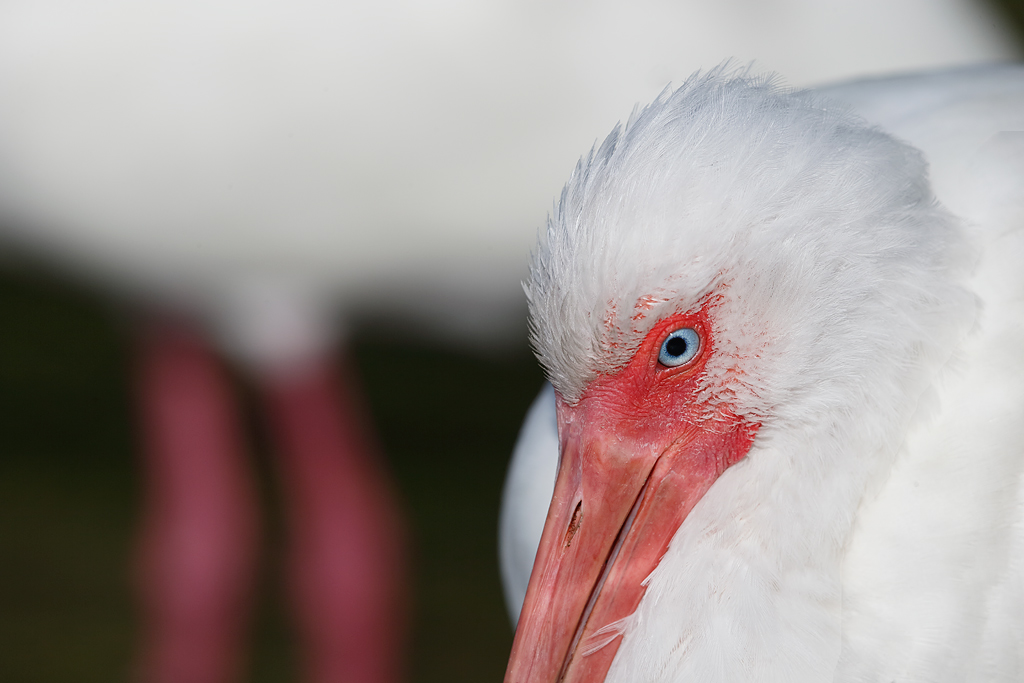
This White Ibis image was also created on the first morning of the Fort DeSoto/Hooptie Deux/Roseate Spoonbill Short Notice IPT with the tripod-mounted Canon 500mm f/4L EF IS II lens, the Canon 2x EF Extender III (Teleconverter), and the Canon EOS-1D X. ISO 400. Evaluative metering +1/3 stop as framed: 1/2000 sec. at f/8 in Manual mode. Note: this is my standard bright white/ISO 400 exposure in full sun.

Central sensor (by necessity)/AI Servo Expand/Rear Focus AF on the eye and recompose. Click here if you missed the Rear Focus Tutorial. Click on the image for a larger version.

Knowing that we would be working with relatively tame subjects and wanting to travel light I grabbed the 500II and left the 600II in the trunk of my vehicle.

Neat Juxtaposition

While I was able to come up with a completely clean background in the opening image I originally saw the background bird here as a big problem. But by carefully choosing my perspective I was able to change a negative into a positive. In the first few frames the legs of the back bird merged with the breast of the front bird so I took a small step to my left to clean that up. I started working at f/16 but realized that by working wide open at f/8 the legs of the second bird would be more pleasingly blurred.

[Not a valid template]

The Lesson?

When things look bleak and making a good image seems an impossibility, put your thinking cap on and don’t give up. On IPTs we actually teach you how to consider the conditions and figure out the best option, just as I did yesterday morning.

Your Favorite?

Take a moment and leave a comment letting us know which of these two images you liked best. And why you prefer the one that you do.

Animated GIF

As the animated GIF plays note the increased detail in the white feathers, the punched up look of the face and bill, and the subtle but effective clean-up of the lores. As above, I used an 80% layer of Detail Extractor on the whites and a 15% layer of Tonal Contrast on the bill and face. Bill clean-up with the Patch Tool, Content Aware Fill–I have been using that more and more recently, and the Spot Healing Brush.

All of the above is detailed in our Digital Basics file. Digital Basics includes my complete digital workflow, dozens of great Photoshop tips, Layer Masking for Dummies, Eye Doctor work, NIK Color Efex Pro basics, all of my Keyboard Shortcuts, and tons more. This PDF, sent via e-mail, will be the best $25 you’ll ever spent on your photography.

[Not a valid template]

NIK 15% Discount

As regular readers know, Color Efex Pro has drastically changed my digital workflow and little by little I have begun using Viveza to solve more than a few sticky image optimization problems and Silver Efex Pro for fast, dramatic B&W conversions. You can save 15% on all NIK products (including Color Efex Pro, Silver Efex Pro, and Viveza) by clicking here and entering BAA in the Promo Code box at check-out. Then hit Apply to see your savings. You can download a trial copy that will work for 15 days and allow you to create full sized images.

Africa Photo Safari/Tanzania: August 2013

Serengeti Summer Migration Safari: 12 full and two half-days of photography: $12,999/person double occupancy. Limit: 12/Openings: 7.

Leaders: Todd Gustafson and Arthur Morris.

Leave the US AUG 3, 2013. Fly home from Arusha, Tanzania on the evening of August 18. Day 1 of the safari is August 5. Our last morning of photography is August 18. We will be visiting Tarangire National Park, Seronera Lodge–aka Leopard City!–twice, an exclusive mobile tented camp in the Serengeti, and at the end, the spectacular wildlife spectacle that is Ngorongoro Crater.

A deposit of $4,000 is due immediately. With four signed up, this trip is a go. Happy Campers only please.

Once we cash your check you will be strongly advised to purchase travel insurance. While we all assume that we will be fine, health and family emergencies do arrive unexpectedly. You may wish to consider using Travel Insurance Services. Do understand that most policies must be purchased within two weeks of our cashing your deposit check.

Payment in full is due no later than 15 April, 2013. Sign up with a friend or a spouse and apply a $300 per person discount.

This trip is a go. Guaranteed maximum no more than 12 photographers plus the three great leaders. 3 persons/van. You get a row of seats for yourself and your gear. In addition to rotating in-the-field instruction with each of the co-leaders, artie, Todd, and denise will be available for image sharing and review and informal Photoshop instruction during breaks and after meals. And–with apologies to Miss Manners–even during meals!

The lodging is all first class. Please e-mail
for a PDF with additional details, the complete itinerary, and a description of the unparalleled photographic opportunities that we will enjoy. Please e-mail or call me on my cell at 1-863-221-2372 with any questions. I hope that you can join us.

Bear Boat/Bears Catching Salmon IPT: September 2-9, 2013 from Kodiak, AK: $6699. Happy campers only! Maximum 6 + two leaders: Arthur Morris and Denise Ippolito. Openings: 1.

It is mandatory that you be in Kodiak no later than the late afternoon of September 1 to avoid missing the float plane(s) to the boat on the morning of September 2. With air travel in AK being what it is, with the chance of fog or other bad weather–being on Kodiak on August 31 is an even better plan). I will take the group out to dinner in Kodiak on the evening of September 1. Denise and I will plan on being on Kodiak on August 31 to avoid any potential disaster. We will take one or more float planes to the boat mid-morning on September 2. We will photograph bears that afternoon and every day for the next six days (weather permitting of course). We should have bears catching salmon every day. In addition, we will get some nice stuff on Mew Gull and Glaucous-winged Gulls dining on roe and the remains of predated salmon. we may–depending on where the concentrations of bears are–get to photograph Harbor seals and some hauled out Steller’s Sea Lions (an endangered species). Halibut fishing (license required) is optional. On September 9, our last morning on the boat, we will photograph in the early morning and then return to Kodiak via float plane. The eight days will consist of six full days (Sept 3, 4, 5, 6, 7, & 8) of photography featuring lots of Coastal Brown Bears catching salmon as above plus a variety of other natural history subjects plus some nice scenic photography that I forgot to mention above. Plus the first afternoon and the last morning.

What’s included? 8 DAYS/7 NIGHTS on the boat as above. All meals on the boat. (The food is quite excellent.) National Park fees. One night’s double occupancy lodging on Kodiak; arrive: Sept 1/depart: Sept 2. The thank-you-in-advance dinner on Sept 1. In-the-field photo tips, instruction, and guidance. An insight into the minds of two top professionals; we will constantly let you know what we are thinking, what we are doing, and why we are doing it. Small group image review, image sharing, and Photoshop instruction on the boat. Denise’s creativity will amaze you.

What’s not included: Your round trip airfare to and from Kodiak, AK (almost surely through Anchorage). All necessary lodging other than the cost of your double occupancy room on the night of August 31 should you opt to arrive early–we can arrange that in advance for you. We will let you know the cost of a single supplement if so desired. The cost of the round-trip float plane to the boat on September 2 and back to Kodiak on September 9. The cost of a round trip this year was $500. The suggested crew tip of $210.

Is this an expensive trip? Yes, of course. But with 6 full and two half days, a wealth of great subjects, and the fact that you will be walking with the bears it will be one of the great experiences of your life. (See the comments below.) Most folks who take part in a Bear Boat IPT wind up coming back for more. A $2,000 per person non-refundable deposit by check only made out to “Arthur Morris” is required to hold your spot. Please click here and then scroll down and read our cancellation policies. Then please print, read, and sign the necessary paperwork here and send it to us with your deposit check. Deposit due immediately. That leaves a balance of $4499. The first payment of $2499 is due January 15, 2013. The final payment of $2000 is due on April 15, 2013. This trip is a go. Note: most similar but cheaper trips are only 7 DAYS/6 NIGHTS. Please e-mail for photos.

Typos

On all blog posts, feel free to e-mail or leave a comment regarding any typos, wrong words, misspellings, omissions, or grammatical errors. Just be right. 🙂

Support the BAA Blog. Support the BAA Bulletins: Shop B&H here!

We want and need to keep providing you with the latest free information, photography and Photoshop lessons, and all manner of related information. Show your appreciation by making your purchases immediately after clicking on any of our B&H or Amazon Affiliate links in this blog post. Remember, B&H ain’t just photography!

If you are considering an item for purchase or comparison shopping be sure to place an item in your cart to see the too-low-to show the actual price. In many cases the prices are so low that B&H is forbidden from publicizing them!

B&H Search Engine Banner


B&H Photo - Video - Pro Audio


Support the BAA Blog. Support the BAA Bulletins: Shop Amazon here!

Consider doing all of your Amazon.com shopping using the search link below. You'll be getting the same low prices and great service that you are accustomed to and at the same time, supporting my efforts in the Bulletins and on the Blog to bring you great images, timely product news and info, and tons of free educational articles on an almost daily (and sometimes almost back-breaking) basis :) Just type your search in the little white box and hit Go.

And from the BAA On-line Store:

LensCoats. I have a LensCoat on each of my big lenses to protect them from nicks and thus increase their re-sales value. All my big lens LensCoat stuff is in Hardwood Snow pattern.
LegCoat Tripod Leg Covers. I have four tripods active and each has a Hardwood Snow LegCoat on it to help prevent further damage to my tender shoulders :) And you will love them in mega-cold weather....
Gitzo GT3532 LS CF Tripod. This one replaces the GT3530LS Tripod and will last you a lifetime. Learn more about this great tripod here.
Mongoose M3.6 Tripod Head. Right now this is the best tripod head around for use with lenses that weigh less than 9 pounds. For heavier lenses, check out the Wimberley V2 head.
Double Bubble Level. You will find one in my camera's hot shoe whenever I am not using flash.
The Lens Align Mark II. I use the Lens Align Mark II pretty much religiously to micro-adjust all of my gear an average of once a month and always before a major trip. Enjoy our free comprehensive tutorial here.
BreezeBrowser. I do not see how any digital photographer can exist without this program.
Delkin Flash Cards. I use and depend on Delkin compact Flash Cards and card readers most every day. Learn more about their great 700X and 1000X cards here or about my favorite Delkin card here.
March 6th, 2013

800mm f/5.6 L IS Faulty Reasoning; Could It Be?

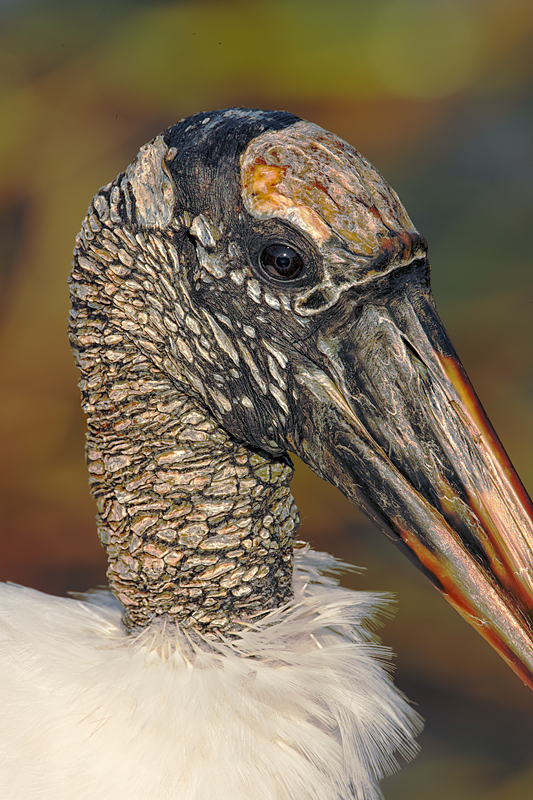
This gorgeous adult Wood Stork was photographed at Anhinga Trail on this year’s Canon Digital Learning Center Everglades Destination Workshop with the tripod-mounted Canon EF 800mm f/5.6L IS USM Autofocus lens, the Canon 1.4x EF Extender III (teleconverter), and the Canon EOS-1D Mark IV now replaced by the Canon EOS-1D X digital SLR . ISO 400. Evaluative metering at zero as framed: 1/500 sec. at f/16 in Manual mode (to protect the whites).

800mm f/5.6 L IS Faulty Reasoning; Could It Be?

This was a beautiful bird; the colors and textures on the head inspired me to go long and to create a tight, sharp head portrait. The darker tones as they came out of the camera needed more detail. First I ran a Curves Adjustment layer and a layer of NIK Color Efex Pro Detail Extractor at about 30% I kept the layers intact so that I could go back and reduce the Opacity as needed. I added Regular Layer Masks to these layers so that I could fine tune the results. I finished up with some Tim Grey Non-destructive Dodging and Burning till I got it perfect. Or at least perfect to my eye. The trick is to avoid overdoing things, especially with the Detail Extractor.

Thanks to a comment by Mike Vanacek at BAA Bulletin #432 I realized that my reasoning for proclaiming the Canon 600mm f/4L IS II far superior to the older 800mm f/5.6L IS might indeed be faulty. Mike, who was relaying the thoughts of multiple IPT veteran and mutual friend Jim Bickett, wrote, “Todd (Gustafson), with whom will be with you in Africa later this year, used his Nikon 600mm + 1.7TC almost 95% of the time. One of the older participants in Africa had sold his 800mm and got the 600mm II. He constantly taunted me with its advantages. My neighbor (Jim Bicket whom you know) loves his 800mm and believes I would be making a mistake selling it for the 600mm.”

That got me to thinking. I quickly realized that for folks who are not comfortable using a 2X III teleconverter or who simply cannot create sharp images with the 600II/2X III combo would be far better off sticking with the 800 or purchasing a used one. Why? They will enjoy great reach with larger in the frame subjects.

Thanks Mike, and thanks Jim.

Africa Photo Safari/Tanzania: August 2013

Serengeti Summer Migration Safari: 12 full and two half-days of photography: $12,999/person double occupancy. Limit: 12/Openings: 7.

Leaders: Todd Gustafson and Arthur Morris.

Leave the US AUG 3, 2013. Fly home from Arusha, Tanzania on the evening of August 18. Day 1 of the safari is August 5. Our last morning of photography is August 18. We will be visiting Tarangire National Park, Seronera Lodge–aka Leopard City!–twice, an exclusive mobile tented camp in the Serengeti, and at the end, the spectacular wildlife spectacle that is Ngorongoro Crater.

A deposit of $4,000 is due immediately. With four signed up, this trip is a go. Happy Campers only please.

Once we cash your check you will be strongly advised to purchase travel insurance. While we all assume that we will be fine, health and family emergencies do arrive unexpectedly. You may wish to consider using Travel Insurance Services. Do understand that most policies must be purchased within two weeks of our cashing your deposit check.

Payment in full is due no later than 15 April, 2013. Sign up with a friend or a spouse and apply a $300 per person discount.

This trip is a go. Guaranteed maximum no more than 12 photographers plus the three great leaders. 3 persons/van. You get a row of seats for yourself and your gear. In addition to rotating in-the-field instruction with each of the co-leaders, artie, Todd, and denise will be available for image sharing and review and informal Photoshop instruction during breaks and after meals. And–with apologies to Miss Manners–even during meals!

The lodging is all first class. Please e-mail
for a PDF with additional details, the complete itinerary, and a description of the unparalleled photographic opportunities that we will enjoy. Please e-mail or call me on my cell at 1-863-221-2372 with any questions. I hope that you can join us.

Bear Boat/Bears Catching Salmon IPT: September 2-9, 2013 from Kodiak, AK: $6699. Happy campers only! Maximum 6 + two leaders: Arthur Morris and Denise Ippolito. Openings: 1.

It is mandatory that you be in Kodiak no later than the late afternoon of September 1 to avoid missing the float plane(s) to the boat on the morning of September 2. With air travel in AK being what it is, with the chance of fog or other bad weather–being on Kodiak on August 31 is an even better plan). I will take the group out to dinner in Kodiak on the evening of September 1. Denise and I will plan on being on Kodiak on August 31 to avoid any potential disaster. We will take one or more float planes to the boat mid-morning on September 2. We will photograph bears that afternoon and every day for the next six days (weather permitting of course). We should have bears catching salmon every day. In addition, we will get some nice stuff on Mew Gull and Glaucous-winged Gulls dining on roe and the remains of predated salmon. we may–depending on where the concentrations of bears are–get to photograph Harbor seals and some hauled out Steller’s Sea Lions (an endangered species). Halibut fishing (license required) is optional. On September 9, our last morning on the boat, we will photograph in the early morning and then return to Kodiak via float plane. The eight days will consist of six full days (Sept 3, 4, 5, 6, 7, & 8) of photography featuring lots of Coastal Brown Bears catching salmon as above plus a variety of other natural history subjects plus some nice scenic photography that I forgot to mention above. Plus the first afternoon and the last morning.

What’s included? 8 DAYS/7 NIGHTS on the boat as above. All meals on the boat. (The food is quite excellent.) National Park fees. One night’s double occupancy lodging on Kodiak; arrive: Sept 1/depart: Sept 2. The thank-you-in-advance dinner on Sept 1. In-the-field photo tips, instruction, and guidance. An insight into the minds of two top professionals; we will constantly let you know what we are thinking, what we are doing, and why we are doing it. Small group image review, image sharing, and Photoshop instruction on the boat. Denise’s creativity will amaze you.

What’s not included: Your round trip airfare to and from Kodiak, AK (almost surely through Anchorage). All necessary lodging other than the cost of your double occupancy room on the night of August 31 should you opt to arrive early–we can arrange that in advance for you. We will let you know the cost of a single supplement if so desired. The cost of the round-trip float plane to the boat on September 2 and back to Kodiak on September 9. The cost of a round trip this year was $500. The suggested crew tip of $210.

Is this an expensive trip? Yes, of course. But with 6 full and two half days, a wealth of great subjects, and the fact that you will be walking with the bears it will be one of the great experiences of your life. (See the comments below.) Most folks who take part in a Bear Boat IPT wind up coming back for more. A $2,000 per person non-refundable deposit by check only made out to “Arthur Morris” is required to hold your spot. Please click here and then scroll down and read our cancellation policies. Then please print, read, and sign the necessary paperwork here and send it to us with your deposit check. Deposit due immediately. That leaves a balance of $4499. The first payment of $2499 is due January 15, 2013. The final payment of $2000 is due on April 15, 2013. This trip is a go. Note: most similar but cheaper trips are only 7 DAYS/6 NIGHTS. Please e-mail for photos.

Typos

On all blog posts, feel free to e-mail or leave a comment regarding any typos, wrong words, misspellings, omissions, or grammatical errors. Just be right. 🙂

Support the BAA Blog. Support the BAA Bulletins: Shop B&H here!

We want and need to keep providing you with the latest free information, photography and Photoshop lessons, and all manner of related information. Show your appreciation by making your purchases immediately after clicking on any of our B&H or Amazon Affiliate links in this blog post. Remember, B&H ain’t just photography!

If you are considering an item for purchase or comparison shopping be sure to place an item in your cart to see the too-low-to show the actual price. In many cases the prices are so low that B&H is forbidden from publicizing them!

B&H Search Engine Banner


B&H Photo - Video - Pro Audio


Support the BAA Blog. Support the BAA Bulletins: Shop Amazon here!

Consider doing all of your Amazon.com shopping using the search link below. You'll be getting the same low prices and great service that you are accustomed to and at the same time, supporting my efforts in the Bulletins and on the Blog to bring you great images, timely product news and info, and tons of free educational articles on an almost daily (and sometimes almost back-breaking) basis :) Just type your search in the little white box and hit Go.

And from the BAA On-line Store:

LensCoats. I have a LensCoat on each of my big lenses to protect them from nicks and thus increase their re-sales value. All my big lens LensCoat stuff is in Hardwood Snow pattern.
LegCoat Tripod Leg Covers. I have four tripods active and each has a Hardwood Snow LegCoat on it to help prevent further damage to my tender shoulders :) And you will love them in mega-cold weather....
Gizo GT3532 LS CF Tripod. This one replaces the GT3530LS Tripod and will last you a lifetime. Learn more about this great tripod here.
Mongoose M3.6 Tripod Head. Right now this is the best tripod head around for use with lenses that weigh less than 9 pounds. For heavier lenses, check out the Wimberley V2 head.
Double Bubble Level. You will find one in my camera's hot shoe whenever I am not using flash.
The Lens Align Mark II. I use the Lens Align Mark II pretty much religiously to micro-adjust all of my gear an average of once a month and always before a major trip. Enjoy our free comprehensive tutorial here.
BreezeBrowser. I do not see how any digital photographer can exist without this program.
Delkin Flash Cards. I use and depend on Delkin compact Flash Cards and card readers most every day. Learn more about their great 700X and 1000X cards here or about my favorite Delkin card here.
March 5th, 2013

Par for the Course & the Answer to the Snowy Egret Exposure Quiz--Nobody Got It Right!

New Concept IPT Last Minute & Pro-rated Info

Due to a last minute cancellation there is now a single opening on this IPT. If you are local and wish to save a ton of money call us right now and apply a $500 last minute discount: 863-692-0906.

It looks as if folks are liking the idea of more time for image review and image sharing during the day, more in-the-field-instruction with a smaller group, no time in the classroom, and a bit more time to rest and sleep…. Learn more by clicking here and scrolling down to the first item. If you would like to explore the possibility of joining us for part of this IPT or a morning on the Hooptie Deux please e-mail me asap or call me on Tuesday on my personal line at 863-692-2806 for a pro-rated quote. Right now Sunday morning is looking to be superb.

Fort DeSoto/Hooptie Deux/Roseate Spoonbill Short Notice IPT: March 6-10, 2013. 5-DAY: $2399 (Includes 3 mornings on the Hooptie Deux). Limit: 6/Openings: 2.

Join me as part of a small group for five great days of bird photography and learning. We will spend three mornings with the breeding plumage spoonbills on James Shadle’s customized pontoon boat, the Hooptie Deux. This alone would cost you $1050 so this works out to the cheapest IPT ever: 5 full days for only $1349. We will spend two of our mornings and four of our afternoons at Fort DeSoto photographing all manner of wading birds, gulls, terns, and almost surely some Great Horned Owl chicks. Our last afternoon will be spent at an active Wood Stork rookery with lots of flight photography opportunities.

This is the front end of a scratching Royal Tern. It was created with the tripod-mounted Canon EF 600mm f/4L IS II USM lens, the Canon 2x EF Extender III (Teleconverter), and the Canon EOS-1D X Digital SLR camera. ISO 400: 1/1600 sec. at f/8 in Manual Mode confirmed via histogram check.

Central sensor (by necessity) Expand/AI Servo/Rear Focus AF on the base of the bill where it meets the head and recompose. Click here if you missed the Rear Focus Tutorial. Click on the image to see a larger version.

You cannot beat the 600II/2XIII TC combo for reach (with phase detection AF).

Par for the Course

I am always looking to make the best possible image in the field but I never shy away from making a good image even better while optimizing an image. That process begins with the RAW conversion in Canon Digital Photo Professional (DPP) usually followed by from two to thirty minutes in Photoshop and NIK Color Efex Pro. Here I share with you several recent examples.

After a group of participants on the Monday In-the-Field Desoto Workshop finished photographing a group of gorgeous Royal Terns, more than one of them asked me, “How did you fit that bird in the frame with the 2X and the 600?” “I didn’t,” I said, showing them the image below on the rear LCD of my 1D X.

This is the rear end of the same scratching Royal Tern photographed just a few seconds after the last of a series of the front end of the bird was created. Of course I used the tripod-mounted Canon EF 600mm f/4L IS II USM lens, the Canon 2x EF Extender III (Teleconverter), and the Canon EOS-1D X Digital SLR camera. ISO 400: 1/1600 sec. at f/8 in Manual Mode confirmed via histogram check.

Learn to Think Digitally in the Field

I realized from the get-go that the image of the front end of the bird would not cut it so as soon as I had what I thought was an image with a nice view of the top of the bird’s head and crest I pointed the camera to the left and made two frames of the back end of the mule. It is mandatory that you do not re-focus when creating stitched panoramas so I did not touch the back button that I use to rear focus. It is also mandatory for obvious reasons that you use the exact same exposure. Working in Manual mode is of course best but an option if you are in an automatic mode is to press the start button to lock the exposure. The image that I chose for the pano is above.

By learning to think digitally in the field you can make some great images in situations the seem hopeless.

This stitched pano of a scratching Royal Tern was created from two images made on last Monday’s In-the-Field Workshop at Fort DeSoto with the tripod-mounted Canon EF 600mm f/4L IS II USM lens, the Canon 2x EF Extender III (Teleconverter), and the Canon EOS-1D X Digital SLR camera. ISO 400: 1/1600 sec. at f/8 in Manual Mode confirmed via histogram check.

Central sensor (by necessity) Expand/AI Servo/Rear Focus AF on the base of the bill where it meets the head and recompose. Click here if you missed the Rear Focus Tutorial. Click on the image to see a larger version.

You cannot beat the 600II/2XIII TC combo for reach (with phase detection AF).

Creating the Stitched Pano

After converting both chosen images in DPP I want to Photoshop, hit File/Automate/Photomerge, clicked on Reposition in Layout, selected the two images, hit OK, and answered a few e-mails. Perfecto. Then I merged the two layers, copied the file name and number of the front end image (_09U2714 Fort Desoto Park, Pinellas County, FL.TIF), and saved the image. The minimal processing took less than two minutes after the pano was assembled.

This is the original frame for the flaring in flight Royal Tern. It was created with the hand held Canon EF 600mm f/4L IS II USM lens and the Canon EOS-1D X Digital SLR camera. ISO 400. Evaluative metering +2/3 stop as framed: 1/2500 sec. at f/5.6 in Manual mode was really pushing the histogram to the right. My excuse? The light was changing every few seconds. The DPP conversion allowed me to bring the WHITEs into Photoshop at about 235.

Central sensor Surround/AI Servo/Rear Focus AF active at the moment of exposure. Click here if you missed the Rear Focus Tutorial. Click on the image to see a larger version.

I am able to hand hold the 600II for flight and action only for short periods of time. Here, it had been on the tripod but I grabbed it when several terns began landing into the wind. As I remember it, this one was taking flight when it turned making framing difficult at best. That is my excuse for cutting off the wing tip 🙂

Clipped Wing…

It is always a bummer when you clip the primaries on a nice flight pose as I did here. Moving the bird back in the frame using techniques from APTATS II was relatively quick and easy with the sky being of consistent tonality. Adding the two wing tips using techniques detailed in APTATS I and in Digital Basics took about 30 more minutes. I plan on doing an MP4 Photoshop Tutorial on the optimization of this image in about a week.

This flaring in flight Royal Tern was photographed on the In-the-Field Workshop at Fort DeSoto earlier this week with the hand held Canon EF 600mm f/4L IS II USM lens and the Canon EOS-1D X Digital SLR camera. ISO 400. Evaluative metering +2/3 stop as framed: 1/2500 sec. at f/5.6 in Manual mode was really pushing the histogram to the right. My excuse? The light was changing every few seconds. The DPP conversion allowed me to bring the WHITEs into Photoshop at about 235.

Central sensor Surround/AI Servo/Rear Focus AF active at the moment of exposure. Click here if you missed the Rear Focus Tutorial. Click on the image to see a larger version.

I am able to hand hold the 600II for flight and action only for short periods of time. Here, it had been on the tripod but I grabbed it when several terns began landing into the wind. As I remember it, this one was taking flight when it turned making framing difficult at best.

Snowy Egret Exposure Quiz

This Snowy Egret was also photographed on the recently concluded SW FLA BIRDS AS ART Instructional Photo-Tour with the hand held Canon EF 300mm f/2.8L IS II USM lens with the Canon 1.4x EF Extender III (Teleconverter) and the Canon EOS-1D X Digital SLR camera body. ISO 400. 1/2000 sec. at f/? in Manual mode.

Central sensor/AI Servo Surround/Rear Focus AF active at the moment of exposure. Click here if you missed the Rear Focus Tutorial. Click on the image to see a larger version. If you own a 1D X be sure to check out the info on our EOS-1D X Autofocus Guide below.

Another Exposure Quiz Answer

This Snowy Egret was photographed in the same light as the Great Blue Heron that opened the March 1st blog post here. The GBH image was created at 1/2000 sec. at f/7.1 in Manual mode. The question was, “With the same ISO and shutter speed what aperture would you have set? And why?

Several folks reasoned that since the GBH had a white neck that the right exposure for the Snowy Egret would be the same, 1/2000 sec. at f/7.1. Julian Mode was very close to the right answer and his reasoning was good as was Merv Lowe. Elinor Osborne’s reasoning was convoluted at best.

Here is my take: yes, the GBH has a white neck but the whites are not as bright as the whites on a Snowy Egret. I stopped down to f/8 and the resulting histogram was perfect: lots of data well into the fifth (rightmost) histogram box with no significant blinkies.

Seriously Huge B&H Savings on Nikon and Canon Gear

Nikon

For the first time in many years NIKON is going to be deeply discounting many legacy pro lenses individually for the next 2 weeks only with discounts up to $350. There are also many amazing deals on NIKON Buy together and Save packages as well. Click here to save.

Nikon DSLRS Bundles with Lenses & Flash: Save up to $750. Click here to save. Make sure to add each item to your shopping cart to see the absolute lowest price.

Canon Lenses & Speedlites: Save Up to $300

Click here to save. Make sure to add each item to your shopping cart to see the absolute lowest price.

Canon Buy Together & Save: Save Up to $400

Click here to save.

EOS-1D X AF Guide

You can learn exactly how I set up and use this camera’s great new AF system in our EOS-1D X AF Guide. And you can learn about our other camera User’s Guides here.

Typos

On all blog posts, feel free to e-mail or leave a comment regarding any typos, wrong words, misspellings, omissions, or grammatical errors. Just be right. 🙂

Support the BAA Blog. Support the BAA Bulletins: Shop B&H here!

We want and need to keep providing you with the latest free information, photography and Photoshop lessons, and all manner of related information. Show your appreciation by making your purchases immediately after clicking on any of our B&H or Amazon Affiliate links in this blog post. Remember, B&H ain’t just photography!

If you are considering an item for purchase or comparison shopping be sure to place an item in your cart to see the too-low-to show the actual price. In many cases the prices are so low that B&H is forbidden from publicizing them!

B&H Search Engine Banner


B&H Photo - Video - Pro Audio


Support the BAA Blog. Support the BAA Bulletins: Shop Amazon here!

Consider doing all of your Amazon.com shopping using the search link below. You'll be getting the same low prices and great service that you are accustomed to and at the same time, supporting my efforts in the Bulletins and on the Blog to bring you great images, timely product news and info, and tons of free educational articles on an almost daily (and sometimes almost back-breaking) basis 🙂 Just type your search in the little white box and hit Go.

Shop Amazon

Consider doing all of your Amazon.com shopping using the search link below. You'll be getting the same low prices and great service that you are accustomed to and at the same time, supporting my efforts in the Bulletins and on the Blog to bring you great images, timely product news and info, and tons of free educational articles on an almost daily (and sometimes almost back-breaking) basis 🙂 Just type your search in the little white box and hit Go.

And from the BAA On-line Store:

LensCoats. I have a LensCoat on each of my big lenses to protect them from nicks and thus increase their re-sales value. All my big lens LensCoat stuff is in Hardwood Snow pattern.
LegCoat Tripod Leg Covers. I have four tripods active and each has a Hardwood Snow LegCoat on it to help prevent further damage to my tender shoulders 🙂 And you will love them in mega-cold weather....
Gizo GT3532 LS CF Tripod. This one replaces the GT3530LS Tripod and will last you a lifetime. Learn more about this great tripod here.
Mongoose M3.6 Tripod Head. Right now this is the best tripod head around for use with lenses that weigh less than 9 pounds. For heavier lenses, check out the Wimberley V2 head.
Double Bubble Level. You will find one in my camera's hot shoe whenever I am not using flash.
The Lens Align Mark II. I use the Lens Align Mark II pretty much religiously to micro-adjust all of my gear an average of once a month and always before a major trip. Enjoy our free comprehensive tutorial here.
BreezeBrowser. I do not see how any digital photographer can exist without this program.
Delkin Flash Cards. I use and depend on Delkin compact Flash Cards and card readers most every day. Learn more about their great 700X and 1000X cards here or about my favorite Delkin card here.
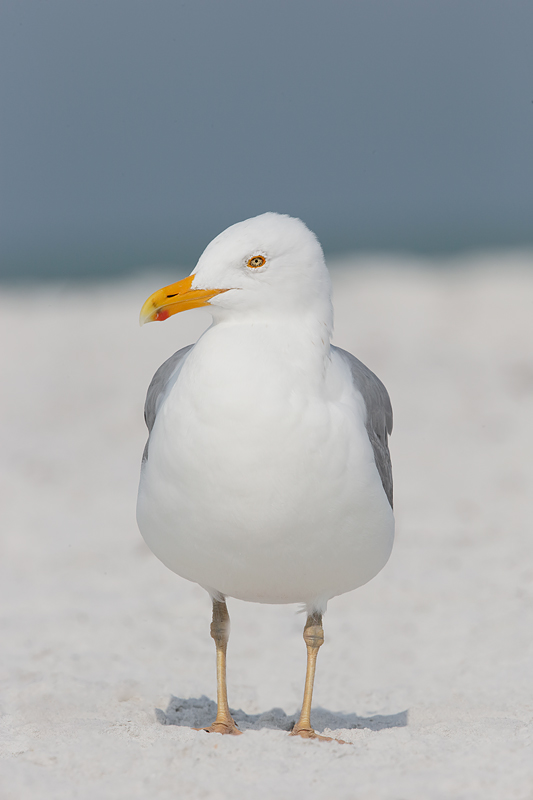
March 4th, 2013

When Sharp Just Does Not Cut It

New Concept IPTSold Out!

With so many folks already signed up it is looking as if folks are liking the idea of more image review during the days, more in-the-field-instruction with a smaller group, no time in the classroom, and a bit more time to rest and sleep…. Learn more by clicking here and scrolling down to the first item.

Pro-rated

While this trip is sold out, we still have room for one more on a pro-rated basis. If you would like to explore the possibility of joining us for a day or two on this IPT or a morning on the Hooptie Deux please e-mail me asap or call me asap on my cell at 863-221-2372 or on my personal line at 863-692-2806.

Fort DeSoto/Hooptie Deux/Roseate Spoonbill Short Notice IPT: March 6-10, 2013. 5-DAY: $2399 (Includes 3 mornings on the Hooptie Deux). Limit: 6/Openings: 0.

Join me as part of a small group for five great days of bird photography and learning. We will spend three mornings with the breeding plumage spoonbills on James Shadle’s customized pontoon boat, the Hooptie Deux. This alone would cost you $1050 so this works out to the cheapest IPT ever: 5 full days for only $1349. We will spend two of our mornings and four of our afternoons at Fort DeSoto photographing all manner of wading birds, gulls, terns, and almost surely some Great Horned Owl chicks. Our last afternoon will be spent at an active Wood Stork rookery with lots of flight photography opportunities.

This image (Tree Swallow sharp I) was created with the tripod-mounted Canon EF 600mm f/4L IS II USM lens, the Canon 1.4x EF Extender III (Teleconverter), and the Canon EOS-1D X Digital SLR camera. ISO 500. Evaluative metering +1/3 stop: 1/1250 sec. at f/5.6 in Manual mode confirmed by histogram check.

Central sensor Surround/AI Servo/Rear Focus AF active at the moment of exposure. Click here if you missed the Rear Focus Tutorial. Click on the image to see a larger version.

When Sharp Just Does Not Cut It

There have been about 20,000 Tree Swallows down by the lake that is five minutes west of my home for the past two mornings. I had been set up for flight when the group in the images above and below blasted off so I went with a fast shutter speed knowing that I would not like the results.

This image (Tree Swallow Sharp II) was also created with the tripod-mounted Canon EF 600mm f/4L IS II USM lens, the Canon 1.4x EF Extender III (Teleconverter), and the Canon EOS-1D X Digital SLR camera. ISO 500. Evaluative metering +1/3 stop: 1/1250 sec. at f/5.6 in Manual mode confirmed by histogram check.

Central sensor Surround/AI Servo/Rear Focus AF active at the moment of exposure. Click here if you missed the Rear Focus Tutorial. Click on the image to see a larger version.

The Problems With Sharp

Note that in both of the images above the off-angled light is accentuated by the fast shutter speed. With the narrow depth-of-field note that the out-of-focus birds in the foreground that are in front of the plane of sharp focus are huge distractions. Note that there is no sense of implied motion. I would normally deleted both of the images above but kept them only for teaching purposes.

This image (Tree Swallow Flock Blur I) was also created on March 2, 2013 with the tripod-mounted Canon EF 600mm f/4L IS II USM lens, the Canon 1.4x EF Extender III (Teleconverter), and the Canon EOS-1D X Digital SLR camera. Note however that for creating a pleasingly blurred image I dropped all the way down to ISO 50. Evaluative metering +2/3 stop as framed: 1/15 sec. at f/16 in Manual mode confirmed by histogram check. (Folks who convert in DPP as I do need to disable Highlight Tone Priority to get down to ISO 50. Note also that unless you are converting in DPP that enabling Highlight Tone Priority has no effect on your RAW files. To learn more about converting in Canon Digital Photo Professional and why I am using it 100% of the time click here and here.

Central sensor Surround/AI Servo/Rear Focus AF active at the moment of exposure. Click here if you missed the Rear Focus Tutorial. Click on the image to see a larger version.

ISO 50

When creating pleasing blurs setting the lowest possible ISO allows you to work at relatively wider apertures; this reduces the amount of time that you will spend cleaning microscopic dust bunnies. There is a lot less visible sensor dust at f/16 than at f/32 or smaller.

This image (Tree Swallow Flock Blur II) was created with the tripod-mounted Canon EF 600mm f/4L IS II USM lens, the Canon 1.4x EF Extender III (Teleconverter), and the Canon EOS-1D X Digital SLR camera. Note however that for creating a pleasingly blurred image I dropped all the way down to SO 50. Evaluative metering +2/3 stop as framed: 1/15 sec. at f/18 in Manual mode confirmed by histogram check; note that it had gotten a shade brighter.

Central sensor Surround/AI Servo/Rear Focus AF active at the moment of exposure. Click here if you missed the Rear Focus Tutorial. Click on the image to see a larger version.

Why Pleasing Blurs? To Pan or Not to Pan?

Note the implied motion. Note that the off angled light has been softened considerably. See the pleasingly pan-blurred backgrounds. Note that the birds traveling in the direction opposite the pan were rendered as soft, white streaks.

In the image above I was panning from right to left with the main flock, the dark birds. This accentuated the streak blur on the birds flying against the pan. But I varied my approach; with the image below, I held the lens relatively still without panning. Note the the degree of blurring of the individual birds was roughly the same regardless of the direction of flight.

This image (Tree Swallow Flock Blur III) was created on the morning of March 3, 2013 with the tripod-mounted Canon EF 600mm f/4L IS II USM lens, the Canon 1.4x EF Extender III (Teleconverter), and the Canon EOS-1D X Digital SLR camera. Evaluative metering +2/3 stop as framed: 1/15 sec. at f/10 in Manual mode confirmed by histogram check.

Lowest central sensor/AI Servo Surround/Rear Focus AF active at the moment of exposure. Click here if you missed the Rear Focus Tutorial. Click on the image to see a larger version.

Why 1/15 sec.? Why Only f/10 For This Image?

1/15th of a second has long been the classic pleasing blur shutter speed. For good reason: it often offers a very pleasing degree of blurring. I made images on both mornings at 1/8 sec. but did not keep a single one….

On Sunday I was out in the field an hour earlier than I had been on Saturday as it was a clear morning. Saturday had started off cloudy. As there was less light on Sunday I was able to use a larger aperture than I had on Saturday while still pushing the exposure to the right and making sure to get data well into the fifth (rightmost) box of the histogram.

This image (Tree Swallow Flock Blur IV) was also created on Sunday morning. For this one I got lower and used the tripod-mounted Canon EF 600mm f/4L IS II USM lens, the Canon 2x EF Extender III (Teleconverter), and the Canon EOS-1D X Digital SLR camera. ISO 50. Evaluative metering at zero: 1/15 sec. at f/14 in Manual Mode was a bit under-exposed.

Central sensor (by necessity) Expand/AI Servo/Rear Focus AF on flock and released the back button. Click here if you missed the Rear Focus Tutorial. Click on the image to see a larger version.

You cannot beat the 600II/2XIII TC combo for reach (with phase detection AF).

Which is Your Favorite?

Take a moment to leave a comment and let us know which is your favorite image, and why.

A Guide to Pleasing Blurs

If you would like to learn more about creating pleasingly blurred images–they are not out of focus accidents, check out A Guide to Pleasing Blurs by Denise Ippolito and yours truly.

Seriously Huge B&H Savings on Nikon and Canon Gear

Nikon

For the first time in many years NIKON is going to be deeply discounting many legacy pro lenses individually for the next 2 weeks only with discounts up to $350. There are also many amazing deals on NIKON Buy together and Save packages as well. Click here to save.

Nikon DSLRS Bundles with Lenses & Flash: Save up to $750. Click here to save. Make sure to add each item to your shopping cart to see the absolute lowest price.

Canon Lenses & Speedlites: Save Up to $300

Click here to save. Make sure to add each item to your shopping cart to see the absolute lowest price.

Canon Buy Together & Save: Save Up to $400

Click here to save.

EOS-1D X AF Guide

You can learn exactly how I set up and use this camera’s great new AF system in our EOS-1D X AF Guide. And you can learn about our other camera User’s Guides here.

Southwest Florida Site Guide

Several folks have written recently asking why this great guide has not been updated since 2007. The answer is that I have not discovered any new hotspots and that the good places remain good and the great places remain great.

Typos

On all blog posts, feel free to e-mail or leave a comment regarding any typos, wrong words, misspellings, omissions, or grammatical errors. Just be right. 🙂

Support the BAA Blog. Support the BAA Bulletins

We want and need to keep providing you with the latest free information, photography and Photoshop lessons, and all manner of related information. Show your appreciation by making your purchases immediately after clicking on any of our B&H or Amazon Affiliate links in this blog post. Remember, B&H ain’t just photography!

B&H Search Engine Banner


B&H Photo - Video - Pro Audio


Shop Amazon

Consider doing all of your Amazon.com shopping using the search link below. You'll be getting the same low prices and great service that you are accustomed to and at the same time, supporting my efforts in the Bulletins and on the Blog to bring you great images, timely product news and info, and tons of free educational articles on an almost daily (and sometimes almost back-breaking) basis :) Just type your search in the little white box and hit Go.

And from the BAA On-line Store:

LensCoats. I have a LensCoat on each of my big lenses to protect them from nicks and thus increase their re-sales value. All my big lens LensCoat stuff is in Hardwood Snow pattern.
LegCoat Tripod Leg Covers. I have four tripods active and each has a Hardwood Snow LegCoat on it to help prevent further damage to my tender shoulders :) And you will love them in mega-cold weather....
Gizo GT3532 LS CF Tripod. This one replaces the GT3530LS Tripod and will last you a lifetime. Learn more about this great tripod here.
Mongoose M3.6 Tripod Head. Right now this is the best tripod head around for use with lenses that weigh less than 9 pounds. For heavier lenses, check out the Wimberley V2 head.
Double Bubble Level. You will find one in my camera's hot shoe whenever I am not using flash.
The Lens Align Mark II. I use the Lens Align Mark II pretty much religiously to micro-adjust all of my gear an average of once a month and always before a major trip. Enjoy our free comprehensive tutorial here.
BreezeBrowser. I do not see how any digital photographer can exist without this program.
Delkin Flash Cards. I use and depend on Delkin compact Flash Cards and card readers most every day. Learn more about their great 700X and 1000X cards here or about my favorite Delkin card here.
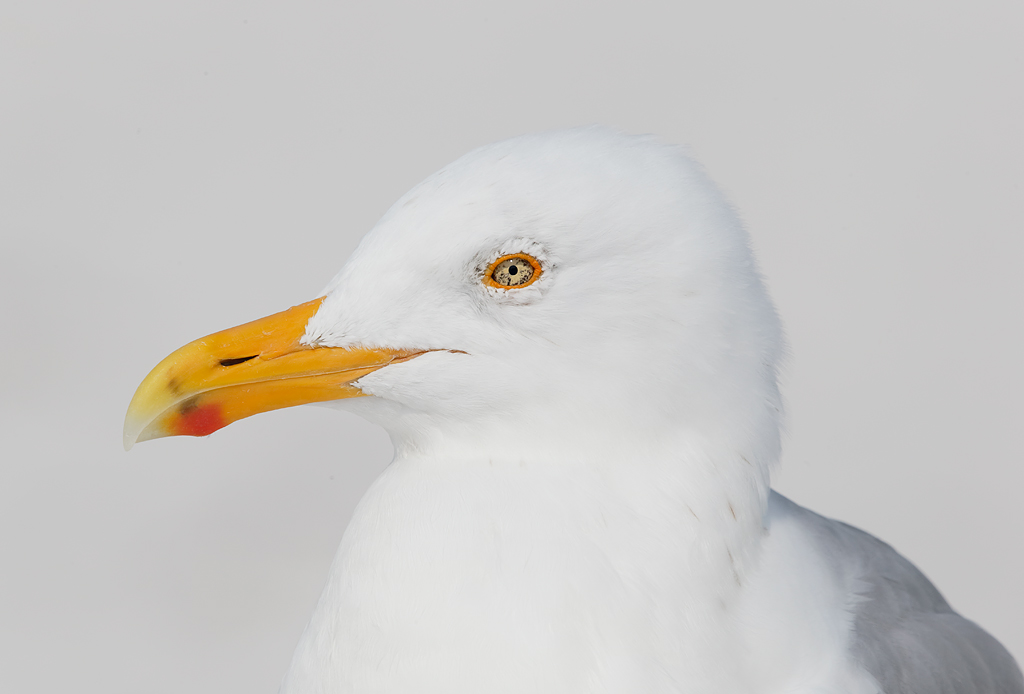
March 2nd, 2013

Comparing the Canon 500mm f/4L IS II and the Canon 600mm f/4L IS II