May 31st, 2012 Youth Category Voting Analysis and Related Comments
Totals of the Judges’ Votes (each of 5 judges awarded each image 1-5 points):
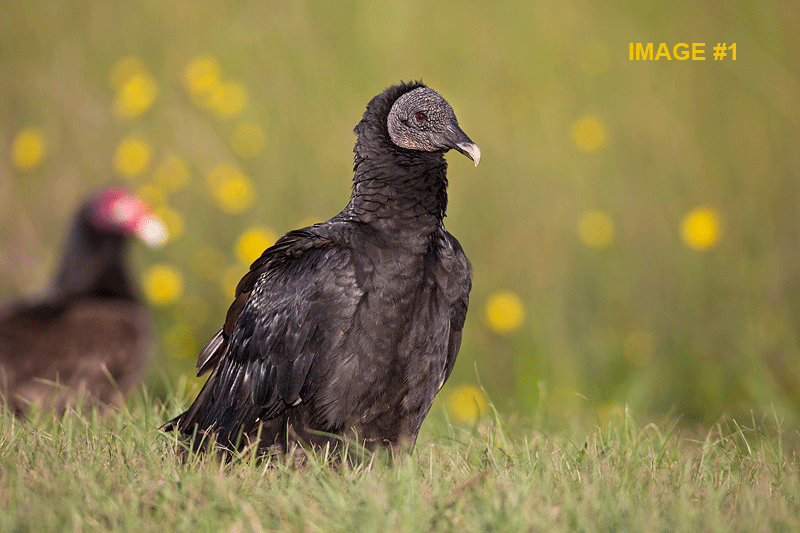
1-Merlin on fence post: 19
2-Kestrel hovering: 18
3-Jabiru Stork silhouette: 17
4-Snowy Owl pano: 16
T5-Hawk Owl vertical: 15
T5-Hyacinth Macaws on fence: 15
7-Black-headed Gull braking in flight: 14
8-Great Grey Owl on post: 13
T9-Short-eared Owl on post vertical: 12
T9-Emu laughing: 12
Public Voting Totals (each of you was asked to vote your five favorite images 1-5 points with 5 being your favorite):
1-Kestrel hovering: 275
2-Hyacinth Macaws on fence: 212
3-Black-headed Gull braking in flight 178
4-Snowy Owl pano 117
5-Great Grey Owl on Post 107
6-Emu Laughing 93
7-Merlin on fence post 85
8-Hawk Owl vertical 82
9-Short-eared Owl on post vertical 49
10-Jabiru Stork silhouette 47
When I posted the ten images for the public voting (here) I almost wrote that I did not expect the tight correlation between the judges’ results and the public judging but decided against it. In any case, there was far less correlation in the two votes, most likely because the images were of very similar quality. I have no explanation for the 10th place showing for the Jabiru silhouette image in the public vote as compared to its much stronger 3rd place finish with the contest judges. Or vice versa for the Merlin image that won the category but finished only 7th in the public vote.
It is interesting that only four photographers made the final round of ten. Though we had hoped for greater participation in this category but were were happy with the quality of the winning and honored images.
The images below are presented in the order of the judges’ placement as above along with my comments.
|
|
|
Jenaya Cheyenne Launstein. Merlin on fence post: 1st place.
|
The judges loved the perfect rule-of-thirds image design, the soft light, the colors and texture of the grasses, the exceptional sharpness, and the perfect head turn.
|
|
|
Jef Pattyn. Kestrel hovering: 2nd place.
|
The sharpness, the beautiful underwing detail, the hunting pose, and the framing make this image special. My bad on this one: For the public judging round I took the liberty of lightening this image; the judge’s saw a much darker version than what you are seeing above…. Lesson learned.
|
|
|
Jef Pattyn. Jabiru Stork silhouette: 3rd place.
|
The judges liked the sunset colors, the composition and sharpness, and the strip of trees at the bottom that frame the image. Julie Zickefoose called this one “Tiki God Storks.”
|
|
|
Jenaya Cheyenne Launstein. 4th place: Snowy Owl pano
|
Fence posts, soft light, textured grasses, pleasing compositions, and textured grasses seem to be a winning combination for Jenaya.
|
|
|
Jenaya Cheyenne Launstein. Tied for 5th place: Hawk Owl vertical
|
More of the same from this talented young photographer. This one could have used a bit less sharpening on the bird and a bit less saturation.
|
|
|
Jef Pattyn. Tied for 5th place: Hyacinth Macaws on fence
|
The sharpness, two perfect head angles, the comical interaction, and the rich colors were all big pluses for this image but I believe that “Hyacinth Macaws on fence” would have done a lot better with the judges with a lot less fence, that is, with a good crop from the bottom as in the cropped version here. You can see the original version here.
|
|
|
Jef Pattyn. 7th place: Black-headed Gull braking in flight
|
Everyone liked the sharp focus, the beautiful image design, and the evenly lit underparts of this gull in flight. The somewhat harsh sidelight on the bird’s face likely hurt this image a bit with the judges panel.
|
|
|
Marlise Tae Lynn Launstein. 8th place: Great Grey Owl on post
|
This sharp image of a rare bird was popular with the public. Had the bird been looking right down the lens barrel it would have likely done much better with the judges.
|
|
|
Marlise Tae Lynn Launstein. Tied for 9th place: Short-eared Owl on post vertical
|
I liked this one a lot for its sharpness, the great subject, a very love vertical rule of thirds image design, and the soft light.
|
|
|
Emily Nicole Henderson. Tied for 9th place: Emu laughing
|
With the laughing Emu and the tilted horizon this one put a smile on everyone’s face. As a game park image, the continental mismatch (South America and Africa) might have been seen as a problem by some.
Comments Welcome
As always your comments on everything above are welcome. Coming soon: the Digital Category.
May 30th, 2012
|
|
|
These copulating Western Gulls were photographed with the hand held Canon 300mm f/2.8 L IS II lens and the Canon EOS-5D Mark III. ISO 400. Evaluative metering +1/3 stop: 1/1250 sec. at f/8 in Manual mode.
One sensor below the Central Sensor/Surround/AI Servo Rear Focus active at the moment of exposure. Click here if you missed the Rear Focus Tutorial. Click on the image to enjoy a larger version.
With RGB values as high as 252 my WHITEs were a bit brighter than I would have liked with my 5D Mark III so I needed to run a Linear Burn on them and followed that up with a good dose of Detail Extractor from NIK Color Efex Pro–the latter on the top of the bird’s head only revealed with an Inverse or Hide-All Layer Mask. Some fancy Digital Eye Doctor work brought the image to life. Detail on all but Detail Extractor may be found in our Digital Basics File . Digital Basics is a PDF that is sent via e-mail. It contains my complete digital workflow as well as dozens of great Photoshop tips. Most folks feel that it is the best $20 that they ever spent on photography.
NIK Color Efex Pro and More
As regular readers know NIK’s Color Efex Pro 4 is now an integral part of my workflow. You can save 15% on all NIK products by clicking here and entering BAA in the Promo Code box at check-out. Then hit Apply to see your savings. You can download a trial copy that will work for 15 days and allow you to create full sized images.
|
Delkin’s New 64GB 700X CompactFlash Pro UDMA Enabled Cards
“Darn. I left my new cards on the desk in the motel room. Bummer. But I have some of my older Delkin 32gb 450X cards, the red, white, and blue ones, the ones with the paint completely worn off them” I said to Denise Ippolito as we gathered our gear and prepared to head down the hills to the cliffs where we had photographed several Western Gulls on nests when arrived in San Diego almost a week ago.
We were just getting ready to leave for Torrey Pines State Reserve to try for Peregrine Falcons in flight when Denise called softly to me, “Artie.” I glanced to my right and saw that the two adult gulls at the end of the cliff were getting ready to mate. I hustled over and we both began to make images rapidly as the pre-copulatory stand turned into the real thing. Though I rarely hold the hammer down this situation called for making lots of images in a short time. It would be better to try and make as many images as possible than to pick and choose so I held the shutter button down. Problem. The buffer filled quickly and I kept having to wait for it to clear. Denise on the other hand kept blasting away nonstop…. It was then that I realized that I had one of the older 450X Delkin cards in my camera while she had one of Delkin’s new 64GB 700X CompactFlash Pro UDMA enabled cards in her 5D Mark III.
When I first got my 5DIII I had had lots of problems with the buffer filling even when I was not rapid-firing. Until I got my hands on one of Delkin’s 700 cards. Since then it had been smooth sailing even when I held the shutter button down. When the dust cleared Denise told me that she was amazed that she had not filled the buffer even though she had taken more than 200 images in just a few minutes. And with the new cards downloading the images with Downloader Pro and Delkin’s Express Card 54 reader in the PCMCIA slot was super-fast as well.
Right after I got my two 64GB 700X CompactFlash Pro UDMA enabled cards I became confused when I saw that Delkin had released a series of new 1000X CompactFlash UDMA 7 enabled cards that were roughly $60 to $90 more expensive than the 700X cards. A quick call to Alan Parry, my main man at Delkin, revealed that the 1000X cards were overkill for even the fastest digital cameras with the largest image files; the 1000X cards are designed for folks shooting serious video.
As you can see below Delkin flash cards are dependable! I look forward to wearing the paint off my two new 64GB 700X CompactFlash Pro cards. If you own or will be purchasing a Canon EOS-5D Mark III, will be the first on your block with a 1DX, or own one of the newer faster cameras with large image files you can get yourself some of the new Delkin700X CompactFlash Pro UDMA enabled cards here. We carry them in the 16, 32, and 64MB sizes. If you are doing serious video we can have the 1000X cards on their way to you same day. They come in 16, 32, 64, and 128MB sizes. As for the “I don’t want to put all my eggs in one basket” way of thinking, most flash cards are lost when you are changing cards. It is a lot easier to keep track of one card than to keep track of multiple cards. And in 11 years of digital photography all with Delkin flash cards I have never lost a single image to card failure.
|
|
|
After several years of hard use I wore the paint off both of my 32GB 450X cards. They still function perfectly so I keep them around as back-ups or to loan to folks who run out of storage in the field. But after losing some great chances to a filled buffer yesterday I will make sure to have a 700X card in my 5D Mark III 100% of the time.
|
Canon EOS-1DX
B&H is now accepting pre-orders for the long awaited Canon EOS-1DX professional digital camera body. As much as I love my 5D III I cannot–like many of you–wait to get my hands on the new camera. If you would like to get one in your hands as soon as possible please use this and only this link: Canon EOS-1DX. As soon as you get your receipt from B&H forward it to me via e-mail so that I can pass it along to my contact at B&H who will expedite your order. As there will be huge demand for the 1DX there is no way to tell how long it will be till you get yours but I and Yechiel Orgel will do our best to get one to you asap. If you are able to get one from another source it is easy to cancel your B&H order; your credit card is not charged until your order is shipped.
Shopper’s Guide
Below is a list of the gear used to create the images in today’s post. Thanks a stack to all who have used the Shopper’s Guide links to purchase their gear as a thank you for all the free information that we bring you on the Blog and in the Bulletins. Before you purchase anything be sure to check out the advice in our Shopper’s Guide.
Canon 300mm f/2.8 L IS II lensI finally broke down and purchased my own copy of this great flight photography and general purpose lens.
Canon EOS-5D Mark III. Except when I need extreme focal length, I have been using my 5D III on the 800 a ton. And loving it.
And from the BAA On-line Store:
LensCoats. I have a LensCoat on each of my big lenses to protect them from nicks and thus increase their re-sales value. All my big lens LensCoat stuff is in Hardwood Snow pattern.
LegCoat Tripod Leg Covers. I have four tripods active and each has a Hardwood Snow LegCoat on it to help prevent further damage to my tender shoulders 🙂 And you will love them in mega-cold weather….
GT3532 LS. This one replaces the GT3530LS Tripod and will last you a lifetime. I’ll be commenting on this new model soon. In short, I like it.
Mongoose M3.6 Tripod Head. Right now this is the best tripod head around for use with lenses that weigh less than 9 pounds. For heavier lenses, check out the Wimberley V2 head.
CR-80 Replacement Foot for Canon 800. When using the 800 on a Mongoose as I do, replacing the lens foot with this accessory lets the lens sit like a dog whether pointed up or down and prevents wind-blown spinning of your lens on breezy days by centering the lens directly over the tripod.
Double Bubble Level. You will find one in my camera’s hot shoe whenever I am not using flash.
The Lens Align Mark II. I use the Lens Align Mark II pretty much religiously to micro-adjust all of my gear an average of once a month and always before a major trip. Enjoy our free comprehensive tutorial here.
BreezeBrowser. I do not see how any digital photographer can exist without this program.
May 28th, 2012
|
|
|
This male Tricolored Blackbird was photographed with the tripod-mounted Canon 800mm f/5.L IS lens and the Canon EOS-1D Mark IV. ISO 400. Evaluative metering at +1 stop: 1/1250 sec. at f/6.3 in Manual mode.
Central sensor (by necessity) AI Servo/Rear Focus AF on the bird’s face and re-compose (during a rare lull in the wind). Click here if you missed the Rear Focus Tutorial. Click on the image for a larger version.
|
Frozen and Battered Again in California: Trikes!
On the Morro Bay IPT we ran into a stretch of unexpectedly cold and windy weather. No IPT this time as I am currently on a busman’s holiday in San Diego with Denise Ippolito but Friday and Saturday past were again unexpectedly cold and incredibly windy. On Saturday we traveled with friend and multiple IPT veteran Mike Goldhamer of San Diego to a Tricolored Blackbird colony in Jacumba, California. As we drove over the summits of the Laguna and the Cuyamaca Mountains on I-8 it was windy, foggy, and raining. As we exited the car at Jacumba it was a very cold and ridiculously unseasonable 39 degrees. It was sunny. And the wind was a steady 25 mph from the southwest with gusts to forty….
It Was A Very Tough Morning
As regular readers know wind against sun conditions make bird photography very difficult at best. Without proper clothing and gloves the cold made things even more difficult. The birds as always were landing on reeds and cattails that were blowing like crazy. This made trying to focus accurately nearly impossible. We were working on a downhill slope so it was difficult to position your tripod while maintaining the height that you needed. And finally, the substrate was uneven, rocky in one spot, muddy in another, and covered with a thick layer of dried reeds and cattails just inches from either. This made getting a secure base from which to work a big problem. As I said, it was a very tough morning. Jeez, I almost forget that as the morning wore on the sun was coming in and out so that getting the right exposure was challenging at best. Yikes!
None-the-less, we perservered. For the most part this meant waiting for a bird to land on a relatively clean perch that was not blocked by other reeds and cattails and then waiting for the wind to abate just a bit. By 10:30am, once again frozen and battered, we all had had enough so we packed up and headed back to San Diego. Surprisingly, each of us had created a few decent images.
|
|
|
This female Tricolored Blackbird was photographed with the tripod-mounted Canon 800mm f/5.L IS lens, the 1.4X III TC, and the Canon EOS-1D Mark IV. ISO 800. Evaluative metering at +1 1/3 stops: 1/400 sec. at f/9 in Manual mode.
Central sensor (by necessity) AI Servo/Rear Focus AF on the bird’s breast active at the moment of exposure. Click here if you missed the Rear Focus Tutorial. Click on the image for a larger version.
|
Female tricoloreds (trikes for short) are much plainer than female Red-winged Blackbirds. The bird in the image above was bringing a mouthful of food to the young in the nest but we could not figure out what the food was.
|
|
|
This male Tricolored Blackbird was photographed with the tripod-mounted Canon 800mm f/5.L IS lens, the 1.4X III TC, and the Canon EOS-1D Mark IV. ISO 500. Evaluative metering at +1 1/3 stops: 1/320 sec. at f/9 in Manual mode.
Two sensors up from the central sensor (by necessity) AI Servo/Rear Focus AF on the bird’s neck active at the moment of exposure. Click here if you missed the Rear Focus Tutorial. Click on the image for a larger version.
|
Male tricoloreds are very similar to male red-wings but have whitish rather than yellow wing-bars. It is always exciting for me to photograph a new species no matter how difficult the conditions.
Take a Moment
Take a moment to let us know which is your favorite image and why.
Canon 500 & 600mm f/4 L IS II Lenses Shipping Soon!
The long-awaited Canon 500mm f/4L IS II lens and the equally long-awaited Canon 600mm f/4L IS II lens should be shipping within a week as they are en route to dealers now. I can help you get one soon at the lowest price. Here’s how.
Pre-order the new Series II 500mm lens by clicking on this link: Canon EF 500mm f/4L IS II USM. Or pre-order the new Series II 600mm lens by using this link: Canon EF 600mm f/4L IS II USM. When you receive your B&H receipt via e-mail forward it to me by e-mail here. I will e-mail it to my affiliate contact at B&H to help expedite your order. Do understand that the demand for these lenses will be huge. If by chance you are able to secure your lens from another source (likely at a higher price) you can simply cancel your B&H pre-order; your credit card is not charged until and unless the lens is shipped. It is a win-win situation for all who wish to get their hands on one or both of these lenses. By using the links above you will be thanking BIRDS AS ART for all the free information that we provide in Bulletins, on the blog, and by answering your e-mail questions (as I have been doing for close to two decades now). So thanks! In addition, you can save your receipt(s) and cash them in for multiple contest entries in the BIRDS AS ART 2nd International Bird Photography Competition.
You can check the amazing lighter weights and specs of the new lenses as compared to the old lenses here. Aside from being well lighter each of the new lenses is well sharper than the previous versions and features 4-stop Image Stabilization. You can learn more about the two new lenses here and here.
Important Note
Though B&H is now accepting pre-orders, you will not–due to their holiday closing–be able to pre-order your lens (or to order anything else) until Monday, May 28th at 9:45PM EDT. So set your alarm for 9:46pm on this coming Monday evening if you wish to be the first on your block to get you hands on either of these two Series II lenses.
Shopper’s Guide.
Support both the Bulletins and the Blog by making all your B & H purchases here.
Below is a list of the gear talked about in this blog post. Thanks a stack to all who have used the Shopper’s Guide links to purchase their gear as a thank you for all the free information that we bring you on the Blog and in the Bulletins. Before you purchase anything be sure to check out the advice in our Shopper’s Guide.
Canon 800mm f/5.6L IS lens. Right now this is my all time favorite super-telephoto lens.
Canon EF 1.4X III TC. This new TC is designed to work best with the new Series II super-telephoto lenses.
Canon EOS-1D Mark IV professional digital camera body. The very best professional digital camera body that I have ever used.
And from the BAA On-line Store:
LensCoats. I have a LensCoat on each of my big lenses to protect them from nicks and thus increase their re-sales value. All my big lens LensCoat stuff is in Hardwood Snow pattern.
LegCoat Tripod Leg Covers. I have four tripods active and each has a Hardwood Snow LegCoat on it to help prevent further damage to my tender shoulders 🙂 And you will love them in mega-cold weather….
GT3532 LS. This one replaces the GT3530LS Tripod and will last you a lifetime. I’ll be commenting on this new model soon. In short, I like it.
Mongoose M3.6 Tripod Head. Right now this is the best tripod head around for use with lenses that weigh less than 9 pounds. For heavier lenses, check out the Wimberley V2 head.
CR-80 Replacement Foot for Canon 800. When using the 800 on a Mongoose as I do, replacing the lens foot with this accessory lets the lens sit like a dog whether pointed up or down and prevents wind-blown spinning of your lens on breezy days by centering the lens directly over the tripod.
Double Bubble Level. You will find one in my camera’s hot shoe whenever I am not using flash.
The Lens Align Mark II. I use the Lens Align Mark II pretty much religiously to micro-adjust all of my gear an average of once a month and always before a major trip. Enjoy our free comprehensive tutorial here.
BreezeBrowser. I do not see how any digital photographer can exist without this program.
May 27th, 2012
|
|
|
Congrats to Jenaya Launstein—14 years old. Her image, “Merlin on fence post” is the frst prize winner in the Youth category of the BIRDS AS ART 1st International Bird Photography Competition. Nikkor 200-400 f/4 ED VR lens with the Nikon D300 and the TC-14EII teleconverter (on a beanbag at 550mm). ISO 400: 1/320 sec. at f/6.3.
Be sure to click on the image to see the spectacular larger version.
|
Merlin on fence post: Jenaya Launstein—14 years old
Jenaya’s image was voted first by the contest judges in the Youth category receiving 19 out of a possible 25 points. It just edged out Jef Pattyn’s hovering Kestrel image which scored 18 points. All of the judges loved the perfect rule-of-thirds image design, the soft light, the colors and texture of the grasses, the exceptional sharpness, and the perfect head turn.
From Jenaya:
In December, 2011 my dad and I took an evening drive in search of wildlife to photograph near our home in Pincher Creek, Alberta, Canada. We spotted a raptor on a post in a nearby field. We quickly whipped our heads around to see and realized that it was a male Merlin! I am really glad I got this image because he was so beautiful and we don’t see these guys too often around here!
|
|
|
Congratulations to Jef Pattyn–11 years old. His “Kestrel hovering” was awarded second prize in the Youth category of the BIRDS AS ART 1st International Bird Photography Competition. Canon 100-400mm IS L zoom lens at 400mm with the EOS-7D. ISO 800. Evaluative metering +2 full stops: 1/1000 sec. at f/6.3.
Be sure to click on the image to see the larger version.
|
Kestrel hovering, Jef Pattyn
Jef’s Kestrel was voted second by the contest judges in the Youth category. It received 18 out of a possible 25 points. The sharpness, the beautiful underwing detail, the hunting pose, and the framing make this image special.
From Jef:
I went with my brother and Dad to Zeeland in The Netherlands; my Dad had heard that there were several Short-eared Owls seen in the open fields around the village of Haamstede. While looking for the owls, this Kestrel came close to the road hovering in search of mice. We approached slowly and used our car as a hide. The Kestrel was not disturbed at all.
|
|
|
Congratulations again to Jef Pattyn–11 years old. His “Jabiru Stork silhouette” was awarded third prize in the Youth category of the BIRDS AS ART 1st International Bird Photography Competition. Canon 100-400mm IS L zoom lens (hand held at 10mm) with the EOS-7D. ISO 6400: 1/160 sec. at f/6.3.
Be sure to click on the image to see the larger version.
|
From Jef:
In the summer of 2011, my family went to Brazil and visited the Pantanal to search for its spectacular wildlife. At the end of our boat on August 12 we got back to our lodge after sunset. To our delight there was a couple of Jabiru storks on the bank of the river. There was almost no light bu it was possible to make create silhouetted images against the fading light of the setting sun.
The judges liked the sunset colors, the composition and sharpness, and the strip of trees at the bottom that frame the image. Julie Zickefoose called this one “Tiki God Storks.”
Congrats!
Congrats to all who placed images in the top ten in the Youth category. You can see all ten honored images here. 58 images made the next to last cut. Only ten went to the judges. Getting to the final round is quite an accomplishment. Prizes (see below) will be shipped once all the winners are announced as several folks had more than one top three images. Be sure to patronize our sponsors; without them, this contest would not exist. There will be more educational stuff from the Contest coming soon.
| First Prize |
Runner Up |
Highly Commended |
Sponsor |
| $100 Gift Certificate |
$50 Gift Certificate |
$25 Gift Certificate |
B&H PHOTO VIDEO |
| choice of lens plate |
P-5 camera body plate |
Plamp |
Wimberley |
| 16 GB 450 X UDMA Compact Flash Card |
Sensor Scope |
Universal Memory Card Reader |
Delkin Devices |
| Level 3 Gift Subscription |
Level 2 Gift Subscription |
Level 1 Gift Subscription |
Nature Photographer Magazine |
| $30 Discount Certificate |
$25 Discount Certificate |
$20 Discount Certificate |
Canvas On Demand |
| Laptop Bag or Pixel Sunscreen |
Pixel Pocket Rocket |
AA Battery Holder |
Think Tank |
| $50 Gift Certificate |
$25 Gift Certificate |
$10 Gift Certificate |
Lens Coat |
| Canon/Nikon Lens Plate |
Canon/Nikon Camera Body Plate |
. |
4th Generation Design |
| . |
Better Beamer |
Better Beamer Replacement Fresnel |
Visual Echoes |
| TriKlear Kit |
TriKlear Kit |
TriKlear Kit |
Lens Pen |
| ABP, ABP II, DB, APTATS I & II, SONGBIRD GUIDE |
ABP, ABP II, DB,APTATS I & II |
ABP, ABP II, DB |
BIRDS AS ART |
| . |
Double Bubble |
. |
HP Marketing |
| BreezeBrowser Pro/Downloader Pro Combo |
BreezeBrowser Pro |
Downloader Pro |
Breeze Systems |
| Sito HD Version Gold Web Site |
|
|
Sito HD |
.
May 25th, 2012 You Be The Judge: Youth
Voting at the You Be The Judge: Youth post was closed this morning at 7:30 am eastern time. The results are being tabulated and will be announced soon along with the winning images as chosen by the panel of five judges.
|
|
|
This image was created with the Canon 70-200mm f/2.8L IS II lens (hand held at 100mm), and the Canon EOS-5D Mark III. ISO 200. Evaluative metering +1 2/3 stops: 1/250 sec. at f/9 in Manual mode.
Far left Upper Sensor/AI Servo Rear Focus AF active at the moment of exposure. Click here if you missed the Rear Focus Tutorial. Click on the image to enjoy a larger, more spectacular version.
|
Three Nests, Three Visions
Denise Ippolito and I are on a busman’s holiday in San Diego, CA. We are hoping to photograph Pergrine Falcon at Torrey Pines State Park. Though June Gloom is here a bit early the weather is supposed to clear soon. So what to do? I was giving Denise the grand tour of La Jolla. Our first stop was the premier Brown Pelican spot on the planet. But there were only a few ratty pelicans on the cliffs. (See the San Diego Site Guide to learn where and when to be for the best pelican photography.) We did notice more than half a dozen Western Gull nests. When we returned the next morning there were as I expected zero local photographers. On a nice morning during pelican season one would expect as many as 50 folks at this relatively small site. But who would get excited by nesting Western Gulls?
Denise and I for two. Heck, as bird photographers from the east we thought that we were in heaven. And the bright overcast provided perfect conditions for photographing the black and white gulls. Not only is contrast reduced when you are working in diffused light but we were able to choose our perspectives without regard to sun angle. Our first concerns of course dealt with finding pleasing motifs (thanks to the late Fritz Pölking who loved that word) that included pleasing backgrounds. The super soft light allowed us great freedom in designing our images.
In the image above I wanted to include every strand of dried grass that made up the nest so I went wide at 100mm with the full frame 5D III. To put the emphasis on the bird and the nest I ran NIK Color Efex Pro’s Tonal Contrast at 50% and applied it only where I wanted it using an Inverse (or Hide-all) Layer Mask. Then I added a strong round of Detail Extractor and applied that with an Inverse (or Hide-all) Layer Mask only to the top of the gull’s head which had been the brightest part of the image. I lightened the iris and sharpened the eye and the eye skin using a Tim Grey Dodge and Burn along with the Digital Eye Doctor Techniques detailed in Digital Basics.
I stopped down a bit and made sure to have AF Servo AF active at the moment of exposure to ensure accurate focus while hand-holding. Most folks do not realize that if you use One-Shot in these situations any movement–even your breathing–with throw off the focus….
NIK
As regular readers know, NIK’s Color Efex Pro 4 has been an integral part of my workflow for almost a year now. You can save 15% on all NIK products by clicking here and entering BAA in the Promo Code box at check-out. Then hit Apply to see your savings. You can download a trial copy that will work for 15 days and allow you to create full sized images. See the great Color Efex Pro tutorial by clicking here.
|
|
|
This image was created with the Canon 70-200mm f/2.8L IS II lens, the 1.4X III TC (hand held at 280mm), and the Canon EOS-1D Mark IV. ISO 400. Evaluative metering at +1 stop: 1/60 sec. at f/14 in Manual mode.
AF sensor two down from the Central Sensor/AI Servo Rear Focus AF active at the moment of exposure. Click here if you missed the Rear Focus Tutorial. Click on the image to enjoy a larger version.
|
For the egg and foot image above I stopped down to f/14, focused on the closest part of the egg, and again made sure to have AF Servo AF active at the moment of exposure to ensure accurate focus while hand-holding. As mentioned above, most folks do not realize that if you use One-Shot in these situations any movement–even your breathing–with throw off the focus….
This bird was quite used to people as it was nesting just a foot from the path that the tourists use to get down on the cliff for sightseeing. I stood nearby and when she stood up for a moment moved a bit closer and framed the image that I wanted vertically. I had chosen the Mark IV for more pixels on the subject as discussed here and here.
| [Not a valid template] |
|
This image was created with the tripod-mounted Canon 800mm f/5.L IS lens and the Canon EOS-5D Mark III. ISO 400. Evaluative metering +2/3 stop: 1/500 sec. at f/11 in Manual mode.
Central Sensor/Spot AF/AI Servo Rear Focus and re-compose. Click here if you missed the Rear Focus Tutorial. And as usual click on the image for a larger version.
|
In the image I knew that stopping down to f/11 would still provide a lovely out-of-focus background because the buff-colored sandstone wall was quite a ways behind the subject. I chose to leave the dark smudge in the upper left corner to balance the dark tones of the Western Gull’s wings.
Three Nests, Three Visions
Take a moment to leave a comment and let us know which of the three images is your favorite, and why.
Denise Ippolito
You can see some of Denise’s visions from the morning by clicking here and checking out her post, “The Cliffs at La Jolla.”
Shopper’s Guide
Below is a list of the gear used to create the images in today’s post. Thanks a stack to all who have used the Shopper’s Guide links to purchase their gear as a thank you for all the free information that we bring you on the Blog and in the Bulletins. Before you purchase anything be sure to check out the advice in our Shopper’s Guide.
Canon 800mm f/5.6L IS lens. Right now this is my all time favorite super-telephoto lens.
Canon 70-200mm f/2.8L IS II lens. Man, I am loving this lens on my shoulder with the 2XIII teleconverter. I also use it a lot–depending on the situation–with the 1.4X III TC.
Canon EF 1.4X III TC. This new TC is designed to work best with the new Series II super-telephoto lenses.
Canon EOS-5D Mark III. Man, I am in love with this camera body. Both the files and the AF system are superb. I cannot wait to get to Morro Bay.
Canon EOS-1D Mark IV professional digital camera body. The very best professional digital camera body that I have ever used.
And from the BAA On-line Store:
LensCoats. I have a LensCoat on each of my big lenses to protect them from nicks and thus increase their re-sales value. All my big lens LensCoat stuff is in Hardwood Snow pattern.
LegCoat Tripod Leg Covers. I have four tripods active and each has a Hardwood Snow LegCoat on it to help prevent further damage to my tender shoulders 🙂 And you will love them in mega-cold weather….
GT3532 LS. This one replaces the GT3530LS Tripod and will last you a lifetime. I’ll be commenting on this new model soon. In short, I like it.
Mongoose M3.6 Tripod Head. Right now this is the best tripod head around for use with lenses that weigh less than 9 pounds. For heavier lenses, check out the Wimberley V2 head.
CR-80 Replacement Foot for Canon 800. When using the 800 on a Mongoose as I do, replacing the lens foot with this accessory lets the lens sit like a dog whether pointed up or down and prevents wind-blown spinning of your lens on breezy days by centering the lens directly over the tripod.
Double Bubble Level. You will find one in my camera’s hot shoe whenever I am not using flash.
The Lens Align Mark II. I use the Lens Align Mark II pretty much religiously to micro-adjust all of my gear an average of once a month and always before a major trip. Enjoy our free comprehensive tutorial here.
BreezeBrowser. I do not see how any digital photographer can exist without this program.
May 22nd, 2012 You Be the Judge: Youth
The judging for the BIRDS AS ART 1st International Bird Photography Competition is complete. All of the judges including me were stunned by the quality of the images. We will be posting all of the images that were sent to the judges. Each of you will have a chance to judge the images. Please read the directions below carefully. Your votes will not determine the winning images but it will be fun to see how everyone’s votes compare to the votes of the judges.
Below are the ten images in the Youth category that were sent to the five judges: Darrell Gulin, Chris Van Rooyen, Julie Zickefoose, Tim Laman (who filled in for a honey-mooning Andy Rouse), and yours truly. Here is another big time thank you to Darrell, Chris, Julie, and Tim. And a big time thanks also to Peter Kes and Denise Ippolito for helping me choose the images that were sent to the judges. We worked very hard for nearly three full days to get from more than 5500 images down to the final 163.
The Youth category is for images created by young photographers born on or after March 31, 1994. Fewer images were entered in this category than in any other category. Before you vote, please click on each image to view it at full size. Then pick your five favorites and vote them 5, 4, 3, 2, and 1 with 5 being your very favorite. Like this:
Hyacinth Macaws on fence: 5
Hawk Owl vertical: 4
Snowy Owl pano: 3
Merlin on fence post: 2
Emu laughing: 1
The “Sample Vote” values above are for illustrative purposes only. Please do not let the sample vote or the vote’s of others influence your vote. Please put each of your five favorites on its own line by hitting “enter” after each one. You can make your life easier by cut and pasting the name of each image that you wish to vote for. No ties; please assign a single digit, 5, 4, 3, 2 or 1 to each of your five favorites.
If you wish to comment on any or all of the images that you voted for, please do so below your five voting lines; this will make tallying the votes easier. Votes cast by those who fail to follow the formatting directions will be relegated to the Trash Bin.
A tally of the public vote along with the actual winning images for each category will be announced approximately 48 hours after each posting.
|
|
|
Black-headed Gull braking in flight
|
|
|
|
Short-eared Owl on post vertical
|
May 21st, 2012

Congrats to Eric A. Rosen. His Great Horned Owl on curved branch was awarded third place in the Captive category of the BIRDS AS ART 1st International Bird Photography Competition.
|
Last Two Captive Lessons
Lesson 1
I followed my own suggestion on the Great Horned Owl on curved branch image above. I selected the bird using the Quick Selection Tool, put the selection on its own layer( Control J), and then lifted the Curve (Control M for Curves on a Layer) to taste. All as described in Digital Basics (that includes my complete digital workflow as well as dozens of great Photoshop tips).
|
|
|
Congratulations to Stan Hoyt. His image of a Toco Toucan (St. Augustine Alligator Farm) is the frst-prize winner in the Captive category of the BIRDS AS ART 1st International Bird Photography Competition.
|
Lesson 2?
Above is Stan’s Captive category winning image as presented to the judges. Starting with his RAW file, I created the similar but different optimized version below. Please let me know which you like best, the original image above or the re-crafted image below. And be sure to let us know what you like or dislike about each version.
|
|
|
This is my version of Stan’s category-winning image.
|
.
B&H Double Rebates Include the 5D Mark III
Click here. Select one of four current Canon camera bodies–both the EOS-5D Mark III and the EOS-7D are in the group. Add a lens–there are 30 in the group, a Series III teleconverter, or a Speedlite, and enjoy large double rebates. The lenses include lots of my favorites: the 70-200mm f/4 L IS, the 70-200mm f/2.8L IS II, the circle lens, the 180 macro, and the 300mm f/4L IS. You can check the specs on all Canon telephoto lenses here. This double rebate offer expires on April 2, 2012.
Nikon Dslr + Lens Bundle Rebates
Click here for details. Offer includes the brand new D3200 and the D7000.
May 20th, 2012 Captive Category Voting Analysis and Related Comments
Totals of the Judges’ Votes (each of 5 judges awarded each image 1-5 points):
1-Toucan: 23
2-Philippine Eagle: 21
3-Great Horned Owl on curved branch: 18
4-Red-tailed Hawk: 17
T5-Bald Eagle screaming: 16
T5-Flamingo head & neck: 16
T5-Flamingo legs with shadow: 16
8-Barred Owl sleeping: 11
T9-Waterfowl Sleeping: 9
T9-Great Horned Owl vertical: 9
Public Voting Totals (each of you was asked to vote your five favorite images 1-5 points with 5 being your favorite):
1-Toucan: 444
2-Philippine Eagle: 429
3-Red-tailed Hawk: 285
4-Great Horned Owl vertical: 175
5-Flamingo head & neck: 151
6-Waterfowl Sleeping: 140
7-Bald Eagle screaming: 134
8-Great Horned Owl on curved branch: 133
9-Flamingo legs with shadow: 108
10-Barred Owl sleeping: 86
The images below are presented in the order of the judges’ placement as above along with my comments.
|
|
|
Toco Toucan, Image copyright 2102: Stan Hoyt
|
The toucan image above was a narrow winner in both the public and the Judges’ voting. The bright colors, black background, tight composition, and wire-cage eye highlight caught everyones’ eye. That said a slightly wider crop, a bit of bill clean-up, and a Linear Burn on the WHITEs would have made this one even stronger. Darkening and evening out the background and selectively applying Noise Reduction and a Surface Blur there would have done the same. None-the-less the graphic impact of this image won the day.
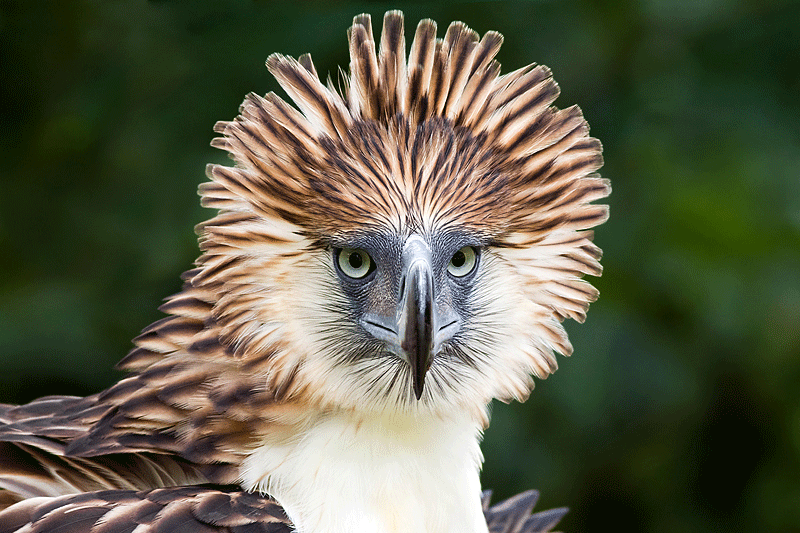
Philippine Eagle, Image copyright 2012: Alain Pascua. Before and after animated GIF.
|
The regal and powerful Philippine Eagle image featuring this majestic bird’s spectacular raised crest was runner-up in both voting categories. With some Photoshop work that would include background smoothing and bill clean-up (both allowed by the lenient competition rules) this image might have overtaken the toucan image for first place; unusually light areas of background will almost always draw the viewer’s attention away from the subject as the whitish circles did here…. For the background clean-up Denise Ippolito (thank you very much Lady D) used a reduced opacity Clone Stamp Tool, the Patch Tool, and an inverse layer mask and selectively ran Noise Reduction on only the background. I added a bit of bill clean-up to produce the “after” image in the animated GIF above. All as described in detail in Digital Basics.
|
|
|
Great Horned Owl on curved branch, Image copyright 2012: Eric A. Rosen.
|
This image–by a very small margin–did well better in the judges’ voting than in the pubic voting. I loved the rolling hills, the killer clouds, and those huge talons but especially the creativity that went into the design of the image. Selectively lightening the subject would have improved this one.
This very strong and sharp image with the killer wing position suffered only from the the dark above/light below background with the strong line of demarcation between the two. Images with dark above/light below motifs almost always have a strike against them as the light area dominates and draws the viewer’s eye. Fourth place with the judges and third place with the public represents another strong correlation in the voting, a clear indication that the cream has risen to the top in this category.
|
|
|
Bald Eagle screaming, Image copyright 2012: Paul Klenck. Canon 50D and tripod-mounted Canon 300/2.8 + 1.4x. f5 at 1/160, ISO 200.
|
.
.
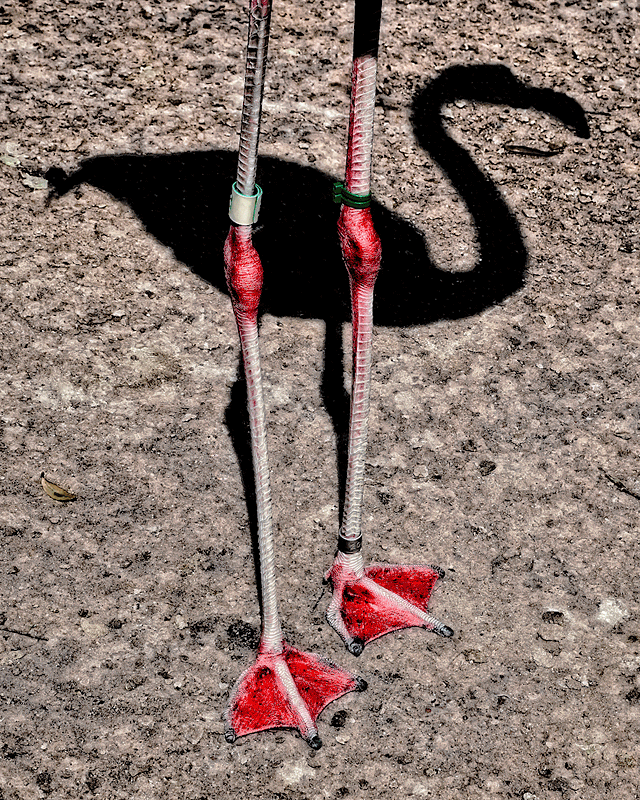
Flamingo legs with shadow before and after
|
The three images above finished in a tie for 5th place in the judge’s voting. “Bald Eagle screaming” (7th in the public vote) is a powerful image with a sweet background and a good head angle. Bringing up a bit more detail in the WHITEs on the top of the head would have improved it. This image and many Bald Eagle images in the contest seemed to suffer a bit of prejudice with the official judges perhaps because they have been seeing too many good photos of this species in recent year. “Flamingo head and neck” (5th in the public vote) is an elegant and beautifully designed zoo shot; the curve of the neck captivated everyone. “Flamingo legs with shadow” (9th in the public voting despite some ardent supporters) did the same by way of the wonderfully creative image design. Both Denise and I felt that it too could have been greatly improved within the rules. For the after image I cleaning and blackened the shadow, cleaned up the substrate, and reduced the contrast as seen in the animated GIF above. Clean-up and contrast adjustments as described in detail in Digital Basics.
“Barred Owl sleeping” placed 8th in the official voting and 10th in the public voting. Those sky blue eyelids make this peaceful a joy to behold. A bit darker overall with a bit more contrast would have improved this one.
.
|
|
|
Great Horned Owl vertical
|
The two images above tied for 9th in the judges’ standings. Many (including me) loved the colors and the soft tones in “Waterfowl sleeping” (a stronger 6th in the public voting). I am pretty sure that some of the judges felt as I did that this one was a bit tight in the frame and that the steep angle of declination to the subject detracted somewhat. “Great Horned Owl vertical” is a pretty much perfect image; I could not think of a single way to improve it. It is nicely framed, the light is sweet, the green background and the mossy perch are killer, the open bill is a plus, and those huge talons rock. It suffered only from the strong competition and, as with the screaming Bald Eagle, perhaps from a bit of judicial prejudice; this is a commonly photographed rehab species. On second thought, a bit more room all around would have yielded a more pleasing image.
Comments Welcome
Your comments on the images, on my analysis, or the voting are of course welcome. Again we ask those who had honored images to leave a comment letting us know their name, which image or images are theirs, the location, and the gear that they used.
B&H Double Rebates Include the 5D Mark III
Click here. Select one of four current Canon camera bodies–both the EOS-5D Mark III and the EOS-7D are in the group. Add a lens–there are 30 in the group, a Series III teleconverter, or a Speedlite, and enjoy large double rebates. The lenses include lots of my favorites: the 70-200mm f/4 L IS, the 70-200mm f/2.8L IS II, the circle lens, the 180 macro, and the 300mm f/4L IS. You can check the specs on all Canon telephoto lenses here. This double rebate offer expires on April 2, 2012.
Nikon Dslr + Lens Bundle Rebates
Click here for details. Offer includes the brand new D3200 and the D7000.
May 18th, 2012
|
|
|
Congratulations to Stan Hoyt. His image of a Toco Toucan is the frst prize winner in the Captive category of the BIRDS AS ART 1st International Bird Photography Competition.
|
Toco Toucan: Stan Hoyt
Stan’s toucan image was voted first by the contest judges in the Captive category receiving 23 out of a possible 25 points. It just edged out Alain Pascua’s fine Great Philippine Eagle image below that scored 21 out of the possible 25 points. Interestingly enough it was also the first choice in the public voting receiving a total of 444 points, just beating out Alain’s Philippine Eagle below which garnered 429 points. As just one of the five finals contest judges I can say that I like the bold colors, the sharpness, the black background, the unusual perspective, the image design, and that wicked eye highlight.
Here is the e-mail that we received from Stan:
Dear Artie, Peter, and Denise.
Wow! This is one email I never expected to receive. I am deeply honored that one of my photos is being considered. I have already uploaded the raw and the optimized images. Here is the information you requested.
Bird Species: Toco Toucan
Location: Alligator Farm, St. Augustine, FL
When: June 23, 2006 at 3:31 PM
Details: Canon 20D, 300mm f4 @f7.1, 1/640 sec., ISO 200, -1 1/3 exp. comp., evaluative metering, AI Servo AF, handheld
Having already enjoyed a morning of photography at the Alligator Farm in St. Augustine, Florida, I returned in mid-afternoon, intending to go straight to the rookery. I took only a few steps past the entrance when my attention was captured by a toco toucan in a large screened enclosure. This beautiful bird was quite active, taking an interest in its surroundings, including the people passing by. Stopping to admire, I began to experiment by taking hand-held images from different locations and angles. The jungle foliage in the enclosure softened the afternoon sun, but also created a lot of dapplied sunlight and shadow. My camera kept wanting to focus on the fine dark mesh of the screen rather than the bird, and I wondered whether any of the images I took would be usable. It wasn’t until I got home and reviewed them on my computer that I saw that not only were several images acceptably sharp but noted that the mesh had created a peculiar cross-hatched catchlight that set off the toucan’s bold eye.
|
|
|
Congratulations to Alain Pascua. His Great Philippine Eagle image was awarded second prize in the Captive category of the BIRDS AS ART 1st International Bird Photography Competition.
|
Great Philippine Eagle, Alain Pascua.
Alain’s eagle was voted second by the contest judges in the Captive category. It received 21 out of a possible 25 points. It placed second in the public vote as well scoring 429 points. As one of five Finals judges I can say that this majestic and regal species along with its raised crest caught my attention from the moment that I saw it. If you have any suggestions on how this image could have been improved within the rules of the contest please leave a comment.
Here is what we heard from Alain:
English Name: Great Philippine Eagle
Common Name: Haring Ibon (Filipino, meaning King Bird), Monkey-eating Eagle (former English name)
Scientific Name: Pithecophaga jefferyi
Conservation Status: Critically Endangered
Range: Endemic to the Philippines, restricted in Eastern Luzon, Samar, Leyte and Mindanao
Location: Philippine Eagle Center, Davao City, Mindanao, Philippines
Date Photographed: June 11, 2010
Equipment: Canon EOS 50D, Canon EF 400mm f/5.6L USM, Benro GH-1 Gimbal Head and Tripod
Settings: 1/160 sec, f/5.6, ISO 800, Evaluative Metering, Manual Exposure in Available Light
I photograph birds in the wild, in their natural habitat, but with the difficulty of finding the Great Philippine Eagle in the wild brought about by its dwindling population and the difficult terrains in a few areas where it could be sighted, I contented myself in photographing it in captivity. I have to overcome the obstructions of cages, iron bars and wires though, so I timed my visit to the Philippine Eagle Center in Davao City in Mindanao during the celebration of Philippine Eagle Week when one of the Great Philippine Eagles is usually brought out of the cage and displayed at a public area. My focus was to capture the image of a majestic, royal, kingly and proud Great Philippine Eagle lording over the depressions of captivity, and fittingly portraying its stature as national bird of the Philippines and the largest eagle in the world. I spent the whole day at the breeding center, patiently waited for visitors to come and for feeding time during which periods the eagle was most active with its lion mane-like head crest standing up for seconds. I clicked more than a thousand shots and packed up only when I was contented enough that one of my images have truly captured and given justice to this great bird. That was on June 11, 2010, the eve of the celebration of the Philippine’s 112th National Independence Day, a very fitting day to pay homage to Haring Ibon – the Lord of the Forest and the King of Birds.
|
|
|
Congrats to Eric A. Rosen. His Great Horned Owl on curved branch was awarded third place in the Captive category of the BIRDS AS ART 1st International Bird Photography Competition.
|
Eric A. Rosen, Great Horned Owl on curved branch
Eric’s owl image was voted third by the contest judges in the Captive category. In somewhat of a surprise to me it finished 8th in the public voting (but only 19 points out of fifth place). I love the curved branch, the puffy white clouds, the great look at those huge talons, Eric’s choice of perspective, and the use of flash to even out the exposure. Selectively lightening the subject would have yielded an even stronger image.
From Eric via e-mail:
I created this image of a captive, non-releasable Great Horned Owl using a handheld Nikon D300 with the Nikkor 18-200mm telephoto lens (hand held at 42mm) and some fill flash. I volunteer my services as a photographer for a non-profit organization that rehabilitates birds that have been hurt; some of the birds are injured so badly that they can never be released back into the wilderness. This photo was taken in February 2010 at a private ranch in Ojai, CA.
Congrats!
Congrats to all who placed images in the top ten in the Captive category. You can see all ten honored images here. 210 images made the next to last cut. Only ten went to the judges. Getting to the final round is quite an accomplishment. The seven photographers who survived to the final round of judging are invited to leave a comment and let us know about their honored image. Note that each of the top three images was created with a focal length of less than 400mm. And all were made locally, near the photographers home.
Prizes (see below) will be shipped once all the winners are announced as several folks had more than one top three images. Be sure to patronize our sponsors; without them, this contest would not exist. More educational stuff from the Contest coming soon.
| First Prize |
2nd Prize |
Third Prize |
Sponsor |
| $100 Gift Certificate |
$50 Gift Certificate |
$25 Gift Certificate |
B&H PHOTO VIDEO |
| choice of lens plate |
P-5 camera body plate |
Plamp |
Wimberley |
| 16 GB 450 X UDMA Compact Flash Card |
Sensor Scope |
Universal Memory Card Reader |
Delkin Devices |
| Level 3 Gift Subscription |
Level 2 Gift Subscription |
Level 1 Gift Subscription |
Nature Photographer Magazine |
| $30 Discount Certificate |
$25 Discount Certificate |
$20 Discount Certificate |
Canvas On Demand |
| Laptop Bag or Pixel Sunscreen |
Pixel Pocket Rocket |
AA Battery Holder |
Think Tank |
| $50 Gift Certificate |
$25 Gift Certificate |
$10 Gift Certificate |
Lens Coat |
| Canon/Nikon Lens Plate |
Canon/Nikon Camera Body Plate |
. |
4th Generation Design |
| . |
Better Beamer |
Better Beamer Replacement Fresnel |
Visual Echoes |
| TriKlear Kit |
TriKlear Kit |
TriKlear Kit |
Lens Pen |
| Giottos MH 1302-655 BallHead |
Double Bubble |
. |
HP Marketing |
| BreezeBrowser Pro/Downloader Pro Combo |
BreezeBrowser Pro |
Downloader Pro |
Breeze Systems |
| Sito HD Version Gold Web Site |
|
|
Sito HD |
.
B&H Double Rebates Include the 5D Mark III
Click here. Select one of four current Canon camera bodies–both the EOS-5D Mark III and the EOS-7D are in the group. Add a lens–there are 30 in the group, a Series III teleconverter, or a Speedlite, and enjoy large double rebates. The lenses include lots of my favorites: the 70-200mm f/4 L IS, the 70-200mm f/2.8L IS II, the circle lens, the 180 macro, and the 300mm f/4L IS. You can check the specs on all Canon telephoto lenses here. This double rebate offer expires on April 2, 2012.
Nikon Dslr + Lens Bundle Rebates
Click here for details. Offer includes the brand new D3200 and the D7000.
May 17th, 2012 Contest Concerns…
Calvin (no last name) posted the comment below at yesterday’s hugely popular “You be the Judge: Captive” blog post here. (Voting will be open till 8am eastern time on Friday, 5/18/12 so it is not too late to join the fun and see how you do compared to the judges.)
“Does anyone else think that the contest (would) have been much more fair if all 5 of the judges had an opportunity to judge all the images, instead of just the 10 images that were chosen by Arthur Morris and 2 other people?“
Here is my answer: Calvin, The contest might possibly have been a bit more fair had we sent all 5,500 images to our four professional judges. The problem is that they all would have quit immediately. They are busy folks who kindly agreed to help with the final judging. They each spent a total of between 1 1/2 and 3 hours of their valuable time to carefully consider the 10-20 images in each of the 11 categories. All major contests have initial rounds of judging by a small group of involved folks. The panel of big-name judges never get to see the vast majority of entered images. In short, your implied suggestion is both impractical and unworkable.
It took Peter Kes, Denise Ippolito, and me nearly three full 8-hour days of hard work to choose the images that went to the judges. As I wrote elsewhere, this process was an extremely difficult one. To be fair to the panel of judges, we decided to send no more than twenty images forward in each of the eleven categories. In some categories–including the Captive category–getting down to twenty or less was fairly easy. In the more popular categories like Portraits, Action, Flight, and Behavior, getting down to 20 was wrenchingly difficult. At times I felt like a very cruel America’s Got Talent judge. As we got close to 20, we compared the strengths and weaknesses of some of the images while others clearly merited being included in the final group. If even one of us liked an image for the finals, it was included. As we deleted and refined our choices, we would often say, “This is an excellent image. If it were to be awarded a prize, would you be proud of our choice?” If all of us answered “No,” that image would be eliminated.
You mentioned “10 images” but in fact 163 of the 5,500 entered images went to the judges. A quick analysis of the public voting would seem to indicate that the initial selection process worked extremely well as all but 1 of the 10 images have garnered at least a single first place vote while two of the images are run-away points leaders. It will be interesting to see how the public evaluation compares to the actual picks of the judges: 1st, 2nd, and 3rd….
Interestingly enough, Calvin did not enter the contest nor did he take the five minutes to judge the presented images….
Do take a moment to leave a comment and answer Calvin’s original question: “Does anyone else think that the contest would have been much more fair if all 5 of the judges had an opportunity to judge all the images, instead of just the 10 images that were chosen by Arthur Morris and 2 other people?”
Mette’s Comment
Mette (first name or last?) posted the following:
T(o)ucan 5
Flamingo 4
“(I) can’t mark the other photos because they are not up to my standards. I would love to (see) the the photos that didn’t make it if these did.“
Interestingly enough, Mette did not enter the contest. Quite obviously, the rest of the group does not agree with Mette’s assessment. Please take a moment to let Mette know what you think of her comment. As I do not want to influence your responses, I will be sharing my thoughts on her comment later on.
To Be Honest
To be honest, I seriously considered deleting both of the comments above. Each was up for moderation; they needed to be approved by me in order to be visible. Like it or not there is no freedom of speech on my blog.
I was reading an article in Sports Illustrated yesterday by SI Editor Terry McDonnell in which he quoted SI Senior Writer Micheal Farber: “”But shining a light is never a bad thing, no matter what is illuminated.” Instantly it became clear to me that I should share both Calvin’s and Mette’s comments with the group. So that is what I did.
Those who enjoy any type of sports would surely enjoy reading “In My Tribe”; you can access the entire article by clicking here. There is lots of outstanding writing in Sports Illustrated and the article ranks right up there with the best.
May 15th, 2012 You Be the Judge: Captive
The judging for the BIRDS AS ART 1st International Bird Photography Competition is complete. All of the judges including me were stunned by the quality of the images. We will be posting all of the images that were sent to the judges. Each of you will have a chance to judge the images. Please read the directions below carefully. Your votes will not determine the winning images but it will be fun to see how everyone’s votes compare to the votes of the judges.
Below are the ten images in the Captive category that were sent to the five judges: Darrell Gulin, Chris Van Rooyen, Julie Zickefoose, Tim Laman (who filled in for a honey-mooning Andy Rouse), and yours truly. Here is a big time thank you to Darrell, Chris, Julie, and Tim. And a big time thanks also to Peter Kes and Denise Ippolito for helping me choose the images that were sent to the judges. We worked very hard for nearly three full days to get from more than 5500 images down to the final 163.
The Captive category is for photographs of captive, zoo, pet, or rehab birds. Before you vote, please click on each image to view it at full size. Then pick your five favorites and vote them 5, 4, 3, 2, and 1 with 5 being your very favorite. Like this:
Bald Eagle calling: 5
Flamingo head and neck: 4
Philippine Eagle: 3
Toucan: 2
Flamingo legs with shadow: 1
The “Sample Vote” values above are for illustrative purposes only. Please put each of your five favorites on its own line by hitting “enter” after each one. You can make your life easier by cut and pasting the name of each image that you wish to vote for. No ties; please assign a single digit, 5, 4, 3, 2 or 1 to each of your five favorites.
If you wish to comment on any or all of the images that you voted for, please do so below your five voting lines; this will make tallying the votes easier. Votes cast by those who fail to follow the formatting directions will be relegated to the Trash Bin.
A tally of the public vote along with the actual winning images for each category will be announced approximately 48 hours after each posting.
|
|
|
Great Horned Owl on curved branch
|
|
|
|
Flamingo head and neck,Flamingo Gardens, Davie FL. Image copyright 2012: Patty Corapi. Canon 7D and the 100-400mm at 285mm. Settings were ISO 400, 1/1250 at f/5.6 with some fill flash. Thanks for the wonderful honor. And Artie – I thank you for all you have taught me over the years. Congrats to the other winners as well. Everyone did a wonderful job.
|
|
|
|
Flamingo legs with shadow
|
|
|
|
Great Horned Owl vertical
|
May 14th, 2012
|
|
|
This adult male Purple Martin was photographed at Bay City, Oregon with the tripod-mounted Canon 800mm f/5.L IS lens, the 1.4X III TC, and the Canon EOS-1D Mark IV. ISO 400. Evaluative metering at +2 1/3 stops as framed: 1/320 sec. at f/11 in Manual mode in early morning light on a clear day at 8:05am.
I pushed the exposure as far to the right as possible without getting any blinkies in the sky or on the post to ensure maximum detail in the dark glossy feathers.
Central sensor (by necessity) AI Servo/Rear Focus AF and re-compose. Click here if you missed the Rear Focus Tutorial. Click on the image for a larger, sharper version. (Some of the images posted here suffer from Word Press compression when viewed at the smaller size.)
|
Tualatin River Bird Festival
Thanks to the generosity of Canon USA/Explorers of Light who sponsored my visit I enjoyed a wonderful long weekend in Tigard, Oregon. BAA fan and new friend Doug Schurman picked me up at the Portland Airport early on Thursday evening. He drove us to Tillamook, OR so that we could scout for the Sunday morning in-the-field workshop. Morro Bay IPT veteran Don Nelson our guide and my host for the weekend met us at 6:30 am on Thursday. Our first and best stop was at a unique Purple Martin colony on the bay at Bay City, OR just north of Tillamook. We returned on Sunday morning by bus to the delight of the 15 participants.
All three of my programs were well-received and the audiences were large, warm, and attentive. Thanks to Norman Penner for inviting me and to Canon EoL’s Steve Inglima for approving the trip. Both Doug and Don treated me like royalty and their kindnesses were greatly appreciated. It is nice to feel like King for a Weekend every now and then.
|
|
|
This adult male Purple Martin on the same piling was photographed at Bay City, Oregon with the tripod-mounted Canon 800mm f/5.L IS lens, the 1.4X III TC, and the Canon EOS-1D Mark IV. ISO 400. Evaluative metering at +3 stops off the sky: 1/320 sec. at f/9 in Manual mode.
This image was created on Thursday at 7:54 am when a cloud briefly covered the sun.
Central sensor (by necessity) AI Servo/Rear Focus AF and re-compose. Click here if you missed the Rear Focus Tutorial. Click on the image for a larger version.
|
Which Do You Like Best?
Which of the two images above do you prefer, the first image made in early morning light or the second made in white sky conditions. Please let us know why.
|
|
|
This image of the colony was created with the Canon 24-105mm L IS lens hand held at 24mm and the EOS-1D Mark IV. ISO 200. Evaluative metering +1 2/3 stops: 1/250 sec. at f/11.
Central sensor (by necessity) AI Servo/Rear Focus AF and re-compose. Click here if you missed the Rear Focus Tutorial. Click on the image for a larger, sharper version.
|
Purple Martin Magic
The rather dilapidated colony at Bay City, OR was perfect for early morning photography as the pilings were right on sun angle and there were several fairly decent thin perches provided by the rotting pilings. In 28 years of bird photography I had never previously enjoyed photographing this species on halfway decent perches.
|
|
|
This yawning adult female Purple Martin was photographed at Bay City, Oregon with the tripod-mounted Canon 800mm f/5.L IS lens, the 1.4X III TC, and the Canon EOS-1D Mark IV. ISO 400. Evaluative metering at +2 stops as framed: 1/320 sec. at f/14 in Manual mode in early morning light on a clear day at 7:40am.
Central sensor (by necessity) AI Servo/Rear Focus AF and re-compose. Click here if you missed the Rear Focus Tutorial. Click on the image for a larger, sharper version. (Some of the images posted here suffer from Word Press compression when viewed at the smaller size.)
|
I loved the yawn and the erect posture of this female.
|
|
|
This pair of Purple Martins was photographed sitting atop there decrepit nest box with the tripod-mounted Canon 800mm f/5.L IS lens, the 1.4X III TC, and the Canon EOS-1D Mark IV. ISO 400. Evaluative metering at +1 1/3 stops as framed: 1/1000 sec. at f/8 in Manual mode in morning light on a clear day at 8:19am.
Central sensor (by necessity) AI Servo/Rear Focus AF and re-compose. Click here if you missed the Rear Focus Tutorial. Click on the image for a larger, sharper version. (Some of the images posted here suffer from Word Press compression when viewed at the smaller size.)
|
It can never hurt to make images of interesting situations rather than creating only images that feature single birds set against clean backgrounds. Though the nest boxes were in need of repair the birds loved them and Don told me that the colony produces lots of young each year.
B&H Double Rebates Include the 5D Mark III
Click here. Select one of four current Canon camera bodies–both the EOS-5D Mark III and the EOS-7D are in the group. Add a lens–there are 30 in the group, a Series III teleconverter, or a Speedlite, and enjoy large double rebates. The lenses include lots of my favorites: the 70-200mm f/4 L IS, the 70-200mm f/2.8L IS II, the circle lens, the 180 macro, and the 300mm f/4L IS. You can check the specs on all Canon telephoto lenses here. This double rebate offer expires on April 2, 2012.
Nikon Dslr + Lens Bundle Rebates
Click here for details. Offer includes the brand new D3200 and the D7000.
Shopper’s Guide.
Support both the Bulletins and the Blog by making all your B & H purchases here.
Below is a list of the gear talked about in this blog post. Thanks a stack to all who have used the Shopper’s Guide links to purchase their gear as a thank you for all the free information that we bring you on the Blog and in the Bulletins. Before you purchase anything be sure to check out the advice in our Shopper’s Guide.
Shopper’s Guide
Below is a list of the gear used to create the images in today’s post. Thanks a stack to all who have used the Shopper’s Guide links to purchase their gear as a thank you for all the free information that we bring you on the Blog and in the Bulletins. Before you purchase anything be sure to check out the advice in our Shopper’s Guide.
Canon 800mm f/5.6L IS lens. Right now this is my all time favorite super-telephoto lens.
Canon 24-105mm L IS lens. I never head into the field without this versatile B-roll lens in my X-trahand vest.
Canon EF 1.4X III TC. This new TC is designed to work best with the new Series II super-telephoto lenses.
Canon EOS-1D Mark IV professional digital camera body. The very best professional digital camera body that I have ever used.
And from the BAA On-line Store:
LensCoats. I have a LensCoat on each of my big lenses to protect them from nicks and thus increase their re-sales value. All my big lens LensCoat stuff is in Hardwood Snow pattern.
LegCoat Tripod Leg Covers. I have four tripods active and each has a Hardwood Snow LegCoat on it to help prevent further damage to my tender shoulders 🙂 And you will love them in mega-cold weather….
Gitzo GT3530LS Tripod. This one will last you a lifetime.
Mongoose M3.6 Tripod Head. Right now this is the best tripod head around for use with lenses that weigh less than 9 pounds. For heavier lenses, check out the Wimberley V2 head.
CR-80 Replacement Foot for Canon 800. When using the 800 on a Mongoose as I do, replacing the lens foot with this accessory lets the lens sit like a dog whether pointed up or down and prevents wind-blown spinning of your lens on breezy days by centering the lens directly over the tripod.
Double Bubble Level. You will find one in my camera’s hot shoe whenever I am not using flash.
The Lens Align Mark II. I use the Lens Align Mark II pretty much religiously to micro-adjust all of my gear an average of once a month and always before a major trip. Enjoy our free comprehensive tutorial here.
BreezeBrowser. I do not see how any digital photographer can exist without this program.
May 11th, 2012
|
|
|
This Japanese Red-crowned Crane image was created at Tsurui Itoh Sanctuary, Hokkaido, Japan with the tripod-mounted Canon 800mm f/5.6L IS lens and the EOS-1D Mark IV. ISO 400. Evaluative metering +1/3 stop: 1/1250 sec. at f/5.6.
Central sensor (expand left and right) AI Servo/Rear Focus AF and re-compose. Click here if you missed the Rear Focus Tutorial. Click on the image for a larger version.
|
Nature’s Best Image Quiz Revelations
The image above was very well received by many of the folks who commented and in fact, I did enter this image in the 2012 Nature’s Best Contest. Not sure if I entered it in Art in Nature or Birds. Good luck to me.
|
|
|
After seeing an Andy Rouse image of a Sally Lightfoot crab on black lava rock surrounded by a blurred wave (in his book, Concepts of Nature, I was determined to try something similar (and perhaps better) on my next Galapagos visit. This image was created with the tripod-mounted Canon 800mm f/5.6L IS lens and the EOS-1D Mark IV. ISO 50. Evaluative metering -2 stops off the crab on the black rock alone: 1/30 sec. at f/9. (I knew that I would need to underexpose quite a bit to avoid losing detail in the white water of the breaking waves; I needed to check the histogram a few times to get it right.)
For a greater appreciation of the image, click on the photo. Then click on the enlarged version to close it.
|
I could not enter the Sally Lightfoot image above in the 2012 Nature’s Best Contest because it was honored in the Art in Nature category of the 2011 contest. Those who suggested that I not enter it might wish to reconsider. 🙂
|
|
|
This Snow Goose/White-fronted Goose blur was created at Lower Klamath NWR, CA with the tripod-mounted Canon 800mm f/5.6L IS lens and the EOS-1D Mark IV. ISO 100. Evaluative metering +2 stops: 1/15 sec. at f/18.
Click on the image to see a larger version.
|
Few folks cared for the image above. I did in fact enter it in this years Nature’s Best Contest in the Art in Nature category. I hope that it does well. I love it. Many contest judges love blurs and so do I. For some they are an acquired taste.
|
|
|
This image–of a flock of Sanderlings with a single Dunlin and a single peep–was created at Cupsogue Beach, Long Island, NY with the tripod-mounted Canon 800mm f/5.6L IS lens and the EOS-1D Mark IV. ISO 400. Evaluative metering +1 2/3 stops: 1/1250 sec. at f/9.
45-point AI Servo AF. For a greater appreciation of the image, click on the photo. Can you spot the two odd-ball species?
|
I could not enter the image above in the 2012 Nature’s Best Contest because it was also honored in the Art in Nature category of the 2011 category. Those who suggested that I not enter it might wish to reconsider. 🙂 I like that they named the Art in Nature category after me….
My Main Point
My main point is that if you are going to enter a contest it is a good plan to take a close look at the winning and honored images from prior contests and try to figure out what the judges are looking for. Tastes change over the years. The BBC contest used to honor what I call straight bird and wildlife portraits. Those days are over; they are now looking for spectacular action and out of the box stuff–blurs, unusual perspectives, insane weather, and they like. Coming soon here: “You Be the Judge.” Each of you will have a chance to vote on the images in each category that went to the judges in the BIRDS AS ART 1st International Bird Photography Competition. I can tell you that the winning images are spectacular, right on a par with the best of BBC and Nature’s Best. I could not be prouder.
B&H Double Rebates Include the 5D Mark III
Click here. Select one of four current Canon camera bodies–both the EOS-5D Mark III and the EOS-7D are in the group. Add a lens–there are 30 in the group, a Series III teleconverter, or a Speedlite, and enjoy large double rebates. The lenses include lots of my favorites: the 70-200mm f/4 L IS, the 70-200mm f/2.8L IS II, the circle lens, the 180 macro, and the 300mm f/4L IS. You can check the specs on all Canon telephoto lenses here. This double rebate offer expires on April 2, 2012.
Nikon Dslr + Lens Bundle Rebates
Click here for details. Offer includes the brand new D3200 and the D7000.
Shopper’s Guide.
Support both the Bulletins and the Blog by making all your B & H purchases here.
Below is a list of the gear talked about in this blog post. Thanks a stack to all who have used the Shopper’s Guide links to purchase their gear as a thank you for all the free information that we bring you on the Blog and in the Bulletins. Before you purchase anything be sure to check out the advice in our Shopper’s Guide.
Canon 800mm f/5.6L IS lens. Right now this is my all time favorite super-telephoto lens.
Canon EOS-1D Mark IV professional digital camera body. The very best professional digital camera body that I have ever used.
And from the BAA On-line Store:
LensCoats. I have a LensCoat on each of my big lenses to protect them from nicks and thus increase their re-sales value. All my big lens LensCoat stuff is in Hardwood Snow pattern.
LegCoat Tripod Leg Covers. I have four tripods active and each has a Hardwood Snow LegCoat on it to help prevent further damage to my tender shoulders. 🙂 And you will love them in mega-cold weather….
GT3532 LS. This one replaces the GT3530LS Tripod and will last you a lifetime. I’ll be commenting on this new model soon. In short, I like it.
Mongoose M3.6 Tripod Head. Right now this is the best tripod head around for use with lenses that weigh less than 9 pounds. For heavier lenses, check out the Wimberley V2 head.
CR-80 Replacement Foot for Canon 800. When using the 800 on a Mongoose as I do, replacing the lens foot with this accessory lets the lens sit like a dog whether pointed up or down and prevents wind-blown spinning of your lens on breezy days by centering the lens directly over the tripod.
Double Bubble Level. You will find one in my camera’s hot shoe whenever I am not using flash.
The Lens Align Mark II. I use the Lens Align Mark II pretty much religiously to micro-adjust all of my gear an average of once a month and always before a major trip. Enjoy our free comprehensive tutorial here.
BreezeBrowser. I do not see how any digital photographer can exist without this program.
May 8th, 2012
|
|
|
This Japanese Red-crowned Crane image was created at Tsurui Itoh Sanctuary, Hokkaido, Japan with the tripod-mounted Canon 800mm f/5.6L IS lens and the EOS-1D Mark IV. ISO 400. Evaluative metering +1/3 stop: 1/1250 sec. at f/5.6.
Central sensor (expand left and right) AI Servo/Rear Focus AF and re-compose. Click here if you missed the Rear Focus Tutorial. Click on the image for a larger version.
|
Nature’s Best Image Quiz
Please let me know which if any of the four images presented here you would enter in the Nature’s Best Contest. And which you would not enter. And in either case, why. The deadline was yesterday, May 7. I completed two entries, 40 images in all. No spoilers please. 🙂
BTW, these are the categories: African Wildlife, Animal Antics, Art in Nature, Birds, Endangered Species, Landscape, Oceans, People in Nature, Plant Life, Power of Nature, Small World, Wildlife, Zoos and Aquariums. Learn more about the categories by scrolling down here.
|
|
|
After seeing an Andy Rouse image of a Sally Lightfoot crab on black lava rock surrounded by a blurred wave (in his book, Concepts of Nature, I was determined to try something similar (and perhaps better) on my next Galapagos visit. This image was created with the tripod-mounted Canon 800mm f/5.6L IS lens and the EOS-1D Mark IV. ISO 50. Evaluative metering -2 stops off the crab on the black rock alone: 1/30 sec. at f/9. (I knew that I would need to underexpose quite a bit to avoid losing detail in the white water of the breaking waves; I needed to check the histogram a few times to get it right.)
For a greater appreciation of the image, click on the photo. Then click on the enlarged version to close it.
|
Join me on the world’s best Galapagos Photo-Cruise/July 2-16, 20i3. Two full weeks +, world’s best guide and itinerary. Click here and scroll down for details.
|
|
|
This image was created at Lower Klamath NWR, CA with the tripod-mounted Canon 800mm f/5.6L IS lens and the EOS-1D Mark IV. ISO 100. Evaluative metering +2 stops: 1/15 sec. at f/18.
Click on the image to see a larger version.
|
I lucked out on my visit to Klamath last February; snow brought tens of thousands of light and dark geese to the refuge.
|
|
|
This image–of a flock of Sanderlings with a single Dunlin and a single peep–was created at Cupsogue Beach, Long Island, NY with the tripod-mounted Canon 800mm f/5.6L IS lens and the EOS-1D Mark IV. ISO 400. Evaluative metering +1 2/3 stops: 1/1250 sec. at f/9.
45-point AI Servo AF. For a greater appreciation of the image, click on the photo. Can you spot the two odd-ball species?
|
More luck here. Had it been a clear morning, I would have gone home empty-handed.
B&H Double Rebates Include the 5D Mark III
Click here. Select one of four current Canon camera bodies–both the EOS-5D Mark III and the EOS-7D are in the group. Add a lens–there are 30 in the group, a Series III teleconverter, or a Speedlite, and enjoy large double rebates. The lenses include lots of my favorites: the 70-200mm f/4 L IS, the 70-200mm f/2.8L IS II, the circle lens, the 180 macro, and the 300mm f/4L IS. You can check the specs on all Canon telephoto lenses here. This double rebate offer expires on April 2, 2012.
Nikon Dslr + Lens Bundle Rebates
Click here for details. Offer includes the brand new D3200 and the D7000.
Shopper’s Guide.
Support both the Bulletins and the Blog by making all your B & H purchases here.
Below is a list of the gear talked about in this blog post. Thanks a stack to all who have used the Shopper’s Guide links to purchase their gear as a thank you for all the free information that we bring you on the Blog and in the Bulletins. Before you purchase anything be sure to check out the advice in our Shopper’s Guide.
Canon 800mm f/5.6L IS lens. Right now this is my all time favorite super-telephoto lens.
Canon EOS-1D Mark IV professional digital camera body. The very best professional digital camera body that I have ever used.
And from the BAA On-line Store:
LensCoats. I have a LensCoat on each of my big lenses to protect them from nicks and thus increase their re-sales value. All my big lens LensCoat stuff is in Hardwood Snow pattern.
LegCoat Tripod Leg Covers. I have four tripods active and each has a Hardwood Snow LegCoat on it to help prevent further damage to my tender shoulders 🙂 And you will love them in mega-cold weather….
GT3532 LS. This one replaces the GT3530LS Tripod and will last you a lifetime. I’ll be commenting on this new model soon. In short, I like it.
Mongoose M3.6 Tripod Head. Right now this is the best tripod head around for use with lenses that weigh less than 9 pounds. For heavier lenses, check out the Wimberley V2 head.
CR-80 Replacement Foot for Canon 800. When using the 800 on a Mongoose as I do, replacing the lens foot with this accessory lets the lens sit like a dog whether pointed up or down and prevents wind-blown spinning of your lens on breezy days by centering the lens directly over the tripod.
Double Bubble Level. You will find one in my camera’s hot shoe whenever I am not using flash.
The Lens Align Mark II. I use the Lens Align Mark II pretty much religiously to micro-adjust all of my gear an average of once a month and always before a major trip. Enjoy our free comprehensive tutorial here.
BreezeBrowser. I do not see how any digital photographer can exist without this program.
May 5th, 2012
EOS-1DX, EOS-5D Mark III, & EOS-1D Mark IV Thoughts
This post was prompted by a recent e-mail from IPT-veteran Mike Cristina who asked, “Do the quality of the files of the 5D Mark III at 22MP compensate for the extra magnification of the 1DM4 at 16MP? Same question for the 1DX. And what about the fact that neither the 5D Mark III or the 1D Mark IV will autofocus at f/8.
The short answer is that pixel-wise, the math is close with the edge to the 1D Mark IV and that pixel-wise the 1D Mark IV is the clear winner over the long anticipated 1DX. I love the files from my Mark IV bodies and I love the files from my 5D Mark III bodies. I have never created an image with the EOS-1DX. Have never even held one in my hands. The issue of no practical autofocus at f/8 is a fact of life that each of us will have to consider. And once the 500 f/4L IS II and the 600 f/4L IS II are on the scene, the ability of the Mark IV to AF with the 2X III teleconverters will become an even more important issue especially for those who photograph in areas where it is difficult to get close to the birds. That said, there is no way that I can decide if a 5D III or a 1DX is a good camera for you. I can share my thoughts and my strategies and the images that I create but in the end you must do your homework and make the decision for yourself.
|
|
|
These Wood Stork chicks were photographed with the tripod-mounted Canon 800mm f/5.L IS lens and the Canon EOS-1D Mark IV. ISO 400. Evaluative metering at +1/3 stop: 1/250 sec. at f/6.3 in Manual mode.
Central sensor AI Servo/Rear Focus AF and re-compose. Click here if you missed the Rear Focus Tutorial. Click on the image for a larger version.
Here I went to the 800/Mark IV to fill the frame with the subjects with the prime lens alone thanks to the Mark IV’s 1.3 crop factor.
|
After the rather simple analysis above things become far more complex. For example, the Canon EOS-7D wins the pixels-on-the-subject contest by miles, but most serious photographers far prefer image files from the 1D MIII or MIV bodies or from any of the 5D bodies by a large margin. There is a lot more to a quality file than pixels on the subject. In general larger pixels equal less noise. Some image sensors simply provide cleaner more detailed image files than others no matter the pixel count. The 1DX (18 mp), the clear loser in the pixel count wars to both the 5D III and the 1D IV, has a brand new sensor that offers 16-channel, dual line readout as compared to 8-channel, single line designs in the previous generation of chips. This offers improved low-light capability with a faster capture speeds of 12 fps. And surely improved image quality as well. For a comprehensive overview/preview of the Canon EOS-1DX see the dpreview.com feature here.
So if the pixel advantage goes to the 1D Mark IV that can autofocus down to f/8 what the heck am I doing with a 5D Mark III? As regular readers know I feel that the new autofocus system in the 5D III is the best ever in any Canon camera body. I make a higher percentage of sharp flight images than ever before and I love the various AF Area Selections modes. I appreciate the light weight of the 5D III when it is hanging on my shoulder with the 70-200 f/2.8L IS IS. In addition, in situations where getting close to the birds is not a concern, the full frame 5D III will give me considerably more pixels on the subject by a factor of 22 to 16.
So where does the EOS-1DX fit into the picture? With the new improved sensor and image files, with the same basic AF system as the 5D III, with a blazing 12 frames per second frame rate, and with pro body heft and feel, the new body will surely be a superb flight photography camera. I will be ordering one through the Canon Explorer of Light program as soon as I am able to do so.
Right now I will continue to use my EOS-1D Mark IV when I need the reach, usually with the 800mm f/5.6L IS and often with the 1.4X III TC and I will use the EOS-5D MIII for flight and action photography and when working with easily approachable birds and animals. And I will be eagerly awaiting the release of the EOS-1DX. You can find additional info on my current gear strategy here. If you would like to try to understand the pixels on the subject math see the BPN thread here.
|
|
|
This Cattle Egret flight image was created with the Canon 70-200mm f/2.8L IS II lens, the 2XIII teleconverter (hand held at 335mm), and the Canon EOS-5D Mark III. ISO 400. Evaluative metering -1/3 stop: 1/3200 sec. at f/5.6 in Manual mode.
Central Sensor Surround/AI Servo Rear Focus AF active at the moment of exposure. Click here if you missed the Rear Focus Tutorial. Be sure to click on the image to see a larger version.
|
If you are a doubter be sure to check out “Is the EOS-5D Mark III–2X III Teleconverter–70-200f/2.8L IS II a Viable Combination?” here.
Question and Questions
Which of the three images above do you like best? Be sure to let us know why. And feel free to post any questions that you might have on any Canon camera bodies.
B&H Double Rebates Include the 5D Mark III
Click here. Select one of four current Canon camera bodies–both the EOS-5D Mark III and the EOS-7D are in the group. Add a lens–there are 30 in the group, a Series III teleconverter, or a Speedlite, and enjoy large double rebates. The lenses include lots of my favorites: the 70-200mm f/4 L IS, the 70-200mm f/2.8L IS II, the circle lens, the 180 macro, and the 300mm f/4L IS. You can check the specs on all Canon telephoto lenses here. This double rebate offer expires on April 2, 2012.
Shopper’s Guide.
Support both the Bulletins and the Blog by making all your B & H purchases here.
Below is a list of the gear talked about in this blog post. Thanks a stack to all who have used the Shopper’s Guide links to purchase their gear as a thank you for all the free information that we bring you on the Blog and in the Bulletins. Before you purchase anything be sure to check out the advice in our Shopper’s Guide.
Canon 800mm f/5.6L IS lens. Right now this is my all time favorite super-telephoto lens.
Canon 70-200mm f/2.8L IS II lens. Man, I am loving this lens on my shoulder with the 2XIII teleconverter. I also use it a lot–depending on the situation–with the 1.4X III TC.
Canon EF 1.4X III TC. This new TC is designed to work best with the new Series II super-telephoto lenses.
Canon EOS-5D Mark III. Man, I am in love with this camera body. Both the files and the AF system are superb.
Canon EOS-1D Mark IV professional digital camera body. The very best professional digital camera body that I have ever used.
Speedlite 600EX-RT. Canon’s latest greatest professional flash has more features than I will ever use or need. Learn more about the new flash by scrolling down here.
And from the BAA On-line Store:
LensCoats. I have a LensCoat on each of my big lenses to protect them from nicks and thus increase their re-sales value. All my big lens LensCoat stuff is in Hardwood Snow pattern.
LegCoat Tripod Leg Covers. I have four tripods active and each has a Hardwood Snow LegCoat on it to help prevent further damage to my tender shoulders 🙂 And you will love them in mega-cold weather….
GT3532 LS. This one replaces the GT3530LS Tripod and will last you a lifetime. I’ll be commenting on this new model soon. In short, I like it.
Mongoose M3.6 Tripod Head. Right now this is the best tripod head around for use with lenses that weigh less than 9 pounds. For heavier lenses, check out the Wimberley V2 head.
CR-80 Replacement Foot for Canon 800. When using the 800 on a Mongoose as I do, replacing the lens foot with this accessory lets the lens sit like a dog whether pointed up or down and prevents wind-blown spinning of your lens on breezy days by centering the lens directly over the tripod.
Double Bubble Level. You will find one in my camera’s hot shoe whenever I am not using flash.
The Lens Align Mark II. I use the Lens Align Mark II pretty much religiously to micro-adjust all of my gear an average of once a month and always before a major trip. Enjoy our free comprehensive tutorial here.
BreezeBrowser. I do not see how any digital photographer can exist without this program.
May 4th, 2012 Stuff: Catching Up
|
|
|
Sandhill Crane, colt lying on grass, Indian Lake Estates, FL. With the Canon 800mm f/5.L IS lens and the Canon EOS-5D Mark III supported by a BLUBB on ground. ISO 400. Evaluative metering +1/3 stop: 1/1250 sec. at f/5.6 in Manual mode–early morning light at 7:45 am.
|
Lying Down on the Job
In Lying Down on the Job, my favorite of the first three photographs was image #2 above.
Why? The intimate perspective, the sharpness, the fact that the light appeared sweeter than in Image #1 even though that image was made a few minutes earlier, and mostly because of the halo of out-of-focus vegetation in the foreground and background that envelop the subject. In addition I love the strip of blue sky at the top. Note that I positioned the bird’s head to fall between the two large out-of-focus green bushes just above the bird in the distant background. That was not an accident. Lastly, the tiny silver stalk in the lower left corner of the frame balances the composition nicely with the gray tones of the young crane.
I do find the small out-of-place feather on the back of the colt’s head (in the image above) to be somewhat distracting and should have removed it.
I love the head portrait too for it’s sharpness, the lovely green background, and the out-of-the-ordinary pose. For me my overall favorite of the four would be #2 over #4 by a small margin as I have been trying for years for something like #2. Lots of folks were on the same page as me choosing #2 and #4 as their faves.
You can read my responses to the many comments on the crane images by scrolling down here.
Juxtapositions in Black
In Juxtapositions in Black most folks preferred the second image but there was some late support for the first image. I agreed with either no one or everyone as I feel that both images are examples of successful juxtaposition-type images. When I saw the Turkey Vulture walking behind the Black Vulture I knew that there might be an opportunity for a juxtaposition type image. When it stopped just to the left of the Black Vulture, I created Image 1. Then the TV continued to walk to my right (its left). I should have made an image when the TV was almost directly behind the BV. It would have been a good example of a bad image. As the TV continued to pass the BV I created Image 2.
In Image 1 you might imagine that the BV is the more dominant bird with the Black Vulture standing tall and upright and looking large and the Turkey Vulture behind it and looking small and rather insignificant. In Image 2 the BV’s posture might be construed as a submissive one and the TV might be seen as the dominant bird. Unlike many of the folks who commented, I do like both compositions. And yes Juan Carlos, I love the o-o-f yellow flowers in each image.
Why Stop There?
In Why Stop There? several folks who responded hit the nail on the head as to why I left the single feather strand. Hats off to Dennis Zaebst who was the first one to offer a pretty much perfect answer: Nice Shot Artie. I think you left the single feather so the juvenile bird would appear as natural as possible, while the rest of the cleanup was done to avoid distraction from the main subject. The single remaining feather does not detract, and allows one to see the bird as it was at the time. My buddy Charles Scheffold said the same thing in different words: The feather adds interest whereas the other stuff just makes it look like a dirty bill. I like it. The only thing that I would add is that though I do lots of clean-up, recently I have been striving too avoid too perfect….
Folks who use a Better Beamer with their telephoto lenses will want to read my comments on when and why to remove the Beamer’s Fresnel screen. Most folks have no clue. See my comments in green in response to Charles Scheffold’s May 2, 2012 2:26pm comment.
Today’s Question
Does anyone know why Fresnel is capitalized in Fresnel lens or Fresnel screen? Or how to pronounce it? Double points if you did not have to do a Google search. 🙂
MIDWAY 2013 SINGLE OPENING
Due to a cancellation, there is now a single opening on the formerly sold out Midway trip. Click here for details and photos. Call 863-692-0906 or e-mail immediately if you are good to go.
| [Not a valid template] |
|
Painted Bunting, male, Santa Clara Ranch, Starr County, TX This image was created with the tripod-mounted Canon 800mm f/5.L IS lens, the EF 25mm Extension Tube, and the Canon EOS-1D Mark IV. ISO 400. Evaluative metering +1 stop: 1/100 sec. at f/5.6. Fill flash at -3 stops with the 580 EX II Speedlite and a Better Beamer.
The extension tube allows for close focus inside the minimum focusing distance of the lens.
We got to photograph several male Painted Buntings on my first visit to Santa Clara. When you are working at 1/100 sec. as I was here, it is imperative that the subject not move during the exposure….
|
Cheap, Short-Notice, Practically Private Instruction at the Santa Clara Ranch, near McCook, TX
I am looking for no more than four photographers to join me and two other leaders (one of whom is named Denise Ippolito) at the ground level water hole blinds on the Santa Clara Ranch near McCook, TX. Amazingly, Google Maps has never heard of McCook, TX. But not to worry, it is on Mapquest 🙂 I first visited Beto Gutierrez’s ranch in early May 2010. You can learn more about that visit here or check out the ranch here.
With the three leaders the likely group size will be six–one student per leader, but might–depending on the level of interest–wind up at 8. You would need to be in McAllen, TX on the late afternoon of Monday May 14, 2012. If you are on our flight to McAllen (United 1621) know that we might stop to do some giant sunflower photography on the way to the ranch which is about an hour west of McAllen. There will be morning and afternoon photography sessions on Tuesday & Wednesday, May 15 and 16th and a final shorter session on the morning of Thursday May 17th. The three leaders will be flying out of McAllen on the 1:27 United flight to Houston.
We will have a variety of songbirds coming to the water along with some snakes and possibly a few mammals that will surely include Mexican Ground Squirrel. Bird species will likely include Painted Bunting, Northern Cardinal, Black-crested (Mexican) Titmouse, Bronzed Cowbird, Long-billed Thrasher, Northern Mockingbird, Mourning Dove, and Olive Sparrow. As migration is underway we may very well be in for a surprise or two. Other possibilities include Green Jay, Lark Sparrow, Pyrrhuloxia, Groove-billed Ani, and Audubon’s Oriole among others.
What’s included: lodging in the simple but modern ranch-house which has ac and wi-fi! Blind fees. Image sharing and individual and small group Photoshop lessons. We will share the cost of a shopping trip and all will get to experience some BIRD AS ART home cooking (unless the want to do some cooking themselves). I don’t cook breakfasts. 🙂 Lunches and dinners will be healthy and simple but oh so good.
What’s not included: ground and ranch transportation and the shared cost of the food. We would be glad to try to set you up with a car pool partner.
Recommended gear: a minimum of a 500mm f/4 lens with both teleconverters and an extension tube. A sturdy tripod along with a Mongoose M3.6 or a Wimberley V2 head, your flash, a Better Beamer, and a flash bracket. An intermediate telephoto would be a huge plus if we are lucky enough to have deer, armadillo, opossum, collared peccary, or dare I even say it aloud–a bobcat come in for a drink. There might be some flowers around….
Cheap, Short-Notice Practically Private Instruction at the Santa Clara Ranch, near McCook, TX. May 14-17, 2012. 2 FULL and one half-day (includes lodging and blind fees): $999. Limit: 5/Openings: 4)
To register or to check on availability please call me immediately at 863-692-0906 and e-mail as well. If there is no answer and you wish to leave a message please call 863-692-0906. A non-refundable $500 is required and may be placed by credit card.
Click here to see the original post and several additional images.
Shopper’s Guide
Below is a list of the gear used to create the images above. Thanks a stack to all who have used the Shopper’s Guide links to purchase their gear as a thank you for all the free information that we bring you on the Blog and in the Bulletins. Before you purchase anything be sure to check out the advice in our Shopper’s Guide.
Canon 800mm f/5.6L IS lens. Right now this is my all time favorite super-telephoto lens.
Canon 300mm f/2.8 L IS II lens. The 300 f/2.8 L IS II with the 1.4X III TC is a killer flight combination.
1.4X III TC. The new Series III 1.4X was designed to work best with the new Series II super-telephoto lenses.
2X III teleconverter. The new 2X TC is sharper than the older Series II 2X TC and is designed to work best with the Series II super-telephoto lenses–two out and two more coming sometime in 2012.
Speedlite 600EX-RT. Canon’s latest greatest professional flash has more features than I will ever use or need. Click here and scroll down for lots more info on the new flash.
Canon EOS-5D Mark III. Man, I am in love with this camera body. Both the files and the AF system are superb.
Canon EOS-1D Mark IV professional digital camera body. The very best professional digital camera body that I have ever used.
And from the BAA On-line Store:
BLUBB. I personally designed the Big Lens Ultimate BeanBag and have it made in the good old US of A. This large beanbag is ideal when working with super-telephoto lenses from your vehicle. Beware of cheaper and much inferior copycat rip-offs; you get what you pay for just like your Daddy said.
LensCoats. I have a LensCoat on each of my big lenses to protect them from nicks and thus increase their re-sales value. All my big lens LensCoat stuff is in Hardwood Snow pattern.
Double Bubble Level. You will find one in my camera’s hot shoe whenever I am not using flash.
The Lens Align Mark II. I use the Lens Align Mark II pretty much religiously to micro-adjust all of my gear an average of once a month and always before a major trip. Enjoy our free comprehensive tutorial here.
BreezeBrowser. I do not see how any digital photographer can exist without this program.
May 2nd, 2012
|
|
|
This Pied-billed Grebe with a small fish was photographed with the tripod-mounted Canon 800mm f/5.L IS lens, the 1.4X III TC, and the Canon EOS-1D Mark IV. ISO 400. Evaluative metering at +2 stops: 1/400 sec. at f/8 in Manual mode.
Central sensor (by necessity) AI Servo/Rear Focus AF active at the moment of exposure. Click here if you missed the Rear Focus Tutorial. Click on the image for a larger version.
|
The Wake Shot
When this small-in-the-frame pied-billed swam by parallel to our position on the Morro Bay IPT I called out to the group, “Focus on the wake and put the bird in the far right side of the frame.” Until after the fact when I had time to show them the resulting image on the LCD on the back of the camera pretty much nobody understood exactly what I was talking about. Thus, “The Wake Shot” blog post. And lots of lessons.
Wake shot opportunities are few and far between. You need still water and a bird swimming parallel to your position. The fish here was a big extra.
|
|
|
This is the BreezeBrowser main view page screen capture for the RAW image. To be able to see the active sensor click on “Show Focus Points” in the “View” drop-down menu or hit Shift+Control+F. That’s one shortcut that I do not use as one I click on Show Focus Points is sticks. Coming soon: How to Run Breezebrowser on a Mac.
Note as usual 🙂 the perfect histogram with the data well to the right as is proper for an overall light-toned image. In The Art of Bird Photography II (ABP II: 916 pages on CD only) I teach you to get the right exposure using digital capture every time. And best of all, it is simple.
|
The BreezeBrowser main view page screen capture above shows exactly where I placed the central sensor in order to create the composition that I wanted. If you think about it there was not better place in the frame to put the bird in the original capture. The central sensor is the only sensor available when using the 800/1.4X III/Mark IV combination.
|
|
|
This JPEG represents the original RAW capture for the featured image that opens this blog post. All the extra space above and below made the pano crop an obvious one. With some detail in the water in the upper left I opted to go with 2/3 above, 1/3 below.
|
The large BLUE cast was removed with an Average Blur Color Balance adjustment. The image was leveled (my Bubble Level was in my pocket!) by drawing a line with the Ruler Tool from the back of the head to the reflection of the back of the head and hitting my “Image/Rotate/Arbitrary” keyboard shortcut: Control + ? and then hitting OK. Both of these killer techniques are detailed in Digital Basics that includes my complete Digital Workflow and dozens of other great Photoshop tips. Digital Basics actually includes several techniques for eliminating color casts and several techniques for leveling an image. Choices are good and with color casts one method often works well where others fail. Digital Basics also teaches you how to create your very own keyboard shortcuts and includes a list of all of them that I use.
|
|
|
This B&W version was created with NIK Silver Efex Pro using the Neutral pre-set (for the first time ever). Once you load the image in Silver Efex Pro it is easy to click on the various pre-sets to determine which looks best with a given iamge. My usual favorites are High Structure, High Contrast Red Filter, and Wet Rocks.
|
NIK 15% Discount
As regular readers here know, NIK Color Efex Pro has drastically changed my digital workflow. Remember that you can save 15% on all NIK products by clicking here and entering BAA in the Promo Code box at check-out. Then hit Apply to see your savings. You can download a trial copy that will work for 15 days and allow you to create full sized images.
Shopper’s Guide.
Support both the Bulletins and the Blog by making all your B & H purchases here.
Below is a list of the gear used to create the images in this blog post. Thanks a stack to all who have used the Shopper’s Guide links to purchase their gear as a thank you for all the free information that we bring you on the Blog and in the Bulletins. Before you purchase anything be sure to check out the advice in our Shopper’s Guide.
Canon 800mm f/5.6L IS lens. Right now this is my all time favorite super-telephoto lens.
Canon EF 1.4X III TC. This new TC is designed to work best with the new Series II super-telephoto lenses.
Canon EOS-1D Mark IV professional digital camera body. The very best professional digital camera body that I have ever used.
And from the BAA On-line Store:
LensCoats. I have a LensCoat on each of my big lenses to protect them from nicks and thus increase their re-sales value. All my big lens LensCoat stuff is in Hardwood Snow pattern.
LegCoat Tripod Leg Covers. I have four tripods active and each has a Hardwood Snow LegCoat on it to help prevent further damage to my tender shoulders 🙂 And you will love them in mega-cold weather….
Gitzo GT3530LS Tripod. This one will last you a lifetime.
Mongoose M3.6 Tripod Head. Right now this is the best tripod head around for use with lenses that weigh less than 9 pounds. For heavier lenses, check out the Wimberley V2 head.
CR-80 Replacement Foot for Canon 800. When using the 800 on a Mongoose as I do, replacing the lens foot with this accessory lets the lens sit like a dog whether pointed up or down and prevents wind-blown spinning of your lens on breezy days by centering the lens directly over the tripod.
Double Bubble Level. You will find one in my camera’s hot shoe whenever I am not using flash.
The Lens Align Mark II. I use the Lens Align Mark II pretty much religiously to micro-adjust all of my gear an average of once a month and always before a major trip. Enjoy our free comprehensive tutorial here.
BreezeBrowser. I do not see how any digital photographer can exist without this program.
April 29th, 2012
Beginning Bird Photography Lessons
I created this image this morning while working with a private client. Ann is a beginning bird photographer. But very smart and a quick study. She arrived knowing when and why to use AI Servo AF and when and why to use One-Shot. She knew how add or subtract light while working in Av mode and knew how to view the histogram. She did not know how to evaluate a histogram or the importance of having at least some data in the fifth (highlight) box. And she had blinkies turned off. We educated her in short order. To start I let her work with the 300mm f/2.8 L IS II lens and the 2X III teleconverter with her Canon EOS-7D, all on a Mongoose M3.6 and a Gitxo 3530 LS tripod. (Note: the 3530 LS has been replaced by the GT3532 LS.)
Within a few minutes she had learned to produce good if not perfect histograms. Once I showed her how, she was a natural at holding the big lens to ensure sharp images and she had a good eye for composition. After an hour I set her up with a 70-200mm f.4 L IS and a 1.4X III TC. She took to hand holding it correctly immediately by bracing her elbows on the boardwalk railings.
She went off by herself making images and honing her newly learn skills. I photographed for a while on my own and then went off the see if she needed any additional help. She had found a wide open Snowy Egret nest with two medium sized chicks! I taught her how to use the pop-up flash in a rather dark situation. Then it was my turn. After hand holding my 70-200mm f/2.8L IS II for a while I went to the 300 with the 2X on a tripod so that I could create some head portraits. As there was a branch blocking the flash as it sat on the 4th Generation Design Integrated Flash Arm. Ann kindly agreed to hold the flash and point it at the bird.
Voila!
Why Stop There?
As you can see by viewing the animated GIF above, I did considerable bill clean-up but opted to leave the single sliver of feather. Why? Clean-up as usual was with the Patch Tool, the Spot Healing Brush, and a series of small Quick Masks. All are described in detail in Digital Basics.
NIK 15% Discount
As regular readers here know, NIK Color Efex Pro has drastically changed my digital workflow. Remember that you can save 15% on all NIK products by clicking here and entering BAA in the Promo Code box at check-out. Then hit Apply to see your savings. You can download a trial copy that will work for 15 days and allow you to create full sized images.
|
|
|
This Adobe Camera RAW screen capture shows my default values. Note the pretty darned good histogram right out of the box…. Click on the image to enlarge it–it’s a lot easier to read then.
|
Canon Speedlite 600EX-RT
Today was the first chance that I had to use my new flash, the Speedlite 600EX-RT, Canon’s most powerful-ever flash. The controls are a bit different from the last several Speedlites so I actually had to read the flash manual. But just enough to get started….
Here are the listed features:
- Wireless Radio Multiple Flash SystemTTL
- E-TTL II & A-TTL Compatible
- GN 197′ (60 m) @ ISO100
- Exceptionally Dust- and Water-Resistant
- Zoom Flash Head: 20-200mm
- Range Dot Matrix LCD Panel and Backlit Button
- Color Filter Holder for Gelatin Filters
- 18 Custom Functions
- Full 180-Degree Swivel in Each Direction
- AF Assist Beam
I obviously have a lot more studying to do. What intrigued me the most were the comprehensive easy-to-follow instructions for Multi/Stroboscopic Flash that includes a section on calculating the shutter speed. I have a good plan for using this feature for bird photography at some point in the future. Maybe on Midway…. See pages 33-35 of the Instructional Manual.
Shopper’s Guide.
Support both the Bulletins and the Blog by making all your B & H purchases here.
Below is a list of the gear talked about in this blog post. Thanks a stack to all who have used the Shopper’s Guide links to purchase their gear as a thank you for all the free information that we bring you on the Blog and in the Bulletins. Before you purchase anything be sure to check out the advice in our Shopper’s Guide.
Canon 300mm f/2.8 L IS II lens. Both on my Southern Oceans and Japan trip this lens proved to be ideal on a tripod for both birds and wildlife with both the 1.4X and 2X III TCs. All images were super-sharp and the lens was light enough for hand-holding from any type of watercraft.
2X III teleconverter. The new 2X TC is sharper than the older Series II 2X TC and is designed to work best with the Series II super-telephoto lenses–two out and two more coming sometime in 2012.
70-200mm f.4 L IS. Ann is planning on buying one of these lightweight, relatively inexpensive beauties as her starter lens. Teamed with a 1.4X III TC and her Canon EOS-7D she will have a decent effective reach of 448mm (or 9.96X magnification).
Canon EOS 5D Mark II Digital Camera. Canon’s lightweight full frame body is perfect for serious landscape photography and worked out great for wildlife on my Southern Oceans voyage.
Speedlite 600EX-RT. Canon’s latest greatest professional flash has more features than I will ever use or need.
And from the BAA On-line Store:
LensCoats. I have a LensCoat on each of my big lenses to protect them from nicks and thus increase their re-sales value. All my big lens LensCoat stuff is in Hardwood Snow pattern.
LegCoat Tripod Leg Covers. I have four tripods active and each has a Hardwood Snow LegCoat on it to help prevent further damage to my tender shoulders 🙂 And you will love them in mega-cold weather….
GT3532 LS. This one replaces the GT3530LS Tripod and will last you a lifetime.
Mongoose M3.6 Tripod Head. Right now this is the best tripod head around for use with lenses that weigh less than 9 pounds. For heavier lenses, check out the Wimberley V2 head.
Double Bubble Level. You will find one in my camera’s hot shoe whenever I am not using flash.
Better Beamer. Triples flash output. Saves battery power. Increases range. Folds flat for travel. And lots more.
4th Generation Design Integrated Flash Arm. Lightweight and efficient; what more could you ask for?
The Lens Align Mark II. I use the Lens Align Mark II pretty much religiously to micro-adjust all of my gear an average of once a month and always before a major trip. Enjoy our free comprehensive tutorial here.
Canon EOS-1D Mark IV User’s Guide. Learn to use your Mark IV the way that I use mine. Also available for the 7D and the Mark III here.
BreezeBrowser. I do not see how any digital photographer can exist without this program.
April 27th, 2012
|
|
|
Black Vulture and Turkey Vulture, Indian Lake Estates, FL. With the Canon 800mm f/5.L IS lens and the Canon EOS-5D Mark III supported by a BLUBB on the door frame with the window lowered. ISO 400. Evaluative metering -1/3 stop: 1/800 sec. at f/8 in Av mode: 8:04 am.
Lens micro-adjustment: +4. Read the Lens Align Mark II Micro-adjusting tutorial. Coming soon: non-tethered micro-adjustments.
Central Sensor/AI Servo Rear Focus AF and re-compose. Click here if you missed the Rear Focus Tutorial. Click here to learn to set up Rear Focus on your 5D Mark II. Click on the image for a larger version.
|
Juxtapositions in Black…
jux·ta·po·si·tion [juhk-stuh-puh-zish-uhn] noun
1. an act or instance of placing close together or side by side, especially for comparison or contrast.
When I first began photographing birds I strove to make images with only a single bird in the frame. It was years before I realized the power of including a second out of focus bird or animal in a pleasing position in the frame. Today I look for potential juxtapositions any time there are two subjects anywhere near each other. You need to think and act fast as juxtapositions often last only a second or two.
There are four nice juxtaposition images in The Art of Bird Photography II on pages 216, 228, 249, and 913. And here is a relevant excerpt from ABP II:
In many instances, an out-of-focus bird in the background is distracting. If the photographer, however, takes great care in the placement of the second bird in the frame and considers its posture as well as its position, then the second bird may serve as somewhat of a mirrored (though pleasingly out-of-focus) repetition of the subject. When attempting this, strive for compositional balance as well. The results can be most pleasing. Imagine two Caspian Terns on a sandy beach. It is a cloudy day, so light angle is not of paramount importance. Working in vertical format, you notice that the bird to the rear appears above and slightly to your right of the closer bird. You need to put some separation between the two birds so you take a large, slow step to your right. You
re-frame the image and notice that the closer bird is in the lower left part of the frame, while the bird in the back now appears in the upper right. The juxtaposition of the two birds is perfect: you have achieved compositional balance. You have created a pleasing image by changing your position, and thus your perspective.
The above is just one of hundreds of lessons that can help you improve your bird and nature photography. ABP II on CD only: 916 pages with more than 900 color photographs; everything that I learned about bird photography from 1998 through 2006 :).
|
|
|
Black Vulture and Turkey Vulture, Indian Lake Estates, FL. With the Canon 800mm f/5.L IS lens and the Canon EOS-5D Mark III supported by a BLUBB on the door frame with the window lowered. ISO 400. Evaluative metering -1/3 stop: 1/800 sec. at f/8 in Av mode: 8:04 am.
Lens micro-adjustment: +4. Read the Lens Align Mark II Micro-adjusting tutorial. Coming soon: non-tethered micro-adjustments.
Central Sensor/AI Servo Rear Focus AF and re-compose. Click here if you missed the Rear Focus Tutorial. Click here to learn to set up Rear Focus on your 5D Mark II. Click on the image for a larger version.
|
Questions and More
Why -1/3 stop exposure compensation?
Would f/22 have sharpened up the Turkey Vulture?
What do you like or dislike in each image?
What would you have done differently?
Which of the two images do you like best? And why?
Support the creation of both the Bulletins and the blog by making all your B & H purchases here.
Shopper’s Guide
Below is a list of the gear used to create the image above. Thanks a stack to all who have used the Shopper’s Guide links to purchase their gear as a thank you for all the free information that we bring you on the Blog and in the Bulletins. Before you purchase anything be sure to check out the advice in our Shopper’s Guide.
Canon 800mm f/5.6L IS lens. Right now this is my all time favorite super-telephoto lens.
1.4X III TC. The new Series III 1.4X was designed to work best with the new Series II super-telephoto lenses.
Canon EOS-5D Mark III. Man, I am in love with this camera body. Both the files and the AF system are superb.
And from the BAA On-line Store:
BLUBB. I personally designed the Big Lens Ultimate BeanBag and have it made in the good old US of A. This large beanbag is ideal when working with super-telephoto lenses from your vehicle. Beware of cheaper and much inferior copycat rip-offs; you get what you pay for just like your Daddy said.
LensCoats. I have a LensCoat on each of my big lenses to protect them from nicks and thus increase their re-sales value. All my big lens LensCoat stuff is in Hardwood Snow pattern.
Double Bubble Level. You will find one in my camera’s hot shoe whenever I am not using flash.
The Lens Align Mark II. I use the Lens Align Mark II pretty much religiously to micro-adjust all of my gear an average of once a month and always before a major trip. Enjoy our free comprehensive tutorial here.
BreezeBrowser. I do not see how any digital photographer can exist without this program.
April 26th, 2012
|
|
|
Sandhill Crane, colt lying on grass, Indian Lake Estates, FL. With the Canon 800mm f/5.L IS lens and the Canon EOS-5D Mark III supported by a BLUBB on the door frame with the window lowered. ISO 400. Evaluative metering +1/3 stop: 1/640 sec. at f/8 in Av mode–early morning light at 7:39 am.
|
Lying Down on the Job
We had a house guest last night, Dan Cadieux, crack Avian Forum moderator at BPN. He arrived yesterday for two photography sessions, an afternoon and a morning. And dinner. This morning was particularly good with lots of cranes, Cattle Egrets, Limpkins, and Wild Turkeys.
Let’s call the image above Image 1. We opted to stay in the vehicle and make a few images as the resting cranes will often stand up if you get out of the car.
|
|
|
Sandhill Crane, colt lying on grass, Indian Lake Estates, FL. With the Canon 800mm f/5.L IS lens and the Canon EOS-5D Mark III supported by a BLUBB on ground. ISO 400. Evaluative metering +1/3 stop: 1/1250 sec. at f/5.6 in Manual mode–early morning light at 7:45 am.
|
We both exited the vehicle slowly. I was surprised when the young crane in Image 2 remained on the ground snapping at an occasional mayfly.
|
|
|
Sandhill Crane, colt lying on grass, Indian Lake Estates, FL. With the hand held Canon 800mm f/5.L IS lens and the Canon EOS-5D Mark III. ISO 400. Evaluative metering +1/3 stop: 1/640 sec. at f/8 in Av mode–early morning light at 7:45 am.
|
While Dan remained on the ground, I grabbed my 300 and walked towards the birds. Image 3 above was created while I was kneeling.
To create Image 4, I stooped over to get the green background that I wanted.
Which Do You Like Best?
Which of the first three images do you like best? And why? Which of the four images do you like best? And why?
Short Notice/Individual or Very Small Group Instruction near Olando, FL this Weekend
Join me at a killer central Florida rookery either Friday, Saturday, or Sunday, April 27, 28, or 29 for a morning, afternoon, or a whole day of photographic instruction. Morning sessions: 7-10am/$300 single. $200 each for two. Limit 2. Afternoon sessions: 3:30pm to 6:30pm/$300 single. $200 each for two. Limit 2. Full day: $550 single. $375 each for two. Limit 2. The full day includes lunch and image review. In all cases I reserve the right to add a second photographer unless you wish to pay the difference :).
Learn to see and think like a pro, to evaluate various photographic situations, and to use light properly. I will be letting you know what I think of your gear set-up, your sharpness techniques, and your shooting style. And sharing the very best nests with you and explaining why they are the very best nests :). Though a minimum of a 500mm f/4 lens with both teleconverters is ideal, folks with lenses as short as a 70-200 will benefit greatly. Please e-mail for additional details if you are seriously interested in joining me. Or try me at 863-692-2806 or on my cell at 863-221-2372. artie
Shopper’s Guide
Below is a list of the gear used to create the images above. Thanks a stack to all who have used the Shopper’s Guide links to purchase their gear as a thank you for all the free information that we bring you on the Blog and in the Bulletins. Before you purchase anything be sure to check out the advice in our Shopper’s Guide.
Canon 800mm f/5.6L IS lens. Right now this is my all time favorite super-telephoto lens.
Canon 300mm f/2.8 L IS II lens. The 300 f/2.8 L IS II with the 1.4X III TC is a killer flight combination.
1.4X III TC. The new Series III 1.4X was designed to work best with the new Series II super-telephoto lenses.
Canon EOS-5D Mark III. Man, I am in love with this camera body. Both the files and the AF system are superb.
And from the BAA On-line Store:
BLUBB. I personally designed the Big Lens Ultimate BeanBag and have it made in the good old US of A. This large beanbag is ideal when working with super-telephoto lenses from your vehicle. Beware of cheaper and much inferior copycat rip-offs; you get what you pay for just like your Daddy said.
LensCoats. I have a LensCoat on each of my big lenses to protect them from nicks and thus increase their re-sales value. All my big lens LensCoat stuff is in Hardwood Snow pattern.
Double Bubble Level. You will find one in my camera’s hot shoe whenever I am not using flash.
The Lens Align Mark II. I use the Lens Align Mark II pretty much religiously to micro-adjust all of my gear an average of once a month and always before a major trip. Enjoy our free comprehensive tutorial here.
BreezeBrowser. I do not see how any digital photographer can exist without this program.
|
|