January 1st, 2011
| [Not a valid template] |
|
The start of the new year, the sun just up. Shinnecock Inlet, Hampton Bays, Long Island, NY. Canon 70-200mm f/2.8L IS lens (hand held at 168mm) with the EOS-1D Mark IV. ISO 400. Evaluative metering +1 stop: 1/320 sec. at f/5.6. (7:20 am)
|
Two Takes on the 1-1-11 Sunrise: Photographic and Philosophic.
Being a lover of what is (Byron Katie: www.theWORK.com), I strive to enjoy each breath and not to worry too much about the past or the future. Holidays and birthdays and anniversaries do not hold much meaning for me. I am excited about every new day, excited by the now, and by the next breath. The reality is that that is all that each of us ever has, the next breath.
So the New Years holiday does not excite me much. That said, I was eager to get out to the beach to photograph the first sunrise of 2011 so that I could share the images with those of you who place more emphasis on the coming of 2011 than I do but who were not in a hurry to get out of bed this morning 🙂 I almost did not make it as the Sunrise Highway was closed because of a big propane leak in Shirley. I made it up to the LIE and was five minutes early for sunrise.
That said I do hope that 2011 is a happy, healthy, productive year for each of you and that it is filled with wondrous travels whether around the world or to your local patch. And I do hope of course that your year is filled with lots of wonderful new images.
| [Not a valid template] |
|
The sun at sunrise with silhouetted Herring Gull, Shinnecock Inlet, Hampton Bays, Long Island, NY. Tripod-mounted Canon 800mm f/5.6L IS lens with the 2X II TC and the EOS-1D Mark IV. ISO 200. Evaluative metering -1 1/3 stops: 1/1600 sec. at f/22. Manual focus. (7:14 am)
|
Photographically, the images could not be more different: big fixed focal length tripod mounted lens vs. short, hand held telephoto zoom. The wide, environmental look vs. the tight view, the latter of course more typical of my style. I love how the wings up gull in each image adds so much, especially in the wide image where it balances the composition perfectly even though it is tiny in the frame.
Interesting enough, the 800 with the 2X would not focus with my Live View/Live Mode focusing trick. (See same in our 7D and Mark IV Camera User’s Guides.) Thus the manual focus. When photographing the rising sun with a big lens and one or more teleconverters, you begin by adding light when the sun is well muted, then you progress to a pretty good degree of underexposure. Pro tip for photographing the muted sun: always use the RGB histogram so that you can control the over-exposure of the RED channel. Once you are getting over-exposure at -3 stops at lowest ISO and your smallest aperture, it is best to pack your tent to avoid damaging your eyes. To learn how to continue safely on a clear day see “Photographing the Bright Sun” on page 534 of The Art of Bird Photography II (916 pages on CD only).
I created 72 images of the huge sun, most with the 2X TC and a few with stacked TCs. (The sun just fits in the frame with the 800, stacked TCs, and the Mark IV.) As things turned out, the image with the gull in the best spot in the frame and with the best wing position was a bit hot in the upper part of the sun. I Quick Masked the bird into a properly exposed image but no matter what I did to the layer with the bird on it I could not match the yellow sun background color so I simply added a Layer Mask to the Layer, worked large, and painted away the offending light circle of yellow.
Thanks for all of the excellent comments on the two Dunlin images (Sleeping Bird Horizontal Composition). I will be sharing my thoughts with you on those soon.
Shopper’s Guide
Here is a list of the gear that I used to create the images above. Thanks a stack to all who have used the Shopper’s Guide links to purchase their gear as a thank you for all the free information that we bring you on the Blog and in the Bulletins.
Canon 70-200mm f/2.8L IS II lens A versatile intermediate zoom that I have been in love with since I first picked it up 6 months ago.
Canon 800mm f/5.L IS lens Right now this is my all time favorite super-telephoto lens.
Canon EOS-1D Mark IV professional digital camera body And this is the very best professional digital camera body that I have even used.
Canon 1.4X II teleconverter This is my most used accessory; I would be lost without it.
Canon 2X II teleconverter I love this combined with my 70-200mm f/2.8L IS lens; Canon’s lighter version of the Nikon 200-400!
And from the BAA On-line Store:
Gitzo 3530 LS Tripod This one will last you a lifetime.
Mongoose M3.6 Tripod Head Right now this is the best tripod head around for use with lenses that weigh less than 9 pounds. For heavier lenses, check out the Wimberley V2 head.
Double Bubble Level You will find one in my camera’s hot shoe whenever I am not using flash.
Delkin 32gb e-Film Pro Compact Flash Card Fast and dependable.
NEOS Navigator 5 Insulated Overshoes My brand new pair of NEOS Navigators kept me warm and dry and provided safe footing and a good grip on the slippery jetty rocks.
If you are considering the purchase of a major piece of photographic gear be it a new camera, a long lens, a tripod or a head, or some accessories be sure to check out our complete Shopper’s Guide.<
December 31st, 2010
| [Not a valid template] |
|
First winter Dunlin resting, Barnegat Jetty, Barnegat Light, NJ Canon 800mm f/5.6L IS lens with the EOS-1D Mark IV. ISO 400. Evaluative metering -1/3 stop: 1/250 sec. at f/8 set manually.
|
| [Not a valid template] |
|
First winter Dunlin resting, Barnegat Jetty, Barnegat Light, NJ Canon 800mm f/5.6L IS lens with the EOS-1D Mark IV. ISO 400. Evaluative metering -1/3 stop: 1/250 sec. at f/8 set manually.
|
Sleeping Bird Horizontal Composition
Given your druthers–with all things being equal–would you have placed the bird on the right side of the frame as in the top image or on the the left side of the image as immediately above? (Note: In these two images all things are not equal.) Which one do you like better, and why? Could I have done anything different in the field to have created a better image?
I went to the Barnegat Jetty for the last two days with Denise Ippolito. We had great chances with Harlequin Duck, Long-tailed Duck, Brant, a hen Common Eider, and a variety of wintering shorebirds including Dunlin, Black-bellied Plover, Purple Sandpiper, and Sanderling. It was obvious that many folks who showed up to photograph at the jetty had not purchased Denise’s Barnegat Jetty Site Guide. As a result they showed up at the wrong time, missed lots of great opportunities, and inconvenienced other photographers (including us) 🙂 I will share additional details in the next Bulletin.
I hope that everyone enjoys a happy, healthy, and productive 2011 filled with travel to wondrous places and lots of wonderful images.
Shopper’s Guide
Here is a list of the gear that I used to create the images above. Thanks a stack to all who have used the Shopper’s Guide links to purchase their gear as a thank you for all the free information that we bring you on the Blog and in the Bulletins.
Canon 800mm f/5.L IS lens Right now this is my all time favorite super-telephoto lens.
Canon EOS-1D Mark IV professional digital camera body And this is the very best professional digital camera body that I have even used.
And from the BAA On-line Store:
Gitzo 3530 LS Tripod This one will last you a lifetime.
Mongoose M3.6 Tripod Head Right now this is the best tripod head around for use with lenses that weigh less than 9 pounds. For heavier lenses, check out the Wimberley V2 head.
Double Bubble Level You will find one in my camera’s hot shoe whenever I am not using flash.
Delkin 32gb e-Film Pro Compact Flash Card Fast and dependable.
NEOS Navigator 5 Insulated Overshoes My brand new pair of NEOS Navigators kept me warm and dry and provided safe footing and a good grip on the slippery jetty rocks.
If you are considering the purchase of a major piece of photographic gear be it a new camera, a long lens, a tripod or a head, or some accessories be sure to check out our complete Shopper’s Guide.
December 29th, 2010
| [Not a valid template] |
|
Sandhill Crane landing, Bosque del Apache NWR, NM. Image copyright 2010: Clemens van der Werf. Canon 800mm f/5.6L IS lens with the 1.4X II TC and the EOS-1D Mark IV. ISO 2000. Evaluative metering +1 stop: 1/800 sec. at f/9.
|
Mystery Photographer & Experience Level Revealed!
I first met Clemens van der Werf on the 2010 Southwest Florida Presidents Week IPT. Clemens had had an interest in black and white photography as a teenager, bought his first serious camera, an Olympus OM 2, and began photographing on local bicycle trips. In addition he photographed sailboat regattas when he was not racing himself. He even sold a few prints to the sailors to finance his hobby. When he entered college he developed other interests and shelved photography. In 2006 he was in Newport, Rhode Island for work when he came across a beautiful gallery that featured the work of a Dutch photographer, Onne Van der Wal.
| [Not a valid template] |
|
Golden Retrievers, FL. Image copyright 2010: Clemens van der Werf. Canon 70-200mm f/2.8 L IS II lens (handheld at 70mm) with the EOS-1D Mark IV. ISO 640. Evaluative metering at zero: 1/1000 sec. at f/6.3.
|
Onne got him to sell all of his Nikon gear and switch to Canon. In 2007 Clemens bought an EOS-5D, the 70-200/2.8 IS, the 300/2.8 IS, and the 24-105/4 IS. From 2007 through 2009 Clemens casually photographed his family and some more sailboat races. For the sailboats he used the Canon 300mm f/2.8L IS lens. Early in 2008 he bought an EOS-1Ds MkIII and in April 2009 added the 500/4 IS. Soon thereafter he drove to the St Augustine Alligator Farm with his daughter for a day trip; it was the first time he used the 500/4. He remembers that he photographed during the middle of a bright sunny day! All hand held as that is how he and Onne did it when photographing boats from the water. Clemens thought that tripods were for dummies. He was not happy with the crappy results. Coincidentally Onne had attended a program that I did in Newport, RI in the fall of 2008. I gave him an ABP II CD and in early 2009 Onne passed it along to Clemens who gleaned it for the technical information. Clemens had no interest in birds at all. Still in search of good technical info, he googled “Arthur Morris” and subscribed to and devoured our free Bulletins. Still he rarely got out to photograph.
| [Not a valid template] |
|
Short-billed Dowitcher, juvenile, Jamaica Bay WR, Queens, NY. Image copyright 2010: Clemens van der Werf. Canon 800mm f/5.6L IS lens with the EOS-1D Mark IV. ISO 800. Evaluative metering +2 stops: 1/125 sec. at f/7.1 set manually.
|
In late 2009 Clemens thought it would be a good idea to do a workshop with me. He figured that he could learn a lot. The workshop that caught his eye was scheduled for February 2010 close to his home in Fort Lauderdale, Florida. He did not care at all for the subjects that we would be photographing: birds. His only only goal was to learn about the technical side of photography. His knowledge of birds was pretty close to zero at that time, as was his interest in them.
When all the workshop participants got together on the first evening he seriously wondered if he had made a mistake and thought that he might not make it through the week . The average age of the participants was well above retirement age and they all were avid birders; there seemed to be no connection at all.
| [Not a valid template] |
|
Farr 40 sailboats, Miami Grand Prix, FL. Image copyright 2008: Clemens van der Werf. Canon 70-200mm f/2.8 L IS I lens (handheld at 70mm from a helicopter) with the EOS-1Ds Mark III. ISO 200. Evaluative metering at zero: 1/1000 sec. at f/9.
|
I will let Clemens continue the story:
How deceiving my first impression of the workshop had been! It turned out to be a fun week during which I started to appreciate birds and their behaviors. The information exchange during the week was close to overload as I had to deal with lots new things such as manual mode, flash, Photoshop, Artie’s rules, etc. But the bottom line was that I was hooked on bird photography and wanted more. During March/April of 2010 I went out on Tampa Bay twice with James Shadle for Roseate Spoonbills and visited Sanibel Island with my family. In August I joined Artie again at Nickerson Beach, NY. In November I joined him again at his beloved Bosque del Apache. I will be attending the San Diego IPT this coming January as well as one of the Homer Bald Eagle IPTs this March.
After the Florida IPT this year I bought an EOS-1D Mark IV; that was just before I went out with James Shadle. I borrowed the new 800 lens for the Florida IPT and Nickerson and bought my own just before the Bosque IPT.
| [Not a valid template] |
|
Snowy Egret fishing, Ding Darling NWR, Sanibel, FL Image copyright 2010: Clemens van der Werf. Canon 300mm f/2.8L IS lens with the EOS-1D Mark IV. ISO 400. Evaluative metering -1/3 stop: 1/2000 sec. at f/6.3 set manually.
|
My challenge is to combine my creative eye and the techniques of digital photography to create pleasing image captures. Creating technically perfect images is by no means equal to capturing images worthy of being hung on your wall or ones that leave you with the constant urge to look at it again and again. Once you have created an image that gets and keeps your attention, you know that you have met the challenge and hit the jackpot. Now there are two subjects that have my special attention: birds and boats. Both have their own technical challenges.
| [Not a valid template] |
|
Wood Duck drake swimming, Albuquerque, NM. Image copyright 2010: Clemens van der Werf. Canon 800mm f/5.6L IS lens with the EOS-1D Mark IV. ISO 400. Evaluative metering +1/3 stop: 1/1000 sec. at f/8. Fill flash with Better Beamer at -2 stops.
|
I currently run a shipping company that specializes in transporting luxury yachts. We have four semi-submersible vessels that load yachts using float-on/float-off loading technology. The vessel basically sinks and becomes a floating dry-dock. The yachts sail onto the vessel; once they are above the submersed deck divers put supports underneath them while the vessel rises out of the water. Once the yachts are dry on deck we secure them for the ocean crossing and sail them to their new cruising destination. We move yachts from between 30 and 200 feet long all over the world. The great majority of them are transported between Florida or the Caribbean and the Mediterranean. You might have seen the process on TV as a couple episodes of Discovery and National Geographic shows about the company have aired. The most recent one was a “Monster Moves” episode. There is more detailed information available here.
(Note; you gotta check this out; it is simply amazing. There are slide programs and videos on the web site.)
The Answer
Clemens was quite flattered that so many folks thought that his images were mine. And I am proud of Clemens’ success. Yes, he has emulated my style, but in many cases he has outdone me while standing right next to me with the same gear. At present, Clemens has been photographing birds for less than one year. You can see more of his work here.
I enjoyed and totally agree with Keith Reeder’s comment: “These are great images to be sure, but nothing which any reasonably hard-working, capable photographer of far fewer than 27 years’ standing shouldn’t easily be able to achieve.”
The facts are that Clemens has worked hard and studied hard, and spent as much time as possible with quality instructors….
Once again it was Joerg Rockenberger who pretty much hit the nail on the head when he wrote: “I’d say less than 1 year. And the reasons the images are so superb are that the photographer is not only very talented and can afford top shelf equipment but most importantly devoured Birds as Art I & II, studied the Digital Basics file multiple times over, attended at least a Bosque and Florida IPT and is a regular at BPN.” JR
(Note: though Clemens is a BPN member, work and family obligations do not leave him much time to participate.)
Shopper’s Guide
Here is a list of the gear that Clemens used to create the images above. (The links are to the newer models in cases where the gear that Clemens used is no longer in production. Thanks a stack to all who have used the Shopper’s Guide links to purchase their gear as a thank you for all the free information that we bring you on the Blog and in the Bulletins.
Canon 70-200mm f/2.8L IS II lens
Canon 300mm f/2.8L IS lens
Canon 500mm f/4L IS lens
Canon 800mm f/5.6L IS lens
Canon 1.4x extender (version II)
Canon EOS-1D Mark IV professional digital camera body
Canon 580 EX II Speedlite
And from the BAA On-line Store:
Gitzo 3530 LS Tripod
Mongoose M3.6 Tripod Head
Mongoose Integrated Flash Arm
Better Beamer flash extender
Promaster Flash Extension Cord
If you are considering the purchase of a major piece of photographic gear be it a new camera, a long lens, a tripod or a head, or some accessories be sure to check out our complete Shopper’s Guide.
December 28th, 2010
| [Not a valid template] |
|
Borneo Orangutan with a homemade umbrella, Tanjung National Park, Kalimantan, Indonesia. Image copyright 2010: Paul Mckenzie
|
Conversations with Paul; Photoshop Info and Philosophies & Gear
First off, I need to say that folks who read the comments with each post are getting some great educational and photographic/philosophical info. For example, take a moment to scroll down and read the comments on the original Paul Mckenzie post here. The comments include a nice note from Paul.
In any case, I would like to share Paul’s response to an e-mail question that I sent him. The question (Can you shoot me a paragraph on your approach to image optimization, what you will do, what you won’t do, and what you’ve done?) was generated by a reader’s comment.
Here is Paul’s reply:
Raw conversion is done with Adobe DNG. In Adobe raw, I’ll adjust temperature, exposure, recovery, fill light and clarity (pretty much as you recommend in your Digital Basics File). Then I open in CS3, crop if necessary and fix colour casts (I’m fine if there are blacks and whites in the image, but admit that I often struggle otherwise). Sometimes I will use levels and curves but increasingly I find myself gravitating to Nik’s tonal contrast in Colour EFEX pro and Nik’s Viveza 2 for selective lightening & darkening. I regularly use Nik’s Define 2.0 for noise reduction – sometimes selectively brushed on. On occasion I’ll go back to CS3 and use quick masks for lightening irises. I use an actions command for resizing and sharpening (i.e; pretty much all sharpening is done generically).
On rare occasions I may remove a blade of grass or for example an out of focus raindrop (usually using a combination of Quick Masks, and the Patch and Clone Stamp tools. I do not introduce elements into an image and never change the natural history of the image.
I would add that I still consider my image processing skills as being no more than adequate. I still have lots to learn. Pretty much everything I know about post processing I have learned from your publications as well as those from Robert O’Toole.
Hope this helps. Paul
My comments on the above: CS-3 cannot convert the RAW images from the Mark IV. To avoid having to purchase CS-5, Paul converts his CR.2 RAW files to DNG files using Adobe DNG Converter. Once this is done, he is then able to convert his DNG RAW files using Adobe Camera RAW (just as I have been doing for the past few years). This is a great tip for folks with newer cameras (both Canon and Nikon I believe) who have not upgraded to CS-5.
I’d suggest to Paul that he try Robert O’Toole’s Average Blur Color Balance Trick (as detailed in the last Digital Basics File update. If that fails (as it does on occasion) you can work the RGB Curves (pulling down the BLUE curve is great for removing a BLUE color cast), you can reduce the saturation of individual colors in Hue Saturation, or you can play around with Selective Color.
As I said in a comment on the original post, Paul’s digital philosophy is quite similar to like mine though I am surely a bit more aggressive when it comes to removing distracting background elements and repairing wing-tips. As regular readers and Bulletin subscribers know, I always let folks know when I have done anything beyond ordinary image optimization and our images are captioned to indicate same. Both Paul and I believe in keeping our images true to the natural history of the situation.
For those who missed the original post, you can see more great images and read the complete story of his amazing trip–hordes of mosquitoes and all, by checking out Paul’s blog here.
Below is Paul’s Indonesia Gear Bag (with selected comments). (Note: the links will take you to the latest gear if the older version is no longer in production.)
Canon 1D MK 4
Canon 5D MK 2
Canon 16-35mm II f2.8 lens – always with the 5D MK 2 as I want a full frame body with this lens
Canon 70-200mm IS f2.8 lens
Canon 1.4x extender (version II)
Canon 300mm IS f/2.8 lens (version I)– I ended using this only once so wasn’t necessary
Canon 100mm f2.8 macro lens (version 1)
Canon 580 EX II speedlight
Canon Macro Twin Lite MT-24 EX flash (for use with macro subjects)
LumiQuest Soft Box – a plastic softbox that you attach to the front of the 580 EX speedlight with velcro. I used this with all wide angle shots of the Orangutans whenever I used flash. The idea being to dampen the flash and spread it as wide as possible. Most of the time I was very close to the Orangutans when I used the wide angle lens and I never went above minus 3 for flash compensation. The low flash output in conjunction with the softbox was also aimed at minimising disturbance of the Orangutans.
| [Not a valid template] |
|
Juvenile Borneo Orangutan swinging from tree branches (mothers hand in the right foreground, Tanjung National Park, Kalimantan, Indonesia. Image copyright 2010: Paul Mckenzie
|
Thanks a ton to Paul for sharing both his wonderful images and his thoughts with us. Safe travels my friend.
December 26th, 2010
| [Not a valid template] |
|
Mother Borneo Orangutan carrying baby on her shoulders, Tanjung National Park, Kalimantan, Indonesia. Image copyright 2010: Paul Mckenzie
|
Amazing Orangutan Adventure; Like Bugs?
Regular readers should be familiar with the name Paul Mckenzie. Even before I met Paul on Midway I knew that he was a skilled, gifted, and hard working young photographer. Paul currently lives in Asia–Hong Kong, I think–with his wife Paveena. (Though they worked in the same office building, they met on a dive boat in the Galapagos.) Paul is having a go at being a full time professional nature photographer and travels the world extensively. He fell in love with East Africa after his first visit there in 1997 and returns often. Recently he made his second trip to a remote area in Indonesia reached only by somewhat arduous travel by boat. In his usual style, Paul produced an incredible collection of images in just four days. In very difficult conditions. One of the things that I most respect and admire about Paul (aside from his killer images) is that he is quite competent with lenses of all focal lengths. He is even good underwater.
To see more great images and to read the complete story of the trip–hordes of mosquitoes and all, check out Paul’s blog here. After you are impressed there, be sure to check out Paul and Paveena’s galleries on their Wild Encounters web site here.
I am looking forward to seeing Paul again on Midway this April, and then again on the October 2012 South Georgia/Falklands Expedition; so far 24 BIRDS AS ART folks will be joining me on that one. If you missed the announcement and would like to learn more, click here.
| [Not a valid template] |
|
Borneo Orangutan sheltering from the rain with makeshift leaf hat, Tanjung National Park, Kalimantan, Indonesia. Image copyright 2010: Paul Mckenzie
|
When I saw this my only thought was, “You gotta be kidding me.”
| [Not a valid template] |
|
Adult and juvenile Borneo Orangutan in rainforest trees, Tanjung National Park, Kalimantan, Indonesia. Image copyright 2010: Paul Mckenzie
|
The painterly qualities of this image are superb.
| [Not a valid template] |
|
Juvenile Borneo Orangutan portrait, Tanjung National Park, Kalimantan, Indonesia. Image copyright 2010: Paul Mckenzie
|
The range of human-like expressions on the faces of the orangutans that Paul captured on his recent trip leave little doubt as to our family tree.
December 25th, 2010
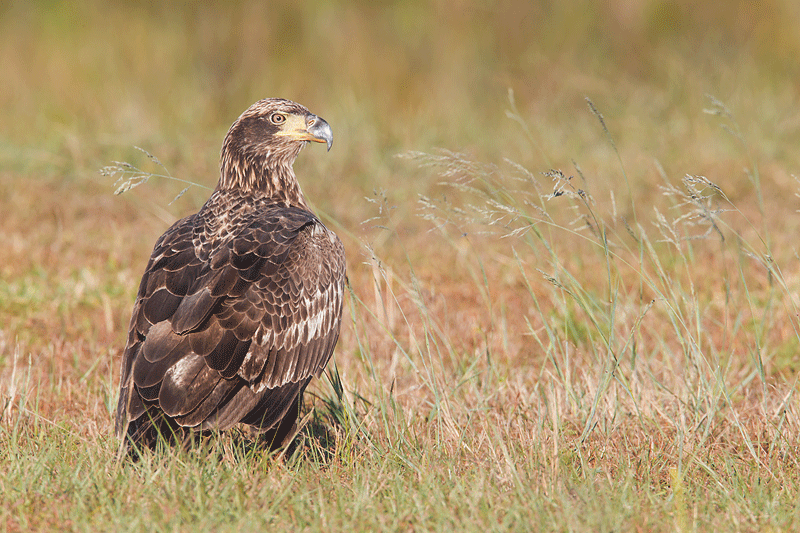
My Thoughts on the Young Bald Eagle Image
First off, I hope that all of you are enjoying the holiday season with friends and family. I enjoyed a rare dessert after lunch today: my 88 year old Mom made an ice box cake from scratch at my request and I had a 3.5 ounce slice. Mmmmm good. I could have eaten the whole thing!
Taking a close look at the animated GIF above reveals the most obvious before and after changes. The two most important for me were the removal of the single blade of out-of-focus grass that overlapped the two broad feathers on the right wing just above the tail. If anyone knows for sure which feather tract they belong to I would appreciate knowing. I suspect that they are great coverts….
In any case, we learned here that out-of-focus foreground elements tend to be quite distracting whether they intersect with the subject or not. First I used Divide and Conquer Cloning; this allowed me to use the Patch Tool to eliminate most of that big blade of grass. Then I needed a few small Quick Masks in the area where the blade of grass intersected the white feather edging. Working very large I used the Patch Tool to eliminate a white speck on a nearby feather. Even Joerg Rockenberger who did an excellent job with his comments missed that one 🙂
That brings up an important point: with the ever-increasing inter-activity here if you do not either check out the comments regularly or subscribe to new comments you will often be missing a ton of good stuff.
Next I eliminated the o-o-f yellow grass blade on the bottom frame edge just to the right of where I had been working. I should have also eliminated a similar blade of grass near the lower right corner. Most folks picked up on the removal of the significant black speck lower right center. I used a small Quick Mask to cover that.
Next I used the Quick Selection Tool (thanks to Denise Ippolito for the how-to lesson on that one) to select the light areas of the lores and the lower mandible. Before putting the selection on its own layer I ran Refine Edge (Alt/Ctrl/R) with my soften-the-edge settings: Smooth: 4; Feather: 2.0 px; Contrast: 0; Shift Edge: 0. Then I ran a 15% Linear Burn on the selection and increased the YELLOW saturation (Ctrl U for Hue-Saturation on a layer).
Next I added two points of BLACK to the BLACKs and the NEUTRALS via my Selective Color action (the f/9 key for me). I do that to probably 95% of my images to yield a slight contrast boost. Lastly I hit my f/4 key to apply the Linear Contrast (RGB) Curves preset to the whole image and reduced the Opacity on that to 25% as it looked overdone.
I am fairly sure that but for the Quick Selection Tool every single Photoshop technique that I mentioned above along with my complete digital workflow is detailed in our Digital Basics File (a PDF that we send by e-mail.) Simply put it is the cheapest high quality Photoshop instruction on the planet and includes free updates for as long as I am pushing the shutter button. Instructions on how to use the Quick Selection Tool will be part of the next update. The last update included a complete rewrite and reorganization.
Lastly I was surprised that several folks suggested getting rid of blade of grass with the seed heads to the left of the young eagle’s head; I chose to leave that one as it balanced nicely with the seed heads on the right side of the image.
BIRDS AS ART NOTES/December 22, 2010
The BIRDS AS ART NOTES OF December 22, 2010 are on-line and can be viewed here.
Here are the features:
Features
- BARNEGAT JETTY INSTRUCTION
- THE BARNEGAT JETTY SITE GUIDE
- Japan in Winter “Only One Trip in a Lifetime Needed IPT.”
- SHOPPER’S GUIDE
- IPT UPDATES
December 24th, 2010
| [Not a valid template] |
|
Great Egret, Fort DeSoto Park, south of St. Petersburg, FL. Canon 300mm f/2.8L IS lens handheld with the EOS-1D Mark IV. ISO 1600. Evaluative metering +2 stops: 1/1600 sec. at f/5.6 set manually. Fill flash at -2 stops with Better Beamer.
|
Photographer Experience Quiz
The six superb images presented here were all created by the same photographer. They might be my images. They might belong to a relative beginner. They might have been made by an experienced nature photographer with a dozen years under their belt. I love each of the images both for their technical excellence and their artistic design.
Important note: the images are protected by copyright law. I will add a copyright notice here once I reveal the name of the photographer. I will do that in a few days at most.
The quiz is multiple choice. Here is the question:
How many years of bird photography experience does the photographer who created these images have?
a) Less than one month
b) Less than six months
c) Less than one year
d) Less than two years
e) Less than four years
f) Less than eight years
g) more than eight years
h) about 27 years, 4 months 🙂
In your comment please use the actual words rather than the letter code. Or both. And please give a brief reason for your choice. If by chance you know for sure whose images these are, or think that you know, please refrain from playing. Thanks.
| [Not a valid template] |
|
Roseate Spoonbill, Alafia Banks, Tampa Bay, FL aboard James Shadle’s Hoptie Deux. Tripod-mounted Canon 500mm f/4L IS lens with the EOS-1D Mark IV. ISO 400. Evaluative metering +2/3 stop: 1/2000 sec. at f/8 set manually.
|
.
| [Not a valid template] |
|
Sanderling preening, Sanibel, FL. Panning Ground-Pod mounted Canon 500mm f/4L IS lens with the 1.4X II TC and the EOS-1D Mark IV. ISO 400. Evaluative metering +1 stop: 1/2500 sec. at f/5.6 set manually.
|
.
| [Not a valid template] |
|
American Oystercatcher dining on skate egg case, Nickerson Beach, Long Island, NY. Tripod-mounted Canon 800mm f/5.6L IS lens with the EOS-1D Mark IV. ISO 640. Evaluative metering +1 2/3 stops: 1/1000 sec. at f/5.6 set manually.
|
.
| [Not a valid template] |
|
Sandhill Crane among the grasses, Bosque del Apache NWR, San Antonio, NM. Tripod-mounted Canon 800mm f/5.6L IS lens with the 1.4X II teleconverter and EOS-1D Mark IV. ISO 400. Evaluative metering +2/3 stop. 1/800 sec. at f/10 set manually.
|
.
| [Not a valid template] |
|
American Wigeon hen walking on ice, Socorro, NM. Canon 70-200mm f/2.8L IS II with the 1.4X II teleconverter (handheld at 280mm) with the EOS-1D Mark IV. ISO 800. Evaluative metering +1 stop: 1/640 sec. at f/9 set manually. Fill flash at -1 2/3 stops.
|
I look forward to reading your comments.
Note: All of the images in this post are copyright Clemens van der Werf who began photographing birds in February 2010. Learn more about Clemens here.
Shopper’s Guide
Here is a list of the gear that somebody used to create the images above. Thanks a stack to all who have used the Shopper’s Guide links to purchase their gear as a thank you for all the free information that we bring you on the Blog and in the Bulletins.
Canon 70-200mm f/2.8L IS II lens
Canon 300mm f/2.8L IS lens
Canon 500mm f/4L IS lens
Canon 800mm f/5.6L IS lens
Canon 1.4X II teleconverter
Canon EOS-1D Mark IV professional digital camera body
Canon 580 EX II Speedlite
And from the BAA On-line Store:
Gitzo 3530 LS Tripod
Mongoose M3.6 Tripod Head
Mongoose Integrated Flash Arm
Better Beamer flash extender
Promaster Flash Extension Cord
Panning Ground Pod
If you are considering the purchase of a major piece of photographic gear be it a new camera, a long lens, a tripod or a head, or some accessories be sure to check out our complete Shopper’s Guide.
December 23rd, 2010
| [Not a valid template] |
|
Common Eider, molting male, Shinnecock Inlet, Hampton Bays, Long Island, NY. Canon 800mm f/5.6L IS lens with the 1.4X II TC and the EOS-1D Mark IV. ISO 800. Evaluative metering -1/3 stop: 1/2000 sec. at f/8 in Av mode.
|
The Central Sensor Crop
When I am using the 800 with the 1.4X II TC and the Mark IV, I have autofocus but only the central sensor is active. This greatly limits your compositional choices, especially when you are working with moving subjects and AI Servo AF. There are many other situations where you are limited to the central sensor only. Two common ones for me were when I worked with either the 500mm or 600mm f/4L IS lenses, the 2X II TC, and a pro body.
When you are working with the central sensor only with a moving subject that is not large in the frame, the subject will always be in the center of the frame. Thus the “central sensor crop” was born. With the large file sizes of the modern digital bodies, sharp images can stand healthy crops. To execute the central sensor crop, I crop from below the bird and from behind the bird; this places the bird pleasingly near one of the lower corners of the frame in the vicinity of one of the rule of thirds points. I use this crop often with swimming ducks as well as with birds in flight.
Having the bird in the center of a horizontal image rarely works well (unless the bird is flying right at you). You can learn the basics of composition in the original The Art of Bird Photography (soft cover). And you can study advanced composition and image design in the section of the same name in The Art of Bird Photography II (916 pages on CD only). Better yet, you can save $10 by purchasing them together here.
| [Not a valid template] |
|
This is the original image before cropping. Note that with the central sensor on the bird there is no other place for the bird to be but smack dab in the center of the horizontal frame. Bad! A healthy crop from behind and below the bird yielded the opening image in this blog post.
|
Shopper’s Guide
Here is a list of the gear that I used to create the image above.
Canon 800mm f/5.6L IS lens
Canon EF Teleconverter 1.4X II
Canon EOS-1D Mark IV professional digital camera body
And from the BAA On-line Store:
Gitzo 3530 LS Tripod
Mongoose M3.6 Tripod Head
Delkin 32gb e-Film Pro Compact Flash Card
If you are considering the purchase of a major piece of photographic gear be it a new camera, a long lens, a tripod or a head, or some accessories be sure to check out our complete Shopper’s Guide.
December 22nd, 2010
no images were found |
|
Immature Bald Eagle, Indian Lake Estates, FL. Canon 800mm f/5.6L IS lens with the 1.4X II TC and the EOS-1D Mark IV. ISO 200. Evaluative metering +1/3 stop: 1/200 sec. at f/13 in Manual mode. From the car with the BLUBB (Big Lens Ultimate BeanBag)
|
Over-the-Shoulder Tips
When photographing birds facing away from you (can you say northwest winds on clear mornings?) there are two main things to consider. First off, you will want to use extra depth-of-field if at all possible. Notice here that I set the aperture at f/13. (Wide open with the 800 and the 1.4X I TC is f/8.) I stopped down in an effort to have enough depth-of-field to render the whole bird sharp from the bill tip all the way back to the tail tip. In this case I opted to focus on the eye and recompose. An option that I do not use unless I am right at minimum focusing distance would be to use even more depth-of field and focus halfway from the tail tip to the bill tip. In this case that would have been on the upper back. (Note: depth-of-field with big lenses and TCs is 50-50 not 1/3 in front, 2/3 behind as it is with short focal length lenses.) You could always use your depth-of-field preview button to check but I do not like doing that when my great subject might fly away.
The second thing to consider is the head angle. Ideal for most over-the-shoulder poses is perfectly square to the imaging sensor. Here the head is turned a bit more towards us than the preferred 90 degrees but the HA is certainly acceptable.
Because depth-of-field (at a given aperture) increases as the distance to the subject increases, using very small apertures is most important when you are photographing small birds at minimum focusing distance; if you focus on the wing of a point blank, frame-filling Painted Bunting while working wide open the eye will not even be close to being sharp.
Before and After Photoshop Quiz
Below is an animated GIF showing the before and after versions of the image above. Please leave a comment and let me know what changes I made to the original. There are three or four relatively significant changes (in addition to the standard workflow stuff). Are you as sharp-eyed as an eagle? I will be back in a few days to see how y’all did and to let you know what Photoshop techniques I used.
Below is a list of the gear that I used to create the images above.
Thanks a stack to all of those who have been purchasing major items via our B&H links as a way of thanking us for the great free info that we provide here and elsewhere; it is greatly appreciated 🙂
Canon 800mm f/5.6L IS lens
Canon EF Teleconverter 1.4X II
Canon EOS-1D Mark IV professional digital camera body
And from the BAA On-line Store:
BLUBB (Big Lens Ultimate BeanBag; designed by yours truly)
Double Bubble Level
If you are considering the purchase of a major piece of photographic gear be it a new camera, a long lens, a tripod or a head, or some accessories be sure to check out our complete Shopper’s Guide.
December 20th, 2010
| [Not a valid template] |
|
Desert Agave vertical blur, Image courtesy of and copyright 2010: Richard Simonsen. Canon EOS-1D Mark IV, EF 24-105mm IS USM: ISO 100, 105mm, 0 ev, f/20 at 1 sec.
|
Richard Simonsen Vertical Agave Blur & BAA Bulletin #353
In BAA Bulletin #353 (see link below) I critiqued two pleasing blurs created by an old student who had been inspired by reading A Guide to Pleasing Blurs. I suggested that one of the images would have made a stronger vertical. Last night he e-mailed and said, “I took some verticals! See the attached.” I have posted the vertical image here (above). Those who view the similar horizontal image in the Bulletin are invited to let us know which one they prefer, the vertical here or the horizontal there.
BAA Bulletin #353 is On-line
BAA Bulletin #353 is on-line and can be accessed here thanks to the dedication and skill of Peter Kes.
Here are the features:
- HAPPY HOLIDAYS
- SW FLA PRESIDENT’S WEEK IPT
- CANON SERIES III TELECONVERTERS
- e-MAIL COMMENTS; THE GOOD & THE BAD
- RICHARD SIMONSEN & A GUIDE TO PLEASING BLURS
- SHOPPER’S GUIDE
- IPT UPDATES
Be sure to check out Melvin Grey’s really cool “holiday greetings” card. It features a hummingbird with a Santa hat 🙂 I forgot to mention in the Bulletin that you can view the straight image (no Santa hat) here.
I arrived in Long Island early this evening and am currently setting up for a two week+ stay at my Mom’s place. See y’all tomorrow.
SHOPPER’S GUIDE
Here is the gear that Richard used to create his pleasing blur:
Canon 24-105mm IS L zoom lens (I am never without this lens in my vest….)
Canon EOS-1D Mark IV professional digital camera body (I only own and travel with two.)
If you are considering the purchase of a major piece of photographic gear be it a new camera, a long lens, a tripod or a head, or some accessories be sure to check out our complete Shopper’s Guide. You will learn to find the lowest prices, comparison shop, and help us to keep offering tons of great free info and images.
December 19th, 2010
| [Not a valid template] |
|
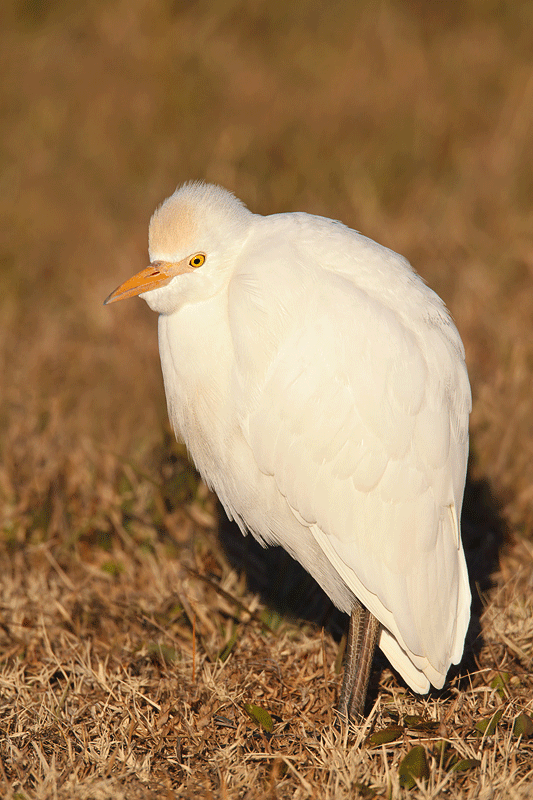
This is the optimized Cattle Egret from the December 15th “What’s Wrong With These Images?” blog post. See my comments on the comments immediately below 🙂
|
Assorted Comments
Wow. Please don’t take this personally–and I do appreciate all the folks who took the time to comment, and I am a lover of what is, but many of the comments smack of the boys and girls taking potshots at Mr. Famous Bird Photographer. I am not saying that this is a contest winning image, but it is a decent and salable photograph. Let’s consider a few snippets.
“Bad head angle.” As the person who coined term with as it applies to bird photography, the head angle here is perfect. I would not change it 1/2 degree in either direction.
“Foreground distracts because it is brighter and seems to be (sic) sharper.” The brilliant white bird is obviously brighter than the brown and yellow grasses. And the sharpest thing in the image is the bird’s eye.
“There is a metal band on the bird’s left leg.” There was no band on either leg. The whitewash on the bird’s left leg was dealt with during image optimization with a series of small Quick Masks.
Regarding “I think I would have …. opened up to F 2.8 or F4 and used an ND filter to cut the light yielding better feather detail overall and defocusing both the background and foreground. Singh-Ray has that neat vari-ND filter. This would be the perfect shot to try it out.” #1: With the 800 and the 1.4X II TC f/8 is wide open so it is not possible to open up to f/2.8 or f/4. #2: The Singh-Rau vari-ND filter comes in a variety of sizes but the 800 lens takes 52mm drop-in filters. The vari-ND is not an option. #3: As the image was perfectly exposed with the histogram well to the right, using an ND filter would not have yielded better feather detail at all.
“poor egret looks like it’s in a shadow box – no room to breathe – claustrofobic…” For images of that include the whole bird, we teach folks (including Danny Deen :)), not to go larger than 75% of either frame dimension. Thus, I am fine with the framing here.
“the lighting angle was too high…” I am not sure what that means but the image was created about 75 minutes after sunrise in rather sweet light.
“Problem with the cattle egret looks to me like obvious flash causing shadows and over exposure causing loss of detail in feathers. Flash is too strong, maybe my computer screen is doing this for me.” Yes. As previously advised, calibrating your monitor would be a good plan. No flash was used on this image. Heck, it was not even mounted. As previously noted, no part of the image was over-exposed. And as you can see in the optimized image, there is loads of detail in the WHITEs.
“too centered…” The bird is well back in the frame with twice as much room in front of the bird as behind….
By popular demand, I did an additional Linear Burn on the WHITEs and added some BLACK to the WHITEs in Selective Color.
Both IPT veteran Monte Brown and Thomas Chamberlin came close to identifying the major problem with the image (as seen through my eyes anyway): the rather tall, out-of-focus piece of grass on the lower frame edge directly below the bill was the biggest problem here. We teach, “Anything out-of-focus between you and the subject will always be a major distraction.” Such is the case here. As Fabrizio figured, that was dealt with during image optimization (with a Quick Mask).
I also eliminated the blade of grass that Monte mentioned, eliminated many of the brighter, whiter blades of grass, and cleaned the bill (using the Clone Stamp and the Patch Tool. As I knew from the start, the optimized image looks pretty darned good.
As for a lower angle, I was using the BLUBB in my vehicle with the window rolled all the way down so I could not get any lower. Had I gotten out of my SUV the flock would have flown the coop. The image could use a teench more room below. As for the bird having “no feet” I am not gonna stop photographing birds standing in the grass….
As for the shadow, I would have preferred that it were not there but moving in either direction would have increased its size. I tried lightening but it looked really yucky.
As for the crane image, it was obviously (“No need to comment on the major problem with this one; I think that it might be fairly evident”) intended to be humorous (though several missed that :)) I posted it to show how frustrating bird photography can be at times as I missed a spectacular opportunity.
It’s a good thing that I do not take things personally.
With regards to “Flames,” the image featured in the December 16th post, I prefer the first image, the softer one with the more muted colors (but only by a small margin). Something in between might be best.
To give you a better idea of what I did with the image clean-up of the Cattle Egret image I created the animated GIF below.
To learn how I used the Clone Stamp, the Patch Tool, and Quick Masks check out our Digital Basics File.
December 17th, 2010
| [Not a valid template] |
|
This yawning Ring-billed Gull was photographed in bright sun on a clear, blue sky day at Fort DeSoto Park, near St. Petersburg, FL. Canon 800mm f/5.6L IS lens and the EOS-50D. ISO 250. Evaluative metering at zero: 1/2000 sec. at f/10.
|
Bright Ideas: You be the Photo Editor
I am in the final stages of working with Helen Longest-Saccone, Editor-in-Chief of Nature Photographer magazine, on my next article, “Photographing Nature in Bright Sun.”
Here are the topics that I cover in the text:
- Work right on sun angle
- When the light is bright, think tight
- Use lots of flash
- Create pleasing blurs with the help of light-robbing filters
- Utilize strong backlight (gasp!)
- Create shade for your subject
- Find a subject in the shade
Okay, you are the photo editor. Click here to see my lightbox submission of 53 images. Then click on the first image to enlarge it and then click next to make your way through the images. Pick eight to illustrate the article, keeping in mind the fact that it would be great to have at least one image for each category. (Note: you will find the image name in the lower right corner of the screen.
The HTML slide show was created in Breezebrowser Pro in about 20 seconds and then uploaded to our server by my right-hand man, Jim Litzenberg. It is just one of the things that I love about Breezebrowser. To learn more about Breezebrowser and Downloader Pro click here.
In a few days, I will share my picks and include the category for each. And a few days after that, I will share Helen’s picks with you.
Shopper’s Guide
Here is a list of the gear (or the current replacement) that I used to create the image above.
Canon 800mm f/5.6L IS lens
Canon EOS 7D
And from the BAA On-line Store:
Gitzo 3530 LS Tripod
Mongoose M3.6 Tripod Head
Delkin 32gb e-Film Pro Compact Flash Card
If you are considering the purchase of a major piece of photographic gear be it a new camera, a long lens, a tripod or a head, or some accessories be sure to check out our complete Shopper’s Guide.
December 16th, 2010
no images were found |
|
Canon 70-200mm f/4L IS lens (hand held at 200mm) with the EOS-1D Mark IV. ISO 50. Evaluative metering +2/3 stop: 1/4 sec. at f/14.
|
Flames & BAA Bulletin #352
With the recent cold snaps, the single deciduous tree in my driveway had some nice fall color just a few days ago. (Most of the leaves are on the ground now…) On Saturday morning last, I wanted to go down to the lake to try for some birds but it was 100% foggy. By 10am it had brightened just a bit so I popped a flash card into the my camera, grabbed the 70-200 f/4L IS lens, and made the short trip down my driveway.
I made about 60 images and kept one. Creating pleasing blurs is like playing the lottery. For this one I did a diagonal pan blur with a bit of jiggle on the way down. To learn this technique and dozens more, check out A Guide to Pleasing Blurs by Denise Ippolito and yours truly.
| [Not a valid template] |
|
I took the optimized image back into Photoshop and brought it into Nik Color Efex and ran a 60% Tonal Contrast on a layer to create a brighter variation.
|
Do you like the softer subdued look of the first image or the bolder more contrasty look immediately above?
You can save 15% on all NIK products by clicking here and entering BAA in the Promo Code box at check-out. Then hit Apply to see your savings.
BAA Bulletin #352
BAA Bulletin #352 is on-line and can be accessed here.
If you have been searching for the world’s best lens cleaning fluid, be sure to check out “Introducing Lens Clens.” The feature includes tips on how I clean my gear (even though I don’t do it as much as I should…)
FEATURES
- BIRDS AS ART GIFT CARDS
- INTRODUCING LENS CLENS
- ADDITIONAL GIFT IDEAS
- “WILDLIFE PHOTOGRAPHY; STORIES FROM THE FIELD” by GEORGE LEPP & KATHRYN VINCENT LEPP
- SOME OF MY CANON LENSES FOR SALE
- SOUTH GEORGIA/FALKLANDS EXPEDITION UPDATE
- IPT UPDATES
Shopper’s Guide
Here is the gear that I used to create “Flames.”
Canon 70-200mm f/4 l IS lens
Canon EOS-1D Mark IV professional digital camera body
Delkin 32gb e-Film Pro Compact Flash Card
If you are considering the purchase of a major piece of photographic gear be it a new camera, a long lens, a tripod or a head, or some accessories be sure to check out our complete Shopper’s Guide.
December 15th, 2010
no images were found |
|
“Early Morning Cattle Egret” was created this morning with the Canon 800mm f/5.6L IS lens and the EOS-1D Mark IV. ISO 400. Evaluative metering +1/3 stop: 1/1000 sec. at f/10. My rig was supported by the BLUBB (Big Lens Ultimate BeanBag; designed by yours truly). Double Bubble Level in the hot shoe.
|
What’s Wrong With These Images?
For me, the Cattle Egret above has one major flaw. Leave a comment and let me know what you think the biggest problem is. And let me know if there are any other issues that you would address while optimizing the image. The only thing that I did after converting the RAW file was to run a pretty hefty (40%) Linear Burn on the brightest whites.
I will be back in two days to let you know what I saw as the single biggest problem and will post the optimized image at that time.
no images were found |
|
“Sandhill Crane Dancing” was also created this morning, this one with the 70-200mm f/4L IS lens (hand held at 200mm) with the EOS-1D Mark IV. ISO 400. Evaluative metering +1/3 stop: 1/2000 sec. at f/5. 45-Point AAFPS.
|
No need to comment on the major problem with this one; I think that it might be fairly evident 🙂 If you would like to bust me on some minor items, please do leave a comment. I posted this one to show how frustrating bird photography can be at times. Even though the wind was from the northwest (the bird should have been facing into the wind as it jumped up…), this one would have had a perfect head angle had I framed the image properly. You gotta love it! (Byron Katie)
Here is a list of the gear that I used to create the images above.
Canon 70-200mm f/4 l IS lens
Canon 800mm f/5.6L IS lens
Canon EF Teleconverter 1.4X II
Canon EOS-1D Mark IV professional digital camera body
And from the BAA On-line Store:
BLUBB (Big Lens Ultimate BeanBag; designed by yours truly)
Double Bubble Level
If you are considering the purchase of a major piece of photographic gear be it a new camera, a long lens, a tripod or a head, or some accessories be sure to check out our complete Shopper’s Guide.
December 13th, 2010
| [Not a valid template] |
|
“Snow Geese in Farmfield” was created with the hand held Canon EF14mm f/2.8L II USM and the EOS-1D Mark IV. ISO 320. Evaluative metering +2/3 stop: 1/125 sec. at f/22.
|
Cloud Lens
I borrowed the 14mm f/2.8 lens from CPS (Canon Professional Services) for my Bosque trip just because. I broke it out whenever we had some cool cloud formations in that big New Mexico sky.
| [Not a valid template] |
|
“Evening Cloud” was created at Ed Kranepool with the hand held Canon EF14mm f/2.8L II USM and the EOS-1D Mark IV. ISO 400. Evaluative metering +1/3 stop: 1/200 sec. at f/4.5.
|
This image was processed as a single frame HDR in NIK HDR Efex pro. Tony Sweet graciously spent 20 minutes on the phone with me on his way to a jazz gig giving me NIK HDR lessons. He is a drummer. He played professionally for 20 years in his first life.
As I learn more about NIK HDR Efex Pro I will be sharing what I learn with you here and in the Bulletins. Tony suggested that I start each HDR with the default (all the sliders at zero), hit reset to flatten the curve, set the Black and White Points, adjust the Warmth slider, adjust the Tone Compression slider, and then tweak as needed. And that is what I did with “Evening Cloud.”
The NIK program is the first HDR program that does what it is supposed to do: take the details from the highlight areas and blend them with the revealed detail in the shadow areas. With Photomatix, every image that comes out of Tone Mapping has blown highlight and underexposed darks…. That has not happened to me once with NIK HDR EFEX Pro and I love the natural look that I can get if I want it.
You can save 15% on all NIK products by clicking here and entering BAA in the Promo Code box at check-out. Then hit Apply to see your savings. I have been using and learning and loving COLOR EFEX and SILVER EFEX also.
Shopper’s Guide
Here is a list of the gear that I used to create the images above.
Canon 14mm f/2.8 II USM lens
Canon EOS-1D Mark IV professional digital camera body
If you are considering the purchase of a major piece of photographic gear be it a new camera, a long lens, a tripod or a head, or some accessories be sure to check out our complete Shopper’s Guide.
December 12th, 2010
| [Not a valid template] |
|
This Sandhill Crane pan blur was created with the Canon 800mm f/5.6L IS lens and the EOS-1D Mark IV. ISO 400. Evaluative metering +1 stop: 1/30 sec. at f/6.3 in Tv mode.
|
My Thoughts on A & B and Lots of Lessons
Thanks to all who offered their opinion. Of the two images in the December 9, 2010 post, I greatly prefer Image A to Image B. Before I let you know why, here are the tech specs for both images. Yes, as some surmised, the set up for each image was identical: Canon 800mm f/5.6L IS lens and the EOS-1D Mark IV. ISO 50. Evaluative metering +1 stop in Tv mode. 1/8 sec. at f/10. Image A and Image B were not only created at the same shutter speed, there were actually created in the same 1/100 of a second at 06:57:28 as part of a two-frame sequence. I have written and said many times that I rarely hold the hammer down for flight photography: I wait until the bird is in the zone and then I create one or two (as here) or three images at most.
Several folks figured that the shutter speed for each image was the same, and they were obviously correct. And some nailed the reason also: the panning rate was different for each image (even though they were created at almost the same instant). In A I was probably panning a bit faster than the bird was flying in order to catch up with it as it took flight. In B my panning speed better matched the speed of the bird in flight, thus the sharper heads in B. More on that in a second.
I prefer the more abstract look of Image A and as someone hinted at, the blurred wings in A are more attractive. And I much prefer the colors in A to the colors in B. With the heads of the two birds in B a bit sharper, it draws attention to the fact that the birds are flying slightly away and that their heads are also angled slightly away. (Congrats to Joerg for nailing that!) You all should know how I feel about poor head angles: I do not like them even in intentionally blurred images. Another plus for A.
Compare Image B with the image above. In the opening image here the bird is pretty much flying parallel to the imaging sensor and the head and neck are angled ever so slightly towards us. I greatly prefer the opening image here to Image B. Heck, I do not very much care for Image B at all.
As detailed in A Guide to Pleasing Blurs, I have chosen an intermediate blur speed (from the low end of the range) in an effort to render the eye or eyes sharp and the wings blurred. And I succeeded. Strangely enough, the Image B RAW file file was darker than the Image A RAW file. I over-compensated a bit by lightening it too much. Lastly, no flash was used with either image.
As Paul Mckenzie noted in his comment, “blurs are very much a matter of personal taste.” If you love B and I love A, not to worry. Your opinion is just as valid as mine.
Shopper’s Guide
Here is a list of the gear that I used to create the image above.
Canon 800mm f/5.L IS lens
Canon EOS-1D Mark IV professional digital camera body
And from the BAA On-line Store:
Gitzo 3530 LS Tripod
Mongoose M3.6 Tripod Head
If you are considering the purchase of a major piece of photographic gear be it a new camera, a long lens, a tripod or a head, or some accessories be sure to check out our complete Shopper’s Guide.
December 11th, 2010
| [Not a valid template] |
|
King Penguins, Gold Bay, South Georgia.
|
The Skinny on a Killer South Georgia/Falklands Cruise: October, 2012
I just got the heads up on a killer South Georgia/Falklands Expedition that will run October 18 to November 11, 2012. It seems a long way off but if you want a seat on this ride you will need to act soon. So far eight BIRDS AS ART folks (including two couples, my pal George Brunt (eggs-ZACT-lee), and Paul Mckenzie, an extremely skilled globe-trotting young photographer are already on board with an equal number threatening to join us very soon. Paul’s web site and his blog are both amazing. Check out his two latest blog posts and you will agree 100%: the guy is talented!
After I returned from my Falklands/South Georgia/Antarctica trip a few years back I knew that I had to return to the Southern Oceans, but not with Zegrahm’s who had most generously had me along; we just had too little time ashore…. Here’s what I wrote in the Antarctica Site Guide soon afterwards:
“By signing up with one of the few photography-only cruises, you will get a lot more bang for you buck. My understanding is that there are two companies that run trips that allow for far more photography time ashore.” I am currently working with the one of those two groups; they offer as much or more time onshore than any other tour company that regularly travels to the Southern Oceans. And they are very well respected.
| [Not a valid template] |
|
Gentoo Penguin, Sea Lion Island, Falkland Islands.
|
I am already registered for the trip: October 18 to November 11, 2012 (including the travel days). Many folks who have been to the continent quickly realize that when it comes to wildlife photography, South Georgia is the crown jewel of the Southern Ocean. This trip offer 10-11 days of photography at various South Georgia locations and three additional and equally spectacular days in the Falklands on the way home. On my Zegrahm’s trip we had but a single day on the Falklands; the photography there was so amazing that if I had not hitched a ride down the hill from the spectacular cormorant colony in the afternoon with a farmer the ship would have left without me.
| [Not a valid template] |
|
King Penguin, neck detail, South Georgia.
|
I will not be an official leader on this trip but those of you who have traveled with me know that I cannot help but teach. I will be available on the boat to review images and answer questions and all who sign up as a result of reading this note are invited to tag along with me on the landings. In addition my friends Tom Murphy and Rod and Marlene Plank will be along as photography leaders. Rod’s images inspired me early on and Tom and wife Bonnie offered guidance when I was just getting started in the tour business. It is obvious to me that the folks running this trip have an obvious passion for photography, for their business, and for their clients needs; they remind me a great deal of BIRDS AS ART, just on a larger scale.
| [Not a valid template] |
|
King Penguin arguing with Antarctic Fur Seal, Gold Bay, South Georgia.
|
When I read through the entire itinerary for the first time the excitement for me was palpable; I practically had a cow! If you can read the whole thing and not dream of making this trip you have me beat by miles. One of the great things about this trip is the timing; we will be early enough in the season that the fur seals will not be set up in their rookieries. This will allow us safe access to lots of locations that are inaccessible December through February.
| [Not a valid template] |
|
Elephant-Seal yawning, Grytviken, South Georgia.
|
It is a far less expensive trip than the expeditions that travel to the continent, it packs far more photographic punch for your dollar than the longer trips that include time on the Antarctic Peninsula, and the wildlife and photography opps will be beyond mind boggling. I cannot even imagine getting the chance to photograph four different species of albatross on a single trip. Not to mention Rockhoppers and Macaronis and more King Penguins than you could ever imagine. If you are seriously interested in this trip feel free to call me with any questions at 863-692-2806 or email at samandmayasgrandpa@att.net for details. I am good to go. And I hope that you can join me.
later and love, artie
ps: I will be back tomorrow to share my thoughts on Images A & B 🙂
| [Not a valid template] |
|
King Penguin, immature: “Oakum Boy,” South Georgia.
|
December 9th, 2010
| [Not a valid template] |
|
This image was made with the Canon 800mm f/5.6L IS lens and the EOS-1D Mark IV. ISO 50. Evaluative metering +1 stop in Tv mode. That is all that you are getting for now…
|
A or B or Neither or Both?? Shutter Speeds?
The image above is Image A. It was created just before 7am on November 23, 2010. See the questions below.
| [Not a valid template] |
|
This image was also made with the Canon 800mm f/5.6L IS lens and the EOS-1D Mark IV. ISO 50. Evaluative metering +1 stop in Tv mode. That is all that you are getting for now on this one too.
|
The image immediately above is Image B. It too was created just before 7am on November 23, 2010.
Which do you like best, Image A or Image B? Why? What do you think was the shutter speed for image A? For Image B?
When I revisit these images in a few days I promise that there will be a lot to think about and a lot to learn.
Shopper’s Guide
Here is a list of the gear that I used to create the images above.
Canon 800mm f/5.L IS lens
Canon EOS-1D Mark IV professional digital camera body
And from the BAA On-line Store:
Gitzo 3530 LS Tripod
Mongoose M3.6 Tripod Head
If you are considering the purchase of a major piece of photographic gear be it a new camera, a long lens, a tripod or a head, or some accessories be sure to check out our complete Shopper’s Guide.
December 8th, 2010
| [Not a valid template] |
|
This image shows the jetty and the lighthouse in front of a very pink pre-dawn sky. The image was made with the 24-105mm IS L lens hand held at 58mm with the EOS-1D Mark IV. ISO 400. Evaluative metering at zero: 1/20 sec. at f.11. If you head to a new spot to photograph birds it is always a great idea to create a few establishing shots that show the place or a few folks birding. Such images are great for slide programs and can help sell an article or two. Don’t think of this B-roll stuff as “just snapshots.” Look for wonderful light, design a pleasing image, and take as much care as you would with an image of a hard to photograph sea duck.
|
The Barnegat Jetty, Barnegat Light City, NJ
Though I lived in the New York/New Jersey metropolitan area for nearly two decades as a birder and bird photographer (and for 46 years in all), I never made it to the famed Barnegat Jetty until last December (2009). Why famous? It is the best place in the Northeast to view and photograph a variety of sea ducks and wintering shorebirds most noticeably Harlequin Duck and Purple Sandpiper. When I got there, a 26″ snow storm sent me running back to my Mom’s home in Holbrook, Long Island, leaving the motel in Ship Bottom at 3am. Yikes! I returned a week later and with Denise Ippolito as my guide, created the wonderful images that you see here plus quite a few more.
| [Not a valid template] |
|
This Harlequin Duck drake was photographed with the Canon 800mm f/5.6L IS lens with the 1.4X II TC and the EOS-1D Mark IV. ISO 800. Evaluative metering +1/3 stop: 1/250 sec. at f/8.
|
The jetty is very long. And very dangerous. Denise, who spends many days each winter season on the jetty, knew right where the birds would be, took me right to them, and gave me more than a few tips on how to avoid killing myself.
| [Not a valid template] |
|
This image was created with the Canon 800mm f/5.6L IS lens with the EOS-1D Mark IV. ISO 500. Evaluative metering +2/3 stop: 1/50 sec. at f/5.6. You gotta love the 4-stop IS system on the 800.
|
It was sunny and bright on the day that I made this image. As I hate high contrast situations I simply went looking for a bird on the shady side of a big rock. And found one 🙂 Purple Sandpiper was my second most wanted Barnegat species. I can’t wait to get back there this December.
| [Not a valid template] |
|
Denise Ippolito has written a fabulous Site Guide for the Barnegat Jetty. (I helped out just a bit :))
|
Denise’s Barnegat Site Guide will make your first visit to this great bird photography location productive and safe. She explains the effects of the winds and the tides and the light on the photographic opportunities. She lets you know what birds you will find there and where and when you will find them. She shares her favorite conditions and her tricks for getting close. And she will keep you safe while you are there, the same way she kept me safe.
The Barnegat Site Guide (6190 words, 68 images) is available from BIRDS AS ART by e-mail as a PDF for only $22. You can call Jim with a credit card in hand at 863-221-2372 or send us a Paypal to birdsasart@att.net . If you prefer the convenience of ordering through the BAA On-line store you can find the Barnegat Guide here.
Just for the record books Barnegat is located on Long Beach Island less than 30 minutes from Manahawkin, NJ.
Shopper’s Guide
Here is a list of the gear that I used to create the images above.
Canon 24-105mm IS L zoom lens
Canon 800mm f/5.L IS lens
Canon EF 1.4XII teleconverter
Canon EOS-1D Mark IV professional digital camera body
And from the BAA On-line Store:
Gitzo 3530 LS Tripod
Mongoose M3.6 Tripod Head
If you are considering the purchase of a major piece of photographic gear be it a new camera, a long lens, a tripod or a head, or some accessories be sure to check out our complete Shopper’s Guide.
December 6th, 2010
| [Not a valid template] |
|
This image of a very worn first winter Western Gull was created with the Canon 70-200mm f/2.8L IS II lens with the 2X II teleconverter (hand held at 400mm) and the EOS-1D Mark IV. ISO 400. Evaluative metering +1 stop: 1/1250 sec. at f/7.1 set manually and confirmed by histogram check. AI Servo central sensor rear focus AF and re-compose.
When I am creating portraits of static birds with my favorite new set up, I always support the lens in one way or another when hand holding. Here I sat on a rock and braced my left arm on my left knee. In addition to ensuring a sharp image I was able to create a more intimate photo with the pleasing background that I wanted (including the white strip of breaking surf at the top) by getting low.
|
My Thoughts on the Western Gull “Which Do You Like Best?” Images
Though I like all three images (else I would not have posted them here :)), the first is my fave. I am a sucker for wing stretches and for distant blue ocean backgrounds. I was also down low when I created this image.
Note that that in the second image, the one of the bird landing, I was standing. As a result, the background, i.e., the Pacific Ocean, was actually much closer to the subject than in the wing stretch image where I was much lower. Thus the background in the first image was softer, sweeter, and more out of focus than the background in the second image.
I love the third image for its abstract look, but feel that I could have created a much more powerful photograph had I not been lazy about mounting my flash when I left the car in the pre-dawn light. The way to go with this image would have been to underexpose the ambient and light the bird with the flash. This would have yielded a much darker pink/blue background and brought the bird to life. Next time I will not be so lazy 🙂
| [Not a valid template] |
|
This is the original of the second image, the one of the landing gull. As you can see, I cropped it from our left, covered the remaining part of the closest bird with a Quick Mask of ocean background, added canvas to the top, and repaired the clipped wing tip.
|
The techniques that I used to process the image are included in Ditigal Basics and Robert O’Toole’s APTATS I, both PDFs sent via e-mail.
Shopper’s Guide
Here is a list of the gear that I used to create the two images in this post.
Canon 70-200mm f/2.8L IS II lens
Canon EF Teleconverter 2X II
Canon EOS-1D Mark IV professional digital camera body
If you are considering the purchase of a major piece of photographic gear be it a new camera, a long lens, a tripod or a head, or some accessories be sure to check out our complete Shopper’s Guide.
|
|