
Your Call?
Is today’s featured image kosher or non-kosher? Why?
In the Last Blog Post
At the last (brilliant) blog post, only Tom Redd took a crack at the ordinary/extraordinary question; I responded to him there. Several other questions were totally ignored as well.
What’s Up?
Despite mostly challenging conditions, we have been making some wonderful images whenever we head to the beach — early every day and some afternoons. We have been working on sunball silhouettes just after 6:00am every morning. We’ve had two photographable Common Tern nests, each with a single tiny chick. This morning, we discovered a just-hatched skimmer chick near the colony ropes. And there are lots of other skimmers on scrapes with eggs that should be hatching soon. The terns are diving for Mole Crabs like mad in the wash every morning. And yours truly spotted a Royal Tern with its fledged young. Shoot me a text to 863-221-2372 if you’d like to join me.
Today is Monday 10 August 2026 and the forecast is for our first NE wind in quite some time so we are expecting to have another great morning. Whatever you opt to do, I hope that you choose to have fun and enjoy life. Please remember that happiness is a choice — Byron Katie – The Work.Com
If an item — a Delkin flash card or reader, a Levered-clamp FlexShooter Pro, or a Wimberley lens plate or low foot — for example, that is available from B&H and/or Bedfords, is also available in the BAA Online Store, it would be great, and greatly appreciated, if you would opt to purchase from us. We will match or beat any price. Please remember also to use my B&H affiliate links or to earn 3% cash back at Bedford by using the BIRDSASART discount code at checkout for your major gear purchases. Doing either often earns you free guides and/or discounts. And always earns my great appreciation.
Gear Questions and Advice
Too many folks attending BAA IPTs and dozens of photographers whom I see in the field and on BirdPhotographer’s.Net, are — out of ignorance — using the wrong gear, especially when it comes to tripods and more especially, tripod heads. And the same is true in spades when ordering new camera bodies or lenses. My advice will often save you some serious money and may help you avoid making a seriously bad choice. Please know that I am always glad to answer your gear questions via e-mail. If you are desperate, you can try me on my cell at 863-221-2372. Please leave a message and shoot me a text if I do not pick up.

B&H Simplified
To ensure that I get credit for your B&H purchases, you can always click here. The tracking is invisible. Using my affiliate links is greatly appreciated. And, with B&H, you can use your PayBoo card. You must use the website to order. You cannot get your free guides if you make a phone order. Once you have an item in your cart, you must complete the order within two hours. Huge thanks!
B&H
Many folks have written recently stating that they purchased a Sony a1 from B&H and would like their free membership in the Sony 1 Info and Updates Group, a $150.00 value. But when I check my affiliate account, their orders have not been there. When I let them know that they get credit for B&H purchases only if they use one of the many B&H affiliate links on the blog or begin their searches with this link, they are always disappointed. If in doubt, please contact me via e-mail and request a BH link. I am always glad to help and to guide you to the right gear.

Bedfords Simplified
Click here to start your search. Choose standard shipping, and when you get to the payment page, enter BIRDSASART in the discount code box and hit apply. You will be upgraded to free second day air Fed-Ex and receive 3% cash back on your credit card once your stuff ships. Using either my affiliate links is greatly appreciated and will often earn you free guides or discounts. To receive a free guide or free entry into a Sony Set-up and Info Notes e-Mail group, you need to shoot me your receipt via e-mail. The B&H receipts need to include the order number.
Bedfords Amazing BAA Discount Policy
Folks who have fallen in love with Bedfords can always use the BIRDSASART coupon code at checkout to enjoy a post-purchase, 3% off-statement credit (excluding taxes and shipping charges) on orders paid with a credit card. The 3% credit will be refunded to the card you used for your purchase when your product ships. Be sure, also, to check the box for free shipping to enjoy free Second Day Air Fed-Ex. This offer does not apply to purchases of Classes, Gift Cards, or prior purchases.
You can visit the Bedfords website here, shoot Steve Elkins an e-mail, or text him on his cell phone at (479) 381-2592.
Facebook Discussion
There were some interesting comments in response to the Image Creation and Optimization Ethics in Today’s World blog post here on Facebook:
Comment/Steven Inglima
I’ve been lobbying for a way for photographers to simply declare with a symbol of some type that the image that they’ve are purposing in any medium be a true photograph (as opposed to an AI creation). Because the lines are being blurred even by people who have a long history as photographers (!), I think it’s important we take a stand and have a clear photographer’s declaration of authenticity.
We have these kinds of the things for other products, like the Kosher symbol for foods that have met certain requirements. Could someone lie and put the K symbol on non-Kosher foods? Well, I suppose they could, but if they got caught (and that’s likely), then they would be branded as frauds. It’s like when Steve McCurry got caught manipulating his Nat Geo images and then lied about it saying an “assistant” did it without his knowledge. As fellow Nat Geo photographer Sam Abell said in a lecture, “He was thrown out of the church”.
What if the professional photographic community all could agree on something like this? I’m proposing a simple symbol that we could use to declare authenticity and free from AI creation, like this:

|
Massaging our own data in Photoshop is still using our own data. The only PS work that you do that couldn’t be done easily in the darkroom (having used film and sensitized papers) would be content-aware-fill. But, even in doing that, it’s still YOUR pixels that Photoshop is working with!!!
Reply/Arthur Morris
Thanks for your thoughtful comments, Steve. A large letter K could signify real, i.e., kosher photos, while a K- symbol would mark photo illustrations—images that don’t accurately represent the raw file. A large PH logo, or a K with a big fat X through it, could then designate “phony”. Like this:
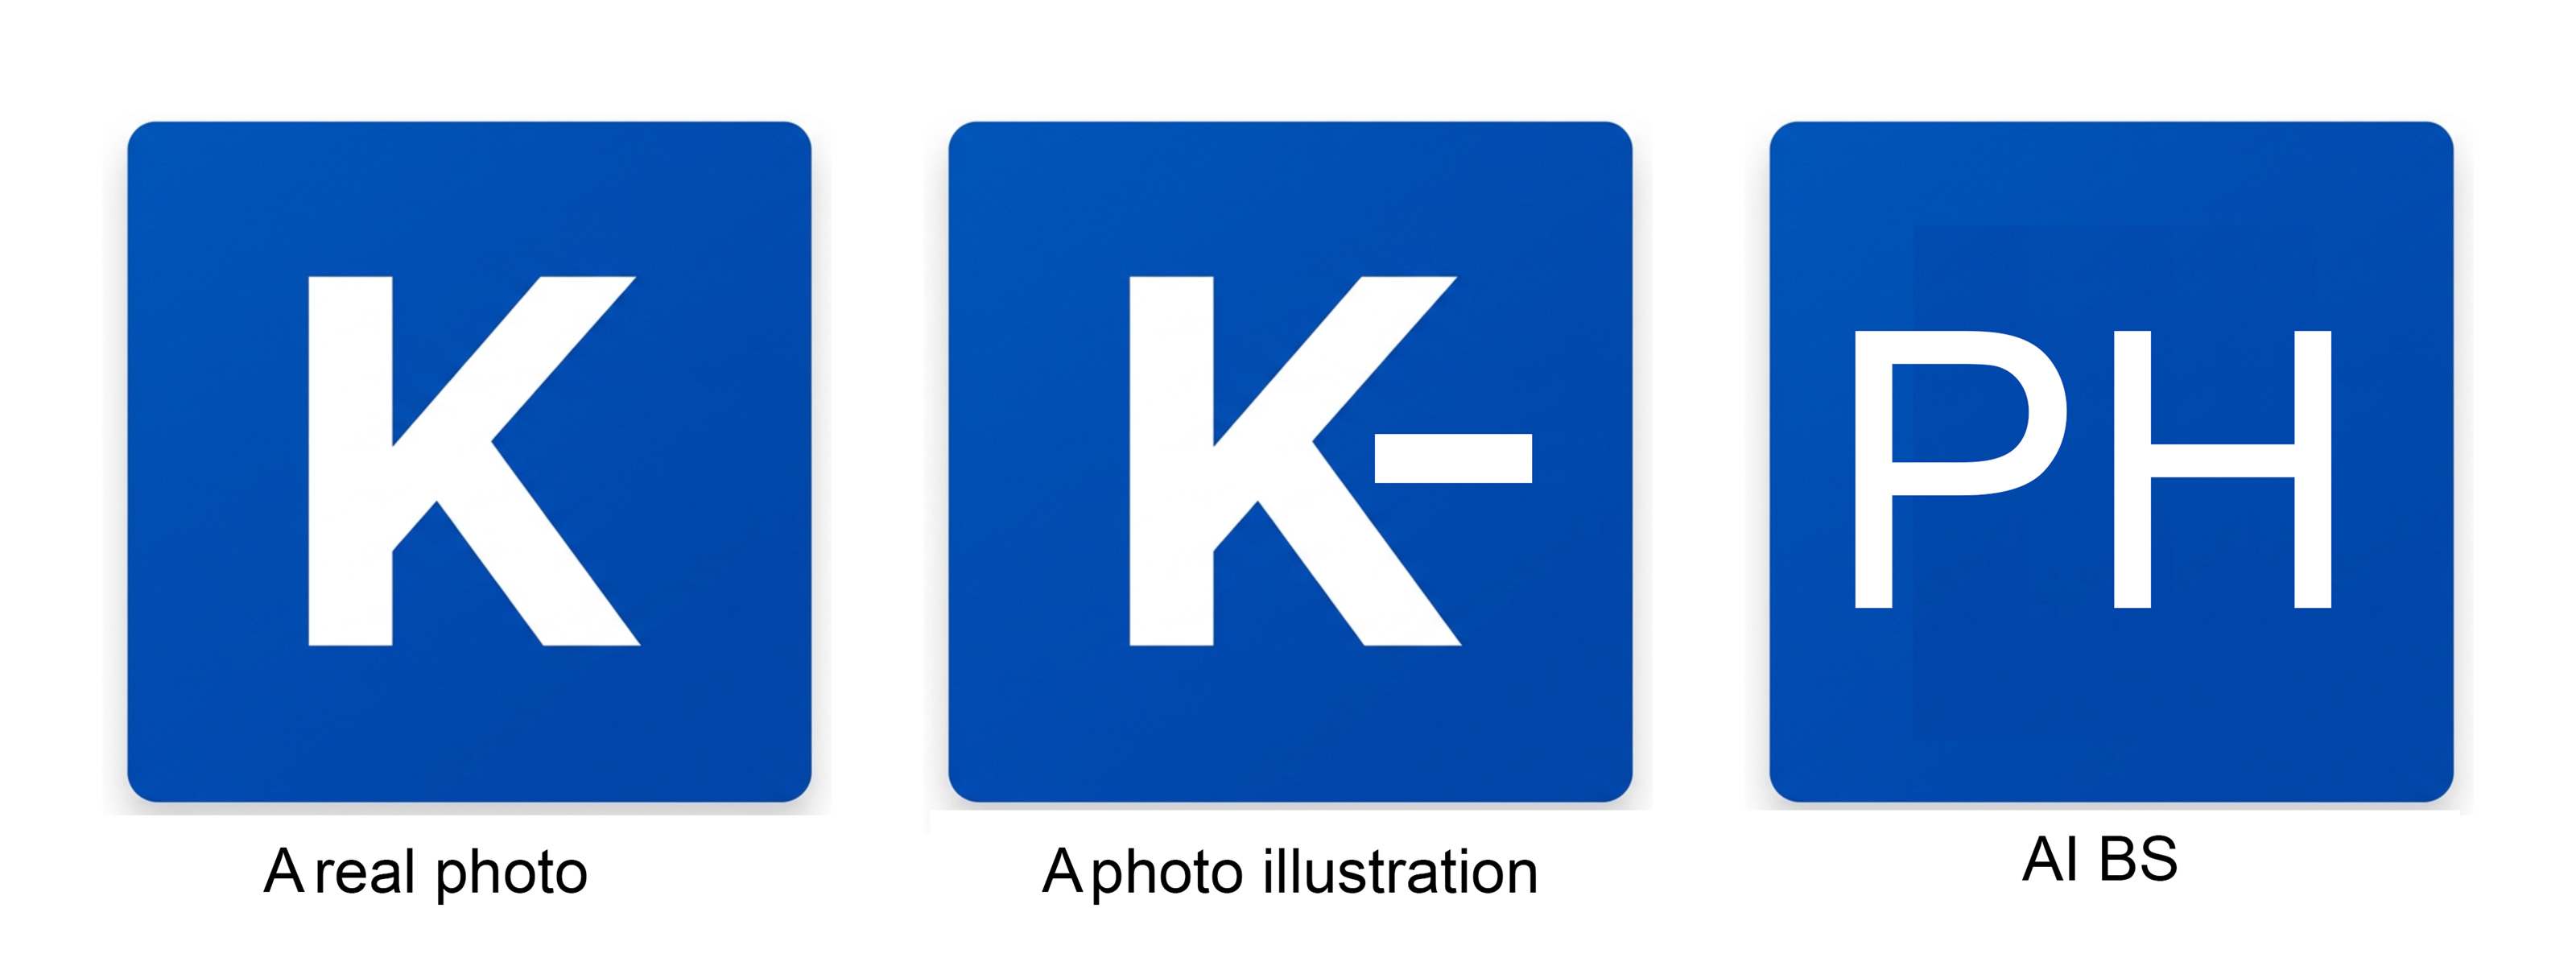
|
Related Notes
My one and only nature photography teacher, Milton Heiberg — eight Tuesday nights in early 1984 at the NYC Audubon office in Manhattan — possessed extraordinary darkroom skills. Working strictly with film, he could seamlessly composite an image of a cowboy holding a gun, standing on an old wooden box inside a glass bottle — a feat that can be done with a few clicks in Photoshop today, but required genius back then.
Steven Inglima was in charge of the Canon Explorers of Light program near the end of my 18-year tenure. He was forced to fire me, only to suffer the very same fate himself just a month later.
The late Robert L. Dunne, who served as an editor of Ranger Rick magazine several decades ago, used a system remarkably similar to what Steve suggested — and he did it in a publication created specifically for 7- to 12-year-old children! I was deeply honored to have met Bob and to have had two of my photo-illustrated articles featured in the magazine: Big Apple Birders and Beach Bird Buddies. My late wife Elaine and I used to take students from our school classes out birding, and those wonderful field trips led directly to my two Ranger Rick pieces.
E-mail/Milton Heiberg
Hi Artie,
Your post about truth in photography was beautifully written and told the story of a real dilemma. I have a favorite line that I have used countless times in my classroom sessions. “Photographs don’t lie, but photographers do”.
I would hate to see any symbol next to a photo indicating its truthfulness as being retouched or un-retouched. It would train the viewer’s eye to put an analytical and mechanical value on a work of art. The only place that kind of a symbol may be necessary would be with a photo that must absolutely or legally represent the truthfulness of the subject, the scene, or the event such as in legal or news publications. For all other photos, no symbols, just obey the publisher’s rules with honest judgment.
There may be a thin line between photo-art and photojournalism, but since the first pinhole in a shoebox cast an image on light-sensitive chemicals, PHOTOGRAPHY WAS and IS an ART. Think of a camera as an artist’s paint brush casting a three dimensional scene onto a two dimensional surface, and the professional photographer always controlled EVERY brushstroke with a darkroom enlarger or a computer screen. AI just makes it easier.
Also think of journalism as the art of writing real events truthfully with spellbinding enthusiasm. And think of photojournalism as the art of making each photo, by taking the oath: “. . . to tell the truth, the whole truth, and nothing but the truth so help me St. Nikon”, without letting the adjustments sacrifice the true story that the photo is telling.
BTW: Steve Inglima’s comment stated that that McCurry “. . . was thrown out of church” (was fired or dropped?) for a lie. To me, lying and blaming an assistant is more serious than a minor photo manipulation. Whatever the whole story was, it looks like McCurry’s big mistake was messing with Nat Geo.
Best, Milton
________________
Milton Heiberg Studios
www.miltonheiberg.com
E-mail Reply by Arthur Morris
Thanks for your thoughtful reply Milton. I think at you are misunderstanding Steve’s comment a bit. He is against 100% Artificial Intelligence “photos,” images created by giving AI instructions on what you want and then passing the results off as real even though the creator never used a camera 🙂 Also, photojournalists who work with National Geographic, the NY Times, all the press agencies, and many, many others, there are no minor photo manipulations. Change an image — get caught and get fired. They are very, very strict.
|
|
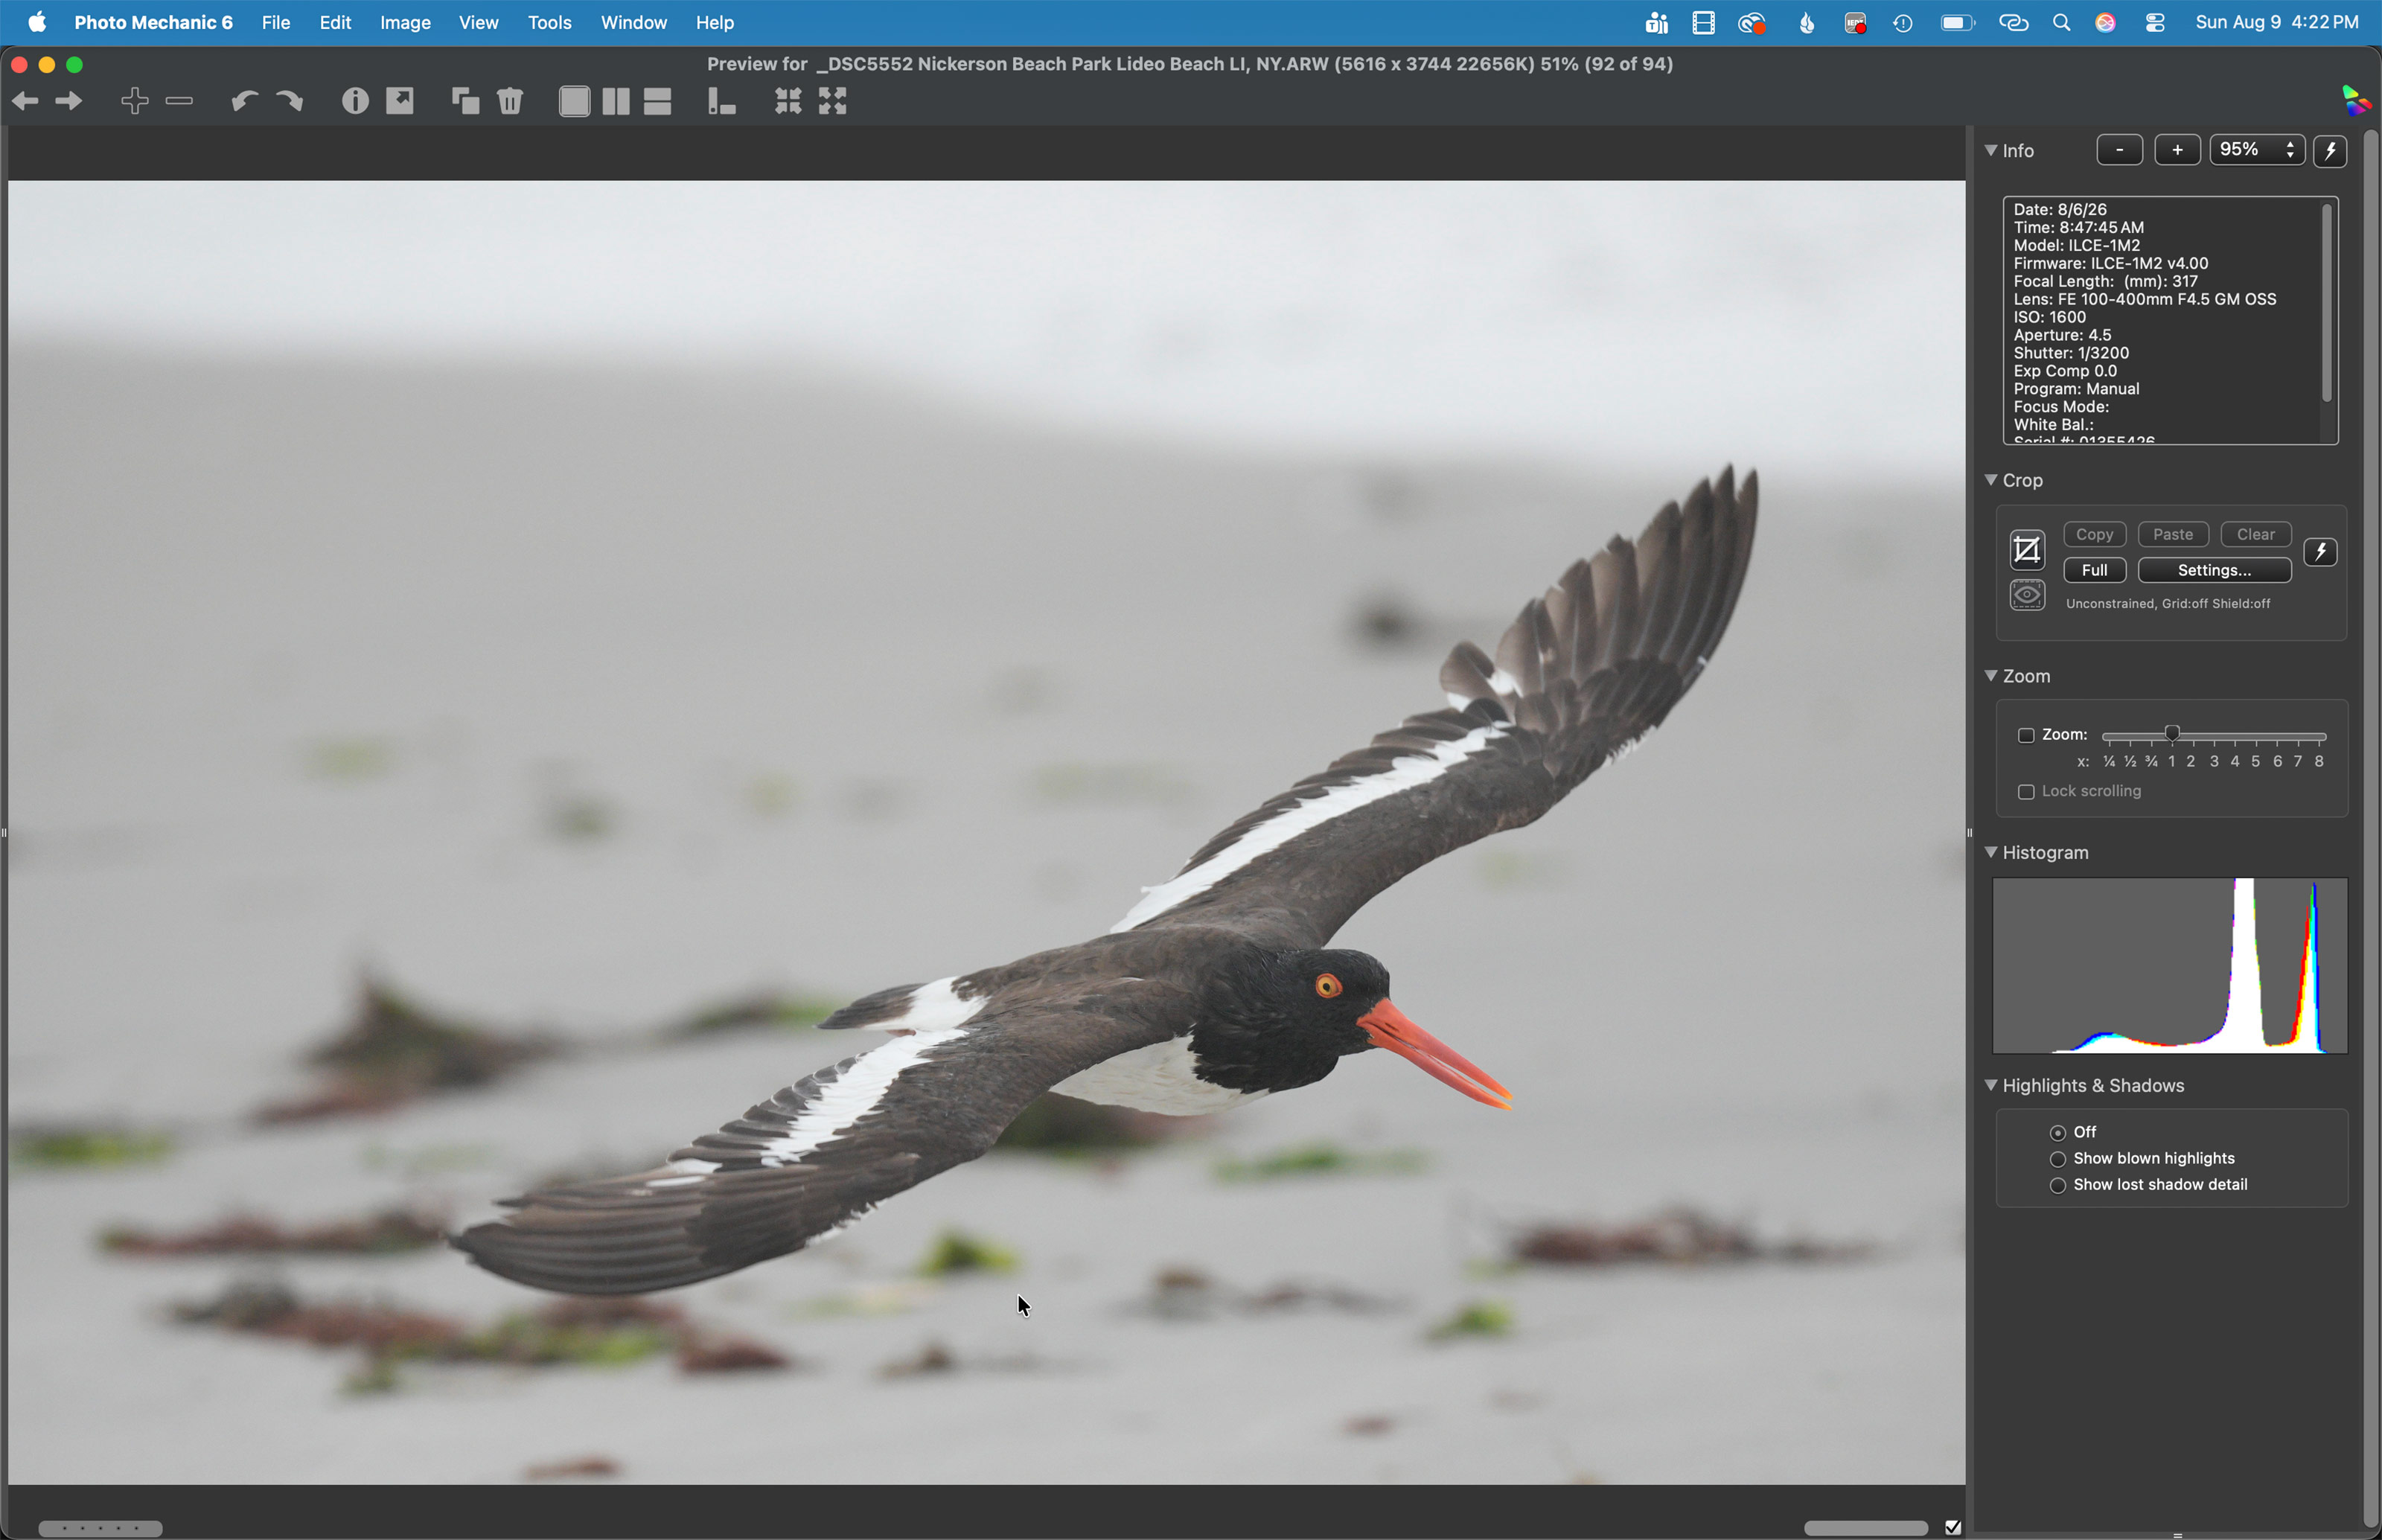
This was the last image I made on the morning of 6 August 2026 at Nickerson Beach Park, Lido Beach, Long Island, NY. St full height, I used the handheld Sony FE 100-400mm f/4.5 GM OSS lens (at 476mm effective focal length) and The Latest Greatest Sony Flagship Body, the a-1 II Mirrorless Camera (in APS-C crop mode). The exposure was determined by Zebras with ISO on the rear wheel. ISO 1600: 1/3200 second at f/4.5 (wide open) in Manual mode. AWB at 8:47:45am on a cloudy morning Wide/AF-C with Bird-Eye/Face Detection performed perfectly. Click on the image to enjoy a larger high-res version. Photo Mechanic screen cap for the American Oystercatcher adult female — dorsal flight image |
Universal Advice for Better Flight Photography
Pan faster! After 43 years, I am still making too many flight shots with the bird too far forward in the frame. So good luck with that!
|
|
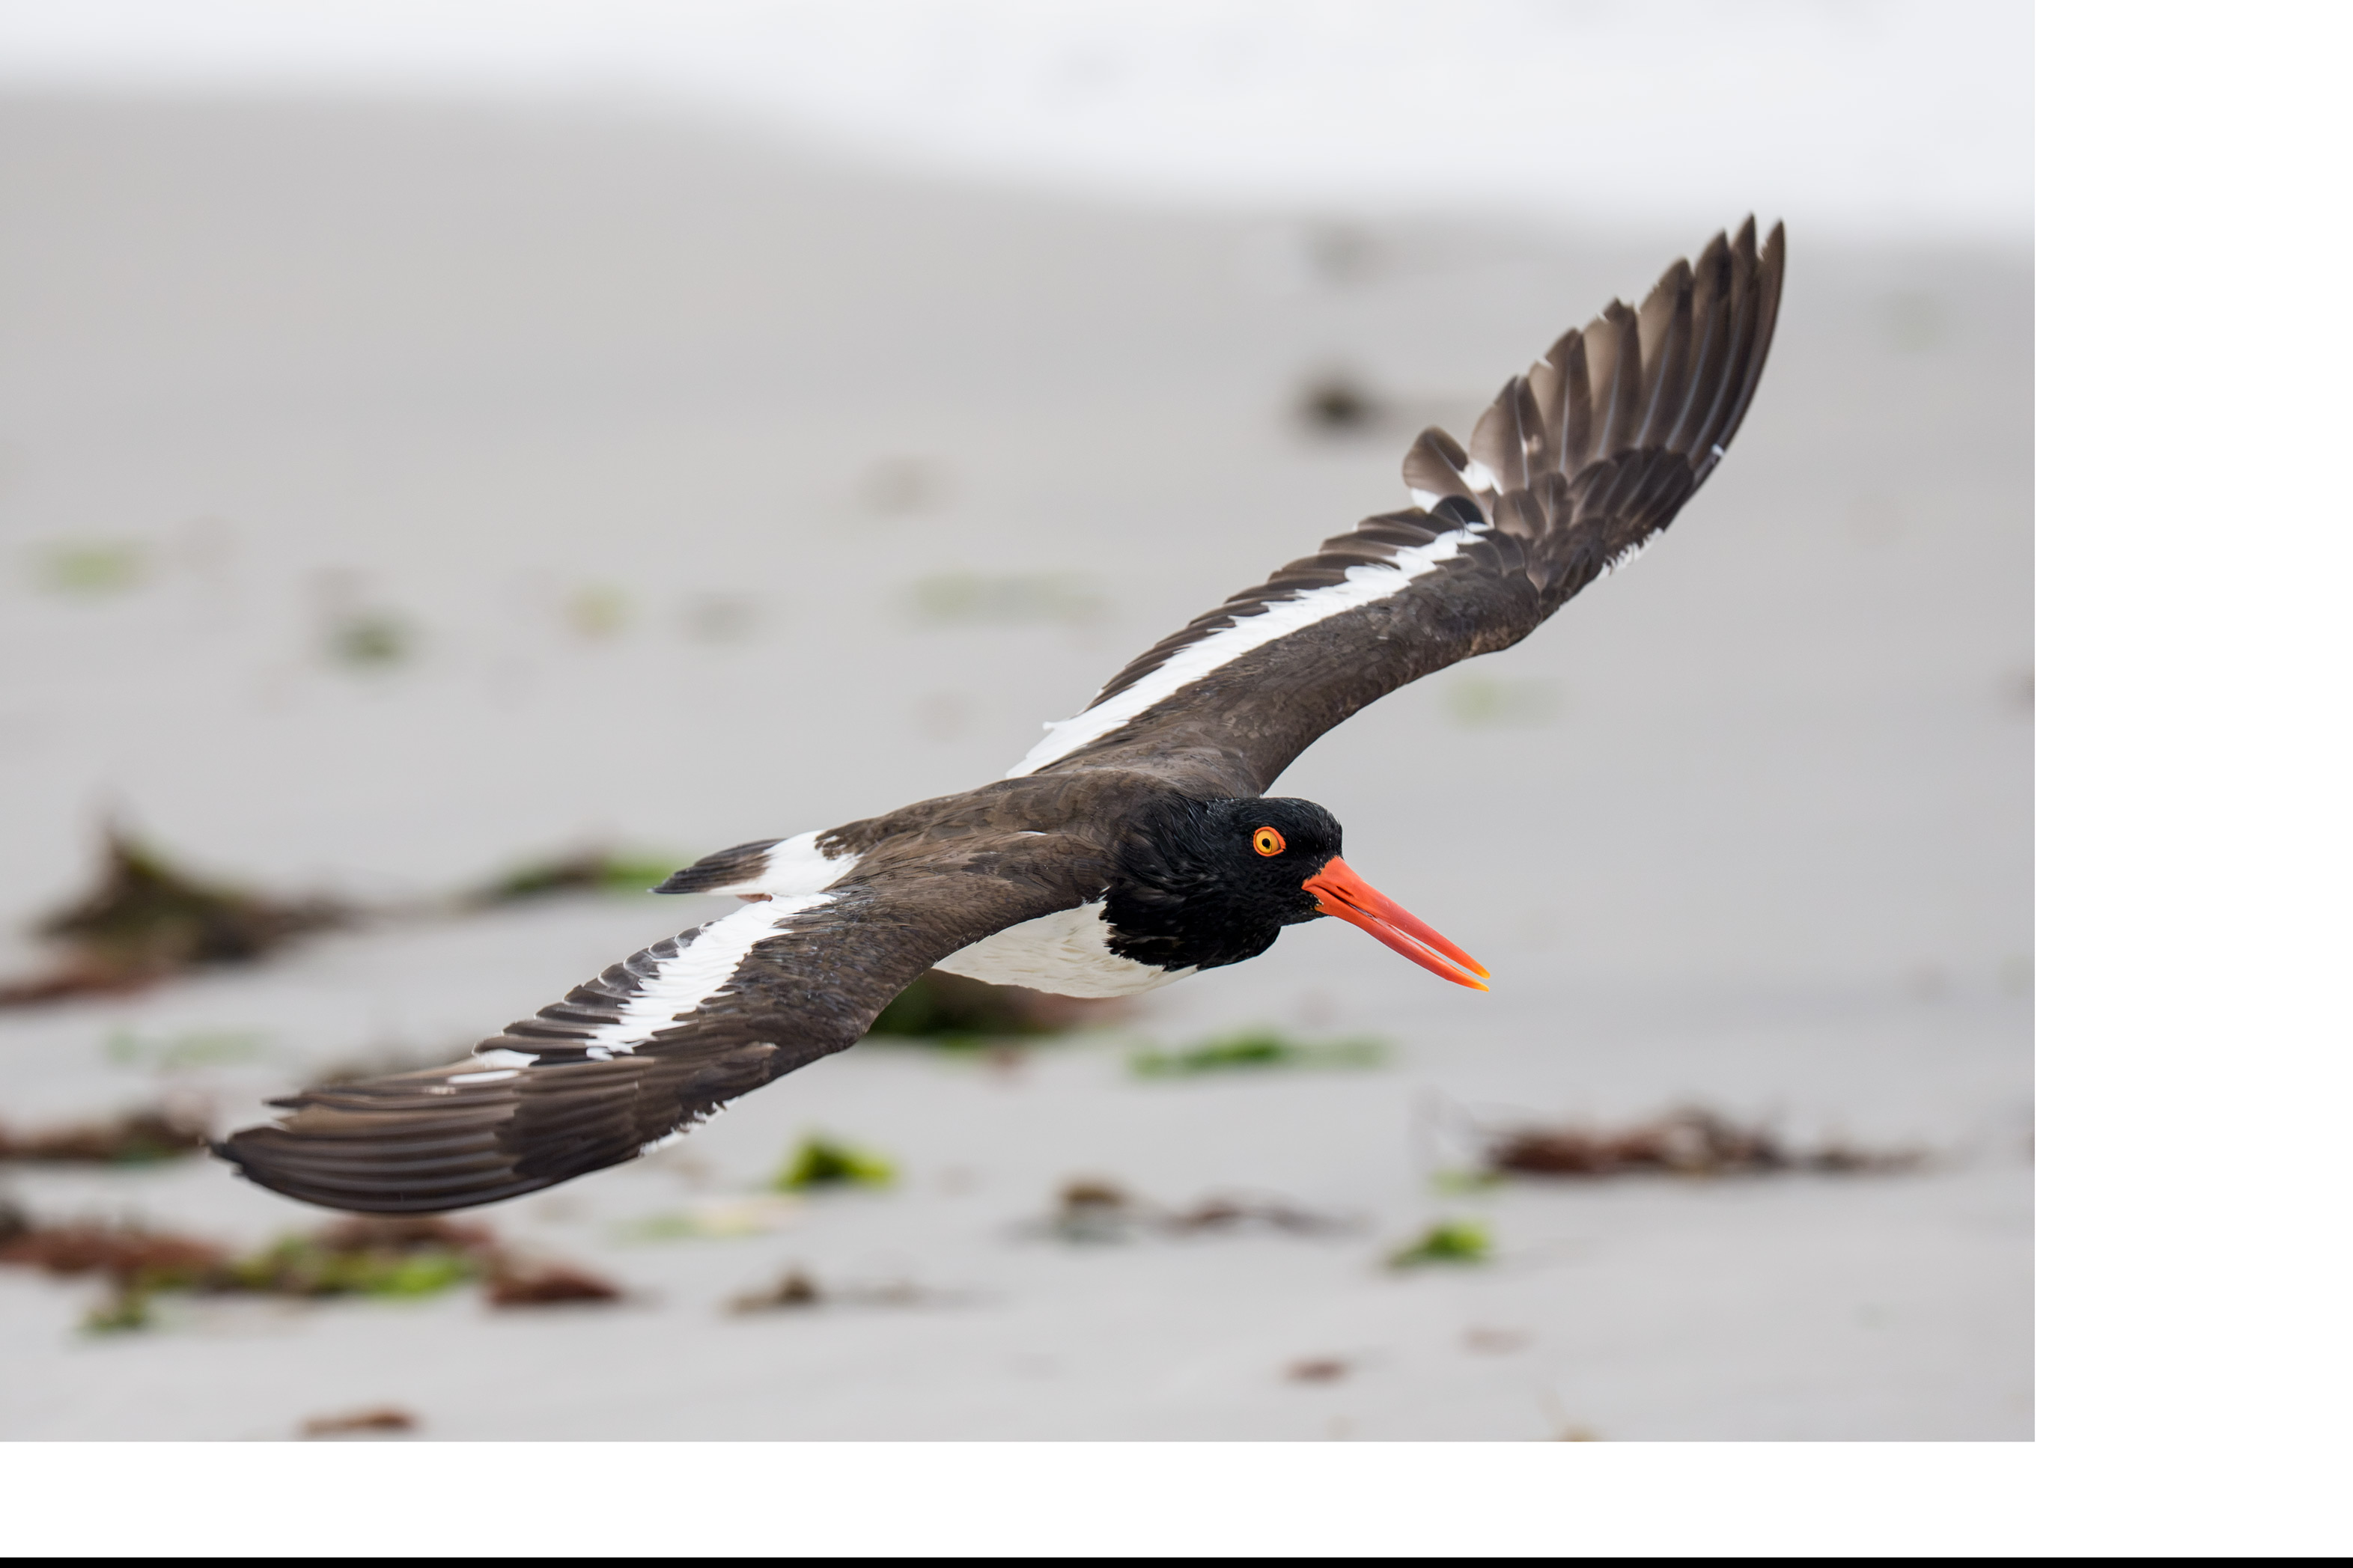
This was the last image I made o the morning of 6 August 2026 at Nickerson Beach Park, Lido Beach, Long Island, NY. St full height, I used the handheld Sony FE 100-400mm f/4.5 GM OSS lens (at 476mm effective focal length) and The Latest Greatest Sony Flagship Body, the a-1 II Mirrorless Camera (in APS-C crop mode). The exposure was determined by Zebras with ISO on the rear wheel. ISO 1600: 1/3200 second at f/4.5 (wide open) in Manual mode. AWB at 8:47:45am on a cloudy morning Wide/AF-C with Bird-Eye/Face Detection performed perfectly. Click on the image to enjoy a larger high-res version. Photoshop screen cap for the American Oystercatcher adult female — dorsal flight image |
The Image Optimization Plan
1- Crop from behind and add canvas below and in front.
2- Eliminate the ocean at the top of the frame.
3- Do the extensive beach clean-up using my usual cadre of Photoshop Tools: the Remove Tool (J), the Patch Tool (P), the Clone Stamp Tool, and some small Quick Masks refined by Regular Layer Masks. Leave a bit of seaweed to be blurred.
4- Gaussian blur on the background.
|
|
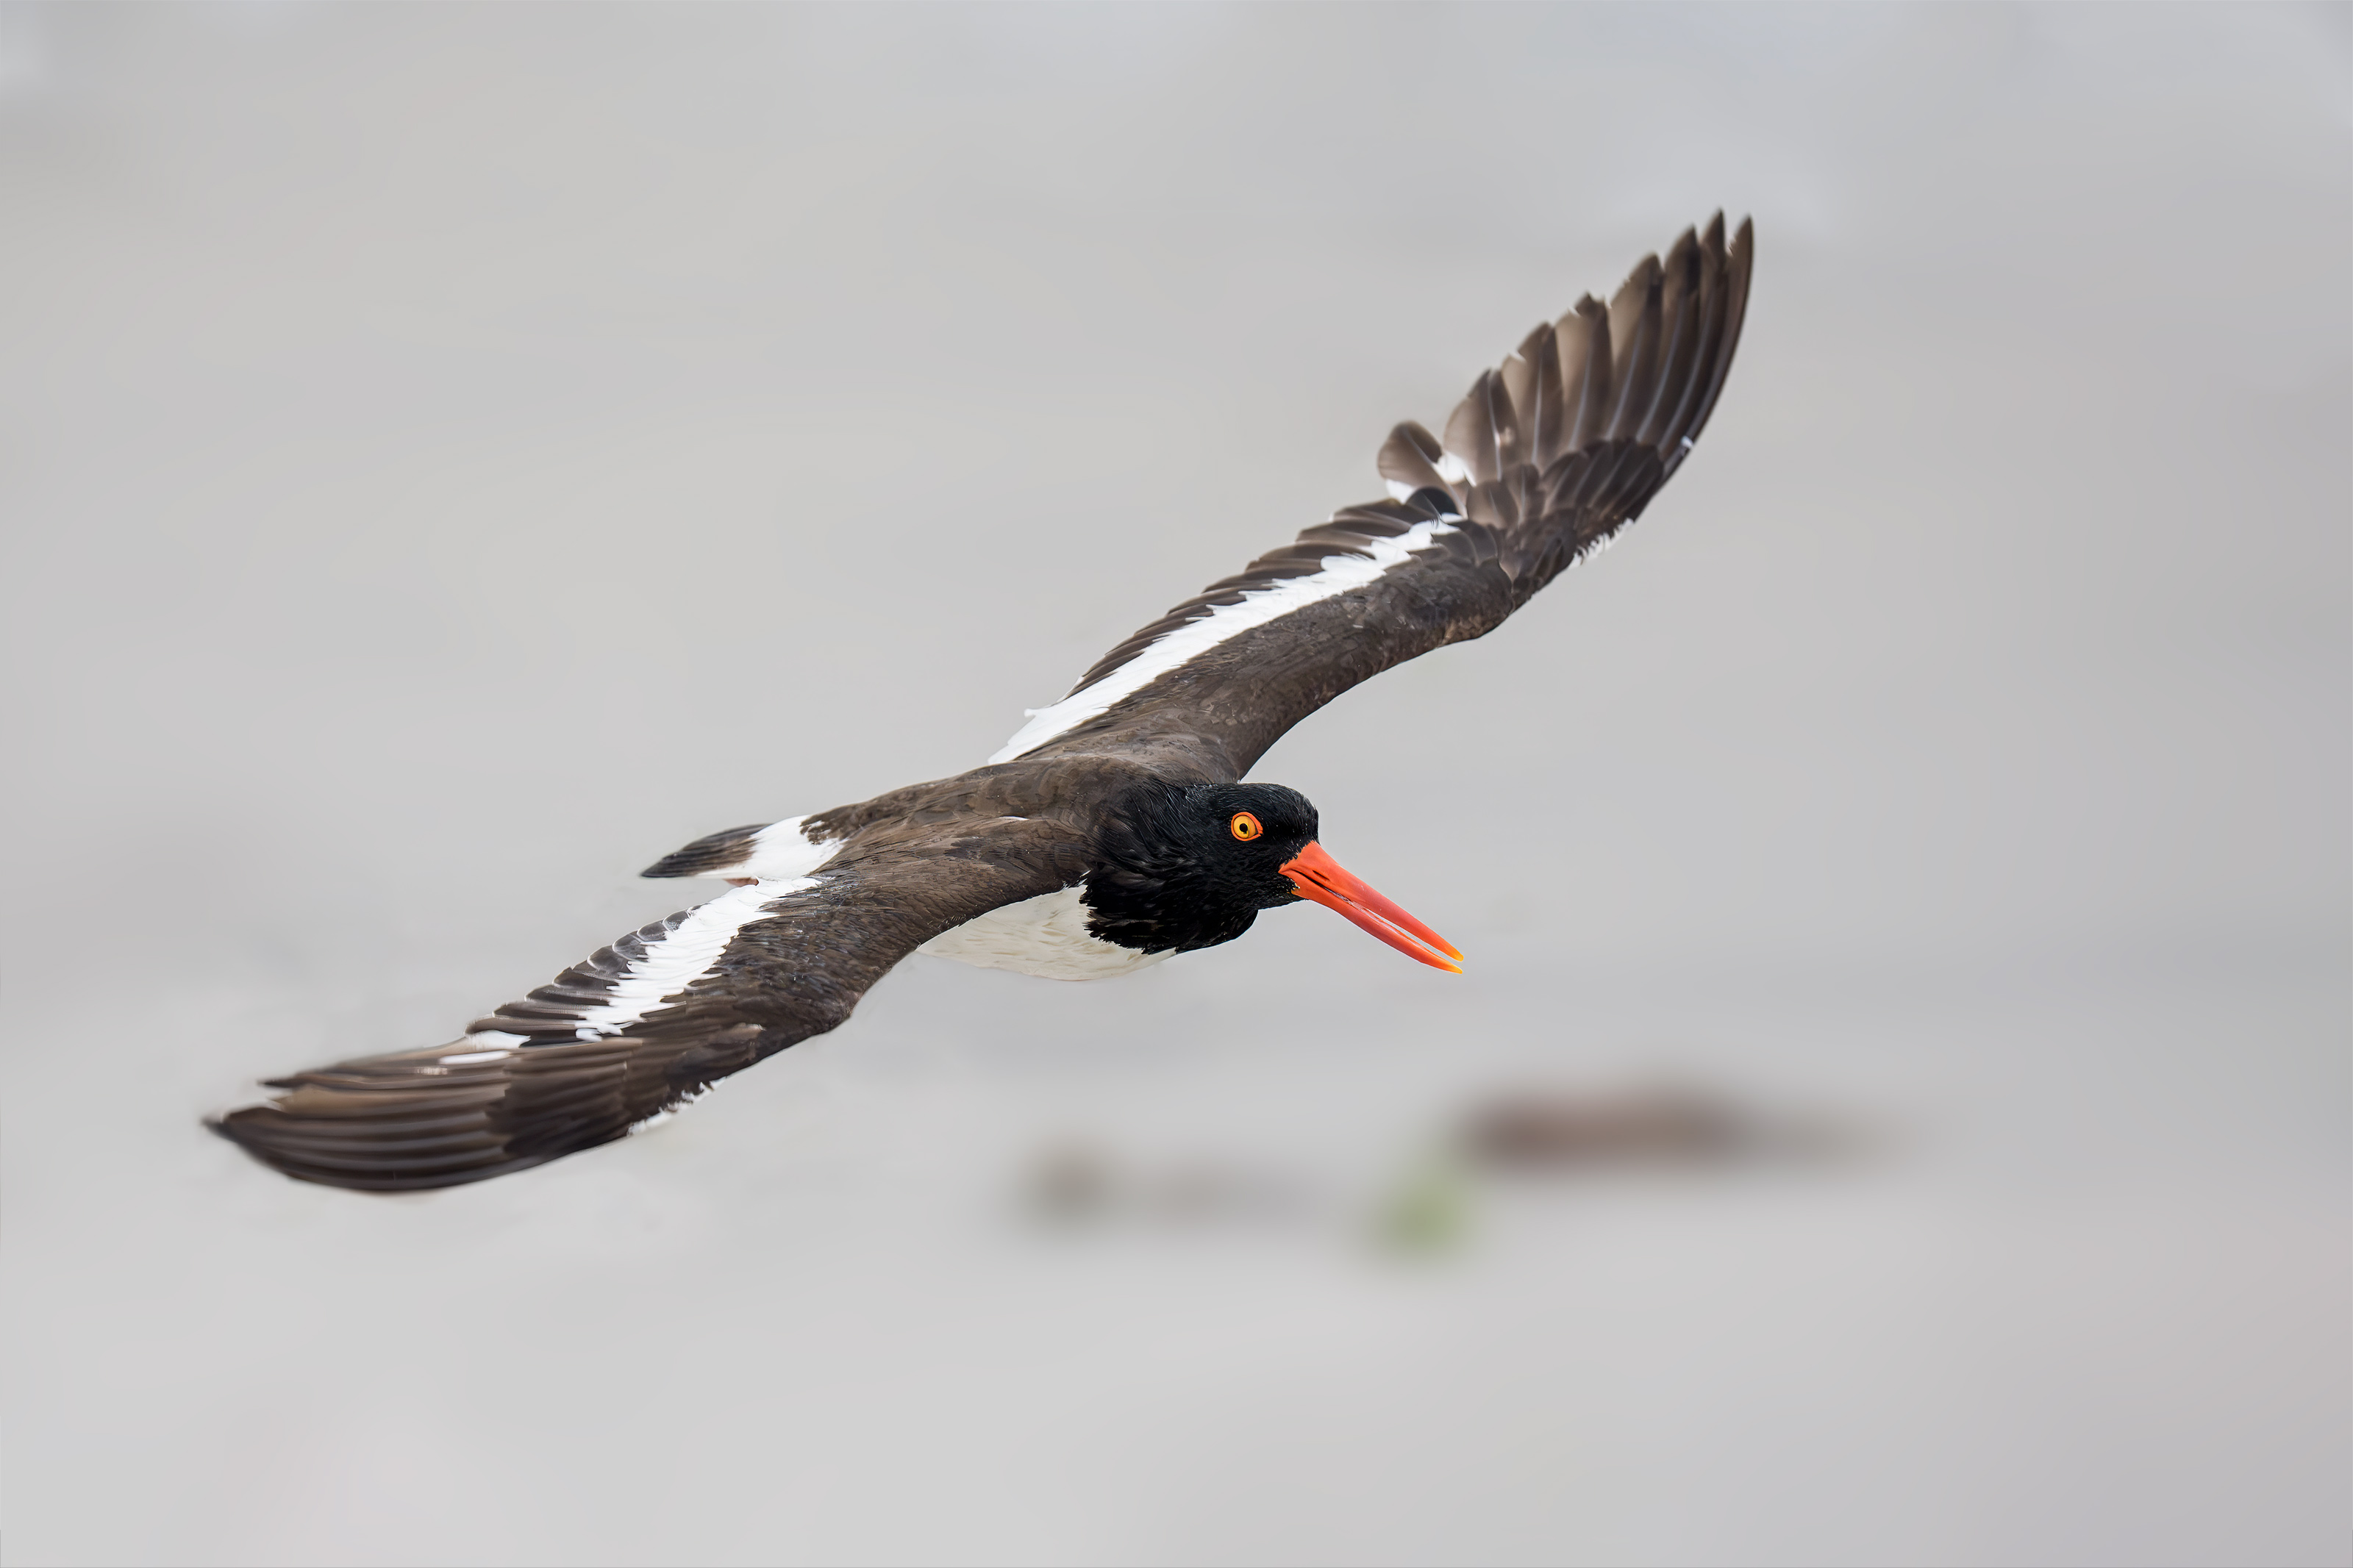
This was the last image I made o the morning of 6 August 2026 at Nickerson Beach Park, Lido Beach, Long Island, NY. St full height, I used the handheld Sony FE 100-400mm f/4.5 GM OSS lens (at 476mm effective focal length) and The Latest Greatest Sony Flagship Body, the a-1 II Mirrorless Camera (in APS-C crop mode). The exposure was determined by Zebras with ISO on the rear wheel. ISO 1600: 1/3200 second at f/4.5 (wide open) in Manual mode. AWB at 8:47:45am on a cloudy morning Wide/AF-C with Bird-Eye/Face Detection performed perfectly. Click on the image to enjoy a larger high-res version. Image #1: The optimized version (he said proudly) for the American Oystercatcher adult female — dorsal flight image
|
It Was Not My Fault!
It was not my fault that the beach was covered with crud; the very next morning, the beach was as clean as a whistle!

|
The BIRDS AS ART Current Workflow e-Guide (Digital Basics II).You can order your copy from the BAA Online Store here, by sending a PayPal for $40 here, or by calling Jim or Jennifer weekdays at 863-692-0906 with your credit card in hand. Be sure to specify Digital Basics II. |
The BIRDS AS ART Current Workflow e-Guide (Digital Basics II)
The techniques mentioned above and tons more great Photoshop tips and techniques — along with my complete digital workflow, Digital Eye Doctor Techniques, and all my personalized Keyboard Shortcuts — are covered in detail in the BIRDS AS ART Current Workflow e-Guide (Digital Basics II), an instructional PDF that is sent via e-mail. Note: folks working on a PC and/or those who do not want to miss anything Photoshop may wish to purchase the original Digital Basics along with DB II while saving $15 by clicking here to buy the DB Bundle.
Please note: the Divide and Conquer technique was inadvertently omitted from DB II. It is detailed in a free excerpt in the blog post here.
Folks who learn well by following along rather than by reading can check out the complete collection of MP 4 Photoshop Tutorial Videos by clicking here. Note: most of the videos are now priced at an amazingly low $5.00 each.
You can learn how and why I converted all of my Canon digital RAW files in DPP 4 in the DPP 4 RAW Conversion Guide here. More recently, I became proficient at converting my Nikon RAW (NEF) files in Adobe Camera Raw. About three years ago I began converting my Nikon and Sony RAW files in Capture One and did that for two years. You can learn more about Capture One in the Capture One Pro 12 Simplified MP4 Video here. The next step would be to get a copy of Arash Hazeghi’s “The Nikon Photographers’ Guide to Phase One Capture One Pro e-Guide” in the blog post here. Today, I convert my Sony raw files in Photoshop with Adobe Camera Raw.
You can learn advanced Quick Masking and advanced Layer Masking techniques in APTATS I & II. You can save $15 by purchasing the pair.

|
The Digital Basics III Video Series |
The Digital Basics III Video Series
I realized more than a year ago that my digital workflow had changed significantly and was toying with the idea of writing a Digital Basics III. More recently, I learned and begun working with two great new Photoshop Tools, the Remove Tool and the Luminance Targeted Adjustment Tool. The former is like a smarter Spot Healing Brush Tool on steroids and the latter is a step up from the fabulous Color Mixer Tool. During that same time frame, I came up with a new and improved 2-step noise reduction technique. I still use Divide and Conquer, Quick Masks, Layer Masks, an expanded array of personalized keyboard shortcuts, and tons of other stuff from both versions of Digital Basics.
As soon as I realized that I did not want to take on another large writing project, I realized that by creating a series of videos I could much more easily share all the details of my current digital workflow and much more easily incorporate additional new tips, techniques, and tools as I went. And so, The Digital Basics III Video Series was born.
You can save $26 by ordering the first five videos in Volume I by clicking here. The videos will be most valuable for folks using the latest version of Photoshop (2024) or Lightroom along with Topaz DeNoise AI and Topaz Sharpen AI.
|
|
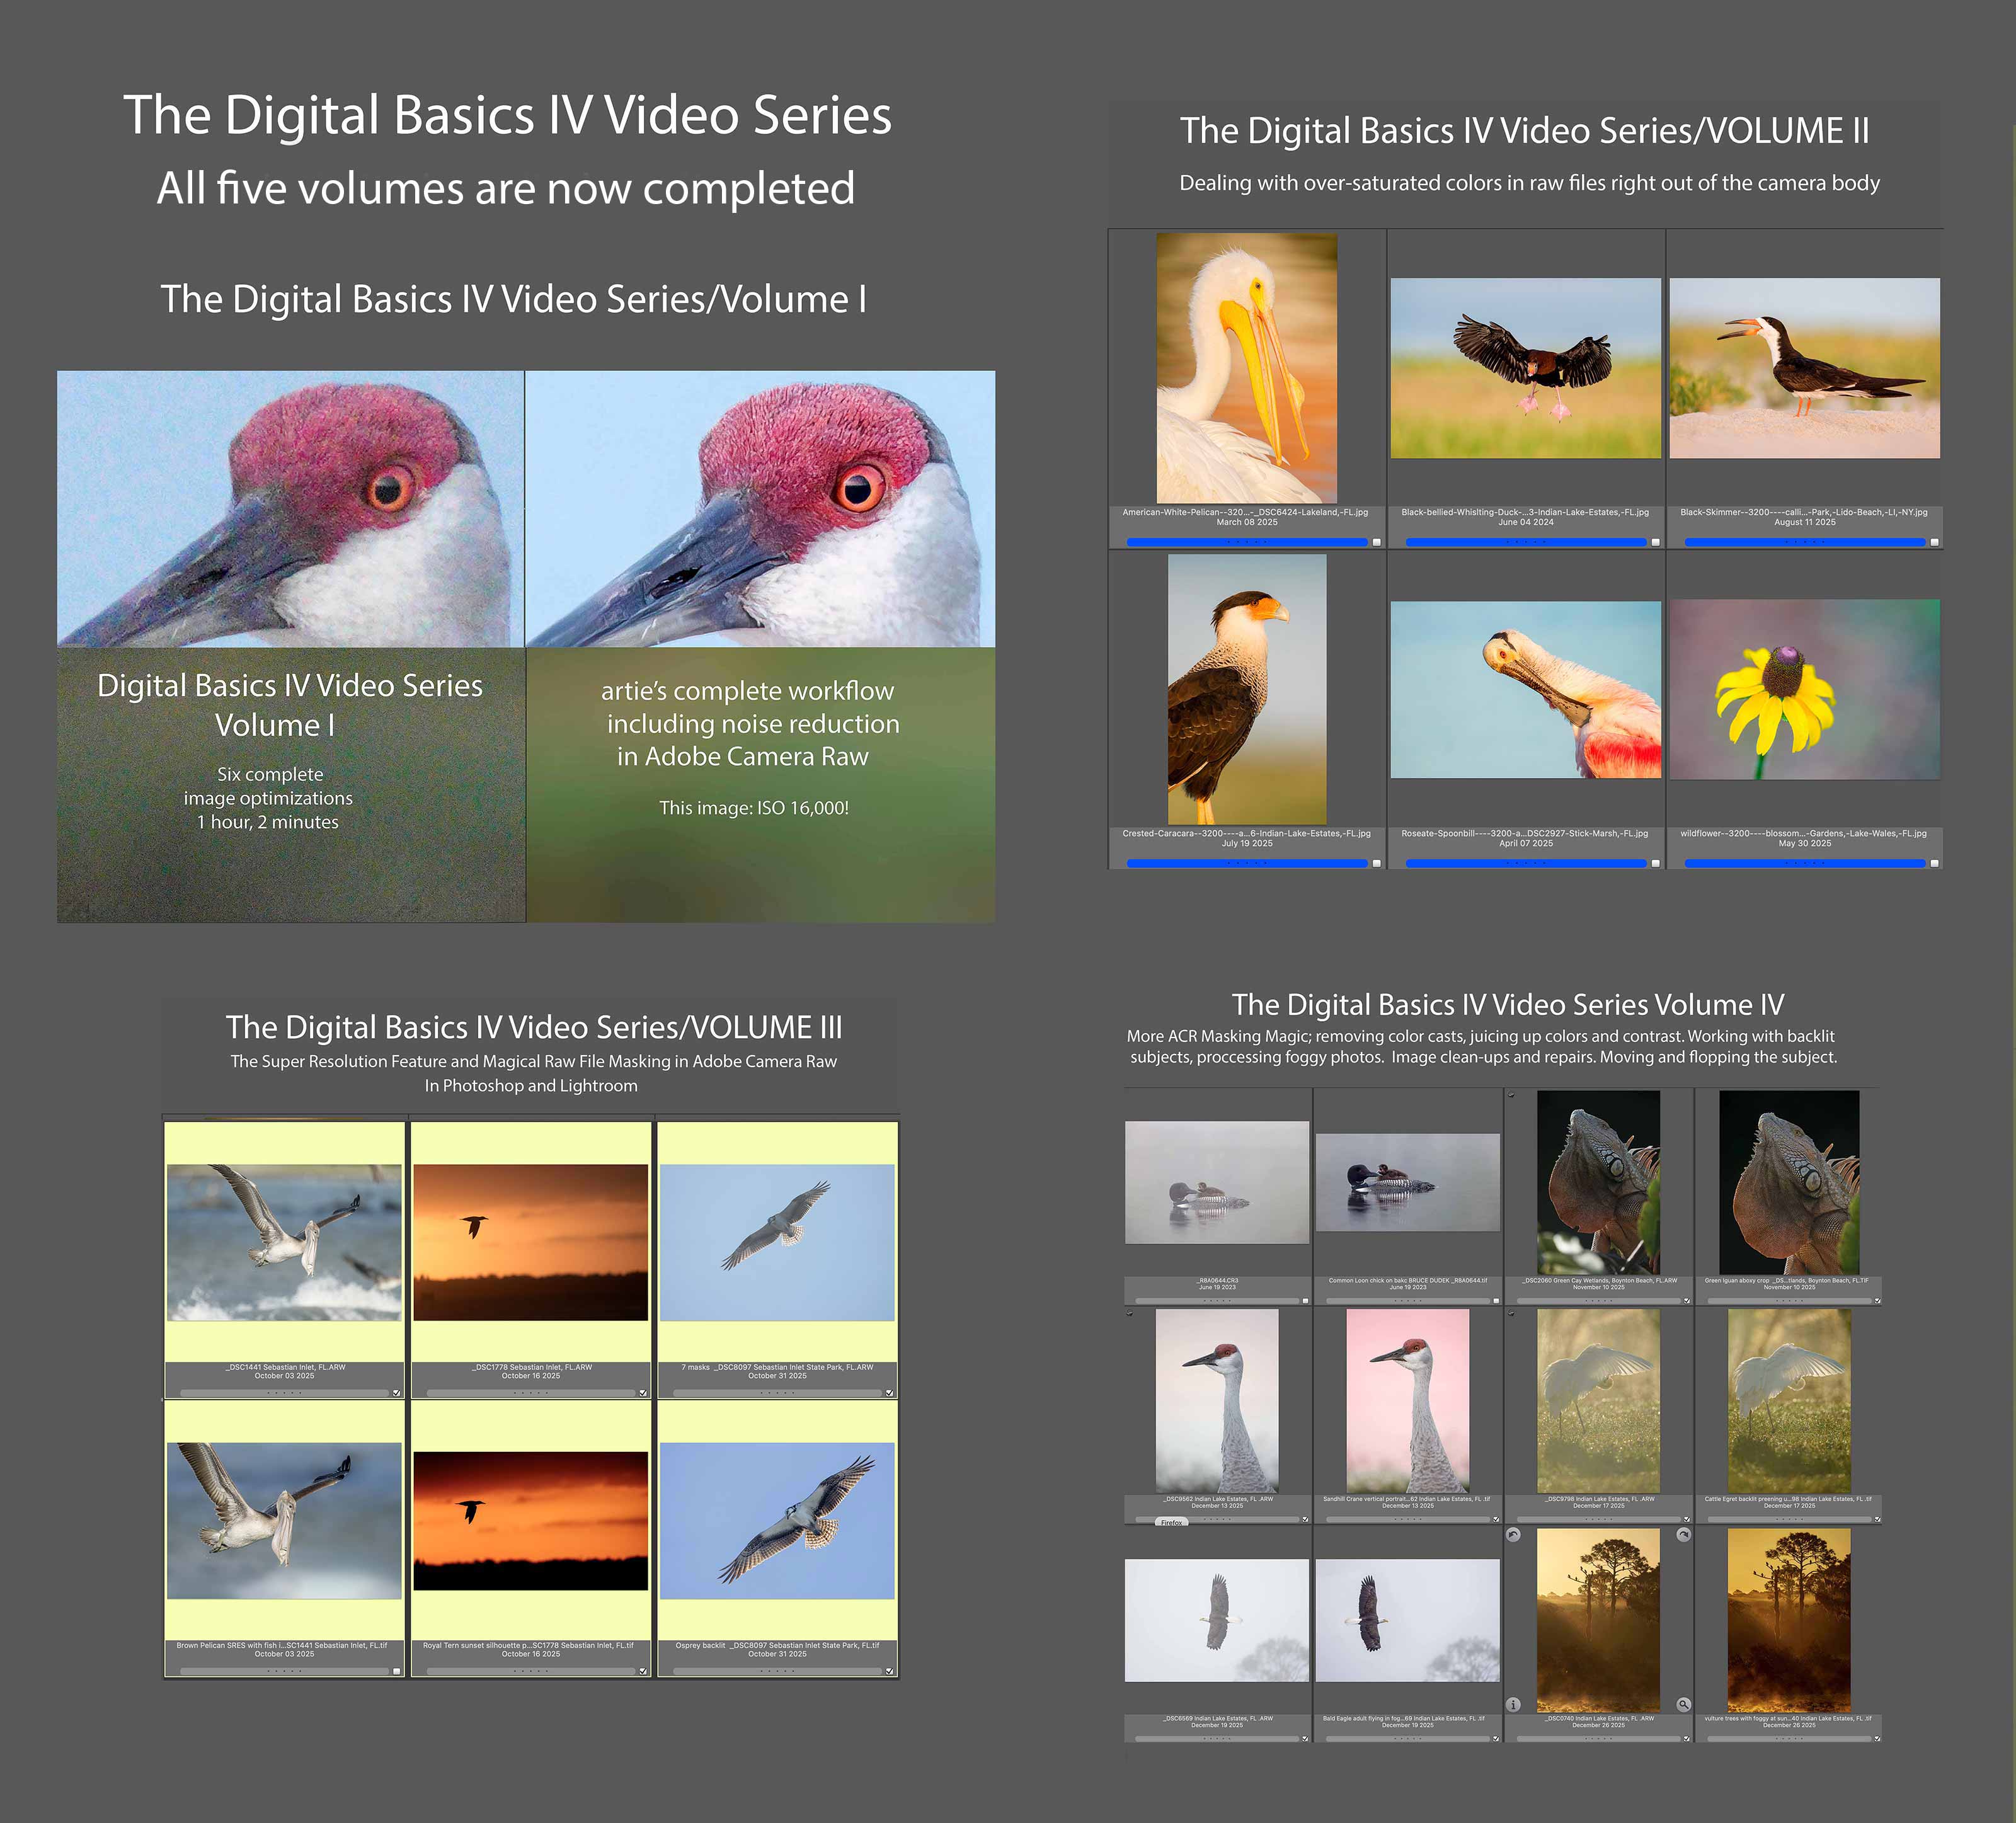
Click to enlarge. The Digital Basics IV Video Series by Arthur Morris/BIRDS AS ARTYou can save $50.00 by purchasing the entire 5-Volume Series by clicking here. |
Digital Basics IV Video Series: $146.00 for all five videos/save $50.00
I have some fabulous new image optimization tips, techniques, and tricks to share. As the Digital Basics III Video Series proved to be so popular, I decided last fall to run it back in the form of Digital Basics IV. Digital Basics V is on the horizon.
My new workflow includes the use of the masking feature in Adobe Camera Raw (thanks to Anita North), the use of the Point Color eye dropper to tame super-saturated colors during raw conversions (discovered in tandem with Anita), a fabulous new Remove Tool trick that makes my favorite Photoshop Tool even more powerful than before -— that one discovered by me. In addition, I have recently begun doing some Curves work during my ACR raw conversions.
My basic workflow remains much the same as is detailed in both the Digital Basics II PDF and in the Digital Basics III Video Series:
1- Setting the Color Temperature (when and if needed).
2- Setting the White and Black Points and adjusting the Highlights and Shadows sliders.
3- Setting the Clarity and Dehaze sliders.
4- Fine-tuning color using the Hue/Saturation/Luminance Targeted Adjustment Tool, a huge step up from the Color Mixer Tool.
5- My 2-step noise reduction technique (with most images).
Once I have the .TIF file in Photoshop, I use my usual cadre of clean-up tools and techniques including the Remove Tool, the Clone Stamp (only rarely), Divide and Conquer, Quick Masking, Layer Masking, Gaussian Blurs, an expanded array of personalized keyboard shortcuts, and tons of other image optimization strategies and methods adapted from previous versions of Digital Basics. I also demonstrate the selective use of Topaz Sharpen AI utilizing the masking feature. And last but not least, I share my JPEG creation methodology.
The Digital Basics IV Video Series is now complete.

|
The BIRDS AS ART Digital Basics Collection: $199.00. |
The BIRDS AS ART Digital Basics Collection
The best news is that learning to use the tools and techniques that I use to improve my images is made fairly simple for those who purchase, use and study the Digital Basics offerings from BIRDS AS ART. One of the great skills that I have been blessed with is writing coherent how-to instructions that can be followed easily by a third grader. Learn to unlock the potential in your images by purchasing the Digital Basics Collection here. The collection includes the Digital Basics II PDF, and all the videos in the Digital Basics III and the Digital Basics IV Video Series.
The original Digital Basics file was created in the mid-aughts when I saw countless numbers of folks creating sharp, nicely designed, well exposed images and then ruining them in Photoshop. I sold enough copies at $20.00 a pop to pay for my $68,000 lap pool! As my workflow changed and improved, various versions of Digital Basics were created to help folks learn to improve their images at the computer during post processing. Save an incredible $86.00 by purchasing the Digital Basics Collection here. Folks who own one or two of the three afore-mentioned products are invited to contact me via e-maill for personalized discount information.
Typos
With all blog posts, feel free to e-mail or to leave a comment regarding any typos or errors.








Non-Kosher, like pork chops or bacon. May taste great but still verboten. Cleaning the beach and losing an ocean may make a great ham sandwich but is not Kosher. Why most photo contests don’t allow it.
Philly Cheesesteak
Also good.
a
Thanks, Jeff. You are correct in that most contests would not allow the clean-up. But for me, it is quite kosher. At the very worst, a photo illustration.
much love, artie
No, I totally get it. It’s Artie’s art. Birds as Art. But, you asked.
>> “. . . to tell the truth, the whole truth, and nothing but the truth so help me St. Nikon ”
Does that oath conform to photographic canon? : )
I was asking the same question with regard to Sony!
with love, artie
I really don’t have any issues with any of the post-processing done to this image, and for several reasons; nothing was done to manipulate/misrepresent the Oystercatcher; nothing was introduced to the scene that in any way fundamentally changed the scene; you are forthcoming about what you did it maximize the image’s potential. I may have removed all of the seaweed and left the small sliver of the ocean, but that said? Totally kosher IMHO.
Thanks, John. Different strokes — would you like corned beef on rye or chicken liver?
with love, artie
ps: I did not like the Atlantic touching the wingtip.