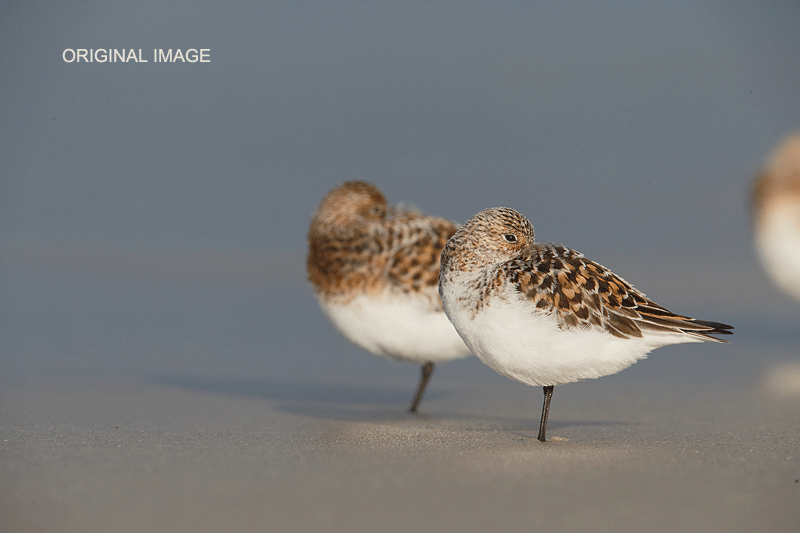
Two sensors to the right (yes to the right–see the original capture below) of the central sensor/AI Servo-Surround/Rear Focus on right hand bird’s upper back active at the moment of exposure. Click here if you missed the Rear Focus Tutorial. Click on the image to see the new even larger version.
And every time I’ve held a rose It seems I only felt the thorns…
Roseate Tern exhibits a rosy blush on the breast at the height of breeding plumage. As I mentioned here before, it is most evident in soft light and is rarely noticeably at all on sunny days. It is quite evident in the image above, enhanced a bit by an increase in Saturation. See below for more on the optimization of this image.
I was looking for a quote relating to the word “rose” or “rosy” to title this blog post and came upon “But he that dares not grasp the thorn Should never crave the rose.” (Anne Bronte, English poet and novelist, 1820-1849.) That brought to mind one of my favorite-ever songs, “And So It Goes. (Music and lyrics by Billy Joel.) In haunting tones, the song begins like this:
In every heart there is a room
A sanctuary safe and strong
To heal the wounds from lovers past
Until a new one comes along
I spoke to you in cautious tones
You answered me with no pretense
And still I feel I said too much
My silence is my self defense
And every time I’ve held a rose
It seems I only felt the thorns
And so it goes, and so it goes
And so will you soon I suppose
Click here to hear the song (sung by a very young Billy Joel). In case you have not figured it out by now I am a huge Billy Joel fan. What is your favorite Billy Joel tune?
The volunteer researchers on Great Gull Island (including me on my recent visit) get to deal with a few thorns of their own. The terns poop on you all day long as you go about your chores. If you let your guard down for a moment, they peck at your head often drawing blood. At times they will strike you on your shoulders, and when you bend over to mark a nest your butt is theirs (so to speak). But well worth it. Those rosy Roseate Terns are gorgeous.
The first Common Tern chicks hatched either yesterday or today and things will be getting really busy on GGI over the next few weeks as the peak of hatching approaches.
This is a screen capture of the BreezeBrowser Main View. Note that the selected AF point is illuminated in red. With Surround the 8 surrounding AF points are active.
BreezeBrowser Main View Screen Capture
Above is the BreezeBrowser Main View screen capture for today’s image. The illuminated red square shows that I moved the active sensor two to the right of the central sensor. Why to the right? I was photographing another tern on another rock. That bird was facing to my right. When I saw this bird nearby begin to display I simply focused on fired without caring about the composition. I did not have time to switch the AF sensor and I did not want to miss the image. See my comments on the image optimization below.
Note: in Breezebrowser you need to make sure to check Show Focus Points under View to activate this feature. To see the focus points in DPP check AF Point under View or hit Alt L. Regular readers know that I use and depend on BreezeBrowser every day of the year. It allows me to sort my keepers and deletes the rejects faster than any other browsing program. We use it on the main computer in the home office to catalog our images file-drawer style. And the companion program, Downloader Pro allows me to download my images quickly and conveniently. It automatically adds my IPTC data and the shooting location. I have it set up to create a folder named by the Month/date/year. The Breezebrowser/Downloader Pro combo saves me many hours each week. To learn earn more or to purchase this great PC only program, click here.
The Image Optimization
The image optimization was easy. After converting the RAW file in DPP I used several of the techniques that I learned in APTATS II to move the bird well left in the frame so that I wound up with a pleasing composition. Then I worked on the dark cap and the bill running my favorite 50-50 Nik Color Efex Pro recipe and reducing the opacity to 50% and following that up with a 15/65/0 Contrast Mask.
All of the above of course as described in detail in Digital Basics File, an instructional PDF that is sent via e-mail. It includes my complete digital workflow, dozens of great Photoshop tips including Digital Eye Doctor techniques, several different ways of expanding canvas, all of my time-saving Keyboard Shortcuts, and Layer Masking and NIK Color Efex Pro basics.
1D X AF & DPP e-Guides
To learn everything that I know about the great 1D X AF system check out our 1D X AF Guide here. To learn how I convert all of my images in DPP check out the DPP Raw Conversion Guide here.
Help Keep Great Gull Island Open For Terns!
This spring crews are continuing to fight vegetation and to rebuild most of the blinds to be ready for the terns when they arrive. 31 of 34 blinds, many already in dire need of repair, were finished off by Hurricane Sandy. Crews are ready to help with both of these projects, but the GGI Project needs funds to purchase lumber and equipment. Contributions of all sizes are both welcome and appreciated AND are tax deductible! Please make checks payable to: AMNH, and send them to:
Great Gull Island Project/AMNH, Department of Ornithology, American Museum of Natural History, Central Park West and 79th Street, New York, NY 10024
GGI’s best-ever dock, completed in 2010, was totaled by Sandy. The project is looking to FEMA for help but as above, any and all donations would be greatly appreciated. You can learn more about Great Gull Island here and visit the GGI Blog here.
Typos
On all blog posts, feel free to e-mail or leave a comment regarding any typos, wrong words, misspellings, omissions, or grammatical errors. Just be right. 🙂
Support the BAA Blog. Support the BAA Bulletins: Shop B&H here!
We want and need to keep providing you with the latest free information, photography and Photoshop lessons, and all manner of related information. Show your appreciation by making your purchases immediately after clicking on any of our B&H or Amazon Affiliate links in this blog post. Remember, B&H ain’t just photography!
If you are considering an item for purchase or comparison shopping be sure to place an item in your cart to see the too-low-to show the actual price. In many cases the prices are so low that B&H is forbidden from publicizing them!
If you are considering an item for purchase or comparison shopping be sure to place an item in your cart to see the too-low-to show the actual price. In many cases the prices are so low that B&H is forbidden from publicizing them!
Support the Blog
Amazon
Everyone buys something from Amazon, be it a big lens or deodorant. Support the blog by starting your search by typing in the little white box below. No purchase is too small to be appreciated; they all add up. Why make it a habit? Because I make it a habit of bringing you new images and information on an almost daily basis.
And from the BAA On-line Store:
LensCoats. I have a LensCoat on each of my big lenses to protect them from nicks and thus increase their re-sales value. All my big lens LensCoat stuff is in Hardwood Snow pattern. LegCoat Tripod Leg Covers. I have four tripods active and each has a Hardwood Snow LegCoat on it to help prevent further damage to my tender shoulders 🙂 And you will love them in mega-cold weather…. Gitzo GT3532 LS CF Tripod. This one replaces the GT3530LS Tripod and will last you a lifetime. Learn more about this great tripod here. Mongoose M3.6 Tripod Head. Right now this is the best tripod head around for use with lenses that weigh less than 9 pounds. For heavier lenses, check out the Wimberley V2 head. Double Bubble Level. You will find one in my camera’s hot shoe whenever I am not using flash. The Lens Align Mark II. I use the Lens Align Mark II pretty much religiously to micro-adjust all of my gear an average of once a month and always before a major trip. Enjoy our free comprehensive tutorial here. BreezeBrowser. I do not see how any digital photographer can exist without this program. Delkin Flash Cards. I use and depend on Delkin compact Flash Cards and card readers most every day. Learn more about their great 700X and 1000X cards here or about my favorite Delkin card here.
Central sensor Surround/AI Servo/Rear Focus on the forward part of the near wing near the body active at the moment of exposure. Click here if you missed the Rear Focus Tutorial. Click on the image to see a larger version.
Try This One…
In the last blog post, Photoshop Hanky Panky, I asked if folks saw anything that indicated that I had done any extensive image optimization in Photoshop. Aside from two comments about possible halos by the legs (see image next), the general consensus was that there were no indications of any monkeying around.
So let’s try it again. If you can detect any evidence of Photoshop chicanery, please leave a comment and state your case. Let us know if you think that I have removed a bird or birds or a rock or rocks from the background. How about a rope or a wooden structure? Might I have replaced the bird’s eye or even worse, its whole head? Do you see any funky looking pixels or evidence of sloppy Clone Stamp Tool work? Be sure to click on the image to see the larger version as you gather evidence of manipulation.
In any case, please let us know by leaving a comment. I will tell all and share the original capture for both of these Roseate Tern images in two days.
This 141% crop was made from an image that was created with the tripod-mounted Canon EF 600mm f/4L IS II USM lens and the Canon EOS 5D Mark III. ISO 400. Evaluative metering -2/3 stop: 1/2500 sec. at f/7.1 in Manual Mode.
Leg Halos?
In yesterday’s aforementioned blog post, two folks left comments stating that the area around the bird’s left looked a bit funky. That area looks fine to me. Is anyone seeing anything problematic there?
Typos
On all blog posts, feel free to e-mail or leave a comment regarding any typos, wrong words, misspellings, omissions, or grammatical errors. Just be right. 🙂
Support the BAA Blog. Support the BAA Bulletins: Shop B&H here!
We want and need to keep providing you with the latest free information, photography and Photoshop lessons, and all manner of related information. Show your appreciation by making your purchases immediately after clicking on any of our B&H or Amazon Affiliate links in this blog post. Remember, B&H ain’t just photography!
If you are considering an item for purchase or comparison shopping be sure to place an item in your cart to see the too-low-to show the actual price. In many cases the prices are so low that B&H is forbidden from publicizing them!
If you are considering an item for purchase or comparison shopping be sure to place an item in your cart to see the too-low-to show the actual price. In many cases the prices are so low that B&H is forbidden from publicizing them!
Support the Blog
Amazon
Everyone buys something from Amazon, be it a big lens or deodorant. Support the blog by starting your search by typing in the little white box below. No purchase is too small to be appreciated; they all add up. Why make it a habit? Because I make it a habit of bringing you new images and information on an almost daily basis.
And from the BAA On-line Store:
LensCoats. I have a LensCoat on each of my big lenses to protect them from nicks and thus increase their re-sales value. All my big lens LensCoat stuff is in Hardwood Snow pattern. LegCoat Tripod Leg Covers. I have four tripods active and each has a Hardwood Snow LegCoat on it to help prevent further damage to my tender shoulders 🙂 And you will love them in mega-cold weather…. Gitzo GT3532 LS CF Tripod. This one replaces the GT3530LS Tripod and will last you a lifetime. Learn more about this great tripod here. Mongoose M3.6 Tripod Head. Right now this is the best tripod head around for use with lenses that weigh less than 9 pounds. For heavier lenses, check out the Wimberley V2 head. Double Bubble Level. You will find one in my camera’s hot shoe whenever I am not using flash. The Lens Align Mark II. I use the Lens Align Mark II pretty much religiously to micro-adjust all of my gear an average of once a month and always before a major trip. Enjoy our free comprehensive tutorial here. BreezeBrowser. I do not see how any digital photographer can exist without this program. Delkin Flash Cards. I use and depend on Delkin compact Flash Cards and card readers most every day. Learn more about their great 700X and 1000X cards here or about my favorite Delkin card here.
This image was created at 6:44 am on the early morning of June 5, 2013 on Great Gull Island with the tripod-mounted Canon EF 600mm f/4L IS II USM lens and the Canon EOS 5D Mark III. ISO 400. Evaluative metering -2/3 stop: 1/2500 sec. at f/7.1 in Manual Mode.
One sensor below and two to the right of the central sensor/AI Servo Surround/Rear just below and behind the tern’s eye active at the moment of exposure. Click here if you missed the Rear Focus Tutorial. Click on the image to see a larger version.
Roseate Tern
The main reason that I made the trip to Great Gull Island was to photograph Roseate Tern. Why? How many folks do you know who have had a chance to photograph this endangered species?
Photoshop Hanky Panky?
If you can detect any evidence of Photoshop hanky panky, please leave a comment and state your case. Let us know if you think that I have removed a bird or birds or a rock or rocks from the background. How about a rope or a wooden structure? Might I have replaced the bird’s eye or even worse, its whole head? Do you see any funky looking pixels or evidence of sloppy Clone Stamp Tool work? Be sure to click on the image to see the larger version as you gather evidence of excessive manipulation.
In any case, please let us know by leaving a comment. I will tell all and share the original capture in two days.
Help Keep Great Gull Island Open For Terns!
This spring crews are continuing to fight vegetation and to rebuild most of the blinds to be ready for the terns when they arrive. 31 of 34 blinds, many already in dire need of repair, were finished off by Hurricane Sandy. Crews are ready to help with both of these projects, but the GGI Project needs funds to purchase lumber and equipment. Contributions of all sizes are both welcome and appreciated AND are tax deductible! Please make checks payable to: AMNH, and send them to:
Great Gull Island Project/AMNH, Department of Ornithology, American Museum of Natural History, Central Park West and 79th Street, New York, NY 10024
Kudos to Julianna Barrett (UCONN) and Suzanne Peyton (USFWS) who obtained grants to expand the Roseate Tern terraces and rebuild the observation blinds but more help is always needed. Not to mention that the GGI’s best-ever dock that was completed in 2010 was totaled by Sandy. The project is looking to FEMA for help but as above, any and all donations would be greatly appreciated.
You can learn more about Great Gull Island here and visit the GGI Blog here.
Typos
On all blog posts, feel free to e-mail or leave a comment regarding any typos, wrong words, misspellings, omissions, or grammatical errors. Just be right. 🙂
Support the BAA Blog. Support the BAA Bulletins: Shop B&H here!
We want and need to keep providing you with the latest free information, photography and Photoshop lessons, and all manner of related information. Show your appreciation by making your purchases immediately after clicking on any of our B&H or Amazon Affiliate links in this blog post. Remember, B&H ain’t just photography!
If you are considering an item for purchase or comparison shopping be sure to place an item in your cart to see the too-low-to show the actual price. In many cases the prices are so low that B&H is forbidden from publicizing them!
If you are considering an item for purchase or comparison shopping be sure to place an item in your cart to see the too-low-to show the actual price. In many cases the prices are so low that B&H is forbidden from publicizing them!
Support the Blog
Amazon
Everyone buys something from Amazon, be it a big lens or deodorant. Support the blog by starting your search by typing in the little white box below. No purchase is too small to be appreciated; they all add up. Why make it a habit? Because I make it a habit of bringing you new images and information on an almost daily basis.
And from the BAA On-line Store:
LensCoats. I have a LensCoat on each of my big lenses to protect them from nicks and thus increase their re-sales value. All my big lens LensCoat stuff is in Hardwood Snow pattern. LegCoat Tripod Leg Covers. I have four tripods active and each has a Hardwood Snow LegCoat on it to help prevent further damage to my tender shoulders 🙂 And you will love them in mega-cold weather…. Gitzo GT3532 LS CF Tripod. This one replaces the GT3530LS Tripod and will last you a lifetime. Learn more about this great tripod here. Mongoose M3.6 Tripod Head. Right now this is the best tripod head around for use with lenses that weigh less than 9 pounds. For heavier lenses, check out the Wimberley V2 head. Double Bubble Level. You will find one in my camera’s hot shoe whenever I am not using flash. The Lens Align Mark II. I use the Lens Align Mark II pretty much religiously to micro-adjust all of my gear an average of once a month and always before a major trip. Enjoy our free comprehensive tutorial here. BreezeBrowser. I do not see how any digital photographer can exist without this program. Delkin Flash Cards. I use and depend on Delkin compact Flash Cards and card readers most every day. Learn more about their great 700X and 1000X cards here or about my favorite Delkin card here.
More Thoughts on the Canon 200-400 f/4L IS and the Series II Super-telephoto Lenses
In the blog post that noted the announcement of the long awaited Canon EF 200-400mm f/4L IS USM Lens with Internal 1.4x Extender, I wrote, “It promises to be a great lens for wildlife and for trips to places like Africa, the Southern Ocean, and the Galapagos. At $11,799, it is quite pricey. I will surely try to borrow one before I buy one.”
So here I am at my Mom’s in Holbrook, Long Island, NY, getting ready to fly back to Florida on Monday morning. I will be leaving for my two-week Galapagos Photo-Cruise on June 30, and then heading to Africa departing on August 1. I currently own the 300mm f/2.8L IS II, the 500mm f/4L IS II, and the 600mm f/4L IS II. Along with the 70-200mm f/2.8L IS II and two set of Series III teleconverters (2 @ 1.4x EF Extender III and 2x EF Extender III).
I used the 500mm f/4L IS II only a bit before I received my 600mm f/4L IS II. Since that time I have rarely used it and never traveled with it always opting for the greater reach of the 600 with my three full frame bodies–2 EOS-1D X bodies and my 5D Mark III.
I had always assumed that I would be bringing the 500 II to the Galapagos and still might go that route. But, there are at least three others on the trip who will be bringing their 600 IIs. And I just hate to be short man on the totem pole. In any case, the 300 II will be invaluable on the cruise for flight photography and for our panga (zodiac) cruises. And the 70-200 II is a necessity. So here is the problem: even if I could borrow a 200-400 for the trip to the archipelago there is simply no way that I could get it all there along with the three camera bodies, the 24-105, and the 15mm fish eye lens.
One must consider the option of making the trip with a 200-400 and without the 500 or 600mm. The 200-400 with the internal 1.4X TC in place and a second 1.4X TC added externally would yield an equivalent focal length of 784mm. This would be well on the short side as compared to either the 500 II or the 600 II with the 2X TC. Those work out to 1000 and 1200mm equivalent focal lengths respectively.
Another possibility would be to travel with the 200-400 and either the 500 or 600 II while leaving the 300 II at home. I have one very big problem with that. The 300 II is a superb flight lens, one that I can easily hand hold. The 200-400 does of course offer greater flexibility than the 300 II but, and this is a very big but: the 300 II weighs only 5.19 pounds while the 200-400 comes in at a relatively whopping 7.98 pounds, almost three pounds heavier than the new 300. The 200-400 weighs more than the 500 II at 7.04 pounds but less than the 600 II that weighs 8.65 pounds. Call me a wimp if you will, but I can hand hold the 500 II for short periods of time for both flight and routine bird photography. I can hand hold the 600 II only for a few seconds at most for flight photography and barely at all for routine photography. So ix-nay on that idea at least for me.
After getting my thoughts down here in writing I am thinking of taking the 500 II as my big lens to the Galapagos along with the 300 II and the other lenses mentioned above. But I still might go with the 600 as my big lens for the cruise. I am pretty sure that Denise Ippolito is going with the 300 II as her big lens for the trip.
That brings us to Africa. I know that Todd Gustafson travels routinely to Africa with his Nikon 600, a Nikon 200-400, a Nikon 28-300, a 10.5mm fish eye, and only two Nikon D4 camera bodies. But Todd is much younger and stronger than I am and can easily hand hold his Nikon 200-400 for flight. He absolutely loves, kills with, and swears by his 200-400 in Africa. I just got off the phone with him and have pretty much decided to sell my 500 II–heck, I rarely use it anymore, and purchase the 200-400. I am pretty sure that I can make it to Africa with the 600 II and the 200-400 while leaving the 300 at home. Or not. Yikes!
A final thought on a Southern Ocean trip (aka The Falklands, South Georgia, and possibly Antarctica): the Canon 200-400mm with the internal TC is pretty much perfect for that trip as the birds are both tame and curious. Though I would leave the 600 II at home I would surely have the 300 II along for flight photography and, with the 2X II TC, as a back-up big lens.
As soon as I order my 200-400 I will likely be offering my 500 II for sale….
You can find complete Canon telephoto lens specs here; be sure to bookmark this page for quick reference. The chart now includes data for the new Canon 200-400.
Questions?
If you have a question or a suggestion on anything above please leave a comment; I will reply asap.
BIRDS AS ART Bulletin #442
BIRDS AS ART Bulletin #442 is online and can be accessed here.
Great Gull Island Visit
Image Optimization Lessons
The Blog is the Bomb!
Japan in Winter
Alan Murphy’s Photography e-Guides
Affiliate Links
Used Camera Gear
IPT Info
Typos
On all blog posts, feel free to e-mail or leave a comment regarding any typos, wrong words, misspellings, omissions, or grammatical errors. Just be right. 🙂
Support the BAA Blog. Support the BAA Bulletins: Shop B&H here!
We want and need to keep providing you with the latest free information, photography and Photoshop lessons, and all manner of related information. Show your appreciation by making your purchases immediately after clicking on any of our B&H or Amazon Affiliate links in this blog post. Remember, B&H ain’t just photography!
If you are considering an item for purchase or comparison shopping be sure to place an item in your cart to see the too-low-to show the actual price. In many cases the prices are so low that B&H is forbidden from publicizing them!
If you are considering an item for purchase or comparison shopping be sure to place an item in your cart to see the too-low-to show the actual price. In many cases the prices are so low that B&H is forbidden from publicizing them!
Support the Blog
Amazon
Everyone buys something from Amazon, be it a big lens or deodorant. Support the blog by starting your search by typing in the little white box below. No purchase is too small to be appreciated; they all add up. Why make it a habit? Because I make it a habit of bringing you new images and information on an almost daily basis.
And from the BAA On-line Store:
LensCoats. I have a LensCoat on each of my big lenses to protect them from nicks and thus increase their re-sales value. All my big lens LensCoat stuff is in Hardwood Snow pattern. LegCoat Tripod Leg Covers. I have four tripods active and each has a Hardwood Snow LegCoat on it to help prevent further damage to my tender shoulders 🙂 And you will love them in mega-cold weather…. Gitzo GT3532 LS CF Tripod. This one replaces the GT3530LS Tripod and will last you a lifetime. Learn more about this great tripod here. Mongoose M3.6 Tripod Head. Right now this is the best tripod head around for use with lenses that weigh less than 9 pounds. For heavier lenses, check out the Wimberley V2 head. Double Bubble Level. You will find one in my camera’s hot shoe whenever I am not using flash. The Lens Align Mark II. I use the Lens Align Mark II pretty much religiously to micro-adjust all of my gear an average of once a month and always before a major trip. Enjoy our free comprehensive tutorial here. BreezeBrowser. I do not see how any digital photographer can exist without this program. Delkin Flash Cards. I use and depend on Delkin compact Flash Cards and card readers most every day. Learn more about their great 700X and 1000X cards here or about my favorite Delkin card here.
This image was created this morning, June 5, 2013 on Great Gull Island with the tripod-mounted Canon EF 600mm f/4L IS II USM lens and the Canon EOS 5D Mark III. ISO 400. Evaluative metering -2/3 stop: 1/3200 sec. at f/8 in Manual Mode.
One sensor below the central sensor Surround/AI Servo/Rear Focus AF barely on the subject’s tail active at the moment of exposure. Click here if you missed the Rear Focus Tutorial. Click on the image to see a larger version.
My Pissed Off Pano Opinions
In the “Pissed Off Pano Questions post here, I asked, Which optimized version better tells the story? Which is more dramatic? Which is the better photograph? Why?
Which optimized version better tells the story? Of the two optimized versions, Version 1 tells the story as the pissed off bird had been perched on the rock. Even though just a cropped version two is somewhat of a lie. I think that most experienced birders would realize from either version I or the original that the pissed off bird had been perched on the rock until it was displaced by the incoming bird.
Thanks to all the folks who commented. I never considered for one second eliminating the wing of the incoming bird as it is a vital part of the story. Remember, while I am the first to clean things up I strive to tell the real story, to share with the viewers what was going on when I pressed the shutter button.
Which is more dramatic?
For me, version II is the most dramatic but also the least truthful.
Which is the better photograph?
When I wrote the blog post I felt strongly that Version 1 was the strongest of the three. I did, however, listen to you all to some degree and created the third version that includes a bit more rock.
I did not like the original composition at all. I wanted to bring the wing of the intruder into the frame from the upper left corner. After doing that, leaving the whole rock left me with a too-boxy composition. Kudos to Nick Clayton on his thoughts on the image design. He was the only one who figgered out what I was thinking :).
And yes, I went with the 5D III for more pixels on the subject and because I was using the 1D X on the 300 II for flight photography.
Any questions? Please feel free to leave a comment.
The Big Lesson
As I wrote in The Art of Bird Photography II, when unexpected action occurs, push the shutter button. Folks, it’s digital. If you waste a frame, it will not cost you one cent. Try to force, train, or otherwise get yourself to push the button the instant anything moves. On occasion, you will be rewarded.
Help Keep Great Gull Island Open For Terns!
This spring crews are continuing to fight vegetation and to rebuild most of the blinds to be ready for the terns when they arrive. 31 of 34 blinds, many already in dire need of repair, were finished off by Hurricane Sandy. Crews are ready to help with both of these projects, but the GGI Project needs funds to purchase lumber and equipment. Contributions of all sizes are both welcome and appreciated AND are tax deductible! Please make checks payable to: AMNH, and send them to:
Great Gull Island Project/AMNH, Department of Ornithology, American Museum of Natural History, Central Park West and 79th Street, New York, NY 10024
Kudos to Julianna Barrett (UCONN) and Suzanne Peyton (USFWS) who obtained grants to expand the Roseate Tern terraces and rebuild the observation blinds but more help is always needed. Not to mention that the GGI’s best-ever dock that was completed in 2010 was totaled by Sandy. The project is looking to FEMA for help but as above, any and all donations would be greatly appreciated.
You can learn more about Great Gull Island here and visit the GGI Blog here.
Typos
On all blog posts, feel free to e-mail or leave a comment regarding any typos, wrong words, misspellings, omissions, or grammatical errors. Just be right. 🙂
Support the BAA Blog. Support the BAA Bulletins: Shop B&H here!
We want and need to keep providing you with the latest free information, photography and Photoshop lessons, and all manner of related information. Show your appreciation by making your purchases immediately after clicking on any of our B&H or Amazon Affiliate links in this blog post. Remember, B&H ain’t just photography!
If you are considering an item for purchase or comparison shopping be sure to place an item in your cart to see the too-low-to show the actual price. In many cases the prices are so low that B&H is forbidden from publicizing them!
If you are considering an item for purchase or comparison shopping be sure to place an item in your cart to see the too-low-to show the actual price. In many cases the prices are so low that B&H is forbidden from publicizing them!
Support the Blog
Amazon
Everyone buys something from Amazon, be it a big lens or deodorant. Support the blog by starting your search by typing in the little white box below. No purchase is too small to be appreciated; they all add up. Why make it a habit? Because I make it a habit of bringing you new images and information on an almost daily basis.
And from the BAA On-line Store:
LensCoats. I have a LensCoat on each of my big lenses to protect them from nicks and thus increase their re-sales value. All my big lens LensCoat stuff is in Hardwood Snow pattern. LegCoat Tripod Leg Covers. I have four tripods active and each has a Hardwood Snow LegCoat on it to help prevent further damage to my tender shoulders 🙂 And you will love them in mega-cold weather…. Gitzo GT3532 LS CF Tripod. This one replaces the GT3530LS Tripod and will last you a lifetime. Learn more about this great tripod here. Mongoose M3.6 Tripod Head. Right now this is the best tripod head around for use with lenses that weigh less than 9 pounds. For heavier lenses, check out the Wimberley V2 head. Double Bubble Level. You will find one in my camera’s hot shoe whenever I am not using flash. The Lens Align Mark II. I use the Lens Align Mark II pretty much religiously to micro-adjust all of my gear an average of once a month and always before a major trip. Enjoy our free comprehensive tutorial here. BreezeBrowser. I do not see how any digital photographer can exist without this program. Delkin Flash Cards. I use and depend on Delkin compact Flash Cards and card readers most every day. Learn more about their great 700X and 1000X cards here or about my favorite Delkin card here.
This image was created just before 7pm on June 5, 2013 on Great Gull Island with the tripod-mounted Canon EF 600mm f/4L IS II USM lens and the Canon EOS 5D Mark III. ISO 400. Evaluative metering at zero: 1/4000 sec. at f/6.3 in Manual Mode.
One sensor below the central sensor Surround/AI Servo/Rear Focus AF on the flock active at the moment of exposure. I was amazed at how well this AF Area Selection Mode acquired and held focus with the fairly proximal background. Click here if you missed the Rear Focus Tutorial. Click on the image to see a larger version.
Dynamic Flock Flight
The tern colony at GGI is always a noisy place even when there are no researchers around and you are completely covered up with a Summer Weight Kwik Camo Throwover Blind. But every so often all the birds on a given end of the island take silent flight; it can be very eerie. One second screaming, shrieking, deafening bedlam; the next second, a loud whoosh followed by silence. The phenomenon is known as a dread flight and nobody knows why they occur.
Yesterday afternoon the wind was just right and the AF system of the 5D III performed admirably. I made about 25 images in the series; the one above was my very favorite. As you can see by looking at the original image below, it needed to be leveled. In addition, I cleaned up the edges quite a bit. See more on that below.
If you click on the image to see the larger size most will be able to pick out the lighter mantled Roseate Tern from among the more common Common Terns.
This is the original capture.
The Image Optimization
The image was leveled using my Keyboard Shortcuts: R for the Ruler Tool and Control + / for Image/Rotate/ Arbitrary. Using the shortcuts saves a ton of time as compared to using the most annoying drop-down menu. I cleaned up the birds on the edges using both the Clone Stamp Tool and the Patch Tool. I eliminated several merges uses Quick Masks with Layer Masks added. The unwanted single birds in the sky were removed with the Clone Stamp Tool; those against the blue water were eliminated with Quick Masks and fine-tuned with Layer Masks.
All of the above of course as described in detail in Digital Basics File, an instructional PDF that is sent via e-mail. It includes my complete digital workflow, dozens of great Photoshop tips including Digital Eye Doctor techniques, several different ways of expanding canvas, all of my time-saving Keyboard Shortcuts, and Layer Masking and NIK Color Efex Pro basics.
This is a screen capture of the BreezeBrowser Main View. Note that the selected AF point is illuminated in red. With Surround the 8 surrounding AF points are active.
BreezeBrowser Main View Screen Capture
Above is the BreezeBrowser Main View screen capture for the image. The illuminated red square shows that I moved the active sensor one down from the central sensor. Note that since I was working with Surround as my AF Area Selection Mode that were 8 additional active AF sensors. In Breezebrowser you need to make sure to check Show Focus Points under View to activate this feature. To see the focus points in DPP check AF Point under View or hit Alt L.
Regular readers know that I use and depend on BreezeBrowser every day of the year. It allows me to sort my keepers and deletes the rejects faster than any other browsing program. We use it on the main computer in the home office to catalog our images file-drawer style. And the companion program, Downloader Pro allows me to download my images quickly and conveniently. It automatically adds my IPTC data and the shooting location. I have it set up to create a folder named by the Month/date/year. The Breezebrowser/Downloader Pro combo saves me many hours each week. To learn earn more or to purchase this great PC only program, click here.
To learn everything that I know about the great 1D X AF system check out our 1D X AF Guide here. To learn how I convert all of my images in DPP check out the DPP Raw Conversion Guide here.
Pissed Off Pano Questions
Do check out the comments on yesterday’s blog post, “Pissed Off Pano Questions,” I am thinking that everyone is way off base. My views coming soon.
Last 2013 Short Notice, Dirt Cheap, In-the-Field Nickerson Beach Photographic Instruction with Arthur Morris
June 8 (pm) and June 9 (am & pm). Afternoons with west winds can be great. Morning sessions run from 5am sharp-9:30 am. Afternoon sessions from 4pm til whenever. These are priced so low that you need to e-mail for the rates. Limit 5/session.
If you e-mail, please include all phone numbers. Payment in full due immediately via credit card after calling the office on a weekday: 863-221-2372. If you would like to join me, please get in touch via e-mail. Breeding American Oystercatcher (chicks likely) and Piping Plover (chicks possible). Common Tern and Black Skimmer/courtship behaviors. Herring and Great Black-backed Gulls. Lots of flight photography when the wind is right. Learn digital exposure and creative image design. Learn to create pleasing blurs at 5am. As I will be living and photographing on Great Gull Island for a week from the afternoon of May 30 until the late afternoon of June 6 and may not have internet access, do sign up and be patient. You will hear from me via e-mail early on June 7th if not the previous evening.
5D Mark III User’s Guide
Learn everything that I know about the EOS-5D Mark III including how I set up my camera for in-camera HDRs in the 5D Mark III User’s Guide. This guide also includes info on the following: 5D III exposure fine points, handling the WHITEs, the top LCD and all camera control buttons, all 5D Mark III drive modes, how to manually select an AF sensor, choosing an AF Area Selection Mode/how and why (includes extensive detail), and Menu Item Access. Coverage of almost all Menu Items and Custom Functions including the following: Image Quality, Auto Lighting Optimizer, Highlight Tone Priority, AF Configuration Tool (includes details on the custom setting that I use), Acceleration/deceleration tracking, Tracking sensitivity, Lens drive when AF impossible, Orientation linked AF point (I love this feature on the 5D III!), Highlight alert, Histogram display, Auto rotate, Custom Shooting Mode set-up, Safety shift, using the Q button, and setting up rear focus. The guide is–of course–written in my informal, easy-to-follow style.
Help Keep Great Gull Island Open For Terns!
This spring crews are continuing to fight vegetation and to rebuild most of the blinds to be ready for the terns when they arrive. 31 of 34 blinds, many already in dire need of repair, were finished off by Hurricane Sandy. Crews are ready to help with both of these projects, but the GGI Project needs funds to purchase lumber and equipment. Contributions of all sizes are both welcome and appreciated AND are tax deductible! Please make checks payable to: AMNH, and send them to:
Great Gull Island Project/AMNH, Department of Ornithology, American Museum of Natural History, Central Park West and 79th Street, New York, NY 10024
GGI’s best-ever dock, completed in 2010, was totaled by Sandy. The project is looking to FEMA for help but as above, any and all donations would be greatly appreciated. You can learn more about Great Gull Island here and visit the GGI Blog here.
Typos
On all blog posts, feel free to e-mail or leave a comment regarding any typos, wrong words, misspellings, omissions, or grammatical errors. Just be right. 🙂
Support the BAA Blog. Support the BAA Bulletins: Shop B&H here!
We want and need to keep providing you with the latest free information, photography and Photoshop lessons, and all manner of related information. Show your appreciation by making your purchases immediately after clicking on any of our B&H or Amazon Affiliate links in this blog post. Remember, B&H ain’t just photography!
If you are considering an item for purchase or comparison shopping be sure to place an item in your cart to see the too-low-to show the actual price. In many cases the prices are so low that B&H is forbidden from publicizing them!
If you are considering an item for purchase or comparison shopping be sure to place an item in your cart to see the too-low-to show the actual price. In many cases the prices are so low that B&H is forbidden from publicizing them!
Support the Blog
Amazon
Everyone buys something from Amazon, be it a big lens or deodorant. Support the blog by starting your search by typing in the little white box below. No purchase is too small to be appreciated; they all add up. Why make it a habit? Because I make it a habit of bringing you new images and information on an almost daily basis.
And from the BAA On-line Store:
LensCoats. I have a LensCoat on each of my big lenses to protect them from nicks and thus increase their re-sales value. All my big lens LensCoat stuff is in Hardwood Snow pattern. LegCoat Tripod Leg Covers. I have four tripods active and each has a Hardwood Snow LegCoat on it to help prevent further damage to my tender shoulders 🙂 And you will love them in mega-cold weather…. Gitzo GT3532 LS CF Tripod. This one replaces the GT3530LS Tripod and will last you a lifetime. Learn more about this great tripod here. Mongoose M3.6 Tripod Head. Right now this is the best tripod head around for use with lenses that weigh less than 9 pounds. For heavier lenses, check out the Wimberley V2 head. Double Bubble Level. You will find one in my camera’s hot shoe whenever I am not using flash. The Lens Align Mark II. I use the Lens Align Mark II pretty much religiously to micro-adjust all of my gear an average of once a month and always before a major trip. Enjoy our free comprehensive tutorial here. BreezeBrowser. I do not see how any digital photographer can exist without this program. Delkin Flash Cards. I use and depend on Delkin compact Flash Cards and card readers most every day. Learn more about their great 700X and 1000X cards here or about my favorite Delkin card here.
This image was created this morning, June 5, 2013 on Great Gull Island with the tripod-mounted Canon EF 600mm f/4L IS II USM lens and the Canon EOS 5D Mark III. ISO 400. Evaluative metering -2/3 stop: 1/3200 sec. at f/8 in Manual Mode.
One sensor below the central sensor Surround/AI Servo/Rear Focus AF barely on the subject’s tail active at the moment of exposure. Click here if you missed the Rear Focus Tutorial. Click on the image to see a larger version.
The Original
The image above is the original image. I was happy to get all of the subject in the frame.
This is my first version.
The Situation
I was photographing a very nice looking Common Tern on the triangular rock perch. It was wearing a single aluminum band. Another bird flew in and chased it off its perch. I fired twice; the first image is presented here.
This is the second version.
Pissed Off Pano Questions
Which optimized version better tells the story? Which is more dramatic? Which is the better photography? Why?
EOS-5D Mark III
Can you come up with two reasons why I was using the 5D III on the 600 II? My 1D X is fine.
Help Keep Great Gull Island Open For Terns!
This spring crews are continuing to fight vegetation and to rebuild most of the blinds to be ready for the terns when they arrive. 31 of 34 blinds, many already in dire need of repair, were finished off by Hurricane Sandy. Crews are ready to help with both of these projects, but the GGI Project needs funds to purchase lumber and equipment. Contributions of all sizes are both welcome and appreciated AND are tax deductible! Please make checks payable to: AMNH, and send them to:
Great Gull Island Project/AMNH, Department of Ornithology, American Museum of Natural History, Central Park West and 79th Street, New York, NY 10024
Kudos to Julianna Barrett (UCONN) and Suzanne Peyton (USFWS) who obtained grants to expand the Roseate Tern terraces and rebuild the observation blinds but more help is always needed. Not to mention that the GGI’s best-ever dock that was completed in 2010 was totaled by Sandy. The project is looking to FEMA for help but as above, any and all donations would be greatly appreciated.
You can learn more about Great Gull Island here and visit the GGI Blog here.
Typos
On all blog posts, feel free to e-mail or leave a comment regarding any typos, wrong words, misspellings, omissions, or grammatical errors. Just be right. 🙂
Support the BAA Blog. Support the BAA Bulletins: Shop B&H here!
We want and need to keep providing you with the latest free information, photography and Photoshop lessons, and all manner of related information. Show your appreciation by making your purchases immediately after clicking on any of our B&H or Amazon Affiliate links in this blog post. Remember, B&H ain’t just photography!
If you are considering an item for purchase or comparison shopping be sure to place an item in your cart to see the too-low-to show the actual price. In many cases the prices are so low that B&H is forbidden from publicizing them!
If you are considering an item for purchase or comparison shopping be sure to place an item in your cart to see the too-low-to show the actual price. In many cases the prices are so low that B&H is forbidden from publicizing them!
Support the Blog
Amazon
Everyone buys something from Amazon, be it a big lens or deodorant. Support the blog by starting your search by typing in the little white box below. No purchase is too small to be appreciated; they all add up. Why make it a habit? Because I make it a habit of bringing you new images and information on an almost daily basis.
And from the BAA On-line Store:
LensCoats. I have a LensCoat on each of my big lenses to protect them from nicks and thus increase their re-sales value. All my big lens LensCoat stuff is in Hardwood Snow pattern. LegCoat Tripod Leg Covers. I have four tripods active and each has a Hardwood Snow LegCoat on it to help prevent further damage to my tender shoulders 🙂 And you will love them in mega-cold weather…. Gitzo GT3532 LS CF Tripod. This one replaces the GT3530LS Tripod and will last you a lifetime. Learn more about this great tripod here. Mongoose M3.6 Tripod Head. Right now this is the best tripod head around for use with lenses that weigh less than 9 pounds. For heavier lenses, check out the Wimberley V2 head. Double Bubble Level. You will find one in my camera’s hot shoe whenever I am not using flash. The Lens Align Mark II. I use the Lens Align Mark II pretty much religiously to micro-adjust all of my gear an average of once a month and always before a major trip. Enjoy our free comprehensive tutorial here. BreezeBrowser. I do not see how any digital photographer can exist without this program. Delkin Flash Cards. I use and depend on Delkin compact Flash Cards and card readers most every day. Learn more about their great 700X and 1000X cards here or about my favorite Delkin card here.
Two sensors down and two to the right of the central sensor Surround/AI Servo/Rear Focus on right hand bird’s upper back active at the moment of exposure. Click here if you missed the Rear Focus Tutorial. Click on the image to see a larger version.
Passing Fancy
In the image above, the male, the bird on our left, has just passed a baitfish to its mate. I believe that the prey item is an Atlantic Silversides, the “spearing” of my youth. I used them as for bait for snappers, baby bluefish about 6-8 inches long. Ten inches was a lunker. Helen is excited (assuming that I am correct) as this is the first year in 45 that the terns of GGI have been feeding on this species of baitfish.
I was hand holding the 300 II/2X III/1D X combo while sitting low in the rocks covered up with a Summer Weight Kwik Camo Throwover Blind. I was facing southeast on a somewhat chilly, hazy afternoon. Hand holding gave me a lot more freedom that had I been using the tripod-mounted 600 II. Why was I lucky not to be using the 600 II with the 2X III TC?
If you missed yesterday’s blog post and would like to learn more about Great Gull Island and the most amazing Helen Hays, click here.
This is a screen capture of the BreezeBrowser Main View.
BreezeBrowser Main View Screen Capture
Above is the BreezeBrowser Main View screen capture for the image. The illuminated red square shows that I moved the active sensor 2 down and two to the right of the central sensor. Why did I do that?
Note that since I normally work with Surround as my AF Area Selection Mode that were six rather than the usual eight active AF sensors. In Breezebrowser you need to make sure to check Show Focus Points under View to activate this feature. To see the focus points in DPP check AF Point under View or hit Alt L.
Regular readers know that I use and depend on BreezeBrowser every day of the year. It allows me to sort my keepers and deletes the rejects faster than any other browsing program. We use it on the main computer in the home office to catalog our images file-drawer style. And the companion program, Downloader Pro allows me to download my images quickly and conveniently. It automatically adds my IPTC data and the shooting location. I have it set up to create a folder named by the Month/date/year. The Breezebrowser/Downloader Pro combo saves me many hours each week. To learn earn more or to purchase this great PC only program, click here.
To learn everything that I know about the great 1D X AF system check out our 1D X AF Guide here. To learn how I convert all of my images in DPP check out the DPP Raw Conversion Guide here.
Help Keep Great Gull Island Open For Terns!
This spring crews are continuing to fight vegetation and to rebuild most of the blinds to be ready for the terns when they arrive. 31 of 34 blinds, many already in dire need of repair, were finished off by Hurricane Sandy. Crews are ready to help with both of these projects, but the GGI Project needs funds to purchase lumber and equipment. Contributions of all sizes are both welcome and appreciated AND are tax deductible! Please make checks payable to: AMNH, and send them to:
Great Gull Island Project/AMNH, Department of Ornithology, American Museum of Natural History, Central Park West and 79th Street, New York, NY 10024
Kudos to Julianna Barrett (UCONN) and Suzanne Peyton (USFWS) who obtained grants to expand the Roseate Tern terraces and rebuild the observation blinds but more help is always needed. Not to mention that the GGI’s best-ever dock that was completed in 2010 was totaled by Sandy. The project is looking to FEMA for help but as above, any and all donations would be greatly appreciated.
You can learn more about Great Gull Island here and visit the GGI Blog here.
Typos
On all blog posts, feel free to e-mail or leave a comment regarding any typos, wrong words, misspellings, omissions, or grammatical errors. Just be right. 🙂
Support the BAA Blog. Support the BAA Bulletins: Shop B&H here!
We want and need to keep providing you with the latest free information, photography and Photoshop lessons, and all manner of related information. Show your appreciation by making your purchases immediately after clicking on any of our B&H or Amazon Affiliate links in this blog post. Remember, B&H ain’t just photography!
If you are considering an item for purchase or comparison shopping be sure to place an item in your cart to see the too-low-to show the actual price. In many cases the prices are so low that B&H is forbidden from publicizing them!
If you are considering an item for purchase or comparison shopping be sure to place an item in your cart to see the too-low-to show the actual price. In many cases the prices are so low that B&H is forbidden from publicizing them!
Support the Blog
Amazon
Everyone buys something from Amazon, be it a big lens or deodorant. Support the blog by starting your search by typing in the little white box below. No purchase is too small to be appreciated; they all add up. Why make it a habit? Because I make it a habit of bringing you new images and information on an almost daily basis.
And from the BAA On-line Store:
LensCoats. I have a LensCoat on each of my big lenses to protect them from nicks and thus increase their re-sales value. All my big lens LensCoat stuff is in Hardwood Snow pattern. LegCoat Tripod Leg Covers. I have four tripods active and each has a Hardwood Snow LegCoat on it to help prevent further damage to my tender shoulders 🙂 And you will love them in mega-cold weather…. Gitzo GT3532 LS CF Tripod. This one replaces the GT3530LS Tripod and will last you a lifetime. Learn more about this great tripod here. Mongoose M3.6 Tripod Head. Right now this is the best tripod head around for use with lenses that weigh less than 9 pounds. For heavier lenses, check out the Wimberley V2 head. Double Bubble Level. You will find one in my camera’s hot shoe whenever I am not using flash. The Lens Align Mark II. I use the Lens Align Mark II pretty much religiously to micro-adjust all of my gear an average of once a month and always before a major trip. Enjoy our free comprehensive tutorial here. BreezeBrowser. I do not see how any digital photographer can exist without this program. Delkin Flash Cards. I use and depend on Delkin compact Flash Cards and card readers most every day. Learn more about their great 700X and 1000X cards here or about my favorite Delkin card here.
Central sensor/AI Servo Surround/Rear Focus AF on the blind and recompose. Click here if you missed the Rear Focus Tutorial. Click on the image to see a larger version.
Helen Hays
Helen Hays spent her first season on Great Gull Island in 1969. She had no clue that she would be here in 2013 for this, her 45th season. She spends an average of 17 weeks here each season directing a team of volunteers and researchers that number from a handful to 20 or 30 during the peak of hatching, usually sometime in mid-June. When asked why she is still here she said, “There are so many things to do.” Simply put, she has devoted her life to studying the Common Terns of Great Gull Island and to a lesser degree, its Roseate Terns–the latter species often nests among the huge boulders and is much more difficult to trap. Since 1995, in Helen has made 14 trips to South America in search of her wintering terns. On the very first trip, that to Brazil her team found the previously unknown wintering grounds of Roseate Tern. She describes it as pure luck. After a 23-year absence, I am spending a week here thanks to Helen’s kindness and support. I am both thankful and blessed.
Central sensor Expand (by necessity)/AI Servo/Rear Focus on the bird’s eye and re-compose. Click here if you missed the Rear Focus Tutorial. Click on the image to see a larger version.
The Focus of Her Attention
Over the decades on GGI Helen has overseen the clearing of habitat, finding and marking nests, banding, weighing, and measure chicks, and trapping and banding the adult commons, all with the goal of helping the birds. Last season was yet another record year for the Common Terns of Great Gull with about 9,500 pairs. Late July 2013 found more than 32,000 Common Terns on the island. GGI is likely the world’s largest Common Tern colony and the Roseate colony, with about 600-1000 pairs, is the largest in the Western Hemisphere. It should be noted that Helen directs the Great Gull Island project under the auspices of the American Museum of Natural History and has been ably assisted by Joe DiCostanzo since about 1975.
Central sensor/AI Servo Surround/Rear Focus AF active at the moment of exposure. Click here if you missed the Rear Focus Tutorial. Click on the image for a larger version.
Dealing With a Morning West Wind
The west winds have been relentless since I arrived late on Thursday past. Great in the afternoons but not so great in the mornings. Somewhat out of desperation I tried doing some backlit stuff yesterday morning as we were returned from a round of marking nests in heavy vegetation with orange fiberglass rods so that they can be easily re-located once the chicks hatch. I was quite pleased with several of the images. The weather had been great until today.
Help Keep Great Gull Island Open For Terns!
This spring crews are continuing to fight vegetation and to rebuild most of the blinds to be ready for the terns when they arrive. 31 of 34 blinds, many already in dire need of repair, were finished off by Hurricane Sandy. Crews are ready to help with both of these projects, but the GGI Project needs funds to purchase lumber and equipment. Contributions of all sizes are both welcome and appreciated AND are tax deductible! Please make checks payable to: AMNH, and send them to:
Great Gull Island Project/AMNH, Department of Ornithology, American Museum of Natural History, Central Park West and 79th Street, New York, NY 10024
Kudos to Julianna Barrett (UCONN) and Suzanne Peyton (USFWS) who obtained grants to expand the Roseate Tern terraces and rebuild the observation blinds but more help is always needed. Not to mention that the GGI’s best-ever dock that was completed in 2010 was totaled by Sandy. The project is looking to FEMA for help but as above, any and all donations would be greatly appreciated.
On all blog posts, feel free to e-mail or leave a comment regarding any typos, wrong words, misspellings, omissions, or grammatical errors. Just be right. 🙂
Support the BAA Blog. Support the BAA Bulletins: Shop B&H here!
We want and need to keep providing you with the latest free information, photography and Photoshop lessons, and all manner of related information. Show your appreciation by making your purchases immediately after clicking on any of our B&H or Amazon Affiliate links in this blog post. Remember, B&H ain’t just photography!
If you are considering an item for purchase or comparison shopping be sure to place an item in your cart to see the too-low-to show the actual price. In many cases the prices are so low that B&H is forbidden from publicizing them!
If you are considering an item for purchase or comparison shopping be sure to place an item in your cart to see the too-low-to show the actual price. In many cases the prices are so low that B&H is forbidden from publicizing them!
Support the Blog
Amazon
Everyone buys something from Amazon, be it a big lens or deodorant. Support the blog by starting your search by typing in the little white box below. No purchase is too small to be appreciated; they all add up. Why make it a habit? Because I make it a habit of bringing you new images and information on an almost daily basis.
And from the BAA On-line Store:
LensCoats. I have a LensCoat on each of my big lenses to protect them from nicks and thus increase their re-sales value. All my big lens LensCoat stuff is in Hardwood Snow pattern. LegCoat Tripod Leg Covers. I have four tripods active and each has a Hardwood Snow LegCoat on it to help prevent further damage to my tender shoulders 🙂 And you will love them in mega-cold weather…. Gitzo GT3532 LS CF Tripod. This one replaces the GT3530LS Tripod and will last you a lifetime. Learn more about this great tripod here. Mongoose M3.6 Tripod Head. Right now this is the best tripod head around for use with lenses that weigh less than 9 pounds. For heavier lenses, check out the Wimberley V2 head. Double Bubble Level. You will find one in my camera’s hot shoe whenever I am not using flash. The Lens Align Mark II. I use the Lens Align Mark II pretty much religiously to micro-adjust all of my gear an average of once a month and always before a major trip. Enjoy our free comprehensive tutorial here. BreezeBrowser. I do not see how any digital photographer can exist without this program. Delkin Flash Cards. I use and depend on Delkin compact Flash Cards and card readers most every day. Learn more about their great 700X and 1000X cards here or about my favorite Delkin card here.
It is Thursday, May 30, 2013. I am headed out to Great Gull Island for a week. GGI is in the middle of the Long Island Sound between Orient Point, Long Island and Niantic, Connecticut. Last time I was there–in 1990–I think, it was home to 9,000+ pairs of Common Terns and about 800 pairs of Roseate Terns. On that visit my older daughter Jennifer met a young biologist named Erik Egensteiner. He is now the father of my two oldest grandkids, Sam and Maya, and obviously Jennifer’s husband. I am a bit excited as I will be living in some sort of open air gun emplacement dating back to the Spanish American War.
You cannot mention GGI without mentioning Helen Hays who has overseen the project under the auspices of the American Museum of Natural History for many, may decades, since the late y 60s I believe. IAC, I am pretty sure that there is more data on the Common Terns of Great Gull Island than on any other species of vertebrate….
I am not sure if I will have internet access or any contact with y’all. If that turns out to be the case, do spend some times visiting back issues of the blog. There is tons to see and to learn. If I do get on line, I will probably be seeing you every day or so as usual. If not, I will see you sometime on June 8th.
later and love, artie
Last 2013 Short Notice, Dirt Cheap, In-the-Field Nickerson Beach Photographic Instruction with Arthur Morris
June 8 (pm) and June 9 (am & pm). Afternoons with west wind can be great. Morning sessions run from 5am sharp-9:30 am. Afternoon sessions from 4pm til whenever. These are priced so low that you need to e-mail for the rates. Limit 5/session.
If you e-mail, please include all phone numbers. Payment in full due immediately via credit card after calling the office on a weekday: 863-221-2372. If you would like to join me, please get in touch via e-mail. Breeding American Oystercatcher (chicks likely) and Piping Plover (chicks possible). Common Tern and Black Skimmer/courtship behaviors. Herring and Great Black-backed Gulls. Lots of flight photography when the wind is right. Learn digital exposure and creative image design. Learn to create pleasing blurs at 5am. As I will be living and photographing on Great Gull Island for a week from the afternoon of May 30 until the late afternoon of June 6 and may not have internet access, do sign up and be patient. You will hear from me via e-mail early on June 7th if not the previous evening.
Thanks!
Thanks a stack to the many who used our B&H link over the past 30 days; May was one of our best months ever. Using our B&H Affiliate Links is a great way to thank me for the 20+ hours each week on the blog, for my efforts in getting out the BAA Bulletins, and for the countless e-mail questions that I answer each week. All are invited to do the same. 🙂
Typos
On all blog posts, feel free to e-mail or leave a comment regarding any typos, wrong words, misspellings, omissions, or grammatical errors. Just be right. 🙂
Support the BAA Blog. Support the BAA Bulletins: Shop B&H here!
We want and need to keep providing you with the latest free information, photography and Photoshop lessons, and all manner of related information. Show your appreciation by making your purchases immediately after clicking on any of our B&H or Amazon Affiliate links in this blog post. Remember, B&H ain’t just photography!
If you are considering an item for purchase or comparison shopping be sure to place an item in your cart to see the too-low-to show the actual price. In many cases the prices are so low that B&H is forbidden from publicizing them!
If you are considering an item for purchase or comparison shopping be sure to place an item in your cart to see the too-low-to show the actual price. In many cases the prices are so low that B&H is forbidden from publicizing them!
Support the Blog
Amazon
Everyone buys something from Amazon, be it a big lens or deodorant. Support the blog by starting your search by typing in the little white box below. No purchase is too small to be appreciated; they all add up. Why make it a habit? Because I make it a habit of bringing you new images and information on an almost daily basis.
And from the BAA On-line Store:
LensCoats. I have a LensCoat on each of my big lenses to protect them from nicks and thus increase their re-sales value. All my big lens LensCoat stuff is in Hardwood Snow pattern. LegCoat Tripod Leg Covers. I have four tripods active and each has a Hardwood Snow LegCoat on it to help prevent further damage to my tender shoulders 🙂 And you will love them in mega-cold weather…. Gitzo GT3532 LS CF Tripod. This one replaces the GT3530LS Tripod and will last you a lifetime. Learn more about this great tripod here. Mongoose M3.6 Tripod Head. Right now this is the best tripod head around for use with lenses that weigh less than 9 pounds. For heavier lenses, check out the Wimberley V2 head. Double Bubble Level. You will find one in my camera’s hot shoe whenever I am not using flash. The Lens Align Mark II. I use the Lens Align Mark II pretty much religiously to micro-adjust all of my gear an average of once a month and always before a major trip. Enjoy our free comprehensive tutorial here. BreezeBrowser. I do not see how any digital photographer can exist without this program. Delkin Flash Cards. I use and depend on Delkin compact Flash Cards and card readers most every day. Learn more about their great 700X and 1000X cards here or about my favorite Delkin card here.
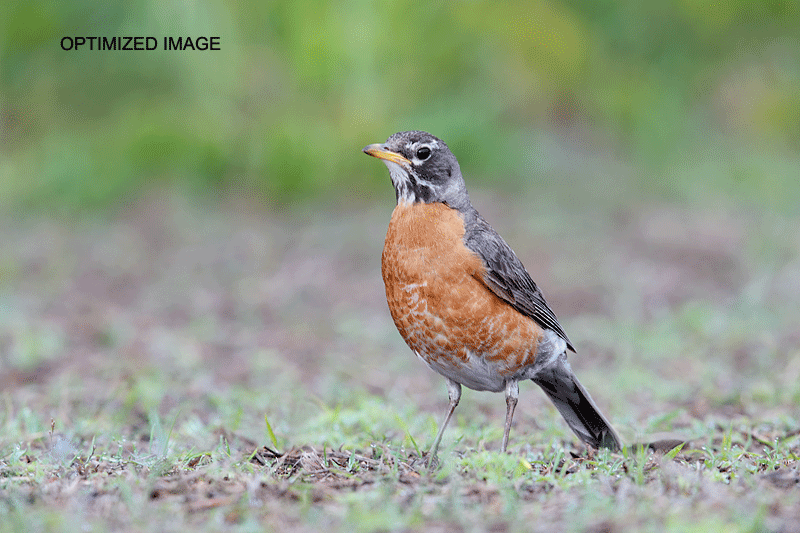
Central sensor (by necessity) Expand/AI Servo/Rear Focus on the center of the bird’s breast active at the moment of exposure. Click here if you missed the Rear Focus Tutorial. Click on the image to see a larger version.
Above you are looking at the optimized image.
Over-exposed American Robin
In the “Your Call and More” blog post here, I presented what seemed to be a badly over-exposed image of an American Robin. Most folks were confident that I would be able to salvage the image. The optimized image above shows that they were correct.
The Image Optimization
First eliminated the blinkies in DPP and then reduced the Brightness by two clicks to -.33 stops. As detailed in the DPP RAW Conversion Guide. In Photoshop a simple Curves adjustment brought the image to life. In addition, note also the elimination of several of the taller, ugly, weed-like stalks. Those repairs were done with the Patch Tool and the Clone Stamp Tool. As described in our in Digital Basics File, an instructional PDF that is sent via e-mail. It includes my complete digital workflow, dozens of great Photoshop tips including Digital Eye Doctor techniques, several different ways of expanding canvas, all of my time-saving Keyboard Shortcuts, and Layer Masking and NIK Color Efex Pro basics.
Central sensor/AI Servo Surround/Rear Focus AF on the central anther and re-compose. Click here if you missed the Rear Focus Tutorial. Click on the image for a larger version.
Iris flower #2
My Favorite Iris Who Image
In the recent “Iris Who?” post here, I asked folks to let us know which was their favorite of the four images and why. Iris flower #1 was the clear favorite. #s 2 and 3 got a few votes as well. #2 was my favorite for the soft yellow color palette and the sweet, out-of-focus green background.
BIRDS AS ART Bulletin #441
BAA Bulletin #441 is online and can be accessed here. There are 8 previously unpublished images each with its own legendary BAA educational caption.
The Holland 2014 A Creative Adventure/BIRDS AS ART/Tulips & A Touch of Holland IPT
Tulips on the Blog
Last 2013 Short Notice, Dirt Cheap, In-the-Field Nickerson Beach Photographic Instruction with Arthur Morris
Japan in Winter
Thanks!
Affiliate Links
Used Camera Gear
IPT Info
Last 2013 Short Notice, Dirt Cheap, In-the-Field Nickerson Beach Photographic Instruction with Arthur Morris
June 7 (pm), June 8 (am & pm), 8 and possibly the morning of June 9. Afternoons with west wind can be great. Morning sessions run from 5am sharp-9:30 am. Afternoon sessions from 4pm til whenever. These are priced so low that you need to e-mail for the rates. Limit 5/session.
If you e-mail, please include all phone numbers. Payment in full due immediately via credit card after calling the office on a weekday: 863-221-2372. If you would like to join me, please get in touch via e-mail. Breeding American Oystercatcher (chicks likely) and Piping Plover (chicks possible). Common Tern and Black Skimmer/courtship behaviors. Herring and Great Black-backed Gulls. Lots of flight photography when the wind is right. Learn digital exposure and creative image design. Learn to create pleasing blurs at 5am. As I will be living and photographing on Great Gull Island for a week from the afternoon of May 30 until the late afternoon of June 6 and may not have internet access, do sign up and be patient. You will hear from me via e-mail early on June 7th if not the previous evening.
Thanks!
Thanks a stack to the many who used our B&H link over the past 30 days; May was one of our best months ever. Using our B&H Affiliate Links is a great way to thank me for the 20+ hours each week on the blog, for my efforts in getting out the BAA Bulletins, and for the countless e-mail questions that I answer each week. All are invited to do the same. 🙂
Typos
On all blog posts, feel free to e-mail or leave a comment regarding any typos, wrong words, misspellings, omissions, or grammatical errors. Just be right. 🙂
Support the BAA Blog. Support the BAA Bulletins: Shop B&H here!
We want and need to keep providing you with the latest free information, photography and Photoshop lessons, and all manner of related information. Show your appreciation by making your purchases immediately after clicking on any of our B&H or Amazon Affiliate links in this blog post. Remember, B&H ain’t just photography!
If you are considering an item for purchase or comparison shopping be sure to place an item in your cart to see the too-low-to show the actual price. In many cases the prices are so low that B&H is forbidden from publicizing them!
If you are considering an item for purchase or comparison shopping be sure to place an item in your cart to see the too-low-to show the actual price. In many cases the prices are so low that B&H is forbidden from publicizing them!
Support the Blog
Amazon
Everyone buys something from Amazon, be it a big lens or deodorant. Support the blog by starting your search by typing in the little white box below. No purchase is too small to be appreciated; they all add up. Why make it a habit? Because I make it a habit of bringing you new images and information on an almost daily basis.
And from the BAA On-line Store:
LensCoats. I have a LensCoat on each of my big lenses to protect them from nicks and thus increase their re-sales value. All my big lens LensCoat stuff is in Hardwood Snow pattern. LegCoat Tripod Leg Covers. I have four tripods active and each has a Hardwood Snow LegCoat on it to help prevent further damage to my tender shoulders 🙂 And you will love them in mega-cold weather…. Gitzo GT3532 LS CF Tripod. This one replaces the GT3530LS Tripod and will last you a lifetime. Learn more about this great tripod here. Mongoose M3.6 Tripod Head. Right now this is the best tripod head around for use with lenses that weigh less than 9 pounds. For heavier lenses, check out the Wimberley V2 head. Double Bubble Level. You will find one in my camera’s hot shoe whenever I am not using flash. The Lens Align Mark II. I use the Lens Align Mark II pretty much religiously to micro-adjust all of my gear an average of once a month and always before a major trip. Enjoy our free comprehensive tutorial here. BreezeBrowser. I do not see how any digital photographer can exist without this program. Delkin Flash Cards. I use and depend on Delkin compact Flash Cards and card readers most every day. Learn more about their great 700X and 1000X cards here or about my favorite Delkin card here.
Urgent Notice: Denise Ippolito Program Tonight: New York City Sierra Club Photography Committee
Denise Ippolito will be presenting “Bloomin’ Ideas and Pleasing Blurs” at the New York City Sierra Club Photography Committee meeting tonight in Manhattan. She will cover techniques, both in-camera and Photoshop, for capturing beautiful flower images and creating pleasingly blurred flower and bird images.
The program is free and open to the public; click here for directions and complete details. The suggested donation is $6.00. If you are able to attend the program after seeing this notice be sure to go up to denise after the program and give her a BIRDS AS ART hug.
Learn everything that there is to know about creating pleasingly blurred images in A Guide to Pleasing Blurs, the e-Book that I co-wrote and co-illustrated with Denise Ippolito. You can learn more about this great guide by clicking here. And you can click here to see Denise’s killer Blur Galleries; be sure to click on several of the galleries as her creativity is pretty much unlimited.
The great e-Guide covers the basics of creating pleasingly blurred images, the factors that influence the degree of blurring, the use of filters in creating pleasing blurs, and a great variety of both in-the-field and Photoshop techniques that can be used to create pleasingly blurred images. Denise and artie teach you many different ways to move your lens during the exposure to create a variety of pleasingly blurred images of flowers and trees and water and landscapes. They teach you to recognize situations where subject movement can be used to your advantage to create pan blurs, wind blurs, and moving water blurs. They teach you to create zoom-blurs both in the field and during post-processing. Artie shares the techniques that he has used and developed for making blurred images of flocks of geese in flight at his beloved Bosque del Apache and Denise shares her flower blur magic as well as a variety of creative Photoshop techniques that she has developed.
With the advent of digital capture, creating blurred images has become a great and inexpensive way to go out with your camera and have fun, and virtually every major photographic competition includes more than a few pleasing blurs as winning or honored images. And while many folks think that making successful blurred images is the result of being a sloppy photographer nothing could be further from the truth. In “A Guide to Pleasing Blurs” Artie and Denise will help you to unleash your creative self.
Central sensor/AI Servo Rear Focus AF 1/3 of the way up the building on our right and re-compose. Click here if you missed the Rear Focus Tutorial. Be sure to click on the image to enjoy a larger version.
Buildings I
Surreal City Sunny Six
After a long, cold, dreary Saturday, Sunday’s sunshine was quite welcome. I was blown away at seeing the buildings lit by bright sun with the blue sky backgrounds. I spent much of the morning standing in one spot with my mouth agape. At times I felt as if I were photographing the international space station….
Central sensor/AI Servo Rear Focus AF 1/2 way into the swirly blue stuff on the left and re-compose. Click here if you missed the Rear Focus Tutorial. Be sure to click on the image to enjoy a larger version.
Buildings II
Hand Held Building Images
It is important to have a solid stance when hand holding for architectural photography. Whenever possible I braced myself against a light pole or building. Careful framing is a necessity.
This 3-frame, in-camera Art Vivid HDR image was also created on the New York City–On Location with Denise Ippolito & Arthur Morris 2-day Workshop with the hand held Canon EF 70-200mm f/2.8L IS II USM zoom lens (at 110mm) and the Canon EOS-5D Mark III. ISO 400. Evaluative metering +1 2/3 stops yielded a base exposure of 1/125 sec. at f/16 in Av mode (+/-2 stops).
Central sensor AI Servo/Rear Focus on the far edge of the building on our left and re-compose. Click here if you missed the Rear Focus Tutorial. Click on the image to see a larger version.
Buildings III
Image Design By Feet
In many of the locations around the former World Trade Center there were good images practically anywhere you looked. Once something caught my eye it was simply a matter of hoofing it to gain the desired perspective and line up the juxtapositions.
Central sensor AI Servo/Rear Focus on the far edge of the tan building and re-compose. Click here if you missed the Rear Focus Tutorial. Click on the image to see a larger version.
Buildings IV
If You Have a Good Horse, Ride It
The building in the center of the image above really captivated me. I incorporated it in images made over a ten block span, each made from a completely different perspective.
This 3-frame, in-camera Art Vivid HDR image was also created on the New York City–On Location with Denise Ippolito & Arthur Morris 2-day Workshop with the hand held Canon EF 70-200mm f/2.8L IS II USM zoom lens (at 80mm) and the Canon EOS-5D Mark III. ISO 400. Evaluative metering +2 1/3 stops yielded a base exposure of 1/160 sec. at f/11 in Av mode (+/-2 stops).
Central sensor AI Servo/Rear Focus on the closest edge of the building on our left and re-compose. Click here if you missed the Rear Focus Tutorial. Click on the image to see a larger version.
Central sensor AI Servo/Rear Focus on the right edge of nearest building and re-compose. Click here if you missed the Rear Focus Tutorial. Click on the image to see a larger version.
Buildings VI
Your Favorite?
Take a moment to leave a comment and let us know which of the six images above is your favorite. And why. Be sure to click on each image to see the larger version.
Thanks!
Thanks a stack to the many who used our B&H link over the past 30 days; May was one of our best months ever. Using our B&H Affiliate Links is a great way to thank me for the 20+ hours each week on the blog, for my efforts in getting out the BAA Bulletins, and for the countless e-mail questions that I answer each week. All are invited to do the same. 🙂
Typos
On all blog posts, feel free to e-mail or leave a comment regarding any typos, wrong words, misspellings, omissions, or grammatical errors. Just be right. 🙂
Support the BAA Blog. Support the BAA Bulletins: Shop B&H here!
We want and need to keep providing you with the latest free information, photography and Photoshop lessons, and all manner of related information. Show your appreciation by making your purchases immediately after clicking on any of our B&H or Amazon Affiliate links in this blog post. Remember, B&H ain’t just photography!
If you are considering an item for purchase or comparison shopping be sure to place an item in your cart to see the too-low-to show the actual price. In many cases the prices are so low that B&H is forbidden from publicizing them!
If you are considering an item for purchase or comparison shopping be sure to place an item in your cart to see the too-low-to show the actual price. In many cases the prices are so low that B&H is forbidden from publicizing them!
Support the Blog
Amazon
Everyone buys something from Amazon, be it a big lens or deodorant. Support the blog by starting your search by typing in the little white box below. No purchase is too small to be appreciated; they all add up. Why make it a habit? Because I make it a habit of bringing you new images and information on an almost daily basis.
And from the BAA On-line Store:
LensCoats. I have a LensCoat on each of my big lenses to protect them from nicks and thus increase their re-sales value. All my big lens LensCoat stuff is in Hardwood Snow pattern. LegCoat Tripod Leg Covers. I have four tripods active and each has a Hardwood Snow LegCoat on it to help prevent further damage to my tender shoulders 🙂 And you will love them in mega-cold weather…. Gitzo GT3532 LS CF Tripod. This one replaces the GT3530LS Tripod and will last you a lifetime. Learn more about this great tripod here. Mongoose M3.6 Tripod Head. Right now this is the best tripod head around for use with lenses that weigh less than 9 pounds. For heavier lenses, check out the Wimberley V2 head. Double Bubble Level. You will find one in my camera’s hot shoe whenever I am not using flash. The Lens Align Mark II. I use the Lens Align Mark II pretty much religiously to micro-adjust all of my gear an average of once a month and always before a major trip. Enjoy our free comprehensive tutorial here. BreezeBrowser. I do not see how any digital photographer can exist without this program. Delkin Flash Cards. I use and depend on Delkin compact Flash Cards and card readers most every day. Learn more about their great 700X and 1000X cards here or about my favorite Delkin card here.
Central sensor (by necessity) Expand/AI Servo/Rear Focus on the nearest bird’s closed eye and re-compose. Click here if you missed the Rear Focus Tutorial. Click on the image to see a larger version.
Disappearing Act
You have two beautifully juxtaposed sleeping shorebirds. The light is gorgeous. The wet sand background is clean and lovely. You have just butt-advanced (moved forward while seated behind your lowered tripod without putting your hands in the sand) about 15 yards while moving to your right. You are perfectly parallel to your subjects. But. The front end of a third bird (see the ORIGINAL IMAGE in the animated GIF below) is on the right frame-edge ruining your image….
Quick Masking to the Rescue
What to do? I created a series of small thin vertical Quick Masks and used the Move Tool (V) to cover the intruder.
The basics of Quick Masking (and tons more) are described in detail in our in Digital Basics File, an instructional PDF that is sent via e-mail. It includes my complete digital workflow, dozens of great Photoshop tips including Digital Eye Doctor techniques, several different ways of expandiing canvas, all of my time-saving Keyboard Shortcuts, and Layer Masking and NIK Color Efex Pro basics. Advanced Quick Masking Techniques including transforming, warping, and wing tip repair are detailed in APTATS I.
New Nickerson In-the-Field Dates Announced
Same as below: June 8 (am and pm), June 9 (am only). Please follow the contact directions below. I may have limited internet and e-mail access from May 30-June 6th but will surely be online on June 7.
More Short Notice, Dirt Cheap, Small Group, In-the-Field Nickerson Beach Photographic Instruction with Arthur Morris. May 27 (pm only), May 28 (am & pm) and May 29 (am only).
All 2013 of course. Right now only one person is signed up for a total of three sessions so the instruction will be practically private. This afternoon–Monday, May 27 is shaping up to be perfect conditions. To join me today, call me on my cell phone at 863-221-2372 and leave a message if no answer. Morning sessions: 5am sharp-9:30 am. Afternoon sessions: 4pm til whenever. These are priced so low that you need to e-mail for the rates. Limit 5/session.
If you e-mail, please include all phone numbers. Payment in full due immediately via credit card after calling the office on a weekday: 863-221-2372. If you would like to join me, please get in touch via e-mail. Breeding American Oystercatcher (chicks likely) and Piping Plover (chicks possible). Common Tern and Black Skimmer/courtship behaviors. Herring and Great Black-backed Gulls. Breeding plumage Sanderling and other shorebird species. Lots of flight photography when the wind is right. Learn digital exposure and creative image design. Learn to create pleasing blurs at 5am.
Typos
On all blog posts, feel free to e-mail or leave a comment regarding any typos, wrong words, misspellings, omissions, or grammatical errors. Just be right. 🙂
Support the BAA Blog. Support the BAA Bulletins: Shop B&H here!
We want and need to keep providing you with the latest free information, photography and Photoshop lessons, and all manner of related information. Show your appreciation by making your purchases immediately after clicking on any of our B&H or Amazon Affiliate links in this blog post. Remember, B&H ain’t just photography!
If you are considering an item for purchase or comparison shopping be sure to place an item in your cart to see the too-low-to show the actual price. In many cases the prices are so low that B&H is forbidden from publicizing them!
If you are considering an item for purchase or comparison shopping be sure to place an item in your cart to see the too-low-to show the actual price. In many cases the prices are so low that B&H is forbidden from publicizing them!
Support the Blog
Amazon
Everyone buys something from Amazon, be it a big lens or deodorant. Support the blog by starting your search by typing in the little white box below. No purchase is too small to be appreciated; they all add up. Why make it a habit? Because I make it a habit of bringing you new images and information on an almost daily basis.
And from the BAA On-line Store:
LensCoats. I have a LensCoat on each of my big lenses to protect them from nicks and thus increase their re-sales value. All my big lens LensCoat stuff is in Hardwood Snow pattern. LegCoat Tripod Leg Covers. I have four tripods active and each has a Hardwood Snow LegCoat on it to help prevent further damage to my tender shoulders 🙂 And you will love them in mega-cold weather…. Gitzo GT3532 LS CF Tripod. This one replaces the GT3530LS Tripod and will last you a lifetime. Learn more about this great tripod here. Mongoose M3.6 Tripod Head. Right now this is the best tripod head around for use with lenses that weigh less than 9 pounds. For heavier lenses, check out the Wimberley V2 head. Double Bubble Level. You will find one in my camera’s hot shoe whenever I am not using flash. The Lens Align Mark II. I use the Lens Align Mark II pretty much religiously to micro-adjust all of my gear an average of once a month and always before a major trip. Enjoy our free comprehensive tutorial here. BreezeBrowser. I do not see how any digital photographer can exist without this program. Delkin Flash Cards. I use and depend on Delkin compact Flash Cards and card readers most every day. Learn more about their great 700X and 1000X cards here or about my favorite Delkin card here.
This 3-frame, in-camera Art Vivid HDR image was created on Lexintgon Avenue, NY, NY on New York City–On Location with Denise Ippolito & Arthur Morris 2-day Workshop with the tripod-mounted Canon EF 70-200mm f/2.8L IS II USM zoom lens (at 110mm), the Canon 1.4x EF Extender III (Teleconverter), and the Canon EOS-5D Mark III. ISO 400. Evaluative metering +1 stop yielded a base exposure of 1/30 sec. at f/22 in Av mode (+/- 2 stops). 2-second timer.
Central sensor AI Servo/Rear Focus on the far end of the lowest building on the right, about 1/3 of the way into the frame. Click here if you missed the Rear Focus Tutorial. Click on the image to see a larger version.
Buildings Image #1
NYC Formula For Success
Take one cloudy, drizzly day. Add the tripod mounted 70-200 II with the 1.4XIII TC. Throw in the 5D Mark III’s in-camera Art Vivid HDR and a nice eye for composition and you have a recipe for some very pleasing and successful architectural images. And don’t forget to add lots of light for the dreary day.
This 3-frame, in-camera Art Vivid HDR image was created on Lexintgon Avenue, NY, NY on New York City–On Location with Denise Ippolito & Arthur Morris 2-day Workshop with the tripod-mounted Canon EF 70-200mm f/2.8L IS II USM zoom lens (at 110mm), the Canon 1.4x EF Extender III (Teleconverter), and the Canon EOS-5D Mark III. ISO 400. Evaluative metering +1 2/3 stops yielded a base exposure of 1/30 sec. at f/22 in Av mode (+/- 2 stops). 2-second timer.
Lower right sensor AI Servo/Rear Focus about 1/3 of the way into the frame. Click here if you missed the Rear Focus Tutorial. Click on the image to see a larger version.
Buildings Image #2
In-Camera Art Vivid HDR
The 5D III’s in-camera Art Vivid HDR style really brings out the building’s greens, blues, and cyans. I absolutely love the In-Camera HDR feature and as regular readers know the Art Vivid style is my favorite for a variety of subjects. It yields a highly saturated 61mb JPEG file. I bring the images into Photoshop, clean the dust spots, and (sometimes) reduce the Saturation about 10 points> I did not need to reduce the saturation for these building images. In fact, but for tiny crops of two of the three images they are pretty much right out of camera. Clean and fast and easy, just as I like things.
Learn everything that I know about the EOS-5D Mark III including how I set up my camera for in-camera HDRs in the 5D Mark III User’s Guide. This guide also includes info on the following: 5D III exposure fine points, handling the WHITEs, the top LCD and all camera control buttons, all 5D Mark III drive modes, how to manually select an AF sensor, choosing an AF Area Selection Mode/how and why (includes extensive detail), and Menu Item Access. Coverage of almost all Menu Items and Custom Functions including the following: Image Quality, Auto Lighting Optimizer, Highlight Tone Priority, AF Configuration Tool (includes details on the custom setting that I use), Acceleration/deceleration tracking, Tracking sensitivity, Lens drive when AF impossible, Orientation linked AF point (I love this feature on the 5D III!), Highlight alert, Histogram display, Auto rotate, Custom Shooting Mode set-up, Safety shift, using the Q button, and setting up rear focus. The guide is–of course–written in my informal, easy-to-follow style.
This 3-frame, in-camera Art Vivid HDR image was created on Lexintgon Avenue, NY, NY on New York City–On Location with Denise Ippolito & Arthur Morris 2-day Workshop with the tripod-mounted Canon EF 70-200mm f/2.8L IS II USM zoom lens (at 110mm), the Canon 1.4x EF Extender III (Teleconverter), and the Canon EOS-5D Mark III. ISO 400. Evaluative metering +2 2/3 stops yielded a base exposure of 1/40 sec. at f/22 in Av mode (+/- 2 stops). 2-second timer.
Lower right sensor AI Servo/Rear Focus about 1/3 of the way into the frame. Click here if you missed the Rear Focus Tutorial. Click on the image to see a larger version.
Buildings Image #3
You Guessed It
Take a moment to leave a comment and let us know which of the three images above is your favorite. And why. Be sure to click on each image to see the larger version.
More Short Notice, Dirt Cheap, Small Group, In-the-Field Nickerson Beach Photographic Instruction with Arthur Morris. May 27 (pm only), May 28 (am & pm) and May 29 (am only).
All 2013 of course. Right now only two folks are signed up for a total of four sessions so the instruction will be practically private. Morning sessions: 5am sharp-9:30 am. Afternoon sessions: 4pm til whenever. These are priced so low that you need to e-mail for the rates. Limit 5/session.
If you e-mail, please include all phone numbers. Payment in full due immediately via credit card after calling the office on a weekday: 863-221-2372. If you would like to join me, please get in touch via e-mail. Breeding American Oystercatcher (chicks likely) and Piping Plover (chicks possible). Common Tern and Black Skimmer/courtship behaviors. Herring and Great Black-backed Gulls. Breeding plumage Sanderling and other shorebird species. Lots of flight photography when the wind is right. Learn digital exposure and creative image design. Learn to create pleasing blurs at 5am.
IPT Info
For complete IPT info including schedule, cancellation policies, and the registration and release forms, click here.
Next Year In Holland
Despite a 100-year record cold spring with very few tulip fields in bloom this trip has been a spectacular success. The colors and variety of tulips at Keukenhof simply stun the mind and the senses. Denise and I are planning our Holland trip for next year: the Keukenhof Creative Tulip Photography IPT with a Touch of Holland. If you are a Happy Camper who is interested in joining Denise and me next spring, please shoot me an e-mail. Details will be announced soon.
We are currently fleshing out the details. The dates will be about the same, in mid April. In addition to the Keukenhof and the flower fields we will do an afternoon of windmills at Kinderdijk, a day in Amsterdam including a morning at the Rijks Museum and an afternoon visit to the Ann Frank House plus some street photography. We will do some street photography and fine dining in the little town of Edam. There will be about 7-9 days of photography in all. Those will include an afternoon option for a day or two of Purple Herons for those with long lenses.
Note: not surprisingly, early interest has been huge with several folks who want to sign up right now. The formal announcement of the dates and price is imminent.
Typos
On all blog posts, feel free to e-mail or leave a comment regarding any typos, wrong words, misspellings, omissions, or grammatical errors. Just be right. 🙂
Support the BAA Blog. Support the BAA Bulletins: Shop B&H here!
We want and need to keep providing you with the latest free information, photography and Photoshop lessons, and all manner of related information. Show your appreciation by making your purchases immediately after clicking on any of our B&H or Amazon Affiliate links in this blog post. Remember, B&H ain’t just photography!
If you are considering an item for purchase or comparison shopping be sure to place an item in your cart to see the too-low-to show the actual price. In many cases the prices are so low that B&H is forbidden from publicizing them!
If you are considering an item for purchase or comparison shopping be sure to place an item in your cart to see the too-low-to show the actual price. In many cases the prices are so low that B&H is forbidden from publicizing them!
Support the Blog
Amazon
Everyone buys something from Amazon, be it a big lens or deodorant. Support the blog by starting your search by typing in the little white box below. No purchase is too small to be appreciated; they all add up. Why make it a habit? Because I make it a habit of bringing you new images and information on an almost daily basis.
And from the BAA On-line Store:
LensCoats. I have a LensCoat on each of my big lenses to protect them from nicks and thus increase their re-sales value. All my big lens LensCoat stuff is in Hardwood Snow pattern. LegCoat Tripod Leg Covers. I have four tripods active and each has a Hardwood Snow LegCoat on it to help prevent further damage to my tender shoulders 🙂 And you will love them in mega-cold weather…. Gitzo GT3532 LS CF Tripod. This one replaces the GT3530LS Tripod and will last you a lifetime. Learn more about this great tripod here. Mongoose M3.6 Tripod Head. Right now this is the best tripod head around for use with lenses that weigh less than 9 pounds. For heavier lenses, check out the Wimberley V2 head. Double Bubble Level. You will find one in my camera’s hot shoe whenever I am not using flash. The Lens Align Mark II. I use the Lens Align Mark II pretty much religiously to micro-adjust all of my gear an average of once a month and always before a major trip. Enjoy our free comprehensive tutorial here. BreezeBrowser. I do not see how any digital photographer can exist without this program. Delkin Flash Cards. I use and depend on Delkin compact Flash Cards and card readers most every day. Learn more about their great 700X and 1000X cards here or about my favorite Delkin card here.
Central sensor/AI Servo Surround/Rear Focus AF on the anther on our right and re-compose. Click here if you missed the Rear Focus Tutorial. Click on the image for a larger version.
Iris flower #1
Iris Who?
In the “Tough Call On Hey Bud” blog post here I shared five iris bud images that I created while co-leading Denise Ippolito’s Creative Photography Iris Workshop on Thursday May 16. We were blessed with perfect flower photography weather: cloudy bright to cloudy with a few rain drops here and there and nearly dead calm conditions until the sun finally came out at 10:45am. Everyone had fun and learned a ton. While I was really attracted to the buds in retrospect I liked my images of the flowers better. Here I share my favorite images of complete flowers. As the 180 macro was just too wide I grabbed the 300 II and went to work; the 300mm focal length (often with the 1.4X TC provided reach and the narrow angle of view that I wanted so that I could isolate single flowers. As the flowers were relatively large, I did not need an extension tube.
Central sensor/AI Servo Surround/Rear Focus AF on the central anther and re-compose. Click here if you missed the Rear Focus Tutorial. Click on the image for a larger version.
Iris flower #2
In-Camera Art Vivid HDRs
I absolutely love the In-Camera HDR feature and as regular readers know the Art Vivid style is my favorite. It yields a highly saturated 61mb JPEG file. I bring the images into Photoshop, clean the dust spots, and reduce the Saturation about 10 points and I am done. Clean and fast and easy, just as I like things.
Learn everything that I know about the EOS-5D Mark III including how I set up my camera for in-camera HDRs in the 5D Mark III User’s Guide. This guide also includes info on the following: 5D III exposure fine points, handling the WHITEs, the top LCD and all camera control buttons, all 5D Mark III drive modes, how to manually select an AF sensor, choosing an AF Area Selection Mode/how and why (includes extensive detail), and Menu Item Access. Coverage of almost all Menu Items and Custom Functions including the following: Image Quality, Auto Lighting Optimizer, Highlight Tone Priority, AF Configuration Tool (includes details on the custom setting that I use), Acceleration/deceleration tracking, Tracking sensitivity, Lens drive when AF impossible, Orientation linked AF point (I love this feature on the 5D III!), Highlight alert, Histogram display, Auto rotate, Custom Shooting Mode set-up, Safety shift, using the Q button, and setting up rear focus. The guide is–of course–written in my informal, easy-to-follow style.
Central sensor/AI Servo Surround/Rear Focus AF on anther on our right and re-compose. Click here if you missed the Rear Focus Tutorial. Click on the image for a larger version.
Iris flower #3
Rotational Perspective
Choosing the angle into the flower, the rotational perspective is an important consideration when photographing flowers and is even more important when photographing irises. I did not realize until preparing this blog post that in the three images above I had subconsciously chosen an identical perspective….
Central sensor/AI Servo Surround/Rear Focus AF on the anther on our left and re-compose. Click here if you missed the Rear Focus Tutorial. Click on the image for a larger version.
Iris flower #4
Your Favorite?
Take a moment to leave a comment and let us know which is your iris flower image and be sure to let us know why you like the one that you chose. They are numbered 1-4.
More Short Notice, Dirt Cheap, Small Group, In-the-Field Nickerson Beach Photographic Instruction with Arthur Morris. May 27 (am & pm), May 28 (am & pm) and May 29 (am only). All 2013 of course. Morning sessions: 5am sharp-9:30 am. Afternoon sessions: 4pm til whenever. These are priced so low that you need to e-mail for the rates. Limit 5/session.
If you e-mail, please include all phone numbers. Payment in full due immediately via credit card after calling the office on a weekday: 863-221-2372. If you would like to join me, please get in touch via e-mail. Breeding American Oystercatcher (chicks likely) and Piping Plover (chicks possible). Common Tern and Black Skimmer/courtship behaviors. Herring and Great Black-backed Gulls. Breeding plumage Sanderling and other shorebird species. Lots of flight photography when the wind is right. Learn digital exposure and creative image design. Learn to create pleasing blurs at 5am.
IPT Info
For complete IPT info including schedule, cancellation policies, and the registration and release forms, click here.
Next Year In Holland
Despite a 100-year record cold spring with very few tulip fields in bloom this trip has been a spectacular success. The colors and variety of tulips at Keukenhof simply stun the mind and the senses. Denise and I are planning our Holland trip for next year: the Keukenhof Creative Tulip Photography IPT with a Touch of Holland. If you are a Happy Camper who is interested in joining Denise and me next spring, please shoot me an e-mail. Details will be announced soon.
We are currently fleshing out the details. The dates will be about the same, in mid April. In addition to the Keukenhof and the flower fields we will do an afternoon of windmills at Kinderdijk, a day in Amsterdam including a morning at the Rijks Museum and an afternoon visit to the Ann Frank House plus some street photography. We will do some street photography and fine dining in the little town of Edam. There will be about 7-9 days of photography in all. Those will include an afternoon option for a day or two of Purple Herons for those with long lenses.
Note: not surprisingly, early interest has been huge with several folks who want to sign up right now. The formal announcement of the dates and price is imminent.
Typos
On all blog posts, feel free to e-mail or leave a comment regarding any typos, wrong words, misspellings, omissions, or grammatical errors. Just be right. 🙂
Support the BAA Blog. Support the BAA Bulletins: Shop B&H here!
We want and need to keep providing you with the latest free information, photography and Photoshop lessons, and all manner of related information. Show your appreciation by making your purchases immediately after clicking on any of our B&H or Amazon Affiliate links in this blog post. Remember, B&H ain’t just photography!
If you are considering an item for purchase or comparison shopping be sure to place an item in your cart to see the too-low-to show the actual price. In many cases the prices are so low that B&H is forbidden from publicizing them!
If you are considering an item for purchase or comparison shopping be sure to place an item in your cart to see the too-low-to show the actual price. In many cases the prices are so low that B&H is forbidden from publicizing them!
Support the Blog
Amazon
Everyone buys something from Amazon, be it a big lens or deodorant. Support the blog by starting your search by typing in the little white box below. No purchase is too small to be appreciated; they all add up. Why make it a habit? Because I make it a habit of bringing you new images and information on an almost daily basis.
And from the BAA On-line Store:
LensCoats. I have a LensCoat on each of my big lenses to protect them from nicks and thus increase their re-sales value. All my big lens LensCoat stuff is in Hardwood Snow pattern. LegCoat Tripod Leg Covers. I have four tripods active and each has a Hardwood Snow LegCoat on it to help prevent further damage to my tender shoulders 🙂 And you will love them in mega-cold weather…. Gitzo GT3532 LS CF Tripod. This one replaces the GT3530LS Tripod and will last you a lifetime. Learn more about this great tripod here. Mongoose M3.6 Tripod Head. Right now this is the best tripod head around for use with lenses that weigh less than 9 pounds. For heavier lenses, check out the Wimberley V2 head. Double Bubble Level. You will find one in my camera’s hot shoe whenever I am not using flash. The Lens Align Mark II. I use the Lens Align Mark II pretty much religiously to micro-adjust all of my gear an average of once a month and always before a major trip. Enjoy our free comprehensive tutorial here. BreezeBrowser. I do not see how any digital photographer can exist without this program. Delkin Flash Cards. I use and depend on Delkin compact Flash Cards and card readers most every day. Learn more about their great 700X and 1000X cards here or about my favorite Delkin card here.
Central sensor (by necessity) Expand/AI Servo/Rear Focus on the leading edge of the neck band active at the moment of exposure. Click here if you missed the Rear Focus Tutorial. Click on the image to see a larger version.
Before the Mayhem Started
Up until I witnessed the violence and murder at Nickerson Beach on Monday afternoon past–click here if you missed that–it had been a peaceful afternoon. The female plover above was walking around near her predator exclosure picking at small items on the sand so I sat down near the ropes at the edge of the colony and created a few images as she made her way back to the nest. Plovers are always step, step, step, stop; step, step, step, stop; and the stops are not long ones. The only way to successfully acquire focus was to pre-focus manually as I followed and framed the image. When the bird would stop I would do my best and make an image or two. In this case, four as the bird paused to ruffle its feathers.
Central sensor (by necessity) Expand/AI Servo/Rear Focus on the bird’s neck active at the moment of exposure. Click here if you missed the Rear Focus Tutorial. Click on the image to see a larger version.
Surf Strategies
After working the plover for a while I headed down to the surf to work the foraging shorebirds. The sun was coming over my left shoulder as I was seated facing east/southeast behind my lowered tripod. With the wind fairly strong from the south the birds that were following the receding waves to feed were heading straight south into the wind and were actually angling away from me and away from the light. When a wave broke the birds would run back up the beach. This was a much better situation as they were running toward me and into the light. The problem was that acquiring and maintaining focus on a speeding Sanderling with the 600 II and the 2X III TC was pretty much impossible even with the vaunted 1D X. Until I pulled an old trick out of the box. I changed my setting for Focus Search On and found that with the AF system instructed not to hunt thatif I prefocused manually and followed the running birds that it was much, much easier to acquire and maintain accurate focus.
With all due respect to the 1D X camera body manual and the Info stuff on the camera what folks are being told makes zero sense. If you would like to learn when and how to set and use the Focus Search custom function you will need a copy of our 1D X AF Guide. 5D Mark III and 1D Mark IV owners will need the camera specific guide for each of these bodies. Learn more here.
Central sensor (by necessity) Expand/AI Servo/Rear Focus on the base of the bird’s bill and release. Click here if you missed the Rear Focus Tutorial. Click on the image to see a larger version.
Killer Sweet Backgrounds
The big attraction in the both the image above and the image below was the killer clean, wet sand backgrounds. I forgot to mention when I posted this on Thursday night that a large part of my “surf strategy” involved scoping out a really clean stretch of beach and then simply sitting in one place for extended periods and waiting for the birds to come to me. When I first sat down it was all Sanderlings, but with patience the two plover species came by for brief visits. As both piping and semipalmated are quite skittish, stalking them is quite difficult if not impossible.
Those who would like to learn more about shorebirds are advised to get a copy of my “Shorebirds; Beautiful Beachcombers.” It is twice out of print and is selling for as much as $75 on e-Bay and Amazon. And we are down to a precious few copies….
Central sensor (by necessity) Expand/AI Servo/Rear Focus on spot where the breast band meets the neck active at the moment of exposure. Click here if you missed the Rear Focus Tutorial. Click on the image to see a larger version.
Your Favorite
Take a moment to leave a comment and let us know which of the images above is your favorite. And why. Be sure to click on each image to see the larger version.
More Short Notice, Dirt Cheap, Small Group, In-the-Field Nickerson Beach Photographic Instruction with Arthur Morris. May 27 (am & pm), May 28 (am & pm) and May 29 (am only). All 2013 of course. Morning sessions: 5am sharp-9:30 am. Afternoon sessions: 4pm til whenever. These are priced so low that you need to e-mail for the rates. Limit 5/session.
If you e-mail, please include all phone numbers. Payment in full due immediately via credit card after calling the office on a weekday: 863-221-2372. If you would like to join me, please get in touch via e-mail. Breeding American Oystercatcher (chicks likely) and Piping Plover (chicks possible). Common Tern and Black Skimmer/courtship behaviors. Herring and Great Black-backed Gulls. Breeding plumage Sanderling and other shorebird species. Lots of flight photography when the wind is right. Learn digital exposure and creative image design. Learn to create pleasing blurs at 5am.
Nickerson Baby Beach-nesting Birds IPT: July 23-25, 2013: $1099. Introductory slide program: Monday, July 22, 2013. Limit 12/Openings: Sold Out. Co-leader: Denise Ippolito.
IPT Info
For complete IPT info including schedule, cancellation policies, and the registration and release forms, click here.
It’s Not Too Late! New York City–On Location with Denise Ippolito & Arthur Morris May 25 – 26, 2013, 2-day Workshop-$495
Join Denise Ippolito and Arthur Morris for a two-day creative workshop in the Big Apple. This exciting adventure through the streets of NYC will begin with an informal get-together at our hotel on the evening of May 24th. This will give us all a chance to get to know each other before we hit the streets in the morning for our first exciting photo shoot. We will explore China Town, Little Italy, Times Square, Rockefeller Center, Grand Central Station (tripod permit included) and much more during our two days together. The emphasis will be on street photography, seeing and capturing dynamic images, and expanding your creativity using a variety of in-camera techniques including HDR and Multiple Exposure.
Please contact me via e-mail for complete details and the itinerary.
Next Year In Holland
Despite a 100-year record cold spring with very few tulip fields in bloom this trip has been a spectacular success. The colors and variety of tulips at Keukenhof simply stun the mind and the senses. Denise and I are planning our Holland trip for next year: the Keukenhof Creative Tulip Photography IPT with a Touch of Holland. If you are a Happy Camper who is interested in joining Denise and me next spring, please shoot me an e-mail. Details will be announced soon.
We are currently fleshing out the details. The dates will be about the same, in mid April. In addition to the Keukenhof and the flower fields we will do an afternoon of windmills at Kinderdijk, a day in Amsterdam including a morning at the Rijks Museum and an afternoon visit to the Ann Frank House plus some street photography. We will do some street photography and fine dining in the little town of Edam. There will be about 7-9 days of photography in all. Those will include an afternoon option for a day or two of Purple Herons for those with long lenses.
Note: not surprisingly, early interest has been huge with several folks who want to sign up right now. The formal announcement of the dates and price is imminent.
Typos
On all blog posts, feel free to e-mail or leave a comment regarding any typos, wrong words, misspellings, omissions, or grammatical errors. Just be right. 🙂
Support the BAA Blog. Support the BAA Bulletins: Shop B&H here!
We want and need to keep providing you with the latest free information, photography and Photoshop lessons, and all manner of related information. Show your appreciation by making your purchases immediately after clicking on any of our B&H or Amazon Affiliate links in this blog post. Remember, B&H ain’t just photography!
If you are considering an item for purchase or comparison shopping be sure to place an item in your cart to see the too-low-to show the actual price. In many cases the prices are so low that B&H is forbidden from publicizing them!
If you are considering an item for purchase or comparison shopping be sure to place an item in your cart to see the too-low-to show the actual price. In many cases the prices are so low that B&H is forbidden from publicizing them!
Support the Blog
Amazon
Everyone buys something from Amazon, be it a big lens or deodorant. Support the blog by starting your search by typing in the little white box below. No purchase is too small to be appreciated; they all add up. Why make it a habit? Because I make it a habit of bringing you new images and information on an almost daily basis.
And from the BAA On-line Store:
LensCoats. I have a LensCoat on each of my big lenses to protect them from nicks and thus increase their re-sales value. All my big lens LensCoat stuff is in Hardwood Snow pattern. LegCoat Tripod Leg Covers. I have four tripods active and each has a Hardwood Snow LegCoat on it to help prevent further damage to my tender shoulders 🙂 And you will love them in mega-cold weather…. Gitzo GT3532 LS CF Tripod. This one replaces the GT3530LS Tripod and will last you a lifetime. Learn more about this great tripod here. Mongoose M3.6 Tripod Head. Right now this is the best tripod head around for use with lenses that weigh less than 9 pounds. For heavier lenses, check out the Wimberley V2 head. Double Bubble Level. You will find one in my camera’s hot shoe whenever I am not using flash. The Lens Align Mark II. I use the Lens Align Mark II pretty much religiously to micro-adjust all of my gear an average of once a month and always before a major trip. Enjoy our free comprehensive tutorial here. BreezeBrowser. I do not see how any digital photographer can exist without this program. Delkin Flash Cards. I use and depend on Delkin compact Flash Cards and card readers most every day. Learn more about their great 700X and 1000X cards here or about my favorite Delkin card here.
Central sensor (by necessity) Expand/AI Servo/Rear Focus on the center of the bird’s breast active at the moment of exposure. Click here if you missed the Rear Focus Tutorial. Click on the image to see a larger version.
The Original Capture
On Saturday past, the many photographers who parked in the main lot at Nickerson Beach were asked to leave by two guys in a little cart as a crew was going to pave the lot. So we did. I could have re-parked by the administration building and walked back but instead, I decided to head back to my Mom’s via the Jones Beach Strip. En route I decided to visit West End and see what I could do from the car (without a BLUBB….)
The medians were full of tiny, gorgeous purple flowers; some sort of ground cover, I guess. On the way in there were Killdeer and robins in the colorful patches but my 600 II was in the trunk. Once I got set up of course the birds were few and far between and getting close was nearly impossible. For the American Robin image above I rested the lens on the window frame. I have no idea why the image was so over-exposed; perhaps I had pointed at something very dark and accidentally hit the AF-On button (that functions as my star button and locks the exposure). But I decided to see what I could do as there seemed to be some promise and I do not have much on robin.
The Image in DPP
The screen capture above shows how the image looked once I brought it into DPP, Canon Digital Photo Professional. I hit ALT M and saw that there were lots of red patches that serve as over-exposed highlight warnings. That you need to hit ALT M each and every time is somewhat of a challenge; it does not stick. I have let the folks at Canon know and they have promised to pass along my suggestion to have the Highlight (ALT M) and Shadow (ALT N) warning stick once you set them once.
Does the image look sharp enough at only 1/50 sec. without adequate support? Does it look as if the highlights can be recovered? How quickly would you delete this image? Or do you think that it is salvageable?
DPP RAW Conversion Guide
DPP is fast and produces high quality image files with accurate colors and low noise levels. To learn more about how and why I use DPP to convert all of my Canon images see our DPP RAW Conversion Guide here.
This 3-frame in-camera HDR Art Vivid image was created with the tripod-mounted Canon EF 300mm f/2.8L IS II USM Telephoto Lens, the Canon 1.4x EF Extender III (Teleconverter), and the Canon EOS 5D Mark III . ISO 800. Evaluative metering +1/3 stop yielded a base exposure of 1/125 sec. at f/13 in Av mode. 2-second timer. Note: I should have used more + compensation for all but the first image here as the Art Vivid JPEGs are always on the dark side.
Central sensor/AI Servo Surround/Rear Focus AF on the bottom of the flower part of the bud. Click here if you missed the Rear Focus Tutorial. Click on the image for a larger version.
Iris bud #5
My Favorite Iris Bud
In the “Tough Call on Hey Bud” blog post, I asked folks which of the five iris bud images was there favorite. Iris bud #1 was the overwhelming choice and #3 got a vote as well. I thought that #4 was clearly the weakest image but nobody voted for my favorite, #5 above, either.
What I loved most about #5 was the bright green background and the patterns and purple edging of the scale, the buds protective cover.
More Short Notice, Dirt Cheap, Small Group, In-the-Field Nickerson Beach Photographic Instruction with Arthur Morris. May 27 (am & pm), May 28 (am & pm) and May 29 (am only). All 2013 of course. Morning sessions: 5am sharp-9:30 am. Afternoon sessions: 4pm til whenever. These are priced so low that you need to e-mail for the rates. Limit 5/session.
If you e-mail, please include all phone numbers. Payment in full due immediately via credit card after calling the office on a weekday: 863-221-2372. If you would like to join me, please get in touch via e-mail. Breeding American Oystercatcher (chicks likely) and Piping Plover (chicks possible). Common Tern and Black Skimmer/courtship behaviors. Herring and Great Black-backed Gulls. Breeding plumage Sanderling and other shorebird species. Lots of flight photography when the wind is right. Learn digital exposure and creative image design. Learn to create pleasing blurs at 5am.
Nickerson Baby Beach-nesting Birds IPT: July 23-25, 2013: $1099. Introductory slide program: Monday, July 22, 2013. Limit 12/Openings: Sold Out. Co-leader: Denise Ippolito.
IPT Info
For complete IPT info including schedule, cancellation policies, and the registration and release forms, click here.
It’s Not Too Late! New York City–On Location with Denise Ippolito & Arthur Morris May 25 – 26, 2013, 2-day Workshop-$495
Join Denise Ippolito and Arthur Morris for a two-day creative workshop in the Big Apple. This exciting adventure through the streets of NYC will begin with an informal get-together at our hotel on the evening of May 24th. This will give us all a chance to get to know each other before we hit the streets in the morning for our first exciting photo shoot. We will explore China Town, Little Italy, Times Square, Rockefeller Center, Grand Central Station (tripod permit included) and much more during our two days together. The emphasis will be on street photography, seeing and capturing dynamic images, and expanding your creativity using a variety of in-camera techniques including HDR and Multiple Exposure.
Please contact me via e-mail for complete details and the itinerary.
Next Year In Holland
Despite a 100-year record cold spring with very few tulip fields in bloom this trip has been a spectacular success. The colors and variety of tulips at Keukenhof simply stun the mind and the senses. Denise and I are planning our Holland trip for next year: the Keukenhof Creative Tulip Photography IPT with a Touch of Holland. If you are a Happy Camper who is interested in joining Denise and me next spring, please shoot me an e-mail. Details will be announced soon.
We are currently fleshing out the details. The dates will be about the same, in mid April. In addition to the Keukenhof and the flower fields we will do an afternoon of windmills at Kinderdijk, a day in Amsterdam including a morning at the Rijks Museum and an afternoon visit to the Ann Frank House plus some street photography. We will do some street photography and fine dining in the little town of Edam. There will be about 7-9 days of photography in all. Those will include an afternoon option for a day or two of Purple Herons for those with long lenses.
Note: not surprisingly, early interest has been huge with several folks who want to sign up right now. The formal announcement of the dates and price is imminent.
Typos
On all blog posts, feel free to e-mail or leave a comment regarding any typos, wrong words, misspellings, omissions, or grammatical errors. Just be right. 🙂
Support the BAA Blog. Support the BAA Bulletins: Shop B&H here!
We want and need to keep providing you with the latest free information, photography and Photoshop lessons, and all manner of related information. Show your appreciation by making your purchases immediately after clicking on any of our B&H or Amazon Affiliate links in this blog post. Remember, B&H ain’t just photography!
If you are considering an item for purchase or comparison shopping be sure to place an item in your cart to see the too-low-to show the actual price. In many cases the prices are so low that B&H is forbidden from publicizing them!
If you are considering an item for purchase or comparison shopping be sure to place an item in your cart to see the too-low-to show the actual price. In many cases the prices are so low that B&H is forbidden from publicizing them!
Support the Blog
Amazon
Everyone buys something from Amazon, be it a big lens or deodorant. Support the blog by starting your search by typing in the little white box below. No purchase is too small to be appreciated; they all add up. Why make it a habit? Because I make it a habit of bringing you new images and information on an almost daily basis.
And from the BAA On-line Store:
LensCoats. I have a LensCoat on each of my big lenses to protect them from nicks and thus increase their re-sales value. All my big lens LensCoat stuff is in Hardwood Snow pattern. LegCoat Tripod Leg Covers. I have four tripods active and each has a Hardwood Snow LegCoat on it to help prevent further damage to my tender shoulders 🙂 And you will love them in mega-cold weather…. Gitzo GT3532 LS CF Tripod. This one replaces the GT3530LS Tripod and will last you a lifetime. Learn more about this great tripod here. Mongoose M3.6 Tripod Head. Right now this is the best tripod head around for use with lenses that weigh less than 9 pounds. For heavier lenses, check out the Wimberley V2 head. Double Bubble Level. You will find one in my camera’s hot shoe whenever I am not using flash. The Lens Align Mark II. I use the Lens Align Mark II pretty much religiously to micro-adjust all of my gear an average of once a month and always before a major trip. Enjoy our free comprehensive tutorial here. BreezeBrowser. I do not see how any digital photographer can exist without this program. Delkin Flash Cards. I use and depend on Delkin compact Flash Cards and card readers most every day. Learn more about their great 700X and 1000X cards here or about my favorite Delkin card here.
Central sensor Surround/AI Servo/Rear Focus on the point just forward of the folded wing active at the moment of exposure. Click here if you missed the Rear Focus Tutorial. Click on the image to see a larger version.
Time 7:53:29.
Warning: Graphic Violence & Murder
After a wonderful afternoon of photographing oystercatchers and shorebirds at Nickerson Beach on the afternoon of Monday, May 21, I was on my way back to my vehicle when I noted an American Oystercatcher pair with a chick heading back to the protection of the roped off colony. As it was getting dark I continued on my way. In a few steps I noted a second chick that had become separated from its family. Without much concern I walked towards it herding it gently towards the colony and its parents that were not a long way off to my left. As the little guy made its way under the strings of the colony an adult oystercatcher flew in from my right, pounced on the chick, and began pummeling it with its stout bill. I followed my own advice by shooting first and asking shutter speed and exposure questions later. The image above was the 1st in the sequence.
Central sensor Surround/AI Servo/Rear Focus on the adult’s neck active at the moment of exposure. Click here if you missed the Rear Focus Tutorial. Click on the image to see a larger version.
Time 7:53:46. 23 seconds after the opening image was made.
Setting a Faster Shutter Speed
I made three images of the initial assault before realizing that the images were too bright and that the shutter speed was much too slow. When I made this image I was sure that the chick was already dead. The attack was so unexpected and so violent that I was not thinking very clearly.
This image was created with the tripod-mounted Canon EF 600mm f/4L IS II USM lens and the Canon EOS-1D X Digital SLR camera. ISO 1600. Evaluative metering probably plus 2/3 stop: 1/640 sec. at f/5.6 in Manual Mode. BTW, I realized while preparing this blog post that I could have been working at f/4 but as I said, I was not thinking clearly at the time….
Central sensor Surround/AI Servo/Rear Focus on the top of the base of the adult’s bill active at the moment of exposure. Click here if you missed the Rear Focus Tutorial. Click on the image to see a larger version.
Time 7:54:01. 25 seconds after the preceding image was created.
Last Gasp…
Here the totally defenseless chick raised its head in feeble defense. What is not evident in these images is the fury of the pounding.
This image was created with the tripod-mounted Canon EF 600mm f/4L IS II USM lens and the Canon EOS-1D X Digital SLR camera. ISO 1600. Evaluative metering probably plus 2/3 stop: 1/640 sec. at f/5.6 in Manual Mode. BTW, I realized while preparing this blog post that I could have been working at f/4 but as I said, I was not thinking clearly at the time….
Central sensor Surround/AI Servo/Rear Focus on the bottom of the center of the folded wing active at the moment of exposure. Click here if you missed the Rear Focus Tutorial. Click on the image to see a larger version.
Time 7:54:37. 37 seconds more have elapsed….
The Only Possible Outcome
I’ve lowered my tripod now and at this point it is obvious that the chick is dead.
This image was created with the tripod-mounted Canon EF 600mm f/4L IS II USM lens and the Canon EOS-1D X Digital SLR camera. ISO 1600. Evaluative metering probably plus 2/3 stop: 1/640 sec. at f/5.6 in Manual Mode. BTW, I realized while preparing this blog post that I could have been working at f/4 but as I said, I was not thinking clearly at the time….
Central sensor Surround/AI Servo/Rear Focus on the bottom of the center of the folded wing active at the moment of exposure. Click here if you missed the Rear Focus Tutorial. Click on the image to see a larger version.
Time 7:54:41. This one was made only 4 seconds after the previous image.
The End
The adult is now satisfied that it has killed the chick and a moment later walks off to the east. I have seen many Black Skimmer chicks killed by Great Black-backed Gulls but none of those attacks got to me as much as this one did, not only because the chick was killed by one of its own species but because of the violence of the attack.
What’s the Biology?
It is all rather simple. Oystercatchers kill the chicks of other pairs to increases the odds that its chicks will survive as there will be less competition for food resources. A bird’s sole reason for existence it to increase the chances of passing its genes along to the next generation. Adult Black Skimmers routinely attack and often kill wandering chicks from other nests but before yesterday I had not seen this behavior with oystercatchers. I am unsure as the whether I have heard of it. If anyone has online access to BONA (Birds of North America) it is likely that they can learn more to share with us here. I have a hard copy at home.
More Short Notice, Dirt Cheap, Small Group, In-the-Field Nickerson Beach Photographic Instruction with Arthur Morris. May 27 (am & pm), May 28 (am & pm) and May 29 (am only). All 2013 of course. Morning sessions: 5am sharp-9:30 am. Afternoon sessions: 4pm til whenever. These are priced so low that you need to e-mail for the rates. Limit 5/session.
If you e-mail, please include all phone numbers. Payment in full due immediately via credit card after calling the office on a weekday: 863-221-2372. If you would like to join me, please get in touch via e-mail. Breeding American Oystercatcher (chicks likely) and Piping Plover (chicks possible). Common Tern and Black Skimmer/courtship behaviors. Herring and Great Black-backed Gulls. Breeding plumage Sanderling and other shorebird species. Lots of flight photography when the wind is right. Learn digital exposure and creative image design. Learn to create pleasing blurs at 5am.
This IPT is now a go. Conditions at Nickerson are excellent. Join Denise and me on Long Island, NY this coming summer to photograph Common Tern chicks, baby American Oystercatchers, and just-hatched Black Skimmer chicks along with the adults. The opportunities will include chances to photograph a variety of breeding behaviors including courtship feeding, display flight and combat, and copulations. Car-pooling is recommended; if we opt to return to the beach before 5pm there is a $30/vehicle parking fee that is not included so it is best to share that expense. Parking in the morning is free.
Now that the trip is a go–we had been worried about the effects of Hurricane Sandy–I fully expect that this IPT will fill almost instantly. Payment in full is due by check upon registration.
IPT Info
For complete IPT info including schedule, cancellation policies, and the registration and release forms, click here.
New York City–On Location with Denise Ippolito & Arthur Morris May 25 – 26, 2013, 2-day Workshop-$495
Join Denise Ippolito and Arthur Morris for a two-day creative workshop in the Big Apple. This exciting adventure through the streets of NYC will begin with an informal get-together at our hotel on the evening of May 24th. This will give us all a chance to get to know each other before we hit the streets in the morning for our first exciting photo shoot. We will explore China Town, Little Italy, Times Square, Rockefeller Center, Grand Central Station (tripod permit included) and much more during our two days together. The emphasis will be on street photography, seeing and capturing dynamic images, and expanding your creativity using a variety of in-camera techniques including HDR and Multiple Exposure.
Please contact me via e-mail for complete details and the itinerary.
Next Year In Holland
Despite a 100-year record cold spring with very few tulip fields in bloom this trip has been a spectacular success. The colors and variety of tulips at Keukenhof simply stun the mind and the senses. Denise and I are planning our Holland trip for next year: the Keukenhof Creative Tulip Photography IPT with a Touch of Holland. If you are a Happy Camper who is interested in joining Denise and me next spring, please shoot me an e-mail. Details will be announced soon.
We are currently fleshing out the details. The dates will be about the same, in mid April. In addition to the Keukenhof and the flower fields we will do an afternoon of windmills at Kinderdijk, a day in Amsterdam including a morning at the Rijks Museum and an afternoon visit to the Ann Frank House plus some street photography. We will do some street photography and fine dining in the little town of Edam. There will be about 7-9 days of photography in all. Those will include an afternoon option for a day or two of Purple Herons for those with long lenses.
Note: not surprisingly, early interest has been huge with several folks who want to sign up right now. The formal announcement of the dates and price is imminent.
Typos
On all blog posts, feel free to e-mail or leave a comment regarding any typos, wrong words, misspellings, omissions, or grammatical errors. Just be right. 🙂
Support the BAA Blog. Support the BAA Bulletins: Shop B&H here!
We want and need to keep providing you with the latest free information, photography and Photoshop lessons, and all manner of related information. Show your appreciation by making your purchases immediately after clicking on any of our B&H or Amazon Affiliate links in this blog post. Remember, B&H ain’t just photography!
If you are considering an item for purchase or comparison shopping be sure to place an item in your cart to see the too-low-to show the actual price. In many cases the prices are so low that B&H is forbidden from publicizing them!
If you are considering an item for purchase or comparison shopping be sure to place an item in your cart to see the too-low-to show the actual price. In many cases the prices are so low that B&H is forbidden from publicizing them!
Support the Blog
Amazon
Everyone buys something from Amazon, be it a big lens or deodorant. Support the blog by starting your search by typing in the little white box below. No purchase is too small to be appreciated; they all add up. Why make it a habit? Because I make it a habit of bringing you new images and information on an almost daily basis.
And from the BAA On-line Store:
LensCoats. I have a LensCoat on each of my big lenses to protect them from nicks and thus increase their re-sales value. All my big lens LensCoat stuff is in Hardwood Snow pattern. LegCoat Tripod Leg Covers. I have four tripods active and each has a Hardwood Snow LegCoat on it to help prevent further damage to my tender shoulders 🙂 And you will love them in mega-cold weather…. Gitzo GT3532 LS CF Tripod. This one replaces the GT3530LS Tripod and will last you a lifetime. Learn more about this great tripod here. Mongoose M3.6 Tripod Head. Right now this is the best tripod head around for use with lenses that weigh less than 9 pounds. For heavier lenses, check out the Wimberley V2 head. Double Bubble Level. You will find one in my camera’s hot shoe whenever I am not using flash. The Lens Align Mark II. I use the Lens Align Mark II pretty much religiously to micro-adjust all of my gear an average of once a month and always before a major trip. Enjoy our free comprehensive tutorial here. BreezeBrowser. I do not see how any digital photographer can exist without this program. Delkin Flash Cards. I use and depend on Delkin compact Flash Cards and card readers most every day. Learn more about their great 700X and 1000X cards here or about my favorite Delkin card here.